OpenStack平台搭建,超详细,附源码。
目录
任务1,基础运维任务
一,主机拓扑
二,配IP地址,改主机名,配地址映射,关闭selinux,关防火墙
1,配IP地址
2,改主机名
3,配地址映射
4,关闭selinux
5,关闭防火墙
三,挂载镜像,配yum仓库
1,上传镜像
2,挂载
3,配yum仓库
四,配时间同步
1,配置chronyd
任务2 OpenStack搭建任务
五,安装iaas包,配环境变量
1,安装iaas-xiandian包
2,配环境变量
六,安装各种服务
1,通过脚本安装host
2,通过脚本安装mysql
3,通过脚本安装keystone
4,通过脚本安装glance
5,通过脚本安装nova
6,通过脚本安装neutron
7,通过脚本安装dashboard
8,合并资源
_____________________________________________________________________________
任务1,基础运维任务
一,主机拓扑
controller:
eth0 仅主机 192.168.100.10
eth1 Net 192.168.200.10
compute
eth0 仅主机 192.168.100.20
eth1 Net 192.168.200.20
二,配IP地址,改主机名,配地址映射,关闭selinux,关防火墙
1,配IP地址
开机到install页面,按键盘tab键,在quite前输入net.ifnames=0 biosdevname=0回车.
配置IP地址,这个不用再写了把,按照上边的主机拓扑自己配。
2,改主机名
controller:
hostnamectl set-hostname controller && bashcompute:
hostnamectl set-hostname compute && bash3,配地址映射
controller:
vim /etc/hosts127.0.0.1 localhost localhost.localdomain localhost4 localhost4.localdomain4
::1 localhost localhost.localdomain localhost6 localhost6.localdomain6
192.168.100.10 controller
192.168.100.20 compute
scp /etc/hosts [email protected]:/etc/hosts4,关闭selinux
controller:
vi /etc/selinux/config# This file controls the state of SELinux on the system.
# SELINUX= can take one of these three values:
# enforcing - SELinux security policy is enforced.
# permissive - SELinux prints warnings instead of enforcing.
# disabled - No SELinux policy is loaded.
SELINUX=permissive
# SELINUXTYPE= can take one of three two values:
# targeted - Targeted processes are protected,
# minimum - Modification of targeted policy. Only selected processes are protected.
# mls - Multi Level Security protection.
SELINUXTYPE=targeted
scp /etc/selinux/config [email protected]:/etc/selinux/config
setenforce 0
compute:
setenforce 05,关闭防火墙
controller:
systemctl stop firewalld && systemctl disable firewalldcompute:
systemctl stop firewalld && systemctl disable firewalld三,挂载镜像,配yum仓库
1,上传镜像
controller:
上传如下镜像到controller的/root目录下
[root@controller ~]# ll
total 8075172
-rw-------. 1 root root       1298 Jan  8 10:50 anaconda-ks.cfg
-rw-r--r--. 1 root root 4470079488 Jan  8 12:50 CentOS-7-x86_64-DVD-1804.iso
-rw-r--r--. 1 root root 3798892544 Jan  8 12:49 XianDian-IaaS-V2.4.iso
2,挂载
controller:
mkdir /opt/centos
mkdir /opt/openstack
mount CentOS-7-x86_64-DVD-1804.iso /home/
cp -Rbvf /home/* /opt/centos/
umount /home/
mount XianDian-IaaS-V2.4.iso /home/
cp -Rbvf /home/* /opt/openstack/
umount /home/
3,配yum仓库
controller:
cd /etc/yum.repos.d/
mv CentOS-* /home/
vi local.repo
[centos]
name=centos
baseurl=file:///opt/centos/
gpgcheck=0
enabled=1
[iaas]
name=iaas
baseurl=file:///opt/openstack/iaas-repo
gpgcheck=0
enabled=1
yum repolist
yum list
yum update
yum makecache
yum -y install vsftpd vim
vim /etc/vsftpd/vsftpd.conf
加入一行
anon_root=/optsystemctl restart vsftpd && systemctl enable vsftpd
compute:
cd /etc/yum.repos.d/
mv CentOS-* /home/
vi local.repo
[centos]
name=centos
baseurl=ftp://controller/centos/
gpgcheck=0
enabled=1
[iaas]
name=iaas
baseurl=ftp://controller/openstack/iaas-repo
gpgcheck=0
enabled=1
yum repolist
yum list
yum update
yum makecache
yum -y install vim
四,配时间同步
1,配置chronyd
controller:
vim /etc/chrony.conf注释server开头行,增加如下
allow 192.168.100.0/24
local stratum 10
systemctl start chronyd && systemctl enable chronydcompute:
vim /etc/chrony.conf注释server开头行,增加如下
server 192.168.100.10 iburstsystemctl start chronyd && systemctl enable chronyd
chronyc sources任务2 OpenStack搭建任务
五,安装iaas包,配环境变量
1,安装iaas-xiandian包
controller:
yum -y install iaas-xiandiancompute:
yum -y install iaas-xiandian2,配环境变量
controller:
vim /etc/xiandian/openrc.sh输入":%s/^#//g"批量删除注释符,输入“:%s/PASS=/PASS=000000/g”批量改变环境变量
再依次更改剩余环境变量,其它环境变量按括号中举例的配即可,注意IP地址。
scp /etc/xiandian/openrc.sh [email protected]:/etc/xiandian/openrc.shcompute:
vim /etc/xiandian/openrc.sh更改neturon下的IP为192.168.100.20,保存退出。
六,安装各种服务
1,通过脚本安装host
controller:
iaas-pre-host.sh
reboot
compute:
iaas-pre-host.sh
reboot
2,通过脚本安装mysql
controller:
iaas-install-mysql.shcompute:
yum -y install MySQL-python3,通过脚本安装keystone
controller:
iaas-install-keystone.sh4,通过脚本安装glance
controller:
iaas-install-glance.sh5,通过脚本安装nova
controller:
iaas-install-nova-controller.shcompute:
iaas-install-nova-compute.sh6,通过脚本安装neutron
controller:
iaas-install-neutron-controller.shcompute:
iaas-install-neutron-compute.sh7,通过脚本安装dashboard
controller:
iaas-install-dashboard.sh8,合并资源
controller:
vim /etc/xiandian/openrc.sh更改如下
HOST_IP_NODE=192.168.100.10
HOST_NAME_NODE=controller
controller重新跑nove脚本
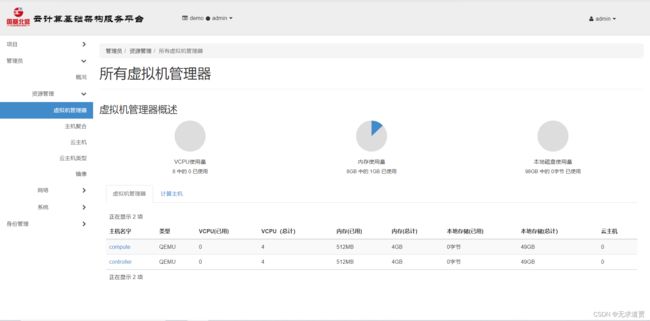
iaas-install-nove-compute.sh成功,可以看到是两个节点的资源,共8G。

