158行Python代码复现DeepMind递归神经网络DRAW
![]()
作者 | Samuel Noriega
译者 | Freesia
编辑 | 夕颜
来源 | AI科技大本营(ID: rgznai100)
【导读】最近,谷歌 DeepMind 发表论文( DRAW: A Recurrent Neural Network For Image Generation),提出了一个用于图像生成的递归神经网络,该系统大大提高了 MNIST 上生成模型的质量。为更加深入了解 DRAW,本文作者基于 Eric Jang 用 158 行 Python 代码实现该系统的思路,详细阐述了 DRAW 的概念、架构和优势等。
首先我们先解释一下 DRAW 的概念吧
递归神经网络是一种用于图像生成的神经网络结构。Draw Networks 结合了一种新的空间注意机制,该机制模拟了人眼的中心位置,采用了一个顺序变化的自动编码框架,使之对复杂图像进行迭代构造。
该系统大大提高了 MNIST 上生成模型的质量,特别是当对街景房屋编号数据集进行训练时,肉眼竟然无法将它生成的图像与真实数据区别开来。
Draw 体系结构的核心是一对递归神经网络:一个是压缩用于训练的真实图像的编码器,另一个是在接收到代码后重建图像的解码器。这一组合系统采用随机梯度下降的端到端训练,损失函数的最大值变分主要取决于对数似然函数的数据。
DRAW 的架构
Draw 网络类似于其他变分自动编码器,它包含一个编码器网络,该编码器网络决定着潜在代码上的 distribution(潜在代码主要捕获有关输入数据的显著信息),解码器网络接收来自 code distribution 的样本,并利用它们来调节其自身图像的 distribution 。
DRAW 与其他自动解码器的三大区别
编码器和解码器都是 DRAW 中的递归网络,解码器的输出依次添加到 distribution 中以生成数据,而不是一步一步地生成 distribution 。动态更新的注意机制用于限制由编码器负责的输入区域和由解码器更新的输出区域 。简单地说,这一网络在每个 time-step 都能决定“读到哪里”和“写到哪里”以及“写什么”。
左:传统变分自动编码器
在生成过程中,从先前的 P(z)中提取一个样本 z ,并通过前馈译码器网络来计算给定样本的输入 P(x_z)的概率。
在推理过程中,输入 x 被传递到编码器网络,在潜在变量上产生一个近似的后验 Q(z|x) 。在训练过程中,从 Q(z|x) 中抽取 z,然后用它计算总描述长度 KL ( Q (Z|x)∣∣ P(Z)−log(P(x|z)),该长度随随机梯度的下降(https://en.wikipedia.org/wiki/Stochastic_gradient_descent)而减小至最小值。
右:DRAW网络
在每一个步骤中,都会将先前 P(z)中的一个样本 z_t 传递给递归解码器网络,该网络随后会修改 canvas matrix 的一部分。最后一个 canvas matrix cT 用于计算 P(x|z_1:t)。
在推理过程中,每个 time-step 都会读取输入,并将结果传递给编码器 RNN,然后从上一 time-step 中的 RNN 指定读取位置,编码器 RNN 的输出用于计算该 time-step 的潜在变量的近似后验值。
损失函数
最后一个 canvas matrix cT 用于确定输入数据的模型 D(X | cT) 的参数。如果输入是二进制的,D 的自然选择呈伯努利分布,means 由 σ(cT) 给出。重建损失 Lx 定义为 D 下 x 的负对数概率: ![]()
The latent loss 潜在distributions序列 ![]() 的潜在损失
的潜在损失 ![]() 被定义为源自
被定义为源自  的潜在先验 P(Z_t)的简要 KL散度。
鉴于这一损失取决于由 ![]() 绘制的潜在样本 z_t ,因此其反过来又决定了输入 x。如果潜在 distribution是一个
绘制的潜在样本 z_t ,因此其反过来又决定了输入 x。如果潜在 distribution是一个 ![]() 这样的 diagonal Gaussian ,P(Z_t) 便是一个均值为 0,且具有标准离差的标准 Gaussian,这种情况下方程则变为
这样的 diagonal Gaussian ,P(Z_t) 便是一个均值为 0,且具有标准离差的标准 Gaussian,这种情况下方程则变为  。
。
对于每个随机梯度下降,我们使用单个 z 样本进行优化。
L^Z 可以解释为从之前的序列向解码器传输潜在样本序列 z_1:T 所需的 NAT 数量,并且(如果 x 是离散的)L^x 是解码器重建给定 z_1:T 的 x 所需的 NAT 数量。因此,总损失等于解码器和之前数据的预期压缩量。
改善图片
正如 EricJang 在他的文章中提到的,让我们的神经网络仅仅“改善图像”而不是“一次完成图像”会更容易些。正如人类艺术家在画布上涂涂画画,并从绘画过程中推断出要修改什么,以及下一步要绘制什么。
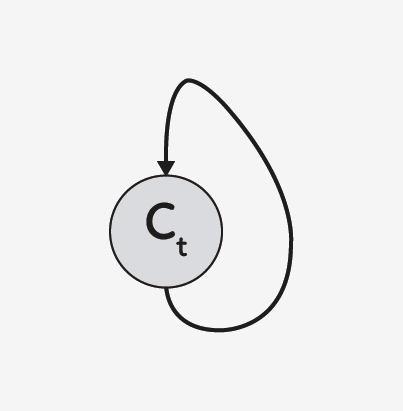
改进图像或逐步细化只是一次又一次地破坏我们的联合 distribution P(C) ,导致潜在变量链 C1,C2,…CT−1 呈现新的变量分布 P(CT) 。
诀窍是多次从迭代细化分布 P(Ct|Ct−1)中取样,而不是直接从 P(C) 中取样。
在 DRAW 模型中, P(Ct|Ct−1) 是所有 t 的同一 distribution,因此我们可以将其表示为以下递归关系(如果不是,那么就是 Markov Chain 而不是递归网络了)。
DRAW模型的实际应用
假设你正在尝试对数字 8 的图像进行编码。每个手写数字的绘制方式都不同,有的样本 8 可能看起来宽一些,有的可能长一些。如果不注意,编码器将被迫同时捕获所有这些小的差异。
但是……如果编码器可以在每一帧上选择一小段图像并一次检查数字 8 的每一部分呢?这会使工作更容易,对吧?
同样的逻辑也适用于生成数字。注意力单元将决定在哪里绘制数字 8 的下一部分-或任何其他部分-而传递的潜在矢量将决定解码器生成多大的区域。
基本上,如果我们把变分的自动编码器(VAE)中的潜在代码看作是表示整个图像的矢量,那么绘图中的潜在代码就可以看作是表示笔画的矢量。最后,这些向量的序列实现了原始图像的再现。
好吧,那么它是如何工作的呢?
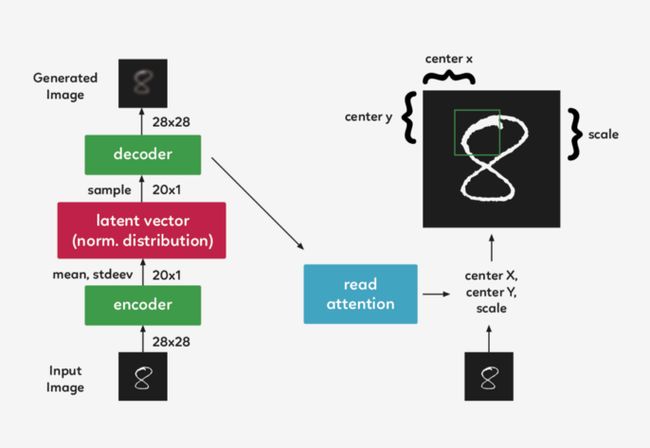
在一个递归的 VAE 模型中,编码器在每一个 timestep 会接收整个输入图像。在 Draw 中,我们需要将焦点集中在它们之间的 attention gate 上,因此编码器只接收到网络认为在该 timestep 重要的图像部分。第一个 attention gate 被称为“Read”attention。
“Read”attention分为两部分:
选择图像的重要部分和裁剪图像
选择图像的重要部分
为了确定图像的哪一部分最重要,我们需要做些观察,并根据这些观察做出决定。在 DRAW中,我们使用前一个 timestep 的解码器隐藏状态。通过使用一个简单的完全连接的图层,我们可以将隐藏状态映射到三个决定方形裁剪的参数:中心 X、中心 Y 和比例。
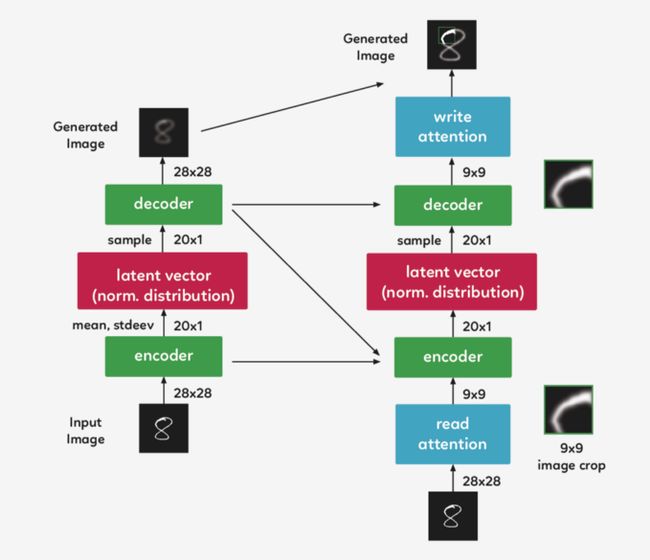
裁剪图像
现在,我们不再对整个图像进行编码,而是对其进行裁剪,只对图像的一小部分进行编码。然后,这个编码通过系统解码成一个小补丁。
现在我们到达 attention gate 的第二部分, “write”attention,(与“read”部分的设置相同),只是“write”attention 使用当前的解码器,而不是前一个 timestep 的解码器。
实际应用便是如此吗?
虽然可以直观地将注意力机制描述为一种裁剪,但实践中使用了一种不同的方法。在上面描述的模型结构仍然精确的前提下,使用了 gaussian filters 矩阵,没有利用裁剪的方式。我们在 DRAW 中取了一组每个 filter 的中心间距都均匀的 gaussian filters 矩阵 。
代码一览
我们在 Eric Jang 的代码的基础上,对其进行一些清理和注释,以便于理解.
# first we import our libraries
import tensorflow as tf
from tensorflow.examples.tutorials import mnist
from tensorflow.examples.tutorials.mnist import input_data
import numpy as np
import scipy.misc
import os
Eric 为我们提供了一些伟大的功能,可以帮助我们构建 “read” 和 “write” 注意门径,还有过滤我们将使用的初始状态功能,但是首先,我们需要添加新的功能,来使我们能创建一个密集层并合并图像。并将它们保存到本地计算机中,以获取更新的代码。
# fully-conected layer
def dense(x, inputFeatures, outputFeatures, scope=None, with_w=False):
    with tf.variable_scope(scope or "Linear"):
        matrix = tf.get_variable("Matrix", [inputFeatures, outputFeatures], tf.float32, tf.random_normal_initializer(stddev=0.02))
        bias = tf.get_variable("bias", [outputFeatures], initializer=tf.constant_initializer(0.0))
        if with_w:
            return tf.matmul(x, matrix) + bias, matrix, bias
        else:
            return tf.matmul(x, matrix) + bias


# merge images
def merge(images, size):
    h, w = images.shape[1], images.shape[2]
    img = np.zeros((h * size[0], w * size[1]))
    for idx, image in enumerate(images):
        i = idx % size[1]
        j = idx / size[1]
        img[j*h:j*h+h, i*w:i*w+w] = image
    return img


# save image on local machine
def ims(name, img):
    # print img[:10][:10]
    scipy.misc.toimage(img, cmin=0, cmax=1).save(name)
现在让我们把代码放在一起以便完成。
# DRAW implementation
class draw_model():
    def __init__(self):

        # First we download the MNIST dataset into our local machine.
        self.mnist = input_data.read_data_sets("data/", one_hot=True)
        print "------------------------------------"
        print "MNIST Dataset Succesufully Imported"
        print "------------------------------------"
        self.n_samples = self.mnist.train.num_examples


        # We set up the model parameters
        # ------------------------------
        # image width,height
        self.img_size = 28
        # read glimpse grid width/height
        self.attention_n = 5
        # number of hidden units / output size in LSTM
        self.n_hidden = 256
        # QSampler output size
        self.n_z = 10
        # MNIST generation sequence length
        self.sequence_length = 10
        # training minibatch size
        self.batch_size = 64
        # workaround for variable_scope(reuse=True)
        self.share_parameters = False

        # Build our model
        self.images = tf.placeholder(tf.float32, [None, 784]) # input (batch_size * img_size)
        self.e = tf.random_normal((self.batch_size, self.n_z), mean=0, stddev=1) # Qsampler noise
        self.lstm_enc = tf.nn.rnn_cell.LSTMCell(self.n_hidden, state_is_tuple=True) # encoder Op
        self.lstm_dec = tf.nn.rnn_cell.LSTMCell(self.n_hidden, state_is_tuple=True) # decoder Op


        # Define our state variables
        self.cs = [0] * self.sequence_length # sequence of canvases
        self.mu, self.logsigma, self.sigma = [0] * self.sequence_length, [0] * self.sequence_length, [0] * self.sequence_length


        # Initial states
        h_dec_prev = tf.zeros((self.batch_size, self.n_hidden))
        enc_state = self.lstm_enc.zero_state(self.batch_size, tf.float32)
        dec_state = self.lstm_dec.zero_state(self.batch_size, tf.float32)


        # Construct the unrolled computational graph
        x = self.images
        for t in range(self.sequence_length):
            # error image + original image
            c_prev = tf.zeros((self.batch_size, self.img_size**2)) if t == 0 else self.cs[t-1]
            x_hat = x - tf.sigmoid(c_prev)
            # read the image
            r = self.read_basic(x,x_hat,h_dec_prev)
            #sanity check
            print r.get_shape()
            # encode to guass distribution
            self.mu[t], self.logsigma[t], self.sigma[t], enc_state = self.encode(enc_state, tf.concat(1, [r, h_dec_prev]))
            # sample from the distribution to get z
            z = self.sampleQ(self.mu[t],self.sigma[t])
            #sanity check
            print z.get_shape()
            # retrieve the hidden layer of RNN
            h_dec, dec_state = self.decode_layer(dec_state, z)
            #sanity check
            print h_dec.get_shape()
            # map from hidden layer
            self.cs[t] = c_prev + self.write_basic(h_dec)
            h_dec_prev = h_dec
            self.share_parameters = True # from now on, share variables


        # Loss function
        self.generated_images = tf.nn.sigmoid(self.cs[-1])
        self.generation_loss = tf.reduce_mean(-tf.reduce_sum(self.images * tf.log(1e-10 + self.generated_images) + (1-self.images) * tf.log(1e-10 + 1 - self.generated_images),1))


        kl_terms = [0]*self.sequence_length
        for t in xrange(self.sequence_length):
            mu2 = tf.square(self.mu[t])
            sigma2 = tf.square(self.sigma[t])
            logsigma = self.logsigma[t]
            kl_terms[t] = 0.5 * tf.reduce_sum(mu2 + sigma2 - 2*logsigma, 1) - self.sequence_length*0.5 # each kl term is (1xminibatch)
        self.latent_loss = tf.reduce_mean(tf.add_n(kl_terms))
        self.cost = self.generation_loss + self.latent_loss

        # Optimization
        optimizer = tf.train.AdamOptimizer(1e-3, beta1=0.5)
        grads = optimizer.compute_gradients(self.cost)
        for i,(g,v) in enumerate(grads):
            if g is not None:
                grads[i] = (tf.clip_by_norm(g,5),v)
        self.train_op = optimizer.apply_gradients(grads)


        self.sess = tf.Session()
        self.sess.run(tf.initialize_all_variables())

    # Our training function
    def train(self):
        for i in xrange(20000):
            xtrain, _ = self.mnist.train.next_batch(self.batch_size)
            cs, gen_loss, lat_loss, _ = self.sess.run([self.cs, self.generation_loss, self.latent_loss, self.train_op], feed_dict={self.images: xtrain})
            print "iter %d genloss %f latloss %f" % (i, gen_loss, lat_loss)
            if i % 500 == 0:


                cs = 1.0/(1.0+np.exp(-np.array(cs))) # x_recons=sigmoid(canvas)


                for cs_iter in xrange(10):
                    results = cs[cs_iter]
                    results_square = np.reshape(results, [-1, 28, 28])
                    print results_square.shape
                    ims("results/"+str(i)+"-step-"+str(cs_iter)+".jpg",merge(results_square,[8,8]))

    # Eric Jang's main functions
    # --------------------------
    # locate where to put attention filters on hidden layers
    def attn_window(self, scope, h_dec):
        with tf.variable_scope(scope, reuse=self.share_parameters):
            parameters = dense(h_dec, self.n_hidden, 5)
        # center of 2d gaussian on a scale of -1 to 1
        gx_, gy_, log_sigma2, log_delta, log_gamma = tf.split(1,5,parameters)


        # move gx/gy to be a scale of -imgsize to +imgsize
        gx = (self.img_size+1)/2 * (gx_ + 1)
        gy = (self.img_size+1)/2 * (gy_ + 1)


        sigma2 = tf.exp(log_sigma2)
        # distance between patches
        delta = (self.img_size - 1) / ((self.attention_n-1) * tf.exp(log_delta))
        # returns [Fx, Fy, gamma]
        return self.filterbank(gx,gy,sigma2,delta) + (tf.exp(log_gamma),)

    # Construct patches of gaussian filters
    def filterbank(self, gx, gy, sigma2, delta):
        # 1 x N, look like [[0,1,2,3,4]]
        grid_i = tf.reshape(tf.cast(tf.range(self.attention_n), tf.float32),[1, -1])
        # individual patches centers
        mu_x = gx + (grid_i - self.attention_n/2 - 0.5) * delta
        mu_y = gy + (grid_i - self.attention_n/2 - 0.5) * delta
        mu_x = tf.reshape(mu_x, [-1, self.attention_n, 1])
        mu_y = tf.reshape(mu_y, [-1, self.attention_n, 1])
        # 1 x 1 x imgsize, looks like [[[0,1,2,3,4,...,27]]]
        im = tf.reshape(tf.cast(tf.range(self.img_size), tf.float32), [1, 1, -1])
        # list of gaussian curves for x and y
        sigma2 = tf.reshape(sigma2, [-1, 1, 1])
        Fx = tf.exp(-tf.square((im - mu_x) / (2*sigma2)))
        Fy = tf.exp(-tf.square((im - mu_x) / (2*sigma2)))
        # normalize area-under-curve
        Fx = Fx / tf.maximum(tf.reduce_sum(Fx,2,keep_dims=True),1e-8)
        Fy = Fy / tf.maximum(tf.reduce_sum(Fy,2,keep_dims=True),1e-8)
        return Fx, Fy


    # read operation without attention
    def read_basic(self, x, x_hat, h_dec_prev):
        return tf.concat(1,[x,x_hat])


    # read operation with attention
    def read_attention(self, x, x_hat, h_dec_prev):
        Fx, Fy, gamma = self.attn_window("read", h_dec_prev)
        # apply parameters for patch of gaussian filters
        def filter_img(img, Fx, Fy, gamma):
            Fxt = tf.transpose(Fx, perm=[0,2,1])
            img = tf.reshape(img, [-1, self.img_size, self.img_size])
            # apply the gaussian patches
            glimpse = tf.batch_matmul(Fy, tf.batch_matmul(img, Fxt))
            glimpse = tf.reshape(glimpse, [-1, self.attention_n**2])
            # scale using the gamma parameter
            return glimpse * tf.reshape(gamma, [-1, 1])
        x = filter_img(x, Fx, Fy, gamma)
        x_hat = filter_img(x_hat, Fx, Fy, gamma)
        return tf.concat(1, [x, x_hat])


    # encoder function for attention patch
    def encode(self, prev_state, image):
        # update the RNN with our image
        with tf.variable_scope("encoder",reuse=self.share_parameters):
            hidden_layer, next_state = self.lstm_enc(image, prev_state)


        # map the RNN hidden state to latent variables
        with tf.variable_scope("mu", reuse=self.share_parameters):
            mu = dense(hidden_layer, self.n_hidden, self.n_z)
        with tf.variable_scope("sigma", reuse=self.share_parameters):
            logsigma = dense(hidden_layer, self.n_hidden, self.n_z)
            sigma = tf.exp(logsigma)
        return mu, logsigma, sigma, next_state

    def sampleQ(self, mu, sigma):
        return mu + sigma*self.e

    # decoder function
    def decode_layer(self, prev_state, latent):
        # update decoder RNN using our latent variable
        with tf.variable_scope("decoder", reuse=self.share_parameters):
            hidden_layer, next_state = self.lstm_dec(latent, prev_state)


        return hidden_layer, next_state


    # write operation without attention
    def write_basic(self, hidden_layer):
        # map RNN hidden state to image
        with tf.variable_scope("write", reuse=self.share_parameters):
            decoded_image_portion = dense(hidden_layer, self.n_hidden, self.img_size**2)
        return decoded_image_portion

    # write operation with attention
    def write_attention(self, hidden_layer):
        with tf.variable_scope("writeW", reuse=self.share_parameters):
            w = dense(hidden_layer, self.n_hidden, self.attention_n**2)
        w = tf.reshape(w, [self.batch_size, self.attention_n, self.attention_n])
        Fx, Fy, gamma = self.attn_window("write", hidden_layer)
        Fyt = tf.transpose(Fy, perm=[0,2,1])
        wr = tf.batch_matmul(Fyt, tf.batch_matmul(w, Fx))
        wr = tf.reshape(wr, [self.batch_size, self.img_size**2])
        return wr * tf.reshape(1.0/gamma, [-1, 1])


model = draw_mod
你可以在作者的github主页上查看更多:
https://github.com/shugert/DRAW
原文链接:
https://hackernoon.com/understanding-a-recurrent-neural-network-for-image-generation-7e2f83wdg
◆
精彩推荐
◆
「2019 AI开发者大会」 除了邀请国内外一线公司重磅嘉宾外,还邀请到了亚马逊首席科学家@李沐,他将于9月5日亲授「深度学习实训营」,通过动手实操,帮助开发者全面了解深度学习的基础知识和开发技巧。原价1099元,目前福利价199元!!且现场赠送价值85元《动手学深度学习》一本。
![]()
推荐阅读
冠军奖3万元!CSDN×易观算法大赛开赛啦
谁偷偷删了你的微信?别慌!Python帮你都揪出来了
吐血整理!140种Python标准库、第三方库和外部工具都有了
如何用爬虫技术帮助孩子秒到心仪的幼儿园(基础篇)
Python传奇:30年崛起之路
干货 | Python后台开发的高并发场景优化解决方案
2019年最新华为、BAT、美团、头条、滴滴面试题目及答案汇总
阿里巴巴杨群:高并发场景下Python的性能挑战
![]()
你点的每个“在看”,我都认真当成了喜欢


