基于CNN卷积神经网络的TensorFlow+Keras深度学习搭建人脸模型
基于CNN卷积神经网络的TensorFlow+Keras深度学习搭建人脸模型并识别
- 前言
-
-
- 补充
- 项目实现效果
-
- 模型数据
-
- VGG16
- CNN
-
- 项目概述
-
- 项目运行流程
- 核心环境配置
- 项目核心代码详解
-
- 目录
- 收集人脸数据—Labelme制作数据标签*FaceCollection.py*
- 使用LabelMe对图像进行切割并标签
- 深度训练人脸数据—CNN卷积神经网络+TensorFlow+Keras
-
-
- 使用TFtest.py检测CUDA是否配置成功
- 查看数据集并构建图像加载功能
-
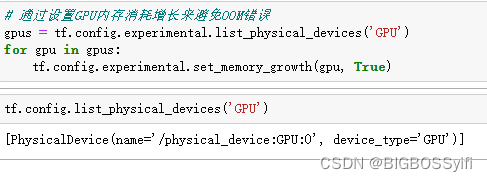
- GPU内存极限增长限制
- 将图像载入到TensorFlow的数据Pipeline
-
- 数据分类
-
- 手动将数据SPLT到训练测试和VAL—移动匹配的标签
- 匹配图像和标签
-
- 建立Albumentations图像通道
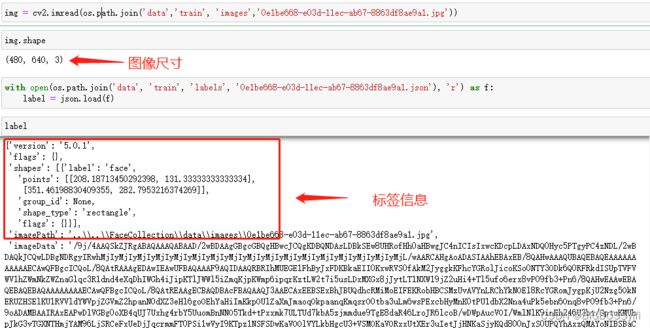
- 用OpenCV和JSON加载图像与标签
- 提取坐标并重新缩放以匹配图像分辨率
- Augmentation 图像处理
- 搭建运行Augmentation Pipeline
- 加载 Tensorflow数据集
- 预处理Labels标签
-
- 运行构建标签转换方法
- 加载标签信息到Tensorflow数据集
- 将标签和图像样本匹配
-
- 数据集采样测试
- 搭建神经网络
-
- Layers和基础神经网络和VGG16神经网络
- 构建神经网络实例
- 定义损失和优化
- 训练数据
-
- 利用Plot查看数据
- 模型预测与测试
-
- 保存模型
- 人脸检测与识别——OpenCV
-
- 加载模型
- 实时检测
- 项目地址
前言
之前的博客做了几个简单人脸识别的项目(人脸识别考勤与门禁):
- 树莓派4B爽上流安装python3的OpenCV(人脸检测识别—门禁 “人脸识别篇”)
- Python+OpenCV人脸识别签到考勤系统(新手入门)
之前项目中的人脸识别是仅基于OpenCV利用FaceRecognition+Dlib来实现的;其原理是利用现成的hard分类器和LBP算法来进行人脸检测,并收集人脸数据训练人脸数据集(xml)实现人脸识别;

上述的人脸识别方法缺点:识别率低,错误率较高(同条件下与TensorFlow深度训练后对照)
所以基于上述的问题,本项目使用OpenCV基于CNN卷积神经网络+TensorFlow+Keras来搭建人脸识别模型,来提高识别效率和准确度;(当然模型的准确率与训练次数成正比)
补充
本项目使用TensorFlow-GPU进行训练:需要提前搭建好CUDA环境具体可以参考本文:TensorFlow-GPU-2.4.1与CUDA安装教程
项目实现效果
PS:项目地址在最后会开源
模型数据
VGG16
Model: "vgg16"
_________________________________________________________________
Layer (type)                 Output Shape              Param #
=================================================================
input_1 (InputLayer)         [(None, None, None, 3)]   0
_________________________________________________________________
block1_conv1 (Conv2D)        (None, None, None, 64)    1792
_________________________________________________________________
block1_conv2 (Conv2D)        (None, None, None, 64)    36928
_________________________________________________________________
block1_pool (MaxPooling2D)   (None, None, None, 64)    0
_________________________________________________________________
block2_conv1 (Conv2D)        (None, None, None, 128)   73856
_________________________________________________________________
block2_conv2 (Conv2D)        (None, None, None, 128)   147584
_________________________________________________________________
block2_pool (MaxPooling2D)   (None, None, None, 128)   0
_________________________________________________________________
block3_conv1 (Conv2D)        (None, None, None, 256)   295168
_________________________________________________________________
block3_conv2 (Conv2D)        (None, None, None, 256)   590080
_________________________________________________________________
block3_conv3 (Conv2D)        (None, None, None, 256)   590080
_________________________________________________________________
block3_pool (MaxPooling2D)   (None, None, None, 256)   0
_________________________________________________________________
block4_conv1 (Conv2D)        (None, None, None, 512)   1180160
_________________________________________________________________
block4_conv2 (Conv2D)        (None, None, None, 512)   2359808
_________________________________________________________________
block4_conv3 (Conv2D)        (None, None, None, 512)   2359808
_________________________________________________________________
block4_pool (MaxPooling2D)   (None, None, None, 512)   0
_________________________________________________________________
block5_conv1 (Conv2D)        (None, None, None, 512)   2359808
_________________________________________________________________
block5_conv2 (Conv2D)        (None, None, None, 512)   2359808
_________________________________________________________________
block5_conv3 (Conv2D)        (None, None, None, 512)   2359808
_________________________________________________________________
block5_pool (MaxPooling2D)   (None, None, None, 512)   0
=================================================================
Total params: 14,714,688
Trainable params: 14,714,688
Non-trainable params: 0
_________________________________________________________________
None
CNN
Model: "model"
__________________________________________________________________________________________________
Layer (type)                    Output Shape         Param #     Connected to
==================================================================================================
input_2 (InputLayer)            [(None, 120, 120, 3) 0
__________________________________________________________________________________________________
vgg16 (Functional)              (None, None, None, 5 14714688    input_2[0][0]
__________________________________________________________________________________________________
global_max_pooling2d (GlobalMax (None, 512)          0           vgg16[0][0]
__________________________________________________________________________________________________
global_max_pooling2d_1 (GlobalM (None, 512)          0           vgg16[0][0]
__________________________________________________________________________________________________
dense (Dense)                   (None, 2048)         1050624     global_max_pooling2d[0][0]
__________________________________________________________________________________________________
dense_2 (Dense)                 (None, 2048)         1050624     global_max_pooling2d_1[0][0]
__________________________________________________________________________________________________
dense_1 (Dense)                 (None, 1)            2049        dense[0][0]
__________________________________________________________________________________________________
dense_3 (Dense)                 (None, 4)            8196        dense_2[0][0]
==================================================================================================
Total params: 16,826,181
Trainable params: 16,826,181
Non-trainable params: 0
__________________________________________________________________________________________________
None
项目概述
项目运行流程
1. 收集人脸数据—Labelme制作数据标签
FaceCollection.py
2. 深度训练人脸数据——CNN卷积神经网络+TensorFlow+Keras
FaceTFTrain.py
3. 人脸检测与识别——OpenCV
Face Recognition.py
核心环境配置
Python == 3.9.0
labelme == 5.0.1
tensorflow -gpu == 2.7.0 (CUDA11.2)
opencv-python == 4.0.1
matplotlib == 3.5.1
albumentations == 0.7.12
项目核心代码详解
目录
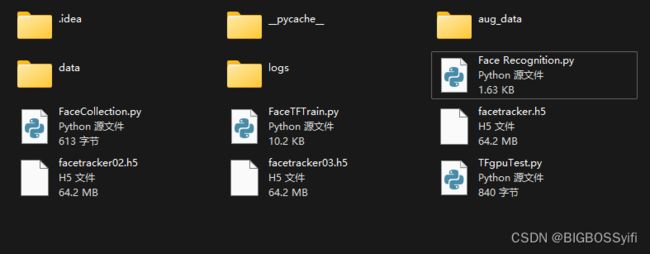
| 名称 | 用途 |
|---|---|
| data | 收集的人脸数据 |
| data-images | 人脸数据 |
| aug_data | 扩大数据集 |
| data-labels | 人脸数据标签 |
| logs | 训练日志 |
| .h5 | 已训练好的人脸模型(.h5) |
| FaceCollection.py | 收集人脸数据 |
| FaceTFTrain.py | 深度训练人脸数据 |
| Face Recognition.py | 人脸检测 |
收集人脸数据—Labelme制作数据标签FaceCollection.py
IMAGES_PATH = os.path.join('data','images')		# 文件路径
number_images = 70		# 拍摄张数

cap = cv2.VideoCapture(0)	# 调用摄像头(0-1-2....)
for imgnum in range(number_images):
    print('Collecting image {}'.format(imgnum))
    ret, frame = cap.read()
    imgname = os.path.join(IMAGES_PATH,f'{str(uuid.uuid1())}.jpg')		# 使用UUID进行命名
    cv2.imwrite(imgname, frame)
    cv2.imshow('frame', frame)
    time.sleep(0.5)

    if cv2.waitKey(1) & 0xFF == ord('q'):
        break
cap.release()
cv2.destroyAllWindows()
使用LabelMe对图像进行切割并标签
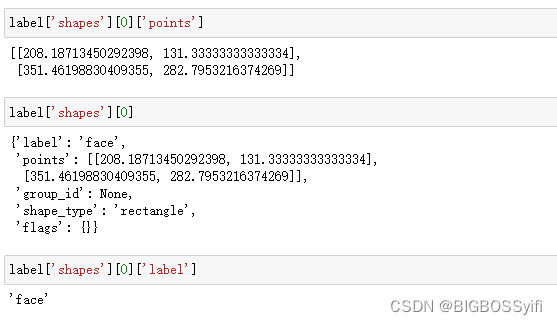
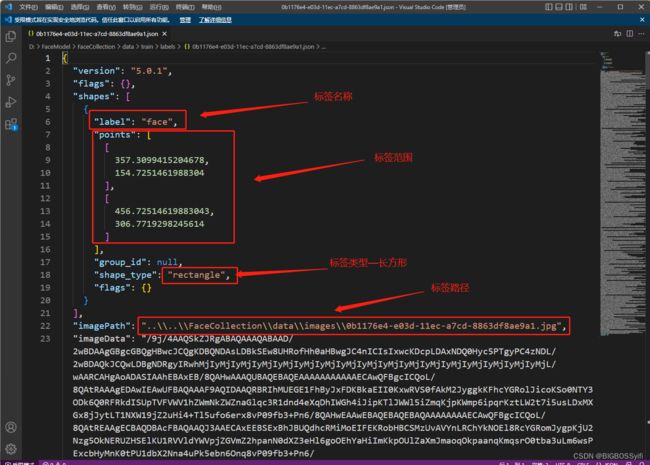
设定好图像路径和标签路径,需要对每一张收集的数据进行一次标签制作:

生成好的Label信息:
深度训练人脸数据—CNN卷积神经网络+TensorFlow+Keras
建议本项目使用TensorFlow-GPU进行训练:需要提前搭建好CUDA环境具体可以参考本文:TensorFlow-GPU-2.4.1与CUDA安装教程
使用TFtest.py检测CUDA是否配置成功
# Coding BIGBOSSyifi
# Datatime:2022/6/3 15:38
# Filename:TFgpuTest.py
# Toolby: PyCharm

import tensorflow.compat.v1 as tf
tf.compat.v1.disable_eager_execution()
with tf.device('/cpu:0'):
    a = tf.constant([1.0, 2.0, 3.0], shape=[3], name='a')
    b = tf.constant([1.0, 2.0, 3.0], shape=[3], name='b')
with tf.device('/gpu:1'):
    c = a + b

# 注意:allow_soft_placement=True表明:计算设备可自行选择,如果没有这个参数,会报错。
# 因为不是所有的操作都可以被放在GPU上,如果强行将无法放在GPU上的操作指定到GPU上,将会报错。
sess = tf.Session(config=tf.ConfigProto(allow_soft_placement=True, log_device_placement=True))
# sess = tf.Session(config=tf.ConfigProto(log_device_placement=True))
sess.run(tf.global_variables_initializer())
print(sess.run(c))
出现显卡的信息就没问题了:
查看数据集并构建图像加载功能
GPU内存极限增长限制
将图像载入到TensorFlow的数据Pipeline
images = tf.data.Dataset.list_files('data\\images\\*.jpg')
images.as_numpy_iterator().next()

def load_image(x):
    byte_img = tf.io.read_file(x)
    img = tf.io.decode_jpeg(byte_img)
    return img
数据分类
手动将数据SPLT到训练测试和VAL—移动匹配的标签
for folder in ['train','test','val']:
    for file in os.listdir(os.path.join('data', folder, 'images')):

        filename = file.split('.')[0]+'.json'
        existing_filepath = os.path.join('data','labels', filename)
        if os.path.exists(existing_filepath):
            new_filepath = os.path.join('data',folder,'labels',filename)
            os.replace(existing_filepath, new_filepath)
匹配图像和标签
建立Albumentations图像通道
augmentor = alb.Compose([alb.RandomCrop(width=450, height=450),
                         alb.HorizontalFlip(p=0.5),
                         alb.RandomBrightnessContrast(p=0.2),
                         alb.RandomGamma(p=0.2),
                         alb.RGBShift(p=0.2),
                         alb.VerticalFlip(p=0.5)],
                       bbox_params=alb.BboxParams(format='albumentations',
                                                  label_fields=['class_labels']))
用OpenCV和JSON加载图像与标签
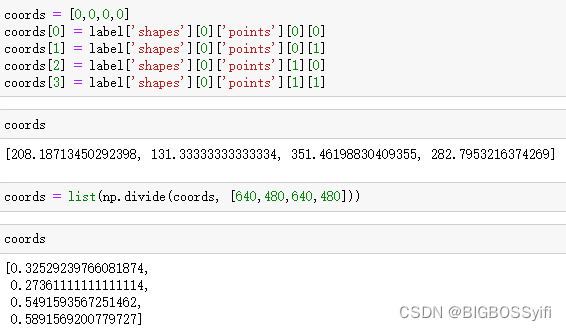
提取坐标并重新缩放以匹配图像分辨率
Augmentation 图像处理
搭建运行Augmentation Pipeline
for partition in ['train','test','val']:
    for image in os.listdir(os.path.join('data', partition, 'images')):
        img = cv2.imread(os.path.join('data', partition, 'images', image))

        coords = [0,0,0.00001,0.00001]
        label_path = os.path.join('data', partition, 'labels', f'{image.split(".")[0]}.json')
        if os.path.exists(label_path):
            with open(label_path, 'r') as f:
                label = json.load(f)

            coords[0] = label['shapes'][0]['points'][0][0]
            coords[1] = label['shapes'][0]['points'][0][1]
            coords[2] = label['shapes'][0]['points'][1][0]
            coords[3] = label['shapes'][0]['points'][1][1]
            coords = list(np.divide(coords, [640,480,640,480]))

        try:
            for x in range(60):
                augmented = augmentor(image=img, bboxes=[coords], class_labels=['face'])
                cv2.imwrite(os.path.join('aug_data', partition, 'images', f'{image.split(".")[0]}.{x}.jpg'), augmented['image'])

                annotation = {}
                annotation['image'] = image

                if os.path.exists(label_path):
                    if len(augmented['bboxes']) == 0:
                        annotation['bbox'] = [0,0,0,0]
                        annotation['class'] = 0
                    else:
                        annotation['bbox'] = augmented['bboxes'][0]
                        annotation['class'] = 1
                else:
                    annotation['bbox'] = [0,0,0,0]
                    annotation['class'] = 0


                with open(os.path.join('aug_data', partition, 'labels', f'{image.split(".")[0]}.{x}.json'), 'w') as f:
                    json.dump(annotation, f)

        except Exception as e:
            print(e)
加载 Tensorflow数据集
train_images = tf.data.Dataset.list_files('aug_data\\train\\images\\*.jpg', shuffle=False)
train_images = train_images.map(load_image)
train_images = train_images.map(lambda x: tf.image.resize(x, (120,120)))
train_images = train_images.map(lambda x: x/255)

test_images = tf.data.Dataset.list_files('aug_data\\test\\images\\*.jpg', shuffle=False)
test_images = test_images.map(load_image)
test_images = test_images.map(lambda x: tf.image.resize(x, (120,120)))
test_images = test_images.map(lambda x: x/255)

val_images = tf.data.Dataset.list_files('aug_data\\val\\images\\*.jpg', shuffle=False)
val_images = val_images.map(load_image)
val_images = val_images.map(lambda x: tf.image.resize(x, (120,120)))
val_images = val_images.map(lambda x: x/255)
加载的信息
array([[[0.36519608, 0.45735294, 0.5421569 ],
        [0.3612745 , 0.4598039 , 0.5421569 ],
        [0.35735294, 0.45784312, 0.54656863],
        ...,
        [0.75753677, 0.7291054 , 0.77077204],
        [0.7581495 , 0.73400736, 0.7735294 ],
        [0.7583333 , 0.74215686, 0.7740196 ]],

       [[0.40490195, 0.4356005 , 0.52009803],
        [0.3951593 , 0.44313726, 0.52794117],
        [0.3779412 , 0.44748774, 0.525     ],
        ...,
        [0.7563726 , 0.7367647 , 0.7642157 ],
        [0.74938726, 0.73719364, 0.7637868 ],
        [0.7516544 , 0.74381125, 0.7634191 ]],

       [[0.4151961 , 0.44264707, 0.50894606],
        [0.40686274, 0.44123775, 0.5097426 ],
        [0.40153188, 0.43523285, 0.5088235 ],
        ...,
        [0.7529412 , 0.73333335, 0.75686276],
        [0.7534314 , 0.7441176 , 0.7642157 ],
        [0.7436274 , 0.7357843 , 0.7504902 ]],

       ...,

       [[0.1637255 , 0.23615196, 0.30753675],
        [0.15428922, 0.22487745, 0.30428922],
        [0.16850491, 0.2322304 , 0.32193628],
        ...,
        [0.05098039, 0.04705882, 0.06666667],
        [0.05490196, 0.05833333, 0.06617647],
        [0.04773284, 0.05900735, 0.071875  ]],

       [[0.15079656, 0.22432598, 0.2846201 ],
        [0.13725491, 0.21960784, 0.2872549 ],
        [0.13958333, 0.22879902, 0.2930147 ],
        ...,
        [0.04748775, 0.05042892, 0.07003676],
        [0.05012255, 0.05398284, 0.07254902],
        [0.04448529, 0.04932598, 0.06599265]],

       [[0.15269607, 0.23161764, 0.28651962],
        [0.13180147, 0.22640932, 0.2841299 ],
        [0.11746324, 0.22156863, 0.2682598 ],
        ...,
        [0.04981618, 0.05716912, 0.09099264],
        [0.05055147, 0.05147059, 0.09001225],
        [0.05349265, 0.05196078, 0.08333334]]], dtype=float32)
预处理Labels标签
运行构建标签转换方法
def load_labels(label_path):
    with open(label_path.numpy(), 'r', encoding = "utf-8") as f:
        label = json.load(f)

    return [label['class']], label['bbox']
加载标签信息到Tensorflow数据集
train_labels = tf.data.Dataset.list_files('aug_data\\train\\labels\\*.json', shuffle=False)
train_labels = train_labels.map(lambda x: tf.py_function(load_labels, [x], [tf.uint8, tf.float16]))

test_labels = tf.data.Dataset.list_files('aug_data\\test\\labels\\*.json', shuffle=False)
test_labels = test_labels.map(lambda x: tf.py_function(load_labels, [x], [tf.uint8, tf.float16]))

val_labels = tf.data.Dataset.list_files('aug_data\\val\\labels\\*.json', shuffle=False)
val_labels = val_labels.map(lambda x: tf.py_function(load_labels, [x], [tf.uint8, tf.float16]))
加载的信息:
(array([1], dtype=uint8),
 array([0.5127, 0.4956, 0.8286, 0.943 ], dtype=float16))
将标签和图像样本匹配
处理配对后:
(array([[1],
        [1],
        [1],
        [1],
        [1],
        [1],
        [1],
        [1]], dtype=uint8),
 array([[0.03955, 0.2686 , 0.363  , 0.648  ],
        [0.4888 , 0.426  , 0.99   , 0.9873 ],
        [0.2515 , 0.4033 , 0.5386 , 0.836  ],
        [0.5103 , 0.2123 , 0.842  , 0.666  ],
        [0.1704 , 0.2622 , 0.502  , 0.695  ],
        [0.3135 , 0.4802 , 0.6875 , 0.931  ],
        [0.3179 , 0.2386 , 0.5845 , 0.635  ],
        [0.1937 , 0.2764 , 0.512  , 0.613  ]], dtype=float16))
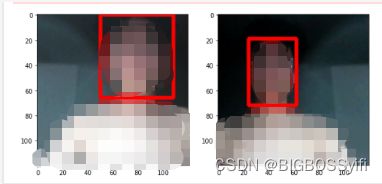
数据集采样测试
data_samples = train.as_numpy_iterator()
res = data_samples.next()

fig, ax = plt.subplots(ncols=4, figsize=(20,20))
for idx in range(4):
    sample_image = res[0][idx]
    sample_coords = res[1][1][idx]

    cv2.rectangle(sample_image,
                  tuple(np.multiply(sample_coords[:2], [120,120]).astype(int)),
                  tuple(np.multiply(sample_coords[2:], [120,120]).astype(int)),
                        (255,0,0), 2)

    ax[idx].imshow(sample_image)
搭建神经网络
Layers和基础神经网络和VGG16神经网络
from tensorflow.keras.models import Model
from tensorflow.keras.layers import Input, Conv2D, Dense, GlobalMaxPooling2D
from tensorflow.keras.applications import VGG16

vgg = VGG16(include_top=False)
构建神经网络实例
def build_model():
    input_layer = Input(shape=(120,120,3))

    vgg = VGG16(include_top=False)(input_layer)

    # Classification Model
    f1 = GlobalMaxPooling2D()(vgg)
    class1 = Dense(2048, activation='relu')(f1)
    class2 = Dense(1, activation='sigmoid')(class1)

    # Bounding box model
    f2 = GlobalMaxPooling2D()(vgg)
    regress1 = Dense(2048, activation='relu')(f2)
    regress2 = Dense(4, activation='sigmoid')(regress1)

    facetracker = Model(inputs=input_layer, outputs=[class2, regress2])
    return facetracker
定义损失和优化
batches_per_epoch = len(train)
lr_decay = (1./0.75 -1)/batches_per_epoch

opt = tf.keras.optimizers.Adam(learning_rate=0.0001, decay=lr_decay)

def localization_loss(y_true, yhat):
    delta_coord = tf.reduce_sum(tf.square(y_true[:,:2] - yhat[:,:2]))

    h_true = y_true[:,3] - y_true[:,1]
    w_true = y_true[:,2] - y_true[:,0]

    h_pred = yhat[:,3] - yhat[:,1]
    w_pred = yhat[:,2] - yhat[:,0]

    delta_size = tf.reduce_sum(tf.square(w_true - w_pred) + tf.square(h_true-h_pred))

    return delta_coord + delta_size

classloss = tf.keras.losses.BinaryCrossentropy()
regressloss = localization_loss
训练数据
class FaceTracker(Model):
    def __init__(self, eyetracker,  **kwargs):
        super().__init__(**kwargs)
        self.model = eyetracker

    def compile(self, opt, classloss, localizationloss, **kwargs):
        super().compile(**kwargs)
        self.closs = classloss
        self.lloss = localizationloss
        self.opt = opt

    def train_step(self, batch, **kwargs):

        X, y = batch

        with tf.GradientTape() as tape:
            classes, coords = self.model(X, training=True)

            batch_classloss = self.closs(y[0], classes)
            batch_localizationloss = self.lloss(tf.cast(y[1], tf.float32), coords)

            total_loss = batch_localizationloss+0.5*batch_classloss

            grad = tape.gradient(total_loss, self.model.trainable_variables)

        opt.apply_gradients(zip(grad, self.model.trainable_variables))

        return {"total_loss":total_loss, "class_loss":batch_classloss, "regress_loss":batch_localizationloss}

    def test_step(self, batch, **kwargs):
        X, y = batch

        classes, coords = self.model(X, training=False)

        batch_classloss = self.closs(y[0], classes)
        batch_localizationloss = self.lloss(tf.cast(y[1], tf.float32), coords)
        total_loss = batch_localizationloss+0.5*batch_classloss

        return {"total_loss":total_loss, "class_loss":batch_classloss, "regress_loss":batch_localizationloss}

    def call(self, X, **kwargs):
        return self.model(X, **kwargs)

model = FaceTracker(facetracker)
model.compile(opt, classloss, regressloss)

logdir='logs'
tensorboard_callback = tf.keras.callbacks.TensorBoard(log_dir=logdir)
# epochs为训练次数
hist = model.fit(train, epochs=3000, validation_data=val, callbacks=[tensorboard_callback])
利用Plot查看数据
fig, ax = plt.subplots(ncols=3, figsize=(20,5))

ax[0].plot(hist.history['total_loss'], color='teal', label='loss')
ax[0].plot(hist.history['val_total_loss'], color='orange', label='val loss')
ax[0].title.set_text('Loss')
ax[0].legend()

ax[1].plot(hist.history['class_loss'], color='teal', label='class loss')
ax[1].plot(hist.history['val_class_loss'], color='orange', label='val class loss')
ax[1].title.set_text('Classification Loss')
ax[1].legend()

ax[2].plot(hist.history['regress_loss'], color='teal', label='regress loss')
ax[2].plot(hist.history['val_regress_loss'], color='orange', label='val regress loss')
ax[2].title.set_text('Regression Loss')
ax[2].legend()

plt.show()
模型预测与测试
test_data = test.as_numpy_iterator()
test_sample = test_data.next()
yhat = facetracker.predict(test_sample[0])

fig, ax = plt.subplots(ncols=4, figsize=(20,20))
for idx in range(4):
    sample_image = test_sample[0][idx]
    sample_coords = yhat[1][idx]

    if yhat[0][idx] > 0.9:
        cv2.rectangle(sample_image,
                      tuple(np.multiply(sample_coords[:2], [120,120]).astype(int)),
                      tuple(np.multiply(sample_coords[2:], [120,120]).astype(int)),
                            (255,0,0), 2)

    ax[idx].imshow(sample_image)
保存模型
facetracker.save('facetracker.h5')
人脸检测与识别——OpenCV
加载模型
facetracker = load_model('facetracker.h5') #加载模型
实时检测
cap = cv2.VideoCapture(0)
while cap.isOpened():
    _ , frame = cap.read()
    frame = frame[50:500, 50:500,:]

    rgb = cv2.cvtColor(frame, cv2.COLOR_BGR2RGB)
    resized = tf.image.resize(rgb, (120,120))

    yhat = facetracker.predict(np.expand_dims(resized/255,0))
    sample_coords = yhat[1][0]

    if yhat[0] > 0.5:
        # Controls the main rectangle
        cv2.rectangle(frame,
                      tuple(np.multiply(sample_coords[:2], [450,450]).astype(int)),
                      tuple(np.multiply(sample_coords[2:], [450,450]).astype(int)),
                            (255,0,0), 2)
        # Controls the label rectangle
        cv2.rectangle(frame,
                      tuple(np.add(np.multiply(sample_coords[:2], [450,450]).astype(int),
                                    [0,-30])),
                      tuple(np.add(np.multiply(sample_coords[:2], [450,450]).astype(int),
                                    [80,0])),
                            (255,0,0), -1)

        # Controls the text rendered
        cv2.putText(frame, 'face', tuple(np.add(np.multiply(sample_coords[:2], [450,450]).astype(int),
                                               [0,-5])),
                    cv2.FONT_HERSHEY_SIMPLEX, 1, (255,255,255), 2, cv2.LINE_AA)

    cv2.imshow('EyeTrack', frame)

    if cv2.waitKey(1) & 0xFF == ord('q'):
        break
cap.release()
cv2.destroyAllWindows()
项目地址
本篇项目开源地址(待优化): GitHub
如果有问题可以私信我或者评论下留言
