YOLO系列(v1~v3)的学习及YOLO-Fastest在海思平台的部署(下)
YOLO系列(v1~v3)的学习及YOLO-Fastest在海思平台的部署(上)
YOLO系列(v1~v3)的学习及YOLO-Fastest在海思平台的部署(中)
YOLO系列(v1~v3)的学习及YOLO-Fastest在海思平台的部署(下)
文章目录
- 声明
- 4 YOLO-Fastest
-
- 4.1 工程编译
-
- 4.1.1 Windows版本(基于Windows 10)
- 4.1.2 Linux版本(基于Kubuntu20.04)
-
- (1)CUDA的版本选择和安装
- (2)OpenCV编译
- (3)Darknet工程编译
- 4.2 示例运行
- 4.3 网络结构分析
-
- 4.3.1 YOLO-Fastest1.0-XL网络结构
- 4.3.2 网络对深度可分离卷积的使用
- 4.3.3 网络对 1 × 1 1×1 1×1卷积的使用
- 4.3.4 网络对短连接(Shortcut)的使用
- 4.4 损失函数
- 4.5 网络在VOC上的训练
-
- 4.5.1 制作可用于YOLO网络训练的VOC数据集
- 4.5.2 数据集和标注文件的存放位置
- 4.5.3 配置&前期准备
-
- (1)训练数据准备
- (2)网络结构修改
- (3)获取预训练权重
- (4)网络训练
- (5)网络测试
- 4.6 YOLO-Fastest不同版本的网络结构
-
- 4.6.1 YOLO-Fastest1.0网络结构
- 4.6.2 YOLO-Fastest1.1网络结构
- 4.6.3 YOLO-Fastest1.1-XL网络结构
- 5 部署
-
- 5.1 网络模型的转化
-
- 5.1.1 从Darknet到Caffemodel
-
- (1)编译CPU版PyCaffe
- (2)搭建用于模型转换的Anaconda环境
- (3)修改转换脚本使之支持Python3语法
- (4)模型转换
- 5.1.2 从Caffemodel到wk文件
- 5.2 软件功能和结构设计
- 5.3 部署事项
-
- 5.3.1 将图片转为BGR格式
- 5.3.2 RuyiStudio配置
- 6 相关知识
-
- 6.1 准确度/精确率(Precision)、召回率(Recall)和mAP
- 6.2 PASCAL VOC
- 7 文章之外
-
- 7.1 本文编写过程中使用到的工具
- 后记&祝愿
- 本文资源共享
声明
本文由 凌然 编写。
当前版本R1.0(预发布)。
作者联系方式:E-mail: [email protected]
本文仅为个人学习记录,其中难免存在客观事实的错谬或理解上的歪曲,因此望读者切勿“拿来主义”,由本文的错误造成的损失,作者概不负责。
因在发布期间可能对本文即时修改或校对,因此如非必要请勿转载本文,以免错误的内容在转载后无法得到更新从而对其他人造成误导或负面影响。
4 YOLO-Fastest
[注意]
本章 4.1~4.5 节内容基于YOLO-Fastest1.0-XL网络模型进行,因该版本网络为初代YOLO-Fastest且效果好于非XL版。
4.1 工程编译
4.1.1 Windows版本(基于Windows 10)
在Windows环境下编译YOLO-Fastest工程的步骤网上有很多可以参考的博文或者帖子,这里就不再赘述了。基本的思路是:使用CMake创建/更新VS工程,而后进行编译即可。仅在此记录一下编译过程中需要注意的方面:
-
关于CUDA
-
当前使用CUDA10.2+cuDNN8.0.4.30,尝试使用低版本CUDA(如CUDA8.0)时,编译会出现错误如 未定义标识符 “cudaGraphExec_t” 。
[说明]
在较新的GPU上,低版本CUDA可能无法令Darknet正常工作。例如对于RTX3090,上述组合可能需替换为CUDA11.1+cuDNN8.0.5或更高。
-
若CMake找不到CUDA环境,且相关的环境变量均已被设置,可以考虑重新安装CUDA。
-
若使用CMake进行配置时 CUDNN_LIBRARY_DLL 变量显示未找到,需手动进行设置,默认安装位置为:
C:\Program Files\NVIDIA GPU Computing Toolkit\CUDA\vXX.X\bin\cudnn64_8.dll -
需确保CMAKE变量的 CMAKE_CUDA_ARCHITECTURES 与本机显卡算力一致。(该项正常情况下应被自动检测)
-
若开启 CUDNN_HALF 可能导致在某些平台上无法正常执行训练过程,若出现此情况可将此半精度开关关闭。
-
-
关于OpenCV
- 当前使用的OpenCV版本为:OpenCV4.4.0:opencv-4.4.0-vc14_vc15.exe。其它的某些版本可能会导致编译或运行时错误。
-
关于VS工程配置
- VS工程应生成为Release x64。
- 在工程文件 darknet.vcxproj 中,需保证对CUDA目标版本设置的正确性。可使用记事本打开该文件,查找关键字 BuildCustomizations 以查看。当前默认使用CUDA11.1。
- 在VS中,需确保darknet工程属性中OpenCV库路径依赖正确,检查以下:
- C/C++ -> 所有选项 -> 附加包含目录
- 链接器 -> 附加库目录
- 若需同时支持不同算力的GPU,需修改以下位置的算力配置信息:
- CUDA C/C++ -> Device -> Code Generation
-
关于darknet运行
- 若运行时提示缺少 opencv_world440.dll 文件,可从 PATH_TO_OPENCV/build/x64/vc14/bin 目录下复制得到。
- 修改训练时数据集和标注文件存放位置,参见 4.5.2 数据集和标注文件的存放位置 章节。
[补充]
如果对使用CMAKE生成工程不熟练或生成的工程不好用,不妨基于已有的工程配置做修改,修改的内容即为上述需要注意的方面。
4.1.2 Linux版本(基于Kubuntu20.04)
[说明]
本节仅用于记录在Kubuntu下编译Darknet工程的所需环境搭建和操作步骤以供训练参考,本章对YOLO-Fastest工程的学习依旧基于Windows环境。
(1)CUDA的版本选择和安装
本节选用CUDA11.1+cuDNN8.0.5版本组合。
在Kubuntu下使用 Ctrl+Alt+3 进入tty终端界面,使用以下命令安装CUDA Toolkit ,根据需要选择要安装的软件包。
cd PATH_TO_FILE
sudo ./cuda_11.1.1_455.32.00_linux.run
整个安装过程需要一定时间,请耐心等待。而后解压 cudnn-11.1-linux-x64-v8.0.5.39.tgz 到CUDA Toolkit安装目录对应的文件夹下即可。
[补充]
直接使用CUDA Toolkit安装NVIDIA Driver可能出现错误,此时可使用:
sudo apt install nvidia-driver-460-server安装NVIDIA驱动,若只安装CUDA和cuDNN,则编译出的应用程序无法找到 libcuda.so.1 动态库。
最后,将必要的路径添加到 ~/.bashrc :
sudo apt install vim
sudo vim ~/.bashrc
在文件末尾增加:
export PATH=/usr/local/cuda-11.1/bin:$PATH
export LD_LIBRARY_PATH=/usr/local/cuda-11.1/lib64:$LD_LIBRARY_PATH
保存并退出,使用source命令使修改立即生效。
source ~/.bashrc
[注意]
使用cp命令进行拷贝时需要使用 -P 参数保持软链接,否则cp命令会以原内容替换软链接导致链接丢失。
(2)OpenCV编译
首先需要为Kubuntu升级apt并安装以下工具:
sudo apt update
sudo apt upgrade
sudo apt install gcc g++ make build-essential cmake libgtk2.0-dev pkg-config libavcodec-dev libavformat-dev libswscale-dev
而后从https://github.com/opencv/opencv/releases/tag/4.4.0下载OpenCV4.4.0源码并解压,在目录下执行:
cd PATH_TO_DIRECTORY
mkdir build
cd ./build
cmake ../ -DCMAKE_BUILD_TYPE=RELEASE -DCMAKE_INSTALL_PREFIX=./_install -DOPENCV_GENERATE_PKGCONFIG=ON
make
make install
即可在 ./build/_install 目录下得到编译完成后的OpenCV。
[补充]
如果按照上述步骤自定义安装位置,则需要将运行动态库所在路径添加到环境变量防止编译的应用程序无法找到动态库。
在 ~/.bashrc 文件中增加以下语句:
export LD_LIBRARY_PATH=PATH_TO_OPENCV4/opencv-4.4.0/build/_install/lib:$LD_LIBRARY_PATH保存并退出,使用source命令使修改立即生效即可。
(3)Darknet工程编译
下载YOLO-Fastest工程,拷贝到Ubuntu环境并解压。
打开并编辑 Makefile 文件:
- 开启 GPU=1 、CUDNN=1 编译开关,并配置对应的CUDNN安装路径(一般保持默认即可);
- 照例配置 ARCH 变量,使其包含所使用的GPU的计算能力设置。GPU算力表见:https://developer.nvidia.com/zh-cn/cuda-gpus
- 开启 OPENCV=1 编译开关以支持OpenCV接口。
编译之前,执行以下指令指定OpenCV4的pkg_config路径:
export PKG_CONFIG_PATH=PATH_TO_OPENCV4/build/_install/lib/pkgconfig/
# e.g. export PKG_CONFIG_PATH=/home/wkc/opencv-4.4.0/build/_install/lib/pkgconfig
而后执行make编译即可。
[补充]查看程序运行需要的动态库的方法
objdump -x darknet |grep NEEDED以及
ldd darknet
4.2 示例运行
在工程源码下的 ModelZoo/ 目录下为YOLO-Fastest网络结构配置和预训练权重,这里以 ModelZoo/yolo-fastest-1.0_coco/yolo-fastest-xl* 为例(它的精度会更高一些),可使用如下命令执行预测(命令中各部分路径记得替换):
PATH_TO_FILE/darknet.exe detector test ./cfg/coco.data ./cfg/yolo-fastest-xl.cfg ./cfg/yolo-fastest-xl.weights ./data/PIC_NAME -i 0 -thresh 0.25
其中, -i 命令用于分配执行预测任务的GPU,若只有一块GPU,则该值为0。该参数可以省略。
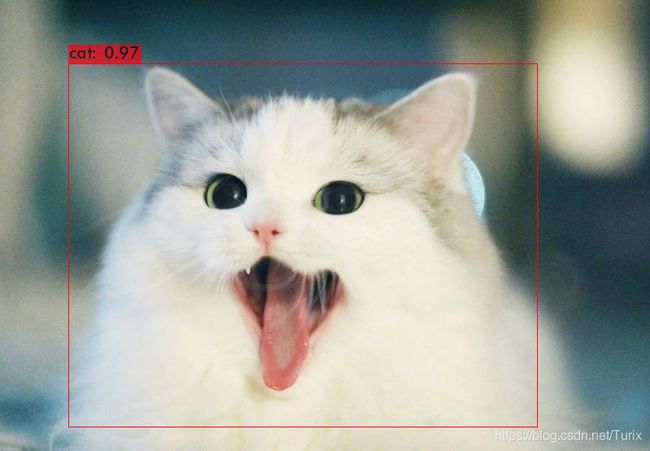
使用YOLO-Fastest1.0-XL检测的执行结果如下:
F:\darknet-yolo-fastest>.\darknet.exe detector test ./cfg/coco.data ./cfg/yolo-fastest-xl.cfg ./cfg/yolo-fastest-xl.weights ./data/3.jpg -thresh 0.25
 CUDA-version: 10020 (10020), cuDNN: 8.0.4, CUDNN_HALF=1, GPU count: 1
 CUDNN_HALF=1
 OpenCV version: 4.4.0
 0 : compute_capability = 500, cudnn_half = 0, GPU: GeForce 940M
net.optimized_memory = 0
mini_batch = 1, batch = 1, time_steps = 1, train = 0
   layer   filters  size/strd(dil)      input                output
   0 Create CUDA-stream - 0
 Create cudnn-handle 0
conv     16       3 x 3/ 2    320 x 320 x   3 ->  160 x 160 x  16 0.022 BF
   1 conv     16       1 x 1/ 1    160 x 160 x  16 ->  160 x 160 x  16 0.013 BF
   2 conv     16/  16  3 x 3/ 1    160 x 160 x  16 ->  160 x 160 x  16 0.007 BF
   3 conv      8       1 x 1/ 1    160 x 160 x  16 ->  160 x 160 x   8 0.007 BF
   4 conv     16       1 x 1/ 1    160 x 160 x   8 ->  160 x 160 x  16 0.007 BF
   5 conv     16/  16  3 x 3/ 1    160 x 160 x  16 ->  160 x 160 x  16 0.007 BF
   6 conv      8       1 x 1/ 1    160 x 160 x  16 ->  160 x 160 x   8 0.007 BF
   7 dropout    p = 0.200        204800  ->   204800
   8 Shortcut Layer: 3,  wt = 0, wn = 0, outputs: 160 x 160 x   8 0.000 BF
   9 conv     48       1 x 1/ 1    160 x 160 x   8 ->  160 x 160 x  48 0.020 BF
  10 conv     48/  48  3 x 3/ 2    160 x 160 x  48 ->   80 x  80 x  48 0.006 BF
  11 conv     16       1 x 1/ 1     80 x  80 x  48 ->   80 x  80 x  16 0.010 BF
  12 conv     64       1 x 1/ 1     80 x  80 x  16 ->   80 x  80 x  64 0.013 BF
  13 conv     64/  64  3 x 3/ 1     80 x  80 x  64 ->   80 x  80 x  64 0.007 BF
  14 conv     16       1 x 1/ 1     80 x  80 x  64 ->   80 x  80 x  16 0.013 BF
  15 dropout    p = 0.200        102400  ->   102400
  16 Shortcut Layer: 11,  wt = 0, wn = 0, outputs:  80 x  80 x  16 0.000 BF
  17 conv     64       1 x 1/ 1     80 x  80 x  16 ->   80 x  80 x  64 0.013 BF
  18 conv     64/  64  3 x 3/ 1     80 x  80 x  64 ->   80 x  80 x  64 0.007 BF
  19 conv     16       1 x 1/ 1     80 x  80 x  64 ->   80 x  80 x  16 0.013 BF
  20 dropout    p = 0.200        102400  ->   102400
  21 Shortcut Layer: 16,  wt = 0, wn = 0, outputs:  80 x  80 x  16 0.000 BF
  22 conv     64       1 x 1/ 1     80 x  80 x  16 ->   80 x  80 x  64 0.013 BF
  23 conv     64/  64  3 x 3/ 2     80 x  80 x  64 ->   40 x  40 x  64 0.002 BF
  24 conv     16       1 x 1/ 1     40 x  40 x  64 ->   40 x  40 x  16 0.003 BF
  25 conv     96       1 x 1/ 1     40 x  40 x  16 ->   40 x  40 x  96 0.005 BF
  26 conv     96/  96  3 x 3/ 1     40 x  40 x  96 ->   40 x  40 x  96 0.003 BF
  27 conv     16       1 x 1/ 1     40 x  40 x  96 ->   40 x  40 x  16 0.005 BF
  28 dropout    p = 0.200        25600  ->   25600
  29 Shortcut Layer: 24,  wt = 0, wn = 0, outputs:  40 x  40 x  16 0.000 BF
  30 conv     96       1 x 1/ 1     40 x  40 x  16 ->   40 x  40 x  96 0.005 BF
  31 conv     96/  96  3 x 3/ 1     40 x  40 x  96 ->   40 x  40 x  96 0.003 BF
  32 conv     16       1 x 1/ 1     40 x  40 x  96 ->   40 x  40 x  16 0.005 BF
  33 dropout    p = 0.200        25600  ->   25600
  34 Shortcut Layer: 29,  wt = 0, wn = 0, outputs:  40 x  40 x  16 0.000 BF
  35 conv     96       1 x 1/ 1     40 x  40 x  16 ->   40 x  40 x  96 0.005 BF
  36 conv     96/  96  3 x 3/ 1     40 x  40 x  96 ->   40 x  40 x  96 0.003 BF
  37 conv     32       1 x 1/ 1     40 x  40 x  96 ->   40 x  40 x  32 0.010 BF
  38 conv    192       1 x 1/ 1     40 x  40 x  32 ->   40 x  40 x 192 0.020 BF
  39 conv    192/ 192  3 x 3/ 1     40 x  40 x 192 ->   40 x  40 x 192 0.006 BF
  40 conv     32       1 x 1/ 1     40 x  40 x 192 ->   40 x  40 x  32 0.020 BF
  41 dropout    p = 0.200        51200  ->   51200
  42 Shortcut Layer: 37,  wt = 0, wn = 0, outputs:  40 x  40 x  32 0.000 BF
  43 conv    192       1 x 1/ 1     40 x  40 x  32 ->   40 x  40 x 192 0.020 BF
  44 conv    192/ 192  3 x 3/ 1     40 x  40 x 192 ->   40 x  40 x 192 0.006 BF
  45 conv     32       1 x 1/ 1     40 x  40 x 192 ->   40 x  40 x  32 0.020 BF
  46 dropout    p = 0.200        51200  ->   51200
  47 Shortcut Layer: 42,  wt = 0, wn = 0, outputs:  40 x  40 x  32 0.000 BF
  48 conv    192       1 x 1/ 1     40 x  40 x  32 ->   40 x  40 x 192 0.020 BF
  49 conv    192/ 192  3 x 3/ 1     40 x  40 x 192 ->   40 x  40 x 192 0.006 BF
  50 conv     32       1 x 1/ 1     40 x  40 x 192 ->   40 x  40 x  32 0.020 BF
  51 dropout    p = 0.200        51200  ->   51200
  52 Shortcut Layer: 47,  wt = 0, wn = 0, outputs:  40 x  40 x  32 0.000 BF
  53 conv    192       1 x 1/ 1     40 x  40 x  32 ->   40 x  40 x 192 0.020 BF
  54 conv    192/ 192  3 x 3/ 1     40 x  40 x 192 ->   40 x  40 x 192 0.006 BF
  55 conv     32       1 x 1/ 1     40 x  40 x 192 ->   40 x  40 x  32 0.020 BF
  56 dropout    p = 0.200        51200  ->   51200
  57 Shortcut Layer: 52,  wt = 0, wn = 0, outputs:  40 x  40 x  32 0.000 BF
  58 conv    192       1 x 1/ 1     40 x  40 x  32 ->   40 x  40 x 192 0.020 BF
  59 conv    192/ 192  3 x 3/ 2     40 x  40 x 192 ->   20 x  20 x 192 0.001 BF
  60 conv     48       1 x 1/ 1     20 x  20 x 192 ->   20 x  20 x  48 0.007 BF
  61 conv    272       1 x 1/ 1     20 x  20 x  48 ->   20 x  20 x 272 0.010 BF
  62 conv    272/ 272  3 x 3/ 1     20 x  20 x 272 ->   20 x  20 x 272 0.002 BF
  63 conv     48       1 x 1/ 1     20 x  20 x 272 ->   20 x  20 x  48 0.010 BF
  64 dropout    p = 0.200        19200  ->   19200
  65 Shortcut Layer: 60,  wt = 0, wn = 0, outputs:  20 x  20 x  48 0.000 BF
  66 conv    272       1 x 1/ 1     20 x  20 x  48 ->   20 x  20 x 272 0.010 BF
  67 conv    272/ 272  3 x 3/ 1     20 x  20 x 272 ->   20 x  20 x 272 0.002 BF
  68 conv     48       1 x 1/ 1     20 x  20 x 272 ->   20 x  20 x  48 0.010 BF
  69 dropout    p = 0.200        19200  ->   19200
  70 Shortcut Layer: 65,  wt = 0, wn = 0, outputs:  20 x  20 x  48 0.000 BF
  71 conv    272       1 x 1/ 1     20 x  20 x  48 ->   20 x  20 x 272 0.010 BF
  72 conv    272/ 272  3 x 3/ 1     20 x  20 x 272 ->   20 x  20 x 272 0.002 BF
  73 conv     48       1 x 1/ 1     20 x  20 x 272 ->   20 x  20 x  48 0.010 BF
  74 dropout    p = 0.200        19200  ->   19200
  75 Shortcut Layer: 70,  wt = 0, wn = 0, outputs:  20 x  20 x  48 0.000 BF
  76 conv    272       1 x 1/ 1     20 x  20 x  48 ->   20 x  20 x 272 0.010 BF
  77 conv    272/ 272  3 x 3/ 1     20 x  20 x 272 ->   20 x  20 x 272 0.002 BF
  78 conv     48       1 x 1/ 1     20 x  20 x 272 ->   20 x  20 x  48 0.010 BF
  79 dropout    p = 0.200        19200  ->   19200
  80 Shortcut Layer: 75,  wt = 0, wn = 0, outputs:  20 x  20 x  48 0.000 BF
  81 conv    272       1 x 1/ 1     20 x  20 x  48 ->   20 x  20 x 272 0.010 BF
  82 conv    272/ 272  3 x 3/ 2     20 x  20 x 272 ->   10 x  10 x 272 0.000 BF
  83 conv     96       1 x 1/ 1     10 x  10 x 272 ->   10 x  10 x  96 0.005 BF
  84 conv    448       1 x 1/ 1     10 x  10 x  96 ->   10 x  10 x 448 0.009 BF
  85 conv    448/ 448  3 x 3/ 1     10 x  10 x 448 ->   10 x  10 x 448 0.001 BF
  86 conv     96       1 x 1/ 1     10 x  10 x 448 ->   10 x  10 x  96 0.009 BF
  87 dropout    p = 0.200        9600  ->   9600
  88 Shortcut Layer: 83,  wt = 0, wn = 0, outputs:  10 x  10 x  96 0.000 BF
  89 conv    448       1 x 1/ 1     10 x  10 x  96 ->   10 x  10 x 448 0.009 BF
  90 conv    448/ 448  3 x 3/ 1     10 x  10 x 448 ->   10 x  10 x 448 0.001 BF
  91 conv     96       1 x 1/ 1     10 x  10 x 448 ->   10 x  10 x  96 0.009 BF
  92 dropout    p = 0.200        9600  ->   9600
  93 Shortcut Layer: 88,  wt = 0, wn = 0, outputs:  10 x  10 x  96 0.000 BF
  94 conv    448       1 x 1/ 1     10 x  10 x  96 ->   10 x  10 x 448 0.009 BF
  95 conv    448/ 448  3 x 3/ 1     10 x  10 x 448 ->   10 x  10 x 448 0.001 BF
  96 conv     96       1 x 1/ 1     10 x  10 x 448 ->   10 x  10 x  96 0.009 BF
  97 dropout    p = 0.200        9600  ->   9600
  98 Shortcut Layer: 93,  wt = 0, wn = 0, outputs:  10 x  10 x  96 0.000 BF
  99 conv    448       1 x 1/ 1     10 x  10 x  96 ->   10 x  10 x 448 0.009 BF
 100 conv    448/ 448  3 x 3/ 1     10 x  10 x 448 ->   10 x  10 x 448 0.001 BF
 101 conv     96       1 x 1/ 1     10 x  10 x 448 ->   10 x  10 x  96 0.009 BF
 102 dropout    p = 0.200        9600  ->   9600
 103 Shortcut Layer: 98,  wt = 0, wn = 0, outputs:  10 x  10 x  96 0.000 BF
 104 conv    448       1 x 1/ 1     10 x  10 x  96 ->   10 x  10 x 448 0.009 BF
 105 conv    448/ 448  3 x 3/ 1     10 x  10 x 448 ->   10 x  10 x 448 0.001 BF
 106 conv     96       1 x 1/ 1     10 x  10 x 448 ->   10 x  10 x  96 0.009 BF
 107 dropout    p = 0.200        9600  ->   9600
 108 Shortcut Layer: 103,  wt = 0, wn = 0, outputs:  10 x  10 x  96 0.000 BF
 109 conv     96       1 x 1/ 1     10 x  10 x  96 ->   10 x  10 x  96 0.002 BF
 110 conv     96/  96  5 x 5/ 1     10 x  10 x  96 ->   10 x  10 x  96 0.000 BF
 111 conv    128       1 x 1/ 1     10 x  10 x  96 ->   10 x  10 x 128 0.002 BF
 112 conv    128/ 128  5 x 5/ 1     10 x  10 x 128 ->   10 x  10 x 128 0.001 BF
 113 conv    128       1 x 1/ 1     10 x  10 x 128 ->   10 x  10 x 128 0.003 BF
 114 conv    255       1 x 1/ 1     10 x  10 x 128 ->   10 x  10 x 255 0.007 BF
 115 yolo
[yolo] params: iou loss: ciou (4), iou_norm: 0.07, obj_norm: 1.00, cls_norm: 1.00, delta_norm: 1.00, scale_x_y: 1.00
nms_kind: greedynms (1), beta = 0.600000
 116 route  109                                            ->   10 x  10 x  96
 117 upsample                 2x    10 x  10 x  96 ->   20 x  20 x  96
 118 route  117 81                                 ->   20 x  20 x 368
 119 conv     96       1 x 1/ 1     20 x  20 x 368 ->   20 x  20 x  96 0.028 BF
 120 conv     96/  96  5 x 5/ 1     20 x  20 x  96 ->   20 x  20 x  96 0.002 BF
 121 conv     96       1 x 1/ 1     20 x  20 x  96 ->   20 x  20 x  96 0.007 BF
 122 conv     96/  96  5 x 5/ 1     20 x  20 x  96 ->   20 x  20 x  96 0.002 BF
 123 conv     96       1 x 1/ 1     20 x  20 x  96 ->   20 x  20 x  96 0.007 BF
 124 conv    255       1 x 1/ 1     20 x  20 x  96 ->   20 x  20 x 255 0.020 BF
 125 yolo
[yolo] params: iou loss: ciou (4), iou_norm: 0.07, obj_norm: 1.00, cls_norm: 1.00, delta_norm: 1.00, scale_x_y: 1.00
nms_kind: greedynms (1), beta = 0.600000
Total BFLOPS 0.721
avg_outputs = 126346
 Allocate additional workspace_size = 2.58 MB
Loading weights from ./cfg/yolo-fastest-xl.weights...
 seen 64, trained: 18627 K-images (291 Kilo-batches_64)
Done! Loaded 126 layers from weights-file
 Detection layer: 115 - type = 28
 Detection layer: 125 - type = 28
./data/3.jpg: Predicted in 332.995000 milli-seconds.
cat: 97%
4.3 网络结构分析
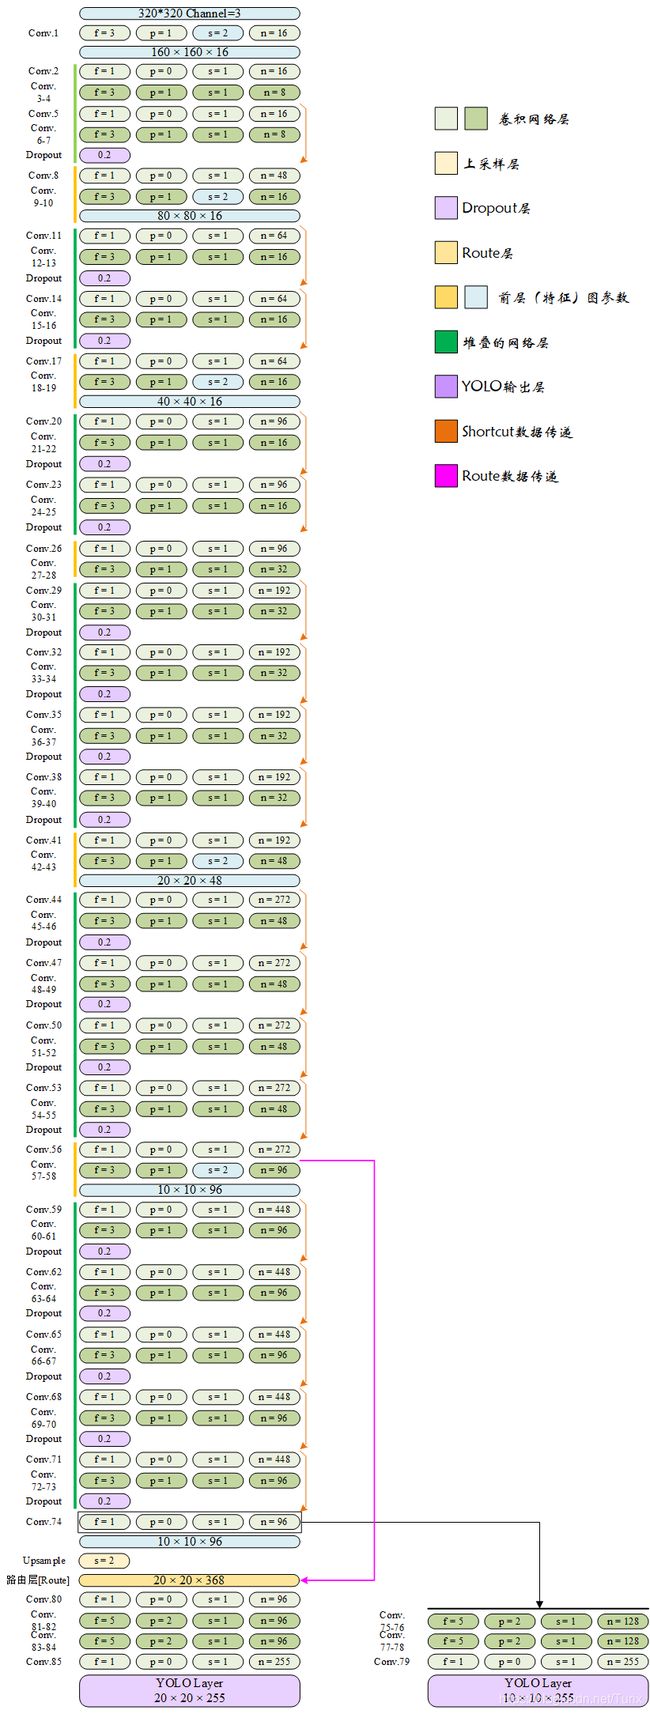
与YOLOv4/YOLOv5不同,YOLO-Fastest仅使用了YOLOv3中的基本网络层,即卷积层、上采样层和YOLO层,所不同的是在每段瓶颈结构末尾增加了概率为0.2的Dropout层以降低过拟合。
4.3.1 YOLO-Fastest1.0-XL网络结构
[注意]
这里仅表示了每层的卷积层参数,实际上每个网络层由卷积层、BN和激活函数组成。
4.3.2 网络对深度可分离卷积的使用
乍看上去,形如“ 1 × 1 1×1 1×1卷积->卷积-> 1 × 1 1×1 1×1卷积”并具有短连接的结构堆叠有些像ResNet中的残差模块,但这里的卷积并非普通卷积层。
网络结构中卷积层使用的g参数表示group分组数量,分组卷积的默认group参数为1,当group参数和输出n参数相等时,配合后级 1 × 1 1×1 1×1网络层实现了深度可分离卷积。深度可分离卷积的概念在MobileNet系列网络中被提出,它相比于普通卷积可大幅降低参数数量,但有分析认为它会增加训练时长、减少推理时长。
将上图中所有分组卷积层和其后的 1 × 1 1×1 1×1卷积层替换为普通卷积层,则网络结构如下图所示:
4.3.3 网络对 1 × 1 1×1 1×1卷积的使用
观察上图的网络结构发现,在骨干网络中,每 3 × 3 3×3 3×3网络层之前都被放置了一层 1 × 1 1×1 1×1卷积,且对于大多数网络层,其前级 1 × 1 1×1 1×1网络的输出维数是本层的数倍。 1 × 1 1×1 1×1卷积的概念在GoogLeNet系列网络中被提出,最开始使用在Inception结构内,用于控制网络数据传递时对来自不同大小感受野的特征图信息的数据深度。据此可以看出,网络中的 1 × 1 1×1 1×1卷积主要用于数据升维,即增加卷积输出的数据深度。这里的网络相当于手动选择了传递过程中的感受野大小(即上图中被恢复为普通卷积的 3 × 3 3×3 3×3卷积核大小)。
4.3.4 网络对短连接(Shortcut)的使用
骨干网络(Conv.1~Conv.73)中,用于升维的 1 × 1 1×1 1×1卷积的输入/输出维数及其倍数如下表:
| 卷积层号 | 输入维数 | 输出维数 | 升维倍数(输出/输入) | 所在短连接跨接单元数 |
|---|---|---|---|---|
| Conv.2 | 16 | 16 | 1 | 0 |
| Conv.5 | 8 | 16 | 2 | 1 |
| Conv.8 | 8 | 48 | 6 | 0 |
| Conv.11/14/17 | 16 | 64 | 4 | 2-0 |
| Conv.20/23/26 | 16 | 96 | 6 | 2-0 |
| Conv.29/32/35/38/41 | 32 | 192 | 6 | 4-0 |
| Conv.44/47/50/53/56 | 48 | 272 | 5.6666 | 4-0 |
| Conv.59/62/65/68/71 | 96 | 448 | 4.6666 | 5 |
[说明]
上表仅用于个人分析时做的笔记,未考虑阅读便利。
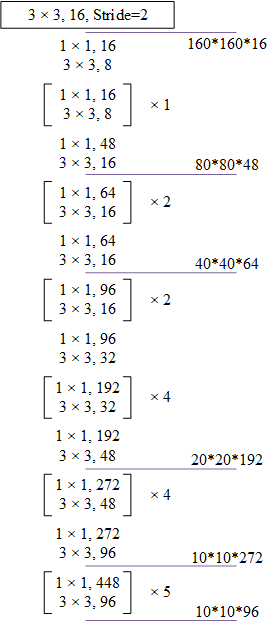
仿照ResNet论文中对网络结构的描述格式,并将深度可分离卷积的实现改写为普通卷积,则骨干网络示意如下图所示:
其中,中括号括起的单元前后有短连接合并特征;涉及到下采样的卷积层的卷积步长为2;路由层引用的 20 × 20 × 272 20×20×272 20×20×272特征图并不被算在短连接的范畴内。
[补充]
根据上图所示网络,是否可以这样猜想:中间未做下采样的卷积层仅仅是因为作者发现其效果并不理想才单独空出的呢?
4.4 损失函数
YOLO-Fastest使用的损失函数与YOLOv4相同,即在YOLOv3损失函数的基础上将 x , y , ω , h x, y, \omega, h x,y,ω,h的坐标损失从交叉熵/MSE损失换成了CIoU损失。置信度与分类损失没有变化。有关的设置为网络配置文件末尾处的 iou_loss=ciou 及相关参数。
Distance-IoU/Complete-IoU在论文《[1911]Distance-IoU Loss: Faster and Better Learning for Bounding Box Regression》中被提出,论文中给出了DIoU/CIoU的设计过程和选择理由,网上绝大部分资料是基于该论文翻译,因此对于其本身这里不再赘述,仅将公式重写如下(以方便摘抄):
L D I o U = 1 − I o U + ρ 2 ( b , b G T ) c 2 {\Large L_{DIoU} = 1 - IoU + \frac{\rho ^{2}(\mathbf{b}, \mathbf{b}^{GT} ) }{c^{2} } } LDIoU=1−IoU+c2ρ2(b,bGT)
L C I o U = 1 − I o U + ρ 2 ( b , b G T ) c 2 + α v {\Large L_{CIoU} = 1 - IoU + \frac{\rho ^{2}(\mathbf{b}, \mathbf{b}^{GT} ) }{c^{2} } + \alpha v } LCIoU=1−IoU+c2ρ2(b,bGT)+αv
v = 4 π 2 ( arctan w G T h G T − arctan w h ) 2 {\Large v = \frac{4}{\pi ^{2} } (\arctan \frac{w^{GT}}{h^{GT}} - \arctan \frac{w}{h})^{2} } v=π24(arctanhGTwGT−arctanhw)2
α = v ( 1 − I o U ) + v ′ {\Large \alpha = \frac{v}{(1 - IoU) + v^{'} } } α=(1−IoU)+v′v
[说明]
源码中的ciou损失计算可参考以下代码路径:
main -> run_detector -> train_detector -> parse_network_cfg -> parse_network_cfg_custom -> parse_yolo -> make_yolo_layer -> forward_yolo_layer -> process_batch -> delta_yolo_box -> box_ciou
[补充]
查看源码实现,在 ··· -> forward_yolo_layer -> process_batch 函数中追踪有关ciou的损失计算时发现,虽然代码确实计算了diou和ciou损失,但这两个损失最终似乎并未合并到总的损失变量中,而仅仅作为局部变量随线程的结束被释放了。更详细的情况还需要进行训练才能确认。
4.5 网络在VOC上的训练
本节将尝试使用标准的VOC2007+VOC2012联合数据集在预训练权重上训练模型。跑通该流程的目的有几方面:
- 验证Darknet网络训练/验证/预测可用性
- 使用预训练网络模型进行迁移学习的步骤
- 直观了解训练要点、速度和流程
4.5.1 制作可用于YOLO网络训练的VOC数据集
VOC数据集在互联网上有公开资源,前面的章节中也提供了下载链接,方便起见这里再次列出。我们只需要数据集中的图像文件夹和XML标注文件夹即可。
[补充]
VOC数据集下载链接:
- VOC2007-TrainVal
- VOC2007-Test
- VOC2012
- 下载好的数据集原件已经放在随文资源中。
将图片放在 voc-images 目录下,将XML标注文件放在同路径下的 voc-annotations 目录下。转换通过下面的脚本完成:
[说明]
转换脚本参考Darknet工程目录下的 scripts/voc_label.py 脚本编写。
# ----------------------------------------------------------------------
# VOC数据集处理流程
# 处理涉及到的几个文件(夹)为:
#     voc-images      存放数据集图片文件的目录
#     voc-annotations 存放原始VOC格式标注文件的目录
#     voc-labels      存放最终YOLO格式标注文件的目录
#     voc.names       按行存放的VOC分类标签名
# 当前脚本工作在与以上各项相同的路径下。
# ----------------------------------------------------------------------
import os
import xml.etree.ElementTree as ET

# --------------------------------------------------
# 全局变量设置和初始化操作
# --------------------------------------------------
picture_directory     = 'voc-images'
annotations_directory = 'voc-annotations'
labels_directory      = 'voc-labels'
list_file_name        = 'voc-list-all.txt'         # 最终生成的全部图片清单文件
prefix                = 'data/ALLIMGS/voc-images/' # 在图像清单中每文件名前增加的前缀(由最终训练时数据集位置确定)
names_file_name       = 'voc.names'

current_path = os.getcwd()
print("Current work directory is " + current_path)
print("Enumerate files in ./" + picture_directory)
picture_list = os.listdir(current_path + '\\' + picture_directory) # 获取目标目录下的图片文件列表
annotations_list  = os.listdir(current_path + '\\' + annotations_directory)  # 获取目标目录下的标注文件列表

# --------------------------------------------------
# 生成图像列表
#     该步骤统计数据集图片目录下的所有图片,支持的
# 后缀名见程序。
# --------------------------------------------------
file_cnt = 0
print("\nEnumerate image files ...")
for file_name in picture_list:
    if file_name[-4:] in ['.jpg', '.png', '.bmp', '.JPG', 'PNG', '.BMP']:
        file_cnt += 1
    elif file_name[-5:] in ['.jpeg', '.JPEG']:
        file_cnt += 1
    else:
        print("Ignored file: " + file_name)
        picture_list.remove(file_name)
print("A total of " , file_cnt , " files were counted.")

# --------------------------------------------------
# 图片-标注匹配与清理
#     该步骤从列表中剔除不存在对应XML文件的项。
# --------------------------------------------------
single_file_cnt = 0
print("\nCheck if picture-label matches ...")
for picture_file in picture_list:
    partner_xml_file_name = os.path.splitext(picture_file)[0] + '.xml'
    if partner_xml_file_name not in annotations_list:
        print("Ignored single picture file: " + picture_file)
        single_file_cnt += 1
        picture_list.remove(picture_file)
print("There are a total of ", single_file_cnt, " files without matching XML files.")
print("A total of ", file_cnt - single_file_cnt, " items are written to the file.")

# --------------------------------------------------
# 保存有效图片列表到文件
# --------------------------------------------------
print("\nSave picture list to file ...")
list_file = open(current_path + '\\' + list_file_name, 'w')
for picture_file in picture_list:
    list_file.write(prefix + picture_file + "\n")
list_file.close()
print("The file list is output to " + list_file_name)

# --------------------------------------------------
# 以图片文件名为基准,取XML文件并进行格式转换
# 仅转换.names文件中存在的分类
# --------------------------------------------------
print("\nStart converting the XML file ...")
classes_names_num = 0
names_file = open(names_file_name)
classes_names_list = names_file.read().splitlines()       # 从.names文件中获取分类名
names_file.close()
classes_names_num = len(classes_names_list)               # 获取.names文件中给出的分类总数
print("There are a total of ", classes_names_num, " classification categories in *.names file.")
classes_count_list = [0] * classes_names_num              # 统计各分类所在图片数量

def convert_box(pic_width, pic_height, box):
    dw = 1./pic_width
    dh = 1./pic_height
    x = (box[0] + box[1])/2.0 - 1
    y = (box[2] + box[3])/2.0 - 1
    w = box[1] - box[0]
    h = box[3] - box[2]
    x = x*dw
    w = w*dw
    y = y*dh
    h = h*dh
    return (x,y,w,h)

def convert_xml2txt(xml_file_pos, txt_file_pos):
    # 打开文件
    xml_file   = open(xml_file_pos, 'r')
    txt_file   = open(txt_file_pos, 'w')
    # 获取图像中整体信息
    xml_tree   = ET.parse(xml_file, parser=None)
    xml_root   = xml_tree.getroot()
    pic_size   = xml_root.find('size')
    pic_width  = int(pic_size.find('width').text)
    pic_height = int(pic_size.find('height').text)
    # 获取标注目标信息并转换
    for obj in xml_root.iter('object'):
        difficult = obj.find('difficult').text
        obj_class = obj.find('name').text
        if int(difficult)==1:
            print("[   Difficult  ]Ignored pic[%s]-class[%s]" % (os.path.basename(xml_file_pos), obj_class))
            continue
        if obj_class not in classes_names_list:
            print("[Out of classes]Ignored pic[%s]-class[%s]" % (os.path.basename(xml_file_pos), obj_class))
            continue
        class_id = classes_names_list.index(obj_class) # 获取索引值
        classes_count_list[class_id] += 1 # 分类数统计
        obj_box = obj.find('bndbox')
        box = (float(obj_box.find('xmin').text), \
               float(obj_box.find('xmax').text), \
               float(obj_box.find('ymin').text), \
               float(obj_box.find('ymax').text))
        bb = convert_box(pic_width, pic_height, box)
        txt_file.write(str(class_id) + " " + " ".join([str(a) for a in bb]) + '\n')
    # 关闭文件
    xml_file.close()
    txt_file.close()

for picture_file in picture_list:
    partner_xml_file_name = os.path.splitext(picture_file)[0] + '.xml'
    partner_txt_file_name = os.path.splitext(picture_file)[0] + '.txt'
    xml_file_pos = current_path + '\\' + annotations_directory + '\\' + partner_xml_file_name
    txt_file_pos = current_path + '\\' + labels_directory + '\\' + partner_txt_file_name

    convert_xml2txt(xml_file_pos, txt_file_pos)

print("Conversion complete.")

# --------------------------------------------------
# 打印各分类统计信息
# --------------------------------------------------
print("\nNumber of categories:")
for class_id in range(classes_names_num):
    print(classes_names_list[class_id] + "\t" + str(classes_count_list[class_id]))

print("\nAll operations have been completed.")
脚本中执行了以下操作:
-
获取 voc-images 目录下的文件列表,对文件格式进行筛选,剔除掉非图片后缀名的文件;
-
将上一步得到的图片列表与 voc-annotations 目录下的XML标注文件列表进行对比,剔除掉没有对应标注文件的单一图片文件;
-
保存得到的全部可转换图片列表;
-
枚举上一步得到的图片列表,对对应XML文件进行转换,并将结果存放到 voc-labels 目录下。在此过程中:
-
仅转换 .names 文件中给出的分类的标注。若出现 .names 文件以外的分类,则略过并打印提示信息;
-
忽略掉具有 difficult 标记的标注信息;
-
仅将VOC格式标注转为YOLO格式标注。
[说明]
YOLO格式即将目标边框的左上-右下坐标点变换为YOLO所需的 ( x , y ) (x, y) (x,y)中心坐标和 w , h w, h w,h宽高,以便损失函数处理时直接比对计算,节省了训练时间。
新版的LabelImg工具已经提供了直接输出YOLO格式的标注信息,制作自定义数据集时可选用这种方法。
-
打印的各分类统计数量为:
aeroplane       911
bicycle 		753
bird  			1169
boat    		902
bottle  		1329
bus     		638
car     		2105
cat     		1266
chair   		2443
cow     		642
diningtable     635
dog     		1571
horse   		760
motorbike       763
person  		15753 ----------最多
pottedplant     1055
sheep   		878
sofa    		592   ----------最少
train   		672
tvmonitor       839
而后使用以下脚本对数据集进行划分,以生成训练集和验证集:
import os
import random

list_file_name        = 'voc-list-all.txt'         # 最终生成的全部图片清单文件
train_list_file_name  = 'voc_train.txt'
valid_list_file_name  = 'voc_test.txt'
valid_set_ratio       = 0.2                        # 验证集占全部图片的比例,用于分割数据集

current_path = os.getcwd()
print("Current work directory is " + current_path)

# --------------------------------------------------
# 将图片列表随机分为训练集和验证集两个文件
#     将picture_list列表随机分为两份,分别存放在不同
# 的文件中作为训练集和验证集。
# --------------------------------------------------
print("\nSplitting dataset ...")
list_file = open(current_path + '\\' + list_file_name, 'r')
picture_list = list_file.read().splitlines() # 从list文件中获取有效图片列表(带有prefix自定义前缀)
list_file.close()

# 随机分割数据集
valid_set = random.sample(picture_list, int(valid_set_ratio * len(picture_list)))
train_set = list(set(picture_list) - set(valid_set))
print("Total:%d Ratio:%f Train:%d Valid:%d\n" % (len(picture_list), valid_set_ratio, len(train_set), len(valid_set)))

# 保存训练集列表到文件
train_list_file = open(current_path + '\\' + train_list_file_name, 'w')
for tmp in train_set:
    train_list_file.write(tmp + '\n')
train_list_file.close()
print("The train set list is output to " + train_list_file_name)

# 保存验证集列表到文件
valid_list_file = open(current_path + '\\' + valid_list_file_name, 'w')
for tmp in valid_set:
    valid_list_file.write(tmp + '\n')
valid_list_file.close()

print("The valid set list is output to " + valid_list_file_name)

print("\nAll operations have been completed.")
4.5.2 数据集和标注文件的存放位置
查看后文中的训练命令和配置文件可知,训练集和验证集的位置通过 .data 文件中的train和valid字段指定,指定的文件中给出了数据集中每张图片的路径,但并没有设置标注文件的位置。实际上,查看Darknet源码可知,Darknet训练过程中会搜索图片所在路径中的指定字段并将其替换为标注文件所在路径。
[注意]
这里的示例仅用作说明,具体目录字段替换操作与设置有关。
在本文使用的工程中,遵循前文的步骤,修改 src/utils.c 中 replace_image_to_label 函数中部分内容如下:
void replace_image_to_label(const char* input_path, char* output_path)
{
    ...
+   find_replace(input_path, "wit-images", "wit-labels", output_path);
+   find_replace(input_path, "voc-images", "voc-labels", output_path);

    ...
}
该函数决定了对于某一训练图片,应当到同目录下哪个文件夹中查找对应的标注文件。例如当前设置表示:VOC数据集中的图像存放在 voc-images 目录中,对其中每张图像的同名标注文件存放在同级目录下的 voc-labels 目录中;自定义数据集中的图像存放在 wit-images 目录中,对其中每张图像的同名标注文件存放在同级目录下的 wit-labels 目录中。训练过程中Darknet会提取当前的图像文件路径,替换掉其中的对应字段以构造标注文件路径。
修改完之后重新编译Darknet即可。
[说明]
你可以仿照着自定义自己的替换选项,上文给出的仅为示例。
4.5.3 配置&前期准备
(1)训练数据准备
训练开始之前,应当准备好以下文件(夹):
-
数据集图片文件夹 voc-images ;
-
YOLO格式的标注文件夹 voc-labels ;
-
分类标签文件 voc.names ;
-
训练集列表文件 voc_train.txt ;
-
验证集列表文件 voc_test.txt;
-
训练数据配置文件 voc.data ;
# 该文件中的内容需根据实际位置进行修改
classes = 20
train   = PATH_TO_FILE/voc_train.txt
valid   = PATH_TO_FILE/voc_test.txt
names   = PATH_TO_FILE/voc.names
backup  = ./models/backup/
(2)网络结构修改
修改网络配置的cfg文件,主要包括:
-
修改YOLO网络层分类数为20,因为VOC数据集是20分类的。分类数目不包括空白背景;
-
修改YOLO的前级卷积网络层输出,改为 3 × ( 4 + 1 + c l a s s e s ) 3×(4+1+classes) 3×(4+1+classes) 。其中的 c l a s s e s classes classes即为上一条中的分类数;
-
修改anchors先验框尺寸;
使用K-均值聚类方法获取先验框的讲解和例程可参考:K-means聚类生成Anchor box_知乎专栏
[说明]
本节中网络训练使用的先验框为工程中默认的配置,未针对VOC数据集做修改。
-
学习率的调整;
[说明]
学习率在初始训练时应调的高一些,后期逐渐降低。学习率的设置与batch大小也有关系。
-
调整batch大小为显卡所能带动的较大值,一般取2的指数次方。
(3)获取预训练权重
使用以下命令获取预训练权重:
PATH_TO_FILE/darknet.exe partial ./cfg/yolo-fastest-xl.cfg ./models/yolo-fastest-xl.weights ./models/yolo-fastest-xl_conv.109 109
网络将获取前109层的权重并将其保存到 ./models/yolo-fastest-xl_conv.109 。
(4)网络训练
执行以下命令在预训练权重上执行训练:
cd /d PATH_TO_DIRECTORY
PATH_TO_FILE/darknet.exe detector train ./data/ALLIMGS/voc.data ./cfg/yolo-fastest-xl.cfg ./models/yolo-fastest-xl_conv.109 models/backup/
[说明]
我将最终编译出的Darknet、依赖库、配置和数据集存放在了单独的文件夹中以便更换训练平台,因此上面的命令中的路径需读者依照实际进行修改。
训练过程中Darknet将实时展示Loss的变化如下图所示:
Darknet会每隔100次iters更新指定的目录下的权重备份文件;每隔10000次iters保存阶段性权重,从这些权重可接续进行训练:
cd /d PATH_TO_DIRECTORY
PATH_TO_FILE/darknet.exe detector train ./data/ALLIMGS/voc.data ./cfg/yolo-fastest-xl.cfg ./models/backup/yolo-fastest-xl_last.weights models/backup/
上述训练过程的权重已保存到随文资源中。
[补充]
若希望在原有预训练权重上重新训练,需要在训练命令中使用 -clear 参数清除迭代次数记录等信息。
相关代码路径见main -> run_detector -> train_detector ,追踪clear参数。
(5)网络测试
此时,让网络预测图片以查看训练效果:
cd /d PATH_TO_DIRECTORY
PATH_TO_FILE/darknet.exe detector test ./data/ALLIMGS/voc.data ./cfg/yolo-fastest-xl.cfg ./models/backup/yolo-fastest-xl_last.weights ./data/ALLIMGS/voc-images/2008_007404.jpg -thresh 0.25
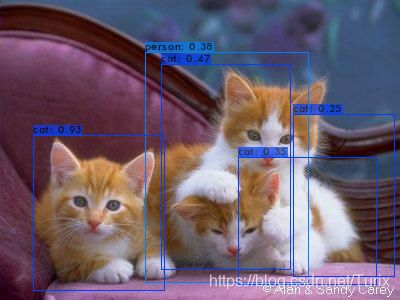
由此可见网络的参数还不是最优,对目标定位不够准确,对边界框的回归不够精确,目标分类存在错误。但无论怎样,使用Darknet训练YOLO-Fastest网络的流程已经清晰了。
4.6 YOLO-Fastest不同版本的网络结构
前面的示例均是基于 ModelZoo/yolo-fastest-1.0_coco/yolo-fastest-xl* 进行的,但 ModelZoo 文件夹下并不只提供了这一种网络结构,不同版本的YOLO-Fastest网络结构之间有什么差异呢?
4.6.1 YOLO-Fastest1.0网络结构
首先看一下相同版本下的 ModelZoo/yolo-fastest-1.0_coco/yolo-fastest.cfg ,与前文统一风格绘制网络的大意结构。为了方便对比,这里依旧将深度可分离卷积恢复为普通卷积,以便观察网络的整体结构。
通过对比可以看出, YOLO-Fastest1.0 和 YOLO-Fastest1.0-XL 相比仅骨干网络各层输出张量缩减了一半、Dropout层随机丢弃权重的概率稍有不同。除此之外其它部分是完全一致的。使用该网络预训练权重检测同一目标的效果如下:
4.6.2 YOLO-Fastest1.1网络结构
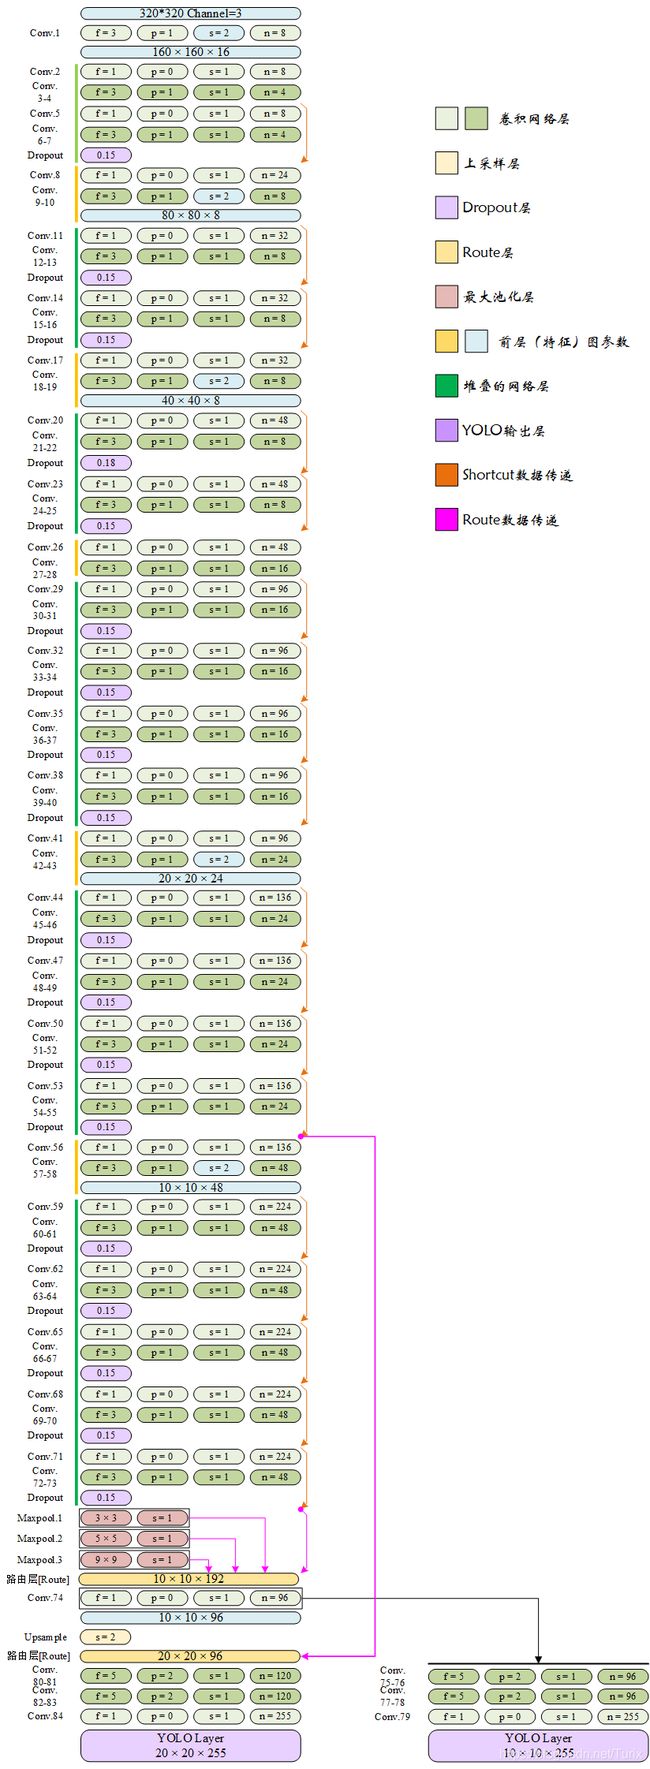
查看 ModelZoo/yolo-fastest-1.1_coco/yolo-fastest-1.1.cfg ,与前文统一风格绘制网络的大意结构。为了方便对比,这里依旧将深度可分离卷积恢复为普通卷积,以便观察网络的整体结构。
YOLO-Fastest1.1网络结构在YOLO-Fastest1.0网络的基础上未对骨干网络做任何改动,但在骨干网络输出末尾增加了并行的3个最大池化层。此外细节上的差异主要为检测网络宽度和结构删减;以及末层路由层数据来源的微调。使用该网络预训练权重检测同一目标的效果如下:
4.6.3 YOLO-Fastest1.1-XL网络结构
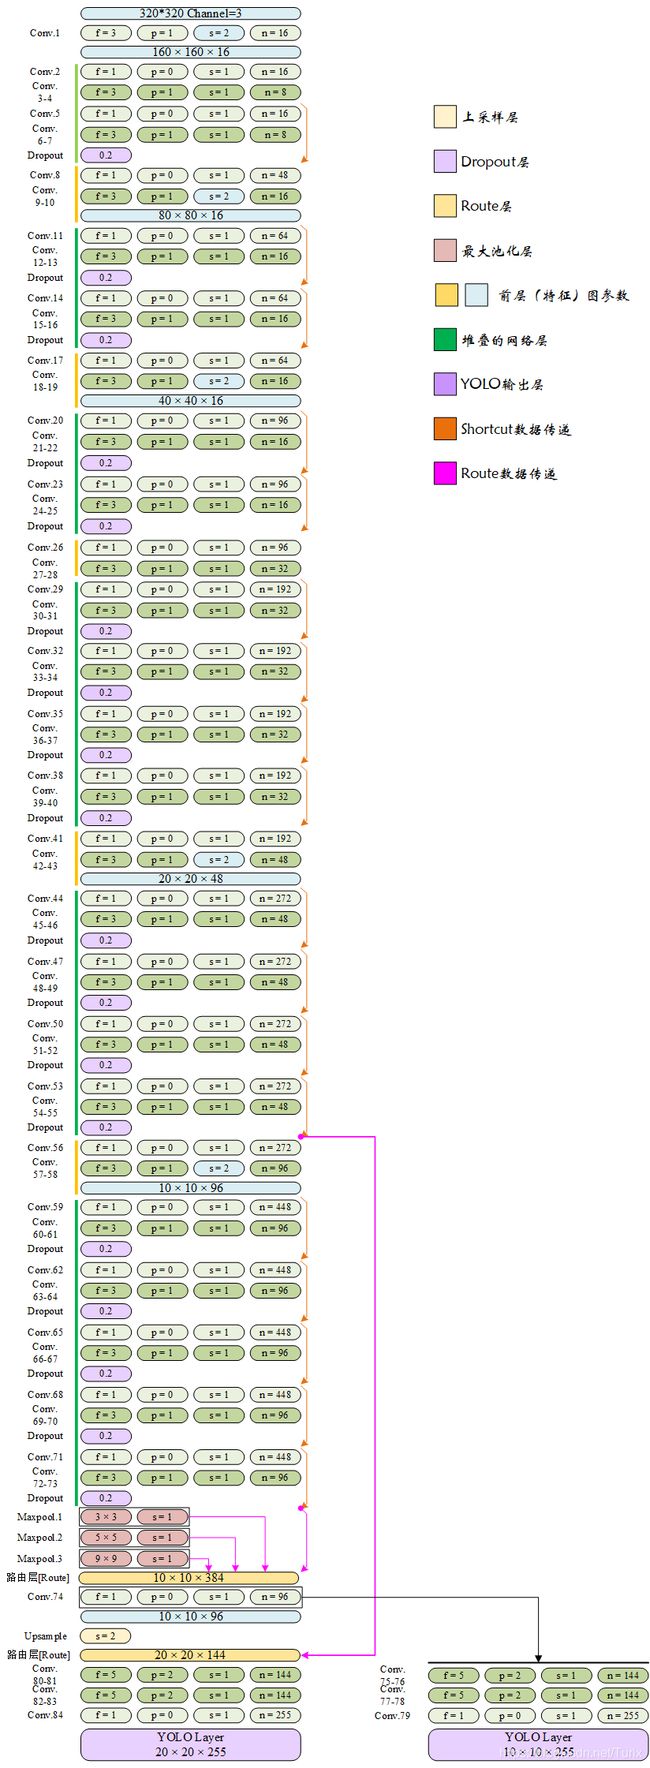
查看 ModelZoo/yolo-fastest-1.1_coco/yolo-fastest-1.1-xl.cfg ,与前文统一风格绘制网络的大意结构。为了方便对比,这里依旧将深度可分离卷积恢复为普通卷积,以便观察网络的整体结构。
YOLO-Fastest1.1-XL网络相当于结合了YOLO-Fastest1.0-XL的骨干网络和YOLO-Fastest1.1的最大池化机制,论细节的话除了末层路由层的数据来源和检测网络结构外,就是将YOLO-Fastest1.1的检测网络又加宽了一点点而已。使用该网络预训练权重检测同一目标的效果如下:
5 部署
本章将尝试对前面章节中使用的YOLO-Fastest1.0-XL网络模型进行转换并部署到海思NNIE上,考虑到各章节之间的解耦,这里将以工程提供的预训练权重进行叙述,读者也可以直接使用预训练权重开始本章的尝试。由于预训练权重是在COCO数据集上得到的,其分类数依然为80,故大部分操作可直接复用SVP-NNIE例程中针对YOLOv3的处理逻辑。
5.1 网络模型的转化
5.1.1 从Darknet到Caffemodel
从Darknet框架训练得到的权重文件转换到对应的Caffemodel需要使用Darknet2Caffe工具,该工具是前辈基于Python2.7编写的,它需要依赖Pytorch和支持待转换网络层的PyCaffe。可惜的是,目前在Windows环境下支持Python2.7的Pytorch包已经很难寻找了,但在Linux环境下的却依然容易获得,因此使用该工具的方法主要有两个:
-
搭建Linux环境(虚拟机或双系统),并安装对应的包环境以运行转换脚本;
-
修改转换脚本使其支持Python3的语法,在Anaconda中新建包含Python3、Pytorch和PyCaffe的环境以运行转换脚本。
[说明]
本节遵循前文,使用Python3.5.4。
需要注意的是,无论选用上述哪种方式都需要编译Caffe,因此遵循前面章节的积累和铺垫以及全文操作的一致性,这里使用第二种方法在Windows下搭建模型转换工具的运行环境。
(1)编译CPU版PyCaffe
PyCaffe的编译依旧可参考 3.1 Caffe平台的搭建 章节,需要注意的有以下几点:
-
模型转换不需要使用GPU接口,可在 build_win.cmd 脚本中开启 CPU_ONLY 编译指示,并无需配置 CUDNN_ROOT CMAKE变量;
[说明]
若此处使用GPU版本的Caffe,可能需配合GPU版本Pytorch或修改转换脚本对Caffe的设置,本节为减少麻烦和节约编译时间仅使用CPU版本的Caffe,GPU版本的环境未做尝试。
-
需要开启Python接口支持,Python版本和路径应设置为与Anaconda环境相同的路径;
-
可关闭NCCL;
-
在生成工程之前需要先添加对Upsample层的支持,具体操作可参考 3.4.1 (Upsample)网络层的添加 章节;
-
在VS解决方案中仅需编译 caffe 工程和 pycaffe 工程即可。
(2)搭建用于模型转换的Anaconda环境
Anaconda环境的建立依旧可参考 3.1 Caffe平台的搭建 章节,只是需要拷贝的PyCaffe包变为了我们刚刚编译得到的CPU版PyCaffe,而后使用以下命令安装Pytorch-CPU版:
conda install pytorch cpuonly -c pytorch
在环境的命令行中进入Python,通过对 caffe 和 torch 包的导入操作是否成功可判断环境是否正确搭建。
(3)修改转换脚本使之支持Python3语法
[说明]
本节部分修改操作参考:记录一下将yolov3模型移植到海思H35系列芯片的步骤_CSDN
下载转换脚本,转换脚本包括 darknet2caffe.py 、prototxt.py 和 cfg.py 三个文件,将三个文件放入同一目录下。
对 darknet2caffe.py 内容进行如下修改:
-
修改全文中形如:
if block.has_key('name'):的语句,修改为以下形式:
if 'name' in block: -
修改176行:
- convolution_param['pad'] = str(int(convolution_param['kernel_size']) / 2) + convolution_param['pad'] = str(int(int(convolution_param['kernel_size']) / 2)) -
修改276、349、350行缩进问题。
对 prototxt.py 内容进行如下修改:
-
修改全文中形如:
if block.has_key(key):的语句,修改为以下形式:
if key in block: -
查找全文两处定义的 print_block 嵌套函数,进行如下替换(替换时注意保持缩进不变):
- def print_block(block_info, prefix, indent): - blanks = ''.join([' ']*indent) - print('%s%s {' % (blanks, prefix)) - for key,value in block_info.items(): - if type(value) == OrderedDict: - print_block(value, key, indent+4) - elif type(value) == list: - for v in value: - print('%s %s: %s' % (blanks, key, format_value(v))) - else: - print('%s %s: %s' % (blanks, key, format_value(value))) - print('%s}' % blanks) - - props = net_info['props'] - layers = net_info['layers'] - print('name: \"%s\"' % props['name']) - print('input: \"%s\"' % props['input']) - print('input_dim: %s' % props['input_dim'][0]) - print('input_dim: %s' % props['input_dim'][1]) - print('input_dim: %s' % props['input_dim'][2]) - print('input_dim: %s' % props['input_dim'][3]) - print('') + def print_block(block_info, prefix, indent): + blanks = ''.join([' ']*indent) + print('%s%s {' % (blanks, prefix), file=fp) + for key,value in block_info.items(): + if type(value) == OrderedDict: + print_block(value, key, indent+4) + elif type(value) == list: + for v in value: + print('%s %s: %s' % (blanks, key, format_value(v)), file=fp) + else: + print('%s %s: %s' % (blanks, key, format_value(value)), file=fp) + print('%s}' % blanks, file=fp) + + props = net_info['props'] + layers = net_info['layers'] + print('name: \"%s\"' % props['name'], file=fp) + print('input: \"%s\"' % props['input'], file=fp) + print('input_shape {', file=fp) + print(' dim: %s' % props['input_dim'][0], file=fp) + print(' dim: %s' % props['input_dim'][1], file=fp) + print(' dim: %s' % props['input_dim'][2], file=fp) + print(' dim: %s' % props['input_dim'][3], file=fp) + print('}', file=fp) -
修改8、9、14行print语法。
(4)模型转换
将需要转换的 yolo-fastest-xl.cfg 和 yolo-fastest-xl.weights 文件拷贝到与转换脚本同路径下(或手动替换下面命令的文件路径),在Anaconda环境中执行以下命令:
cd /d PATH_TO_DIRECTORY
python darknet2caffe.py yolo-fastest-xl.cfg yolo-fastest-xl.weights yolo-fastest-xl.prototxt yolo-fastest-xl.caffemodel
即可开始转换,转换结束后将在当前目录生成 *.prototxt 和 *.caffemodel 文件。
[补充]
若混用GPU版PyCaffe和CPU版Pytorch,在未在脚本中修改Caffe运行模式的情况下进行转换会提示以下错误:
...
F0522 22:27:28.610594 14660 cudnn_conv_layer.cpp:53] Check failed: status == CUDNN_STATUS_SUCCESS (1 vs. 0)  CUDNN_STATUS_NOT_INITIALIZED
*** Check failure stack trace: ***
针对该错误类型,即便按照网上的某些方法为卷积层和激活层参数提供 engine=CAFFE 配置也无法解决。
[其它补充]
使用该脚本也同样可以转换Darknet-YOLOv3的网络模型。转换后的YOLOv3网络描述文件与海思官方提供的最终描述文件有两种不同:
- Route网络层被使用Concat层代替;
- 删去了转换后生成的单一Concat层。
转换后的Caffemodel文件与海思官方提供的最终权重文件 二进制相同 。
5.1.2 从Caffemodel到wk文件
在Windows环境下,从Caffemodel到wk文件主要使用RuyiStudio工具进行转换,具体的步骤和注意事项可参见海思官方文档《HiSVP 开发指南》和《HiSVP API 参考》。各转换工具之间的关系可参考 2.1 平台/软件介绍和环境搭建 章节;模型文件的加载和网络输出处理可参考 2.3 SVP-NNIE前向计算处理过程 章节进行修改。
[补充]
针对不同的嵌入式硬件,使用的转换工具以及转换后的网络模型格式均不相同,具体操作请参见各平台的官方SDK文档和手册。
[注意]
模型的转换参数设置不当或误操作可能会造成预测精度损失。
5.2 软件功能和结构设计
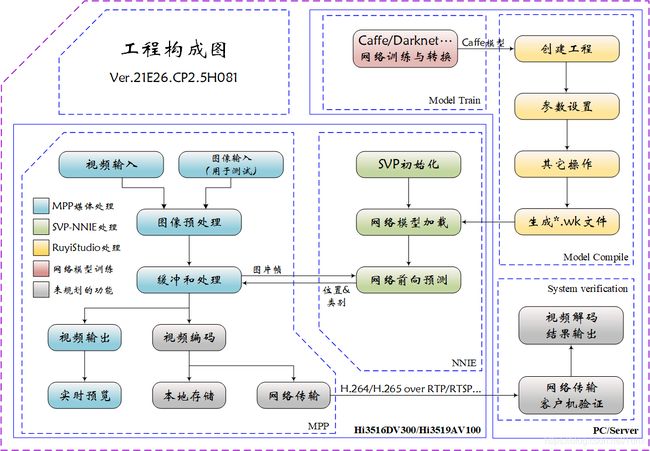
在第2章中,我们已经大略分析了SVP-NNIE例程中使用YOLOv3网络模型进行预测的逻辑结构,YOLO-Fastest同属于YOLO系列,具有相同的YOLO网络层预测输出,因此对YOLO-Fastest的部署可仿照YOLOv3进行,对网络预测的优化步骤也可参考第2章中给出的建议。
下图展示了本文进行部署时的预设计工程构成图,该构成图为不同的目标场景提供了多种可供参考的选项。
5.3 部署事项
5.3.1 将图片转为BGR格式
该操作可借由Python+Numpy+OpenCV完成,代码是参考他人的,如下所示:
import os
import cv2
from numpy import *
import numpy as np

img = "./dog_bike_car_320x320.jpg"
output = "./dog_bike_car_320x320.bgr"

def png2bgr(img, output):
    img_cv2 = cv2.imread(img)
    shape = img_cv2.shape
    print(shape)  # [w, h, 3]

    (B, G, R) = cv2.split(img_cv2)
    with open (output, 'wb') as fp:
        for i in range(320):
            for j in range(320):
                fp.write(B[i, j])
        for i in range(320):
            for j in range(320):
                fp.write(G[i, j])
        for i in range(320):
            for j in range(320):
                fp.write(R[i, j])

    print("done")

png2bgr(img, output)
如此可得到用于单张测试的BGR数据。
5.3.2 RuyiStudio配置
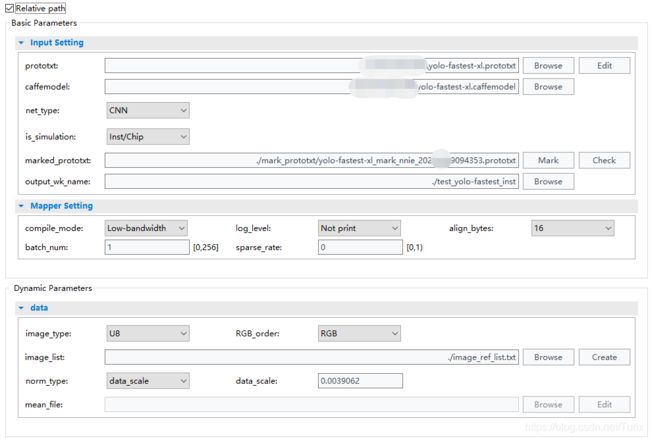
转换YOLO-Fastest1.0-XL的RuyiStudio配置参数如下图所示:
其中 RGB_order 项需选择为 RGB ,而后在程序中向源Blob填充数据时需按照 BGR 填充,以320*320分辨率的 dog_bike_car 示例为例,两者组合后的预测结果如下表所示:
| RGB_order | 源blob填充格式[0:2] | 预测结果 |
|---|---|---|
| RGB | RGB | 0.844133 - Class2 0.780550 - Class17 0.751190 - Class3 |
| RGB | BGR | 0.955817 - Class17 0.907002 - Class2 0.840089 - Class3 |
| BGR | RGB | 0.926960 - Class17 0.910946 - Class2 0.817834 - Class3 |
| BGR | BGR | 0.813307 - Class2 0.775705 - Class17 0.748892 - Class3 |
注:第2类别为bicycle,第3类别为car,第17类别为dog。
从上表可见,RGB_order和填充格式的最佳组合即为 RGB-BGR 。
[注意]
网络的预测结果和Darknet输出概率仍存在不小的差距,造成精度损失一定还有其它原因。
6 相关知识
6.1 准确度/精确率(Precision)、召回率(Recall)和mAP
首先介绍几个名词:TP(True Positive),表示检测为将正类检测为正样本;FP(False Positive),表示将负类检测为正样本;FN(False Negative),表示将正类检测为负样本。(目标检测中,正样本为目标,负样本为背景。在VOC的评测指标中, I O U > 0.5 IOU > 0.5 IOU>0.5被认为是一个正确的边界框预测, I O U ≤ 0.5 IOU ≤ 0.5 IOU≤0.5则被认为是一个错误的预测。)
则精确率的定义为:
P r e c i s i o n = T P T P + F P {\large Precision = \frac{TP}{TP + FP} } Precision=TP+FPTP
表示在所有预测出的正样本中有多少是真正的正类。
召回率的定义为:
P r e c i s i o n = T P T P + F N {\large Precision = \frac{TP}{TP + FN} } Precision=TP+FNTP
表示样本库中所有的正样本中,有多少被检出,为了方便从字面上理解,可以认为召回率是检出率。在信息检索中,精确率对应查准率,召回率对应查全率,但是在目标检测中,我们不这么叫。
在检测任务中,每一个模型预测出的边界框都会伴有一个得分(score),一般而言,得分越高的分类表示识别到的物体对应该类别的可能性越大。为排除得分普遍较低情况下的错误预测,需要对得分设置一个阈值。
对于一个类别,当选择一个较高的阈值时,精确率会提升,因为筛选变的更严格,但会导致一些正确分类被忽略从而可能使召回率(检出率)降低。因此,精确率和召回率之间对应于得分阈值存在一个反比关系。对于一个确定的模型和样本库,我们只需要设置不同的阈值,就能产生不同的精确率和召回率,将这些数据绘制成一个折线图,即为模型在该类别下的P-R曲线图。
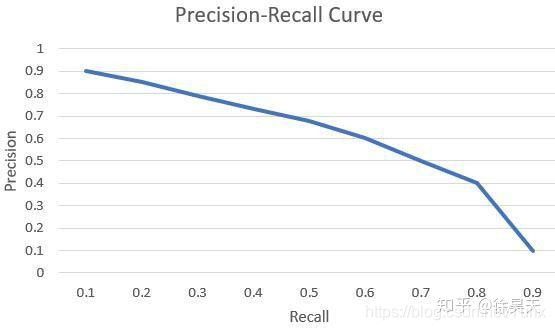
AP(Average Precision,精度均值)为P-R曲线的AUC(Area under Curve,曲线下面积),mAP(mean Average Precision)为所有样本类别AP的平均值,可用于衡量模型的好坏。
6.2 PASCAL VOC
PASCAL视觉目标分类(The PASCAL Visual Object Classes)是一个世界级的计算机视觉挑战赛,主要面向目标检测,从2005年开始举办。
其提供的数据集包含了20类的物体,分别是:
人(person)、鸟(bird)、猫(cat)、牛(cow)、狗(dog)、马(horse)、羊(sheep)、飞机(airplane)、自行车(bicycle)、汽艇(boat)、公交车(bus)、轿车(car)、摩托车(motorbike)、火车(train)、瓶子(bottle)、椅子(chair)餐桌(dining table)、盆栽植物(potted plant)、沙发(sofa)和电视/监视器(tv/monitor)。
VOC数据集标注格式可参考此链接。下面给出了某个文件的标注示例及说明:
<annotation>
	<folder>VOC2012folder>
	<filename>2007_003525.jpgfilename>
	<source>
		<database>The VOC2007 Databasedatabase>
		<annotation>PASCAL VOC2007annotation>
		<image>flickrimage>
	source>
	<size>
		<width>500width>
		<height>375height>
		<depth>3depth>
	size>
	<segmented>1segmented>
	<object>
		<name>catname>
		<pose>Unspecifiedpose>
		<truncated>0truncated>
		<difficult>0difficult>
		<bndbox>
			<xmin>160xmin>
			<ymin>1ymin>
			<xmax>448xmax>
			<ymax>375ymax>
		bndbox>
	object>
annotation>
在这个XML例子中,
7 文章之外
7.1 本文编写过程中使用到的工具
- 在线LaTex公式编辑器:https://www.latexlive.com/
- Netscope:http://ethereon.github.io/netscope/#/editor
- 超神经公开数据集:https://hyper.ai/datasets
后记&祝愿
[说明]
这里没有你期待的知识或总结,只是一些闲言碎语。
说实话,即便是经历了这么长时间的学习,我依旧不是很喜欢深度学习(或者是机器学习,或是AI什么的),因为我在这个领域没有归属感。但我也许已经完成了我应当做的事情——如果你在阅读本文的时候有哪怕一点点的收获的话。
真实的世界是需要人们用情感才能体会到其存在的,但科技不是人,它没有情感,即便你付出了再多的努力,你面对着的始终是冰冷的代码和干瘪的公式。你也许抱着一腔热忱来到这个领域,或者想要凭借“喜欢”在这里坚守一生,就像我当初那样。可这终究是幻想,因为你能理解它,但它不能理解你。
科技为人们筑起了一道围墙,围墙之内没有生机,只有一片荒芜。无论是学术界还是工程界,人们拼尽所有研究出来引以为傲的东西,却无法与大自然的丰富相提并论。既然如此,为什么不一开始就投身到真实存在的世界中呢?因此我非常羡慕搞艺术的人们,比如乐师和画家。艺术是大自然透过眼耳在人心灵中留下的投影,你在赞叹艺术的同时也在欣赏整个世界。但科技不一样,科技最终彰显的只是人们的骄傲。
希望我的读者们,可以在现代社会被楼宇裹挟的生活中得见生机勃勃的自然之美,能够记得书本和屏幕之外还有青树翠蔓、鸟啼虫鸣。希望你们对未知的探索之心、对美好事物的喜欢与爱慕之情以及对人生目标的设定与渴求,都能够放到真实的事物之上。及至最后,希望你的整个人生,都能活得真实。
本文资源共享
百度网盘链接: https://pan.baidu.com/s/1_7TRD9rDUsxgnIGjKYF-UQ
提取码: mhn9
YOLO系列(v1~v3)的学习及YOLO-Fastest在海思平台的部署(上)
YOLO系列(v1~v3)的学习及YOLO-Fastest在海思平台的部署(中)
YOLO系列(v1~v3)的学习及YOLO-Fastest在海思平台的部署(下)
———— END 2021@凌然 ————
2021.2.1~2021.6.19
