22-07-12 西安 尚好房项目(03)Spring Security、Spring Session
认证和授权
提出问题:在生产环境下我们如果不登录后台系统就可以完成这些功能操作吗?
一定需要登录。
提出问题:是不是所有的用户,只要登录成功就都可以操作所有功能呢?
当然不是,不同的用户拥有着不同的权限,用户只能执行拥有权限的操作
认证:登录的过程就是认证
系统提供的用于识别用户身份的功能,通常提供用户名和密码进行登录其实就是在进行认证,认证的目的是让系统知道你是谁
授权:户认证成功后,需要为用户授权
其实就是指定当前用户可以操作哪些功能
Spring Security-用户认证
对后台系统进行权限控制,其本质就是对用户进行认证和授权,使用Spring Security可以帮助我们来简化认证和授权的过程。
访问后台管理系统会显示登录页面让管理员先登录才能访问
web-admin中引入依赖,因为在父工程shf-parent已经有了其依赖管理,所以这里引入的依赖就只有groupId和artifactId,省略了版本号和依赖范围
      org.springframework.security
      spring-security-web


      org.springframework.security
      spring-security-config
认证和授权是发生在处理器处理请求之前,所以引入过滤器“SpringSecurity Filter”
web.xml中
  springSecurityFilterChain
  org.springframework.web.filter.DelegatingFilterProxy


  springSecurityFilterChain
  /*
配置Spring Security
有2种配置的方式
- xml文件进行配置
- Java配置类进行配置(更简洁,更符合Springboot的要求)
两种方式配置效果一致,当前我们使用java类配置
在web-admin项目中创建com.atguigu.config.WebSecurityConfig类
配置类WebSecurityConfig的要求:
1.加上@Configuration,标识当前类为一个配置类
2.加上@EnableWebSecurity,开启SpringSecurity的功能
注意:这个配置类,一定要被Springmvc的包扫描扫到。@Configuration @EnableWebSecurity //@EnableWebSecurity是开启SpringSecurity的默认行为 public class WebSecurityConfig extends WebSecurityConfigurerAdapter { }
启动项目,测试
访问:http://localhost:8000/
url自动跳转到了一个默认的登录页面(框架自带的)我们集成了SpringSecurity,效果就是首页访问不了,它会给你弹出登录页面,让你先登录
1、内存分配账号和密码进行登录
这么做[内存分配]目的:让SpringSecurity知道它要校验的账号和密码是啥子
内存分配用户名密码
1、 重写configure(AuthenticationManagerBuilder auth)方法,Ctrl+O
2、 目前做的登录校验是不连接数据库的,
直接告诉SpringSecurity一个固定的账号和密码:例如lucy,123456@Override protected void configure(AuthenticationManagerBuilder auth) throws Exception { //在SpringSecurity中的内存中设置账号为"lucy",密码为BCryptPasswordEncoder加密器加密后的"123456" auth.inMemoryAuthentication() .passwordEncoder(new BCryptPasswordEncoder()) .withUser("lucy") .password(new BCryptPasswordEncoder().encode("123456")) .roles(""); }为什么这个加密器BCryptPasswordEncoder会出现两次???
- 第一次:相当于注册时使用
- 第二次:相当于登录时校验
加密器用new也太拉跨,spring不让你new,
使用@Bean放在ioc容器,改造后WebSecurityConfig如下:
@Configuration
@EnableWebSecurity //@EnableWebSecurity是开启SpringSecurity的默认行为
public class WebSecurityConfig extends WebSecurityConfigurerAdapter {
    @Autowired
    private PasswordEncoder passwordEncoder;
    @Override
    protected void configure(AuthenticationManagerBuilder auth) throws Exception {
        //在SpringSecurity中的内存中设置账号为"lucy",密码为BCryptPasswordEncoder加密器加密后的"123456"
        auth.inMemoryAuthentication()
                .withUser("lucy")
                .password(passwordEncoder.encode("123456"))
                .roles("");
    }

    @Bean
    public PasswordEncoder createPasswordEncoder(){
        return new BCryptPasswordEncoder();
    }
}
此时第一个new加密器的地方 就可以省略。原因如下:
.passwordEncoder(new BCryptPasswordEncoder()) 这句话的意思,表示告诉SpringSecurity,在校验密码的时候,请使用什么加密器对密码进行加密后再校验。
但是SpringSecurity会自动到IOC容器中找加密器,是一个自动注入使用,所以可省略
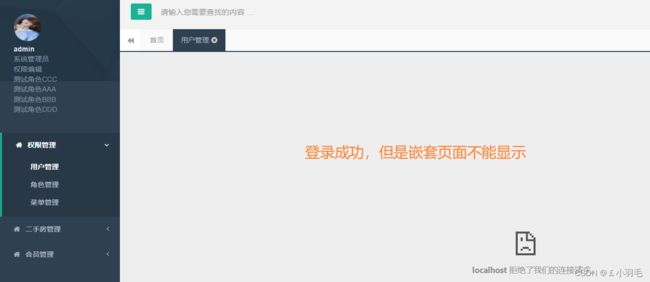
接着,登录成功,但是SpringSecurity默认不允许页面嵌套,所以右边页面没法显示【使用的是Hplush框架】
解决页面嵌套无法显示的办法:
WebSecurityConfig中重写configure(HttpSecurity http)
@Override
protected void configure(HttpSecurity http) throws Exception {
    //必须调用父类的方法,否则就不需要认证即可访问
    super.configure(http);
    //允许页面嵌套
    http.headers().frameOptions().disable();
}
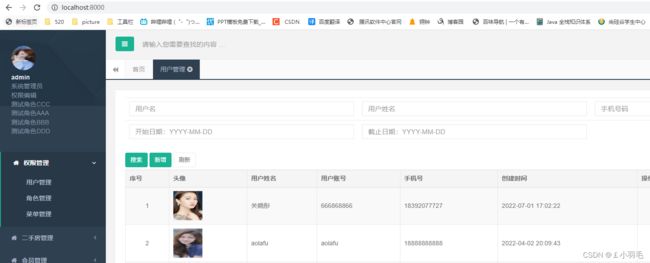
再次访问,重新登录后,效果就有了
接着解决摆在我们面前的这俩件事,认证的功能就算做好了
1.优化登录页面,使更好看(和当前系统的主要题色调匹配)
2.连接数据库,真正进行账号和密码的校验
2、自定义登录页面
1、创建登录页面login.html、在
spring-mvc.xml中配置view-controller2、在WebSecurityConfig配置类中重写configure(HttpSecurity http)
注意:登录页面和静态资源是不需要登录也能访问的
跨域就是:从一个域名发送请求访问另一个域名中的内容
    @Override
    protected void configure(HttpSecurity http) throws Exception {
        //允许页面嵌套
        http.headers().frameOptions().disable();
        //SpringSecurity的相关配置
        http
            .authorizeRequests()
            .antMatchers("/static/**","/login").permitAll()  //允许匿名用户访问的路径
            .anyRequest().authenticated()    // 其它页面全部需要验证
            .and()
            .formLogin()
            .loginPage("/login")    //指定登录时使用我们自定义的登录页面
            .defaultSuccessUrl("/") //登录认证成功后默认转跳的路径
            .and()
            .logout()
            .logoutUrl("/logout")   //表示退出登录请求的路径,这个请求是由SpringSecurity处理的
            .logoutSuccessUrl("/login");//表示退出登录之后跳转到哪个页面

        //关闭跨域请求伪造
        http.csrf().disable();
    }
再次访问,就是我们自定义的登录页面了,顺眼多了
3、使用数据库表中的用户名和密码
Spring Security支持通过实现UserDetailsService接口的方式来提供用户认证授权信息
账号密码校验的时候会连接acl_admin表进行匹配
1、注释掉内存分配用户名和密码
2、创建UserDetailsServiceImpl类实现UserDetailsService接口
重写loadUserByUsername(String username),在该方法中进行登录校验
@Component
public class UserDetailsServiceImpl implements UserDetailsService {
    @Reference
    private AdminService adminService;

    @Override
    public UserDetails loadUserByUsername(String username) throws UsernameNotFoundException {
        //username表示用户登录时候输入的账号
        //1. 我们要校验用户输入的账号是否正确:根据username到acl_admin表中查询
        Admin admin =adminService.getByUsername(username);
        if(null == admin) {
            throw new UsernameNotFoundException("用户名不存在!");
        }
        //如果用户名存在,则将当前用户的密码交给SpringSecurity,让SpringSecurity去校验密码
        //创建一个User对象,并返回:参数1表示用户名、参数2表示密码、参数3表示当前用户拥有的权限列表(目前先指定为空)
        return new User(username,admin.getPassword(),
                AuthorityUtils.commaSeparatedStringToAuthorityList(""));
    }
}
填坑:添加用户时对密码进行加密
admin的密码必须得使用加密器进行加密之后添加
SpringSecurity采用的加密器是BCryptPasswordEncoder,所以用户输入123456,SpringSecurity会将123456使用BCryptPasswordEncoder加密成密文之后再进行校验。
@Autowired
private PasswordEncoder passwordEncoder;
@PostMapping("/save")
public String save(Admin admin, Model model){
    //设置密码
    admin.setPassword(passwordEncoder.encode(admin.getPassword()));
    adminService.insert(admin);
    return successPage(model,"新增用户成功");
}
填坑:左侧动态菜单
动态获取当前登录的用户的动态菜单
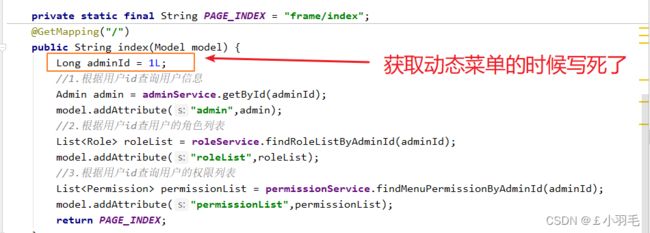
之前我们获取左侧动态菜单的时候,是写死用户为
admin,现在可以用
Spring Security获取登录的用户,从而拿到当前用户的菜单//获取当前登录的用户 Authentication authentication = SecurityContextHolder.getContext().getAuthentication(); User user = (User) authentication.getPrincipal();完整代码修改如下:
@GetMapping("/") public String index(Model model){ //获取当前登录的用户 Authentication authentication = SecurityContextHolder.getContext().getAuthentication(); User user = (User) authentication.getPrincipal(); Admin admin = adminService.getByUsername(user.getUsername()); //2.根据用户id查用户的角色列表 ListroleList = roleService.findRoleListByAdminId(admin.getId()); model.addAttribute("roleList",roleList); //查询用户的权限列表 List permissionList = permissionService.findMenuPermissionByAdminId(admin.getId()); model.addAttribute("admin",admin); model.addAttribute("permissionList",permissionList); return PAGE_INDEX; }
测试动态菜单功能:
admin用户登录测试动态菜单功能:
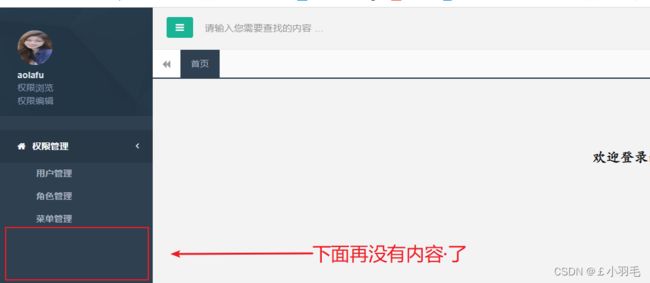
aolafu用户登录测试动态菜单功能
Spring Security-权限校验
1、权限校验-用户授权
授权:当用户登录的时候,查询一个用户拥有哪些权限的code,然后告诉SpringSecurity
没有code表示这个权限并不需要SpringSecurity去校验,什么权限没有code?
一级菜单、二级菜单。因为一级菜单和二级菜单是否显示,是由动态菜单决定的,
根本不需要SpringSecurity校验。
查询用户拥有的权限code,
用户拥有的每一个权限,对应成一个字符串来交给SpringSecurity
代码逻辑不是很难,看点在于这里用到了stream流过滤、映射处理,用stream流过滤code为null的,再映射成Code的集合。
@Override public ListfindPermissionCodeListByAdminId(Long adminId) { //1. 判断adminId是否为1L(超级管理员,应该拥有一切权限) List permissionList; if (adminId.equals(1L)) { //超级管理员 permissionList = permissionMapper.findAll(); } else { //不是超级管理员,根据用户id查询到用户的所有权限 permissionList = permissionMapper.findPermissionListByAdminId(adminId); } //2. 将permissionList转换成permissionCodeList List permissionCodeList = null; if (!CollectionUtils.isEmpty(permissionList)) { permissionCodeList = permissionList.stream() .filter(permission -> !StringUtils.isEmpty(permission.getCode())) //过滤掉为空的code .map(permission -> permission.getCode()) //将每一个permission转换成一个permissionCode .collect(Collectors.toList()); } return permissionCodeList; }
GrantedAuthority是接口。
也就是说我们要将每个code映射成一个SimpleGrantedAuthority对象。
看点:把一个Code集合,映射成为一个GrantedAuthority集合交给SpringSecurity管理。使用Stream流进行映射的,还用到了构造器引用
注意:
import org.springframework.security.core.userdetails.User;
import org.springframework.security.core.userdetails.UserDetails;
@Component public class UserDetailsServiceImpl implements UserDetailsService { @Reference private AdminService adminService; @Reference private PermissionService permissionService; @Override public UserDetails loadUserByUsername(String username) throws UsernameNotFoundException { //username表示用户登录时候输入的账号 //1. 我们要校验用户输入的账号是否正确:根据username到acl_admin表中查询 Admin admin = adminService.getByUsername(username); if (admin == null) { //2. 用户名不正确 throw new UsernameNotFoundException("username not found"); } //2. 如果用户名正确,则将当前用户的密码交给SpringSecurity,让SpringSecurity去校验密码 //创建一个User对象,并返回:参数1表示用户名、参数2表示密码、参数3表示当前用户拥有的权限列表(目前先指定为空) //2.1 查询出当前用户拥有的所有权限,然后告诉SpringSecurity ListpermissionCodeList = permissionService.findPermissionCodeListByAdminId(admin.getId()); //2.2 将permissionCodeList转成grantedAuthorityList List grantedAuthorityList = null; if (!CollectionUtils.isEmpty(permissionCodeList)) { grantedAuthorityList = permissionCodeList.stream() .map(SimpleGrantedAuthority::new) .collect(Collectors.toList()); }else { grantedAuthorityList = AuthorityUtils.commaSeparatedStringToAuthorityList(""); } return new User(username, admin.getPassword(), grantedAuthorityList); } }
我们先让aolafu用户拥有角色修改的权限,测试
测试aolafu用户是否可以修改角色信息
设置aolafu用户只有查看角色的权限,
重新测试,观察操作效果,
提出问题:为什么aolafu明明没有修改的权限,它还能进行修改?
因为修改的时候没有进行权限的校验,我们现在只做了授权,而没做权限校验!!!!
2、权限校验—权限校验
1、修改WebSecurityConfig配置类,开启Controller方法权限控制,添加下述注解
@EnableGlobalMethodSecurity(prePostEnabled = true)2、给Controller方法添加权限注解 ,如
给各个Controller的控制器方法指定对应的操作权限,以角色管理的修改为例
@PreAuthorize("hasAnyAuthority('role.edit')")
    @PreAuthorize("hasAnyAuthority('role.edit')")
    @GetMapping("/edit/{id}")
    public String edit(Model model, @PathVariable Long id) {
        Role role = roleService.getById(id);
        model.addAttribute("role", role);
        return PAGE_EDIT;
    }
此时,再次使用aolafu用户登录(他的权限只有查看角色的功能)
测试:
403 权限拒绝,但是这个页面用户看着不太明白,为了优化用户体验,我们可以自定义访问拒绝处理器
3、自定义访问拒绝处理器
创建页面auth.html,使在权限拒绝的时候不再是403页面,而是我们自定义的这个页面
1、在spring-mvc.xml中配置view-controller
告诉SpringSecurity,当权限不够的时候就显示这个页面
2.创建自定义访问拒绝处理器AtguiguAccessDeniedHandler
public class AtguiguAccessDeniedHandler implements AccessDeniedHandler {

    @Override
    public void handle(HttpServletRequest httpServletRequest, HttpServletResponse httpServletResponse, AccessDeniedException e) throws IOException, ServletException {
        //当访问拒绝的时候,我们怎么处理?
        //重定向访问"/auth"
        httpServletResponse.sendRedirect("/auth");
    }
}
3.配置自定义访问拒绝处理器(WebSecurityConfig中)
重写的方法configure(HttpSecurity http) 中加入这么一行配置//指定自定义的访问拒绝处理器 http.exceptionHandling().accessDeniedHandler(new AtguiguAccessDeniedHandler());这个方法configure(HttpSecurity http) 中现在有配置允许页面嵌套,自定义登录页面,自定义权限拒绝时使用的权限拒绝处理器,以下是完整版
    @Override
    protected void configure(HttpSecurity http) throws Exception {
        //允许页面嵌套
        http.headers().frameOptions().disable();
        //SpringSecurity的相关配置
        http
                .authorizeRequests()
                .antMatchers("/static/**","/login").permitAll()  //允许匿名用户访问的路径
                .anyRequest().authenticated()    // 其它页面全部需要验证
                .and()
                .formLogin()
                .loginPage("/login")    //用户未登录时,访问任何需要权限的资源都转跳到该路径,即登录页面,此时登陆成功后会继续跳转到第一次访问的资源页面(相当于被过滤了一下)
                .defaultSuccessUrl("/") //登录认证成功后默认转跳的路径
                .and()
                .logout()
                .logoutUrl("/logout")   //退出登陆的路径,指定spring security拦截的注销url,退出功能是security提供的
                .logoutSuccessUrl("/login");//用户退出后要被重定向的url

        //关闭跨域请求伪造
        http.csrf().disable();

        //指定自定义的访问拒绝处理器
        http.exceptionHandling().accessDeniedHandler(new AtguiguAccessDeniedHandler());
    }
优化后,再次测试,达到了我们想要的效果
4、页面功能按钮权限控制
再次优化,aolafu只有查看角色的权限,没有其它权限
需求:如果没有该权限,那么相关的按钮就别显示出来了
解决办法,让Thymeleaf与SpringSecurity整合起来。
父工程shf-parent已经管理了这个整合依赖 thymeleaf-extras-springsecurity5
1、直接在web-admin中引入
    org.thymeleaf.extras
    thymeleaf-extras-springsecurity5
2、在Thymeleaf的模板引擎配置spring security 标签支持
3、页面按钮控制
- 在html文件里面声明使用spring-security标签
- 在相关按钮上使用标签 如修改按钮 sec:authorize="hasAuthority('role.edit')
修改 删除 分配权限
测试:效果如下,很满意
Spring Session
啥叫session共享,为什么需要session共享?
session共享是在集群环境中保证多个服务器节点中的session数据一致
1、session共享方案
1.session复制
2.一致性hash(保证一个客户端它连接的集群里面的服务器节点永远是同一个)
缺点:假如这个服务器节点挂掉了呢?客户端会把请求发给另外一个服务器节点,会出问题3.不用session,而采用cookie
缺点:比如受cookie大小的限制,能记录的信息有限;
每次请求响应都需要传递cookie,影响性能,
如果用户关闭cookie,访问就不正常4.用session服务器
可以使用redis作session服务器
特点:多个服务器节点都是共享session服务器中的session数据
利用独立部署的session服务器(集群)统一管理session,服务器每次读写session时,都访问session服务器。
2、session共享原理
1、用户第一次访问应用时,应用会创建一个新的 Session,并且会将 Session 的 ID 作为 Cookie 缓存在浏览器,下一次访问时请求的头部中带着该 Cookie,应用通过获取的 Session ID 进行查找,如果该 Session 存在且有效,则继续该请求,如果 Cookie 无效或者 Session 无效,则会重新生成一个新的 Session
2、在普通的 JavaEE 应用中,Session 信息放在内存中,当容器(如 Tomcat)关闭后,内存中的 Session 被销毁;重启后如果当前用户再去访问对应的是一个新的 Session ,在多实例中无法共享,一个用户只能访问指定的实例才能使用相同的 Session;
3、Session 共享实现的原理是将原来内存中的 Session 放在一个需要共享 Session 的服务器都可以访问到的位置,如数据库,Redis 等等,从而实现多实例 Session 共享 ,只要浏览器的 Cookie 中的 Session ID 没有改变,多个实例中的任意一个被销毁不会影响用户访问
3.Spring Session解决session共享
Spring给我们提供了Spring Session来解决session共享问题
要解决session共享问题:其实就是要改变request.getSession()方法
这个方法中,既有可能创建session、又有可能查找session。
这个方法原本创建的session,是创建在内存中,查找session也是到服务器内存中查找要做到session共享的话,创建的session应该放到session服务器中。查找session的话,也要在session服务器中查询
要实现session共享,我们就得改变request.getSession()这个方法
在filter中创建request的装饰者对象,改变request的getSession()方法
拦截请求,将之前在服务器内存中进行 session 创建的动作,改成在 redis 中创建。
如果要我去写一个框架实现session共享,我会怎么做呢?
1.创建一个filter,执行在所有的filter之前
2. 在filter中创建request的装饰者,在装饰者中修改getSession()方法,实现将session存储到session服务器,以及从session服务器查找session。
3. 将request的装饰者交给处理器进行请求处理但是这个框架Spring给我们提供了Spring Session,它底层的原理思路就是这样的。
当请求进来的时候,SessionRepositoryFilter 会先拦截到请求,将 request 和 response 对象转换成 SessionRepositoryRequestWrapper 和 SessionRepositoryResponseWrapper 。
后续当第一次调用 request 的getSession方法时,
会调用到 SessionRepositoryRequestWrapper 的
getSession方法。这个方法是被重写过的,逻辑是先从 request 的属性中查找,如果找不到;再查找一个key值是"JSESSION"的 Cookie,通过这个 Cookie 拿到 SessionId 去 Redis 中查找,如果查不到,就直接创建一个RedisSession 对象,同步到 Redis 中。
在父工程shf-parent中已经有了这个依赖管理(版本1.3.5.RELEASE),
1、web-admin中引入依赖
    org.springframework.session
    spring-session-data-redis
2、创建spring-redis.xml
session在内存中的超时时间是多久?
闲置30分钟,如果用户一直在发送请求,session是一定不会超时的
web.xml添加session共享过滤器
一定要配置在所有过滤器之前,所有的请求经过该过滤器后执行后续操作
  springSessionRepositoryFilter
  org.springframework.web.filter.DelegatingFilterProxy


  springSessionRepositoryFilter
  /*
4、怎么验证是否实现了session共享呢?
一、测试方法:观察redis客户端
实现session共享的效果:redis中存储了session信息
通过redis客户端查看redis数据 ,说明session成功同步到redis数据库中。
二、测试方法:重启web-admin
如果session是存储到tomcat内存中,当tomcat重启的之后,肯定要重新登录。
因为session是存储在tomcat内存中,而tomcat重启之后,内存中的数据会全部消失
重启web-admin,发现页面不会跳转到登录页面,而是处于登录状态
说明:如果session没有同步到redis,那么再次重启,session信息已经清空,就会再次跳转登录,当前没有跳转登录,说明我们的session信息保存到redis。


