MybatisPlus总结,整合SpringBoot
MybatisPlus总结,整合SpringBoot
一:MP简单介绍
原文地址:www.huiblog.top
01:简述
MybatisPlus在Mybatis的基础上只做增强,不做改变,就像是魂斗罗中的红人和蓝人一样。
官方的介绍:为简化开发而生

02:MP的特性
- 无侵入:只做增强不做改变,引入它不会对现有工程产生影响,如丝般顺滑
- 损耗小:启动即会自动注入基本 CURD,性能基本无损耗,直接面向对象操作
- 强大的 CRUD 操作:内置通用 Mapper、通用 Service,仅仅通过少量配置即可实现单表大部分 CRUD 操作,更有强大的条件构造器,满足各类使用需求
- 支持 Lambda 形式调用:通过 Lambda 表达式,方便的编写各类查询条件,无需再担心字段写错
- 支持主键自动生成:支持多达 4 种主键策略(内含分布式唯一 ID 生成器 - Sequence),可自由配置,完美解决主键问题
- 支持 ActiveRecord 模式:支持 ActiveRecord 形式调用,实体类只需继承 Model 类即可进行强大的 CRUD 操作
- 支持自定义全局通用操作:支持全局通用方法注入( Write once, use anywhere )
- 内置代码生成器:采用代码或者 Maven 插件可快速生成 Mapper 、 Model 、 Service 、 Controller 层代码,支持模板引擎,更有超多自定义配置等您来使用
- 内置分页插件:基于 MyBatis 物理分页,开发者无需关心具体操作,配置好插件之后,写分页等同于普通 List 查询
- 分页插件支持多种数据库:支持 MySQL、MariaDB、Oracle、DB2、H2、HSQL、SQLite、Postgre、SQLServer 等多种数据库
- 内置性能分析插件:可输出 Sql 语句以及其执行时间,建议开发测试时启用该功能,能快速揪出慢查询
- 内置全局拦截插件:提供全表 delete 、 update 操作智能分析阻断,也可自定义拦截规则,预防误操作
03:支持的数据库
- mysql 、 mariadb 、 oracle 、 db2 、 h2 、 hsql 、 sqlite 、 postgresql 、 sqlserver 、 presto
- 达梦数据库 、 虚谷数据库 、 人大金仓数据库
二:MybatisPlus简单使用
一:引入Maven依赖
<project xmlns="http://maven.apache.org/POM/4.0.0"
         xmlns:xsi="http://www.w3.org/2001/XMLSchema-instance"
         xsi:schemaLocation="http://maven.apache.org/POM/4.0.0 http://maven.apache.org/xsd/maven-4.0.0.xsd">
    <modelVersion>4.0.0modelVersion>

    <parent>
        <groupId>org.springframework.bootgroupId>
        <artifactId>spring-boot-starter-parentartifactId>
        <version>2.1.4.RELEASEversion>
    parent>

    <groupId>cn.itcast.mpgroupId>
    <artifactId>itcast-mp-springbootartifactId>
    <version>1.0-SNAPSHOTversion>

    <dependencies>
        <dependency>
            <groupId>org.springframework.bootgroupId>
            <artifactId>spring-boot-starterartifactId>
            <exclusions>
                <exclusion>
                    <groupId>org.springframework.bootgroupId>
                    <artifactId>spring-boot-starter-loggingartifactId>
                exclusion>
            exclusions>
        dependency>
        <dependency>
            <groupId>org.springframework.bootgroupId>
            <artifactId>spring-boot-starter-testartifactId>
            <scope>testscope>
        dependency>

        <dependency>
            <groupId>org.projectlombokgroupId>
            <artifactId>lombokartifactId>
            <optional>trueoptional>
        dependency>

        <dependency>
            <groupId>com.baomidougroupId>
            <artifactId>mybatis-plus-boot-starterartifactId>
            <version>3.1.1version>
        dependency>

        <dependency>
            <groupId>mysqlgroupId>
            <artifactId>mysql-connector-javaartifactId>
            <version>5.1.47version>
        dependency>
        <dependency>
            <groupId>org.slf4jgroupId>
            <artifactId>slf4j-log4j12artifactId>
        dependency>
    dependencies>
    <build>
        <plugins>
            <plugin>
                <groupId>org.springframework.bootgroupId>
                <artifactId>spring-boot-maven-pluginartifactId>
            plugin>
        plugins>
    build>
project>
第二步:编写application.yml文件
spring:
  datasource:
    driver-class-name: com.mysql.jdbc.Driver
    url: jdbc:mysql://127.0.0.1:3306/mb?useUnicode=true&characterEncoding=utf8&autoReconnect=true&allowMultiQueries=true&useSSL=false
    username: root
    password: root
第三步:编写实体类User
@Data
@NoArgsConstructor
@AllArgsConstructor
@TableName("tb_user")
public class User {

    @TableId(type = IdType.AUTO)
    private Long id;
    private String userName;

    @TableField(select = false)//查询时不返回该字段值
    private String password;
    private String name;
    private Integer age;

    @TableField(value = "email")//指定数据库表中字段名
    private String mail;

    @TableField(exist = false)
    private String address;//数据库表中不存在
}
第四步:编写Mapper持久层,这里继承BaseMapper<实体类>
/**
 * @author hui
 * @date 2020/9/13 19:14
 * QQ:2473181454
 * 概要:
 */
@Repository
public interface UserMapper extends BaseMapper<User> {
}
这里和SpringDataJpa类似,只是不需要再传入主键类型
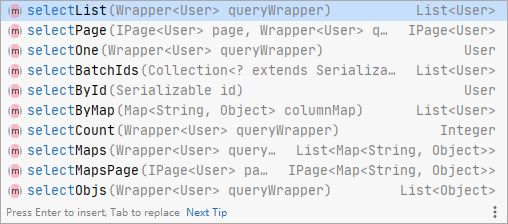
可以看下BaseMapper中的方法:不得不说国人的的插件就是好用,注释都是中文,不用担心看不懂了
/**
 * Mapper 继承该接口后,无需编写 mapper.xml 文件,即可获得CRUD功能
 * 这个 Mapper 支持 id 泛型
 *
 * @author hubin
 * @since 2016-01-23
 */
public interface BaseMapper<T> extends Mapper<T> {

    /**
     * 插入一条记录
     *
     * @param entity 实体对象
     */
    int insert(T entity);

    /**
     * 根据 ID 删除
     *
     * @param id 主键ID
     */
    int deleteById(Serializable id);

    /**
     * 根据 columnMap 条件,删除记录
     *
     * @param columnMap 表字段 map 对象
     */
    int deleteByMap(@Param(Constants.COLUMN_MAP) Map<String, Object> columnMap);

    /**
     * 根据 entity 条件,删除记录
     *
     * @param wrapper 实体对象封装操作类(可以为 null)
     */
    int delete(@Param(Constants.WRAPPER) Wrapper<T> wrapper);

    /**
     * 删除(根据ID 批量删除)
     *
     * @param idList 主键ID列表(不能为 null 以及 empty)
     */
    int deleteBatchIds(@Param(Constants.COLLECTION) Collection<? extends Serializable> idList);

    /**
     * 根据 ID 修改
     *
     * @param entity 实体对象
     */
    int updateById(@Param(Constants.ENTITY) T entity);

    /**
     * 根据 whereEntity 条件,更新记录
     *
     * @param entity        实体对象 (set 条件值,可以为 null)
     * @param updateWrapper 实体对象封装操作类(可以为 null,里面的 entity 用于生成 where 语句)
     */
    int update(@Param(Constants.ENTITY) T entity, @Param(Constants.WRAPPER) Wrapper<T> updateWrapper);

    /**
     * 根据 ID 查询
     *
     * @param id 主键ID
     */
    T selectById(Serializable id);

    /**
     * 查询(根据ID 批量查询)
     *
     * @param idList 主键ID列表(不能为 null 以及 empty)
     */
    List<T> selectBatchIds(@Param(Constants.COLLECTION) Collection<? extends Serializable> idList);

    /**
     * 查询(根据 columnMap 条件)
     *
     * @param columnMap 表字段 map 对象
     */
    List<T> selectByMap(@Param(Constants.COLUMN_MAP) Map<String, Object> columnMap);

    /**
     * 根据 entity 条件,查询一条记录
     *
     * @param queryWrapper 实体对象封装操作类(可以为 null)
     */
    T selectOne(@Param(Constants.WRAPPER) Wrapper<T> queryWrapper);

    /**
     * 根据 Wrapper 条件,查询总记录数
     *
     * @param queryWrapper 实体对象封装操作类(可以为 null)
     */
    Integer selectCount(@Param(Constants.WRAPPER) Wrapper<T> queryWrapper);

    /**
     * 根据 entity 条件,查询全部记录
     *
     * @param queryWrapper 实体对象封装操作类(可以为 null)
     */
    List<T> selectList(@Param(Constants.WRAPPER) Wrapper<T> queryWrapper);

    /**
     * 根据 Wrapper 条件,查询全部记录
     *
     * @param queryWrapper 实体对象封装操作类(可以为 null)
     */
    List<Map<String, Object>> selectMaps(@Param(Constants.WRAPPER) Wrapper<T> queryWrapper);

    /**
     * 根据 Wrapper 条件,查询全部记录
     * 注意: 只返回第一个字段的值
     *
     * @param queryWrapper 实体对象封装操作类(可以为 null)
     */
    List<Object> selectObjs(@Param(Constants.WRAPPER) Wrapper<T> queryWrapper);

    /**
     * 根据 entity 条件,查询全部记录(并翻页)
     *
     * @param page         分页查询条件(可以为 RowBounds.DEFAULT)
     * @param queryWrapper 实体对象封装操作类(可以为 null)
     */
    IPage<T> selectPage(IPage<T> page, @Param(Constants.WRAPPER) Wrapper<T> queryWrapper);

    /**
     * 根据 Wrapper 条件,查询全部记录(并翻页)
     *
     * @param page         分页查询条件
     * @param queryWrapper 实体对象封装操作类
     */
    IPage<Map<String, Object>> selectMapsPage(IPage<T> page, @Param(Constants.WRAPPER) Wrapper<T> queryWrapper);
}
第五步:编写测试类,测试下CRUD操作
@RunWith(SpringRunner.class)
@SpringBootTest
public class TestUserMapper {

    @Autowired
    private UserMapper userMapper;

    @Test
    public void testInsert() {
        User user = new User();
        user.setMail("[email protected]");
        user.setAge(12);
        user.setName("张三123");
        user.setPassword("123");
        user.setUserName("zahngsan");
        int insert = this.userMapper.insert(user);
        System.out.println(insert);

        //获取自增长后的id值
        System.out.println(user.getId());
    }

    @Test
    public void testSelectById() {
        User user = this.userMapper.selectById(1L);
        System.out.println(user);
    }
小结:
新增:使用insert()方法,传入实体类对象,结果返回受影响的行数,新增成功后会将新增后的数据重新封装到user对象中,可以直接获取自增长后的id值
删除:这里有MP提供了4中删除方法

delete(Wrapper wrapper): 根据wrapper中设定的条件来删除
deleteBatchIds:根据id批量删除数据
deleteById:根据id删除
deleteByMap:根据map删除数据,多条件之间时and关系
修改:

- update:传入User实体和wrapper规则,进行修改
- upateById:传入user实体,根据实体中的id进行删除
查询
- selectList:根据传入的wrapper规则进行查询
- selectPage:根据传入的Ipage对象,wrapper规则进行分页查询
- selectOne:根据传入的查询条件,返回单个对象
- selectBatchIds:根据传入的ids,进行id批量查询
- selectById:根据传入的id,返回单个对象
三:MybatisPlus的高级整合
一:分页
01:简单分页
  @Test
    public void testSelectPage() {
        QueryWrapper<User> wrapper = new QueryWrapper<>();
        wrapper.like("email", "com");
        Page<User> page = new Page<>(2, 1);//第2页,一条数据
        IPage<User> userIPage = this.userMapper.selectPage(page, wrapper);
        System.out.println("数据总条数" + userIPage.getTotal());
        System.out.println("数据总页数" + userIPage.getPages());
        System.out.println("当前页数" + userIPage.getCurrent());
        List<User> records = userIPage.getRecords();
        for (User user : records) {
            System.out.println(user);
        }
    }
有了MP自带的分页插件,再也不用自己写limit业务逻辑了,让分页变得更简单,只需要关注数据即可
分页使用selectPage方法,传入Page对象和查询的条件
 /**
     * 分页构造函数
     *
     * @param current 当前页
     * @param size    每页显示条数
     */
    public Page(long current, long size) {
        this(current, size, 0);
    }
Page类的构造方法参数:current:当前页数,size:页大小
02:分页+排序
 @Test
    public void testSelectPage() {
        QueryWrapper<User> wrapper = new QueryWrapper<>();
        wrapper.like("email", "com");

        wrapper.orderByDesc("age");

        Page<User> page = new Page<>(2, 1);//第一页,一条数据
        IPage<User> userIPage = this.userMapper.selectPage(page, wrapper);
        System.out.println("数据总条数" + userIPage.getTotal());
        System.out.println("数据总页数" + userIPage.getPages());
        System.out.println("当前页数" + userIPage.getCurrent());
        List<User> records = userIPage.getRecords();
        for (User user : records) {
            System.out.println(user);
        }
    }
排序时只需要在wrapper中定义排序规则即可
二:排序
 @Test
    public void testOrderByAgeDesc() {
        QueryWrapper<User> wrapper = new QueryWrapper<>();
        //按照年龄倒叙排序
        wrapper.orderByDesc("age");
        //SELECT id,user_name,password,name,age,email FROM tb_user ORDER BY age DESC
        List<User> users = this.userMapper.selectList(wrapper);
        for (User user : users) {
            System.out.println(user);
        }
    }
排序时只需要在wrapper中自定义排序规则即可
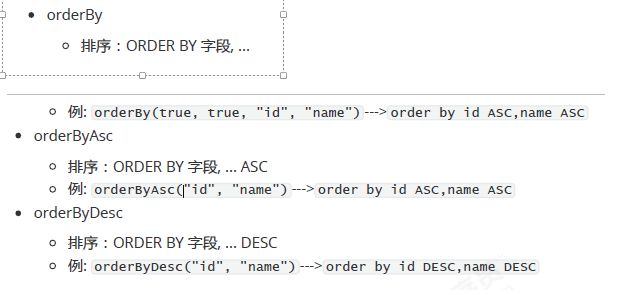
这里看下wrapper中的源码规则:
/** * ignore */ default Children orderByAsc(R column) { return orderByAsc(true, column); } /** * ignore */ default Children orderByAsc(R... columns) { return orderByAsc(true, columns); } /** * 排序:ORDER BY 字段, ... ASC *例: orderByAsc("id", "name")
* * @param condition 执行条件 * @param columns 字段数组 * @return children */ default Children orderByAsc(boolean condition, R... columns) { return orderBy(condition, true, columns); } /** * ignore */ default Children orderByDesc(R column) { return orderByDesc(true, column); } /** * ignore */ default Children orderByDesc(R... columns) { return orderByDesc(true, columns); } /** * 排序:ORDER BY 字段, ... DESC *例: orderByDesc("id", "name")
* * @param condition 执行条件 * @param columns 字段数组 * @return children */ default Children orderByDesc(boolean condition, R... columns) { return orderBy(condition, false, columns); } /** * 排序:ORDER BY 字段, ... *例: orderBy(true, "id", "name")
* * @param condition 执行条件 * @param isAsc 是否是 ASC 排序 * @param columns 字段数组 * @return children */ Children orderBy(boolean condition, boolean isAsc, R... columns);
三:逻辑查询
    @Test
    public void testOr() {
        QueryWrapper<User> wrapper = new QueryWrapper<>();
        wrapper.eq("name", "王五").or().eq("age", 21);
        //SELECT id,user_name,password,name,age,email FROM tb_user ORDER BY age DESC
        List<User> users = this.userMapper.selectList(wrapper);
        for (User user : users) {
            System.out.println(user);
        }
    }

四:Select
在MP中,查询时默认查询所有的数据,可以使用select来指定具体需要哪个字段值
    @Test
    public void testSelect() {
        QueryWrapper<User> wrapper = new QueryWrapper<>();
        //指定查询的字段
        wrapper.eq("name", "王五").or().eq("age", 21).select("id", "name", "age");
        List<User> users = this.userMapper.selectList(wrapper);
        for (User user : users) {
            System.out.println(user);
        }
    }
五:自动填充功能
有些时候我们可能会有这样的需求,插入或者更新数据时,希望有些字段可以自动填充数据,比如密码、version
等。在MP中提供了这样的功能,可以实现自动填充。
添加@TableField注解
@TableField(fill = FieldFill.INSERT) //插入数据时进行填充
private String password;
为password添加自动填充功能,在新增数据时有效。
FieldFill提供了多种模式选择:
public enum FieldFill {
/**
* 默认不处理
*/
DEFAULT,
/**
* 插入时填充字段
*/
INSERT,
/**
* 更新时填充字段
*/
UPDATE,
/**
* 插入和更新时填充字段
*/
INSERT_UPDATE
}
六:逻辑删除
逻辑删除
开发系统时,有时候在实现功能时,删除操作需要实现逻辑删除,所谓逻辑删除就是将数据标记为删除,而并非真正
的物理删除(非DELETE操作),查询时需要携带状态条件,确保被标记的数据不被查询到。这样做的目的就是避免
数据被真正的删除。
01:修改表结构
为tb_user表增加deleted字段,用于表示数据是否被删除,1代表删除,0代表未删除。
ALTER TABLE `tb_user`
ADD COLUMN `deleted` int(1) NULL DEFAULT 0 COMMENT '1代表删除,0代表未删除' AFTER
`version`;
同时,也修改User实体,增加deleted属性并且添加@TableLogic注解:
@TableLogic
private Integer deleted;
02:配置
application.properties:
# 逻辑已删除值(默认为 1)
mybatis-plus.global-config.db-config.logic-delete-value=1
# 逻辑未删除值(默认为 0)
mybatis-plus.global-config.db-config.logic-not-delete-value=0
七:通用枚举
解决了繁琐的配置,让 mybatis 优雅的使用枚举属性!
01:修改表结构
ALTER TABLE `tb_user`
ADD COLUMN `sex` int(1) NULL DEFAULT 1 COMMENT '1-男,2-女' AFTER `deleted`;
02:定义枚举,实现IEnum接口
public enum SexEnum implements IEnum<Integer> {
	MAN(1,"男"),
  WOMAN(2,"女");
private int value;
private String desc;
SexEnum(int value, String desc) {
this.value = value;
this.desc = desc;
}
@Override
public Integer getValue() {
return this.value;
}
@Override
public String toString() {
return this.desc;
}
}
03:配置
# 枚举包扫描
mybatis-plus.type-enums-package=cn.itcast.mp.enums
04:修改实体
private SexEnum sex;
四:进阶配置
一:configLocation
MyBatis 配置文件位置,如果您有单独的 MyBatis 配置,请将其路径配置到 configLocation 中。 MyBatis
Configuration 的具体内容请参考MyBatis 官方文档
mybatis-plus.config-location = classpath:1 mybatis-config.xml
二:mapperLocations
MyBatis Mapper 所对应的 XML 文件位置,如果您在 Mapper 中有自定义方法(XML 中有自定义实现),需要进行
该配置,告诉 Mapper 所对应的 XML 文件位置。
mybatis-plus.mapper-locations = classpath*:mybatis/*.xml
Maven 多模块项目的扫描路径需以 classpath*: 开头 (即加载多个 jar 包下的 XML 文件)
三:typeAliasesPackage
MyBaits 别名包扫描路径,通过该属性可以给包中的类注册别名,注册后在 Mapper 对应的 XML 文件中可以直接使
用类名,而不用使用全限定的类名(即 XML 中调用的时候不用包含包名)。
mybatis-plus.type-aliases-package 1 = cn.itcast.mp.pojo
四:mapUnderscoreToCamelCase
是否开启自动驼峰命名规则(camel case)映射,即从经典数据库列名 A_COLUMN(下划线命名) 到经典 Java 属
性名 aColumn(驼峰命名) 的类似映射。
注意:
此属性在 MyBatis 中原默认值为 false,在 MyBatis-Plus 中,此属性也将用于生成最终的 SQL 的 select body
如果您的数据库命名符合规则无需使用 @TableField 注解指定数据库字段名
#关闭自动驼峰映射,该参数不能和mybatis-plus.config-location同时存在
mybatis-plus.configuration.map-underscore-to-camel-case=false
五:cacheEnabled
全局地开启或关闭配置文件中的所有映射器已经配置的任何缓存,默认为 true。
mybatis-plus.configuration.1 cache-enabled=false
六:idType
全局默认主键类型,设置后,即可省略实体对象中的@TableId(type = IdType.AUTO)配置。
mybatis-plus.global-config.db-config.id-type=auto
七:tablePrefix
表名前缀,全局配置后可省略@TableName()配置。
mybatis-plus.global-config.db-config.1 table-prefix=tb_
五:代码生成器
01:创建工程
pom.xml
<project xmlns="http://maven.apache.org/POM/4.0.0"
xmlns:xsi="http://www.w3.org/2001/XMLSchema-instance"
xsi:schemaLocation="http://maven.apache.org/POM/4.0.0
http://maven.apache.org/xsd/maven-4.0.0.xsd">
<modelVersion>4.0.0modelVersion>
<parent>
<groupId>org.springframework.bootgroupId>
<artifactId>spring-boot-starter-parentartifactId>
<version>2.1.4.RELEASEversion>
parent>
<groupId>cn.itcast.mpgroupId>
<artifactId>itcast-mp-generatorartifactId>
<version>1.0-SNAPSHOTversion>
<dependencies>
<dependency>
<groupId>org.springframework.bootgroupId>
<artifactId>spring-boot-starter-testartifactId>
<scope>testscope>
dependency>

<dependency>
<groupId>com.baomidougroupId>
<artifactId>mybatis-plus-boot-starterartifactId>
<version>3.1.1version>
dependency>
<dependency>
<groupId>com.baomidougroupId>
<artifactId>mybatis-plus-generatorartifactId>
<version>3.1.1version>
dependency>
<dependency>
<groupId>org.springframework.bootgroupId>
<artifactId>spring-boot-starter-freemarkerartifactId>
dependency>

<dependency>
<groupId>mysqlgroupId>
<artifactId>mysql-connector-javaartifactId>
<version>5.1.47version>
dependency>
<dependency>
<groupId>org.slf4jgroupId>
<artifactId>slf4j-log4j12artifactId>
dependency>
dependencies>
<build><plugins>
<plugin>
<groupId>org.springframework.bootgroupId>
<artifactId>spring-boot-maven-pluginartifactId>
plugin>
plugins>
build>
project>
02:代码
package cn.itcast.mp.generator;
import java.util.ArrayList;
import java.util.List;
import java.util.Scanner;
import com.baomidou.mybatisplus.core.exceptions.MybatisPlusException;
import com.baomidou.mybatisplus.core.toolkit.StringPool;
import com.baomidou.mybatisplus.core.toolkit.StringUtils;
import com.baomidou.mybatisplus.generator.AutoGenerator;
import com.baomidou.mybatisplus.generator.InjectionConfig;
import com.baomidou.mybatisplus.generator.config.DataSourceConfig;
import com.baomidou.mybatisplus.generator.config.FileOutConfig;
import com.baomidou.mybatisplus.generator.config.GlobalConfig;
import com.baomidou.mybatisplus.generator.config.PackageConfig;
import com.baomidou.mybatisplus.generator.config.StrategyConfig;
import com.baomidou.mybatisplus.generator.config.TemplateConfig;
import com.baomidou.mybatisplus.generator.config.po.TableInfo;
import com.baomidou.mybatisplus.generator.config.rules.NamingStrategy;
import com.baomidou.mybatisplus.generator.engine.FreemarkerTemplateEngine;
/**
*
* mysql 代码生成器演示例子
*
*/
public class MysqlGenerator {
/**
*
* 读取控制台内容
*
*/
public static String scanner(String tip) {
Scanner scanner = new Scanner(System.in);
StringBuilder help = new StringBuilder();
help.append("请输入" + tip + ":");
System.out.println(help.toString());
if (scanner.hasNext()) {
String ipt = scanner.next();
if (StringUtils.isNotEmpty(ipt)) {
return ipt;
}
}
throw new MybatisPlusException("请输入正确的" + tip + "!");
}
/**
* RUN THIS
*/
public static void main(String[] args) {
// 代码生成器
AutoGenerator mpg = new AutoGenerator();
// 全局配置
GlobalConfig gc = new GlobalConfig();
String projectPath = System.getProperty("user.dir");
gc.setOutputDir(projectPath + "/src/main/java");
gc.setAuthor("itcast");
gc.setOpen(false);
mpg.setGlobalConfig(gc);
// 数据源配置
DataSourceConfig dsc = new DataSourceConfig();
dsc.setUrl("jdbc:mysql://127.0.0.1:3306/mp?
useUnicode=true&useSSL=false&characterEncoding=utf8");
// dsc.setSchemaName("public");
dsc.setDriverName("com.mysql.jdbc.Driver");
dsc.setUsername("root");
dsc.setPassword("root");
mpg.setDataSource(dsc);
// 包配置
PackageConfig pc = new PackageConfig();
pc.setModuleName(scanner("模块名"));
pc.setParent("cn.itcast.mp.generator");
mpg.setPackageInfo(pc);
// 自定义配置
InjectionConfig cfg = new InjectionConfig() {
@Override
public void initMap() {
// to do nothing
}
};
List<FileOutConfig> focList = new ArrayList<>();
focList.add(new FileOutConfig("/templates/mapper.xml.ftl") {
@Override
public String outputFile(TableInfo tableInfo) {
// 自定义输入文件名称
return projectPath + "/itcast-mpgenerator/
src/main/resources/mapper/" + pc.getModuleName()
+ "/" + tableInfo.getEntityName() + "Mapper" +
StringPool.DOT_XML;
}
});
cfg.setFileOutConfigList(focList);
mpg.setCfg(cfg);
mpg.setTemplate(new TemplateConfig().setXml(null));
// 策略配置
StrategyConfig strategy = new StrategyConfig();
strategy.setNaming(NamingStrategy.underline_to_camel);
strategy.setColumnNaming(NamingStrategy.underline_to_camel);
//
strategy.setSuperEntityClass("com.baomidou.mybatisplus.samples.generator.common.BaseE
ntity");
strategy.setEntityLombokModel(true);
//
strategy.setSuperControllerClass("com.baomidou.mybatisplus.samples.generator.common.B
aseController");
strategy.setInclude(scanner("表名"));
strategy.setSuperEntityColumns("id");
strategy.setControllerMappingHyphenStyle(true);
strategy.setTablePrefix(pc.getModuleName() + "_");
mpg.setStrategy(strategy);
// 选择 freemarker 引擎需要指定如下加,注意 pom 依赖必须有!
mpg.setTemplateEngine(new FreemarkerTemplateEngine());
mpg.execute();
}
}
03:测试
代码已经生成:
六:MybatisPlus超级好用插件
MybatisX 是一款基于 IDEA 的快速开发插件,为效率而生。
安装方法:打开 IDEA,进入 File -> Settings -> Plugins -> Browse Repositories,输入 mybatisx 搜索并安装。
功能:
- Java 与 XML 调回跳转
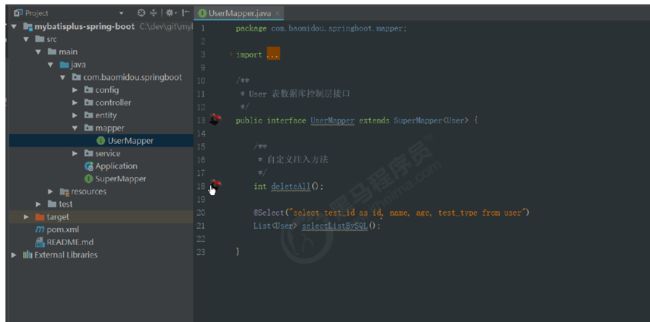
- Mapper 方法自动生成 XML
总结:
对MP的总结不是特别到位,有什么不对的地方欢迎在评论区提出。


