【Netty系列_5】揭开NioEventLoop的面纱
我报名参加金石计划1期挑战——瓜分10万奖池,这是我的第1篇文章,点击查看活动详情
说明: 1. 本文以问题引言和debug的方式,探究NioEventLoop的底层逻辑 2. 由于历史原因,本文使用的代码为编译后的(仅部分为没编译的源代码) 3. 本文为了看起来目录清晰些,目录结构以调用链为基准以树形结构排版
问题:
在开篇前,我们先抛出几个问题,让我们带着问题去阅读本文,不至于读完不知道说了个啥
开篇抛出问题
问题1:NioEventLoop的工作线程是在何时启动的?
注意,这里是NioEventLoop里边的工作线程,而不是NioEventLoop, NioEventLoop的创建不是本文要讲的,可以看:【Netty系列_4】源码分析之NioEventLoopGroup&NioEventLoop的创建 这篇文章
问题2:NioEventLoop有哪些核心方法分别都是干啥的?
一、NioEventLoop 工作线程的启动时机
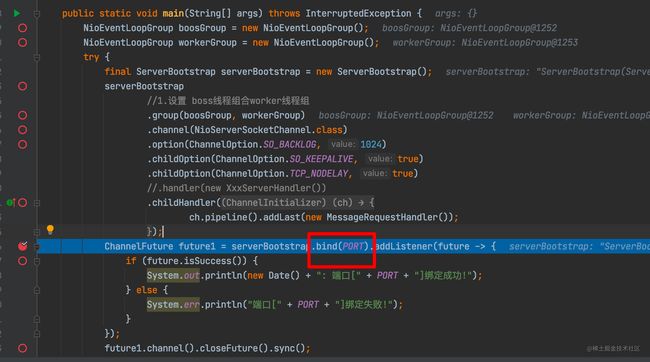
bind();
类:当前main方法所在的启动类
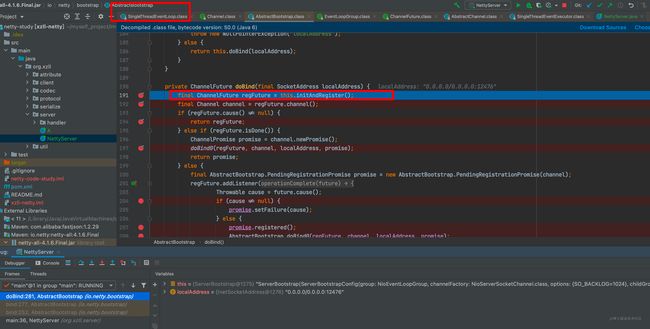
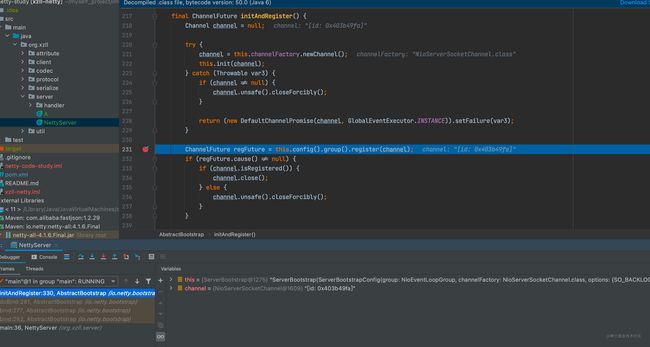
register();
类:AbstractChannel
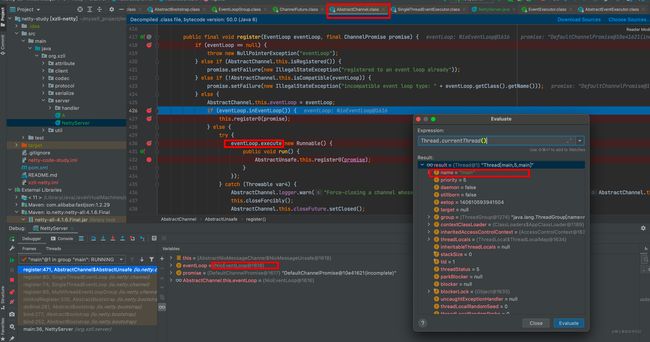
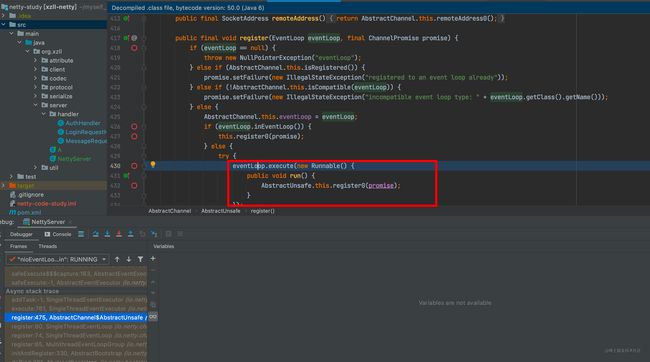
一路点击, 最终来到 AbstractChannel的 register()方法。由于这个方法个人认为稍显重要 所以贴出代码,如下:
```java public final void register(EventLoop eventLoop, final ChannelPromise promise) { if (eventLoop == null) { throw new NullPointerException("eventLoop"); } else if (AbstractChannel.this.isRegistered()) { promise.setFailure(new IllegalStateException("registered to an event loop already")); } else if (!AbstractChannel.this.isCompatible(eventLoop)) { promise.setFailure(new IllegalStateException("incompatible event loop type: " + eventLoop.getClass().getName())); } else { AbstractChannel.this.eventLoop = eventLoop; if (eventLoop.inEventLoop()) { this.register0(promise); } else { try { //最终会走到这里 此处的eventLoop.execute(xxx) 方法将会走进 //SingleThreadEventExecutor的execute(Runnable task) 方法中去 eventLoop.execute(new Runnable() { public void run() { AbstractUnsafe.this.register0(promise); } }); } catch (Throwable var4) { AbstractChannel.logger.warn("Force-closing a channel whose registration task was not accepted by an event loop: {}", AbstractChannel.this, var4); this.closeForcibly(); AbstractChannel.this.closeFuture.setClosed(); this.safeSetFailure(promise, var4); } }
}} ```
在这个方法中,我们可以看到 因为此时的当前线程是main线程 所以inEventLoop是false 所以会走 else 这个分支代码的逻辑
java eventLoop.execute(new Runnable() { public void run() { AbstractUnsafe.this.register0(promise); } });
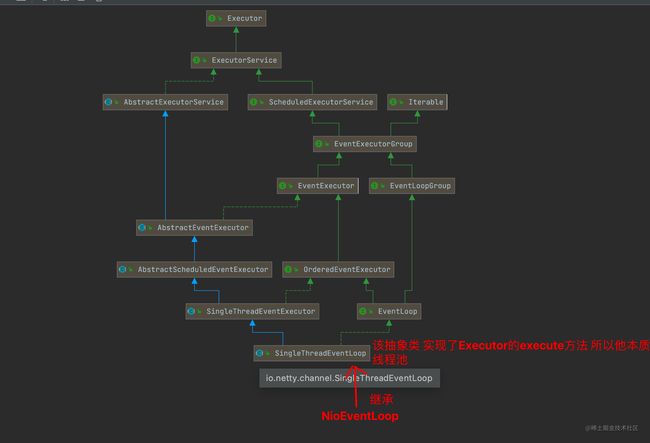
而此处的 java eventLoop.execute() 其实并不会调用到NioEventLoop中去 因为NioEventLoop没有直接实现Executor的execute()方法,而是由NioEventLoop的父类 SingleThreadEventExecutor实现的execute方法,看下图便知。
- NioEventLoop类图:
由此我们知道 AbstractChannel的 register()方法中的 eventLoop.execute()最终是走到了 SingleThreadEventExecutor的execute(Runnable task) 方法去了
execute(Runnable task);
类:SingleThreadEventExecutor
紧接着我们看下SingleThreadEventExecutor的execute(Runnable task)做了什么。
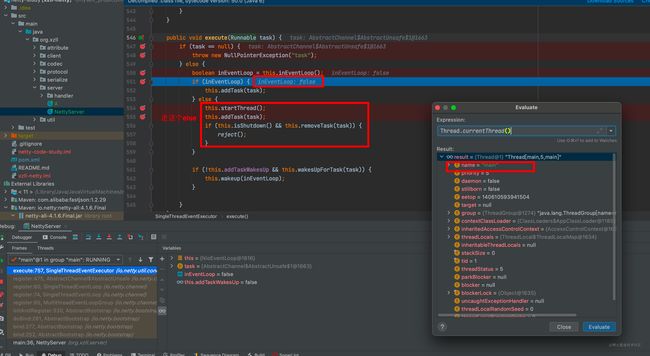 从上图得知,此时的当前线程还是main线程,所以会走下边那个else
```java public void execute(Runnable task) { if (task == null) { throw new NullPointerException("task"); } else { boolean inEventLoop = this.inEventLoop(); if (inEventLoop) { this.addTask(task); } else { //走这个分支,startThread这个方法是真正的启动NioEventLoop中的线程的。从方法名上也能略知一二。 this.startThread(); this.addTask(task); if (this.isShutdown() && this.removeTask(task)) { reject(); } }
if (!this.addTaskWakesUp && this.wakesUpForTask(task)) {
        this.wakeup(inEventLoop);
    }

}
} ```
startThread();
类:SingleThreadEventExecutor
紧接着我们跟进 this.startThread() 方法 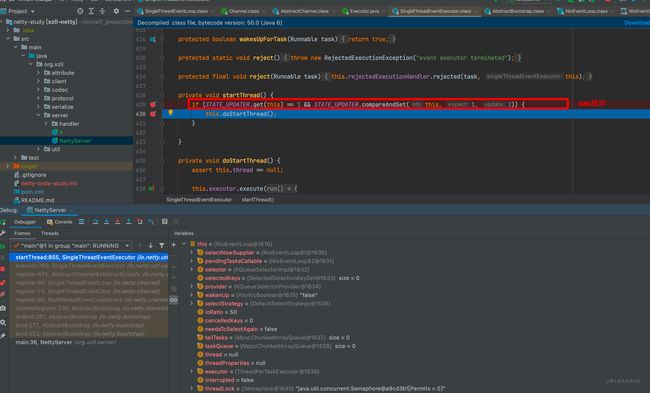 可以看到这里用了个cas操作 这是为什么呢?
```
private static final AtomicIntegerFieldUpdater STATE_UPDATER;
private void startThread() {
if (STATE_UPDATER.get(this) == 1 && STATE_UPDATER.compareAndSet(this, 1, 2)) {
    this.doStartThread();
}
} ```
到这里可能有人犯嘀咕,AtomicIntegerFieldUpdater 这玩意之前没见过 啊 是啥啊?干啥的?下边我们简单介绍下 - 小插曲(AtomicIntegerFieldUpdater简介)
AtomicIntegerFieldUpdater是用来更新某一个实例对象里面的int属性的。 但是注意,在用法上有规则: - 字段必须是volatile类型的,在线程之间共享变量时保证立即可见 - 字段的描述类型(修饰符public/protected/default/private)是与调用者与操作对象字段的关系一致。也就是说调用者能够直接操作对象字段,那么就可以反射进行原子操作。 - 对于父类的字段,子类是不能直接操作的,尽管子类可以访问父类的字段。 - 只能是实例变量,不能是类变量,也就是说不能加static关键字。 - 只能是可修改变量,不能使final变量,因为final的语义就是不可修改。 - 对于AtomicIntegerFieldUpdater和AtomicLongFieldUpdater只能修改int/long类型的字段,不能修改其包装类型(Integer/Long)。如果要修改包装类型就需要使用AtomicReferenceFieldUpdater。
而综上这些规则,我们可以猜测 startThread方法中的cas操作的变量 就是 SingleThreadEventExecutor中的 state变量!
下面我们证明一下猜测
cas 即(if (STATE_UPDATER.get(this) == 1 && STATE_UPDATER.compareAndSet(this, 1, 2))之前: 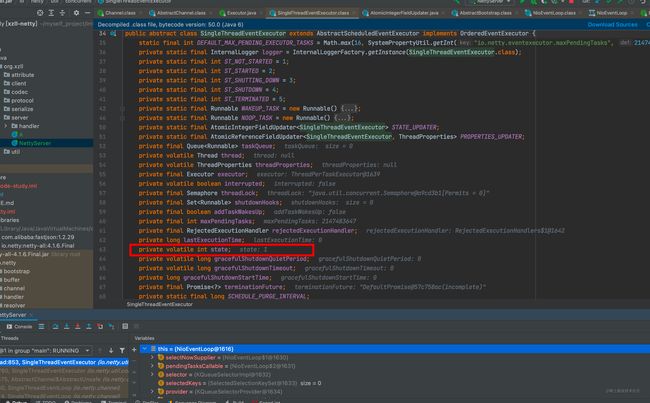
cas 即(if (STATE_UPDATER.get(this) == 1 && STATE_UPDATER.compareAndSet(this, 1, 2))之后: 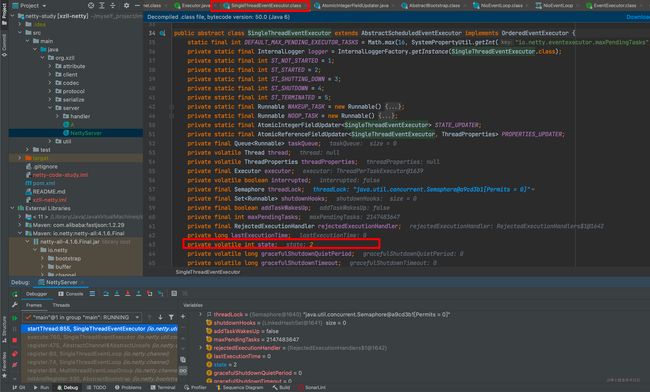
补充:后来我看了netty的源码,才发现这玩意不用咱们猜测 ,从代码中就可以看出来是对哪个变量。。。。下次最好还是下载源码读吧,编译后的有一丢丢差别。 - 补充: 这是源码
java private static final AtomicIntegerFieldUpdaterok,到这里我相信各位也明白了 只有第一次启动时候才会进这个if ,后边在有这个线程调用这个startThread()方法的话 cas永远为false ! 通过这里我们知道 这个是为了防止多次创建并启动NioEVentLoop中的线程的 。为什么我们这么说呢?往下看,当你知道了doStartThread()方法是干啥的,你就知道了为什么说这里的STATE_UPDATER = AtomicIntegerFieldUpdater.newUpdater(SingleThreadEventExecutor.class, "state"); private void startThread() { if (state == ST_NOT_STARTED) { if (STATE_UPDATER.compareAndSet(this, ST_NOT_STARTED, ST_STARTED)) { boolean success = false; try { doStartThread(); success = true; } finally { if (!success) { //很贴心 你没启动成功人还帮你把stats 重置回1 STATE_UPDATER.compareAndSet(this, ST_STARTED, ST_NOT_STARTED); } } } } } cas是防止创建并启动NioEventLoop 中 的线程的了。
doStartThread();
类:SingleThreadEventExecutor
紧接着我们看下doStartThread()干了啥
这个方法比较重要,所以我们连注释带代码一并贴出来: ```java private void doStartThread() { assert thread == null; //## 标记1 executor.execute(new Runnable() { @Override public void run() { thread = Thread.currentThread(); if (interrupted) { thread.interrupt(); } boolean success = false; updateLastExecutionTime(); try { //下边这个run() 是核心方法。也就是说他对应netty线程模型中的---【轮询】, //其实就是while(true)不停的检测某个channel上的io事件,有事件就绪就进行处理,大致就这个意思 //## 标记 2 SingleThreadEventExecutor.this.run(); success = true; } catch (Throwable t) { logger.warn("Unexpected exception from an event executor: ", t); } finally { for (;;) { int oldState = state; if (oldState >= STSHUTTINGDOWN || STATEUPDATER.compareAndSet( SingleThreadEventExecutor.this, oldState, STSHUTTING_DOWN)) { break; } } // 检查是否在循环结束时调用了 confirmShutdown()。 if (success && gracefulShutdownStartTime == 0) { if (logger.isErrorEnabled()) { logger.error("Buggy " + EventExecutor.class.getSimpleName() + " implementation; " + SingleThreadEventExecutor.class.getSimpleName() + ".confirmShutdown() must " + "be called before run() implementation terminates."); } }
try {
            //英语有点塑料 这里就不翻译了。
                // Run all remaining tasks and shutdown hooks. At this point the event loop
                // is in ST_SHUTTING_DOWN state still accepting tasks which is needed for
                // graceful shutdown with quietPeriod.
                for (;;) {
                    if (confirmShutdown()) {
                        break;
                    }
                }
                // Now we want to make sure no more tasks can be added from this point. This is
                // achieved by switching the state. Any new tasks beyond this point will be rejected.
                for (;;) {
                    int oldState = state;
                    if (oldState >= ST_SHUTDOWN || STATE_UPDATER.compareAndSet(
                            SingleThreadEventExecutor.this, oldState, ST_SHUTDOWN)) {
                        break;
                    }
                }
                // We have the final set of tasks in the queue now, no more can be added, run all remaining.
                // No need to loop here, this is the final pass.
                confirmShutdown();
            } finally {
                try {
                    cleanup();
                } finally {
                    // Lets remove all FastThreadLocals for the Thread as we are about to terminate and notify
                    // the future. The user may block on the future and once it unblocks the JVM may terminate
                    // and start unloading classes.
                    // See https://github.com/netty/netty/issues/6596.
                    FastThreadLocal.removeAll();

                    STATE_UPDATER.set(SingleThreadEventExecutor.this, ST_TERMINATED);
                    threadLock.countDown();
                    int numUserTasks = drainTasks();
                    if (numUserTasks > 0 && logger.isWarnEnabled()) {
                        logger.warn("An event executor terminated with " +
                                "non-empty task queue (" + numUserTasks + ')');
                    }
                    terminationFuture.setSuccess(null);
                }
            }
        }
    }
});
} ```
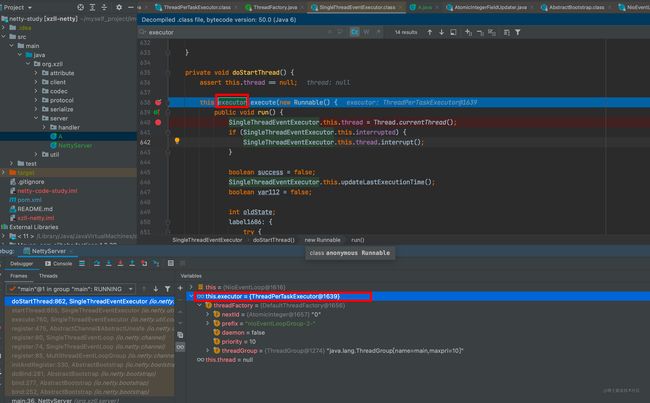
接着我们看下 ## 标记1 this.executor.execute 都做了什么
从上图可以看到 此处的 this.executor 是ThreadPerTaskExecutor的实例对象。所以我们点进去看看
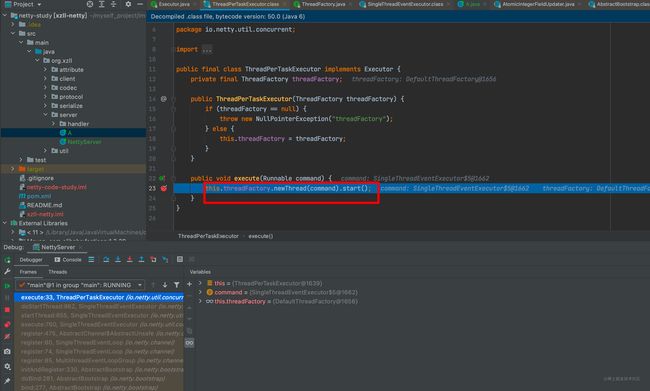 可以知道这里其实很简单就是使用
ThreadPerTaskExecutor中的线程工厂,来创建了个工作线程并启动(start了) ,
注意这里有个很重要的点 ,此处不是创建NioEventLoop(创建NioEventLoop是在Netty系列_3中写过) , 而是创建并启动NioEventLoop中的工作线程!!!!!!!!!!!
是不是有点似曾相识?ThreadPerTaskExecutor 好像在前边某个Netty系列的章节中讲过?没错就是在这个文章-->>>> 【Netty系列_4】源码分析之NioEventLoopGroup&NioEventLoop的创建 当时我在那篇文章中是这么说的:
在将ThreadFactor创建完成后 传给
ThreadPerTaskExecutor类的threadFactor变量保存起来,用于后续的使用(剧透:此实例有个很重要的作用,即创建并开启NioEventLoop 中 的线程)。
到这里我想我们开篇的第一个疑问点(问题1:NioEventLoop的工作线程是在何时启动的?)已经有了答案
二、NioEventLoop的核心方法
run();
接下来就是我们的重头戏 ## 标记1 处
SingleThreadEventExecutor.this.run();的代码分析
废话不多说我们先贴上代码:
java @Override protected void run() { int selectCnt = 0; for (;;) { try { int strategy; try { strategy = selectStrategy.calculateStrategy(selectNowSupplier, hasTasks()); switch (strategy) { case SelectStrategy.CONTINUE: continue; case SelectStrategy.BUSY_WAIT: // 由于 NIO 不支持 busy-wait模式 ,因此直接选择 SELECT case SelectStrategy.SELECT: long curDeadlineNanos = nextScheduledTaskDeadlineNanos(); if (curDeadlineNanos == -1L) { curDeadlineNanos = NONE; // nothing on the calendar } nextWakeupNanos.set(curDeadlineNanos); try { if (!hasTasks()) { strategy = select(curDeadlineNanos); } } finally { //此更新只是为了阻止不必要的选择器唤醒,因此可以使用lazySet(没有竞争条件) nextWakeupNanos.lazySet(AWAKE); } // fall through default: } } catch (IOException e) { //如果我们在这里收到一个 IOException,那是因为 Selector 搞砸了。让我们重建选择器并重试。 issues: https://github.com/netty/netty/issues/8566 rebuildSelector0(); selectCnt = 0; handleLoopException(e); continue; } selectCnt++; cancelledKeys = 0; needsToSelectAgain = false; final int ioRatio = this.ioRatio; boolean ranTasks; if (ioRatio == 100) { try { if (strategy > 0) { processSelectedKeys(); } } finally { // 确保任务始终运行。 ranTasks = runAllTasks(); } } else if (strategy > 0) { final long ioStartTime = System.nanoTime(); try { processSelectedKeys(); } finally { // 确保任务始终运行。 final long ioTime = System.nanoTime() - ioStartTime; ranTasks = runAllTasks(ioTime * (100 - ioRatio) / ioRatio); } } else { ranTasks = runAllTasks(0); // This will run the minimum number of tasks } if (ranTasks || strategy > 0) { if (selectCnt > MIN_PREMATURE_SELECTOR_RETURNS && logger.isDebugEnabled()) { logger.debug("Selector.select() returned prematurely {} times in a row for Selector {}.", selectCnt - 1, selector); } selectCnt = 0; } else if (unexpectedSelectorWakeup(selectCnt)) { // Unexpected wakeup (unusual case) selectCnt = 0; } } catch (CancelledKeyException e) { // 无害的异常 - 但是最好记录下 if (logger.isDebugEnabled()) { logger.debug(CancelledKeyException.class.getSimpleName() + " raised by a Selector {} - JDK bug?", selector, e); } } catch (Error e) { throw (Error) e; } catch (Throwable t) { handleLoopException(t); } finally { // 即使循环处理抛出异常,也始终将其关闭。 try { if (isShuttingDown()) { closeAll(); if (confirmShutdown()) { return; } } } catch (Error e) { throw (Error) e; } catch (Throwable t) { handleLoopException(t); } } } }
首先我们简单看下这个方法的主要干了啥
- 无限for循环。
对应while(true) - 调用select()从操作系统中轮询到网络 IO 事件。 对应
this.select(this.wakenUp.getAndSet(false)) - 处理select轮询出来的I/O事件。对应
this.processSelectedKeys() - 处理异步任务。对应
this.runAllTasks();
如果一句话概况select() , processSelectedKeys()和runAllTasks()这三个重要方法,未免显得太敷衍,我们一个一个来简单看下。
select();
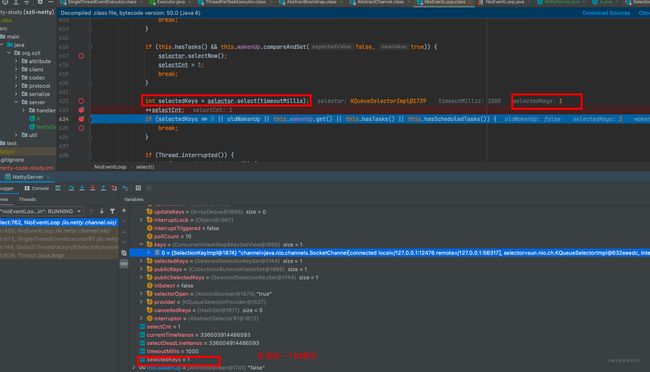
看代码(已删减部分不重要的): java private void select(boolean oldWakenUp) throws IOException { Selector selector = this.selector; try { int selectCnt = 0; long currentTimeNanos = System.nanoTime(); long selectDeadLineNanos = currentTimeNanos + this.delayNanos(currentTimeNanos); while(true) { long timeoutMillis = (selectDeadLineNanos - currentTimeNanos + 500000L) / 1000000L; if (timeoutMillis <= 0L) { if (selectCnt == 0) { selector.selectNow(); selectCnt = 1; } break; } if (this.hasTasks() && this.wakenUp.compareAndSet(false, true)) { selector.selectNow(); selectCnt = 1; break; } int selectedKeys = selector.select(timeoutMillis); ++selectCnt; if (selectedKeys != 0 || oldWakenUp || this.wakenUp.get() || this.hasTasks() || this.hasScheduledTasks()) { break; } long time = System.nanoTime(); if (time - TimeUnit.MILLISECONDS.toNanos(timeoutMillis) >= currentTimeNanos) { selectCnt = 1; } else if (SELECTOR_AUTO_REBUILD_THRESHOLD > 0 && selectCnt >= SELECTOR_AUTO_REBUILD_THRESHOLD) { logger.warn("Selector.select() returned prematurely {} times in a row; rebuilding Selector {}.", selectCnt, selector); this.rebuildSelector(); selector = this.selector; selector.selectNow(); selectCnt = 1; break; } currentTimeNanos = time; } } catch (CancelledKeyException var13) { } } 里边的东西简单说一下。(这块我也是参考了网上,有些小细节我也不知道为啥要这么设计,不太理解Netty作者的意思)
- selector就不多说了,就是当前NioEventLoop上的选择器。
- selectCnt大概是一个记录是否有进行select操作的计数器。
- currentTimeNanos是当前时间(单位纳秒)。
- delayNanos(currentTimeNanos)返回的就是当前时间距离下次定时任务的所剩时间(单位纳秒)。
- selectDeadLineNanos就是下次定时任务的开始时间(单位纳秒)。
- timeoutMillis(单位毫秒)select阻塞超时时间,他的含义则需要联系下面的if代码块,只有当下个定时任务开始距离当前时间>=0.5ms,才能继续往下走,否则表示即将有定时任务要执行,之后会调用一个非阻塞的selectNow()
除了上边这些变量的说明,select()方法还有个非常重要的功能就是 解决了jdk空轮训的bug
解决jdk空轮询bug
我们看下他是咋做的, 在select()方法中。有这么一段代码: java if (time - TimeUnit.MILLISECONDS.toNanos(timeoutMillis) >= currentTimeNanos) { selectCnt = 1; } else if (SELECTOR_AUTO_REBUILD_THRESHOLD > 0 && selectCnt >= SELECTOR_AUTO_REBUILD_THRESHOLD) { logger.warn("Selector.select() returned prematurely {} times in a row; rebuilding Selector {}.", selectCnt, selector); this.rebuildSelector(); selector = this.selector; selector.selectNow(); selectCnt = 1; break; } 而此处的if中的条件用通俗点的话来说就是: - select操作后的时间 - timeoutMillis阻塞超时时间 >= select开始前时间,则说明已经执行过一次阻塞式select了,计数器=1
而进入else if中的条件通俗点讲就是: - 首先你得不符合上边的if条件 ,不符合if条件就代表你得符合: select操作后时间-timeoutMillis阻塞超时时间 < select操作前时间 一般来说 (比如select操作前时间 是 第100纳秒 阻塞时间是 5纳秒 ,操作后时间应该是 第105纳秒或者更高(ps:注意前提条件:select 轮询出的就绪事件是0个))
java if (selectedKeys != 0 || oldWakenUp || this.wakenUp.get() || this.hasTasks() || this.hasScheduledTasks()) { break; }
),如果你操作后时间是第104纳秒(实际情况下 如果select事件直接返回,可能该值会更小,或者说更接近select操作前的时间 第100纳秒 ) 即符合 104-5 =99 < 操作前时间100 ,说明你根本没阻塞 ,直接就返回了 , 且轮询到的事件 0个! 此时说明那你符合两个条件即: 没轮询到io事件&&没阻塞 - 而当你满足上面这个 没轮询到io事件&&没阻塞的条件时,就说明:发生了空轮询(简述:就是即使是关注的select轮询事件返回数量是0(正常情况下要阻塞的),NIO照样不断的从select本应该阻塞的
Selector.select()/Selector.select(timeout)中wake up出来(即不阻塞,直接返回,而此时因为没有事件到来,返回肯定是0 后边继续下一次该循环操作),导致CPU 100%问题)。下图简单描述了该bug生成的过程
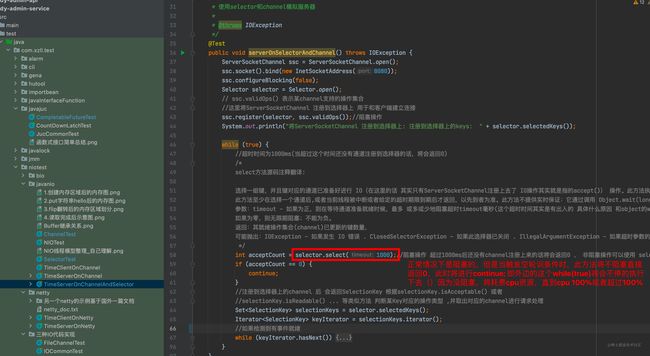 在netty中,如果空轮询发生的次数没达到预先设置的阈值时,是不会去管他的,当这个数量达到512时,将会直接重建select选择器,并将当前这个发生空轮训的select上的selectedKeys挪到新建的select选择器上,从而完美解决空轮训的问题。 注意:如果感兴趣你可以去谷歌看看bug触发的原因和触发条件(严谨来讲,这也算不上完美,但是没有但是。。。)。
我们来看下select重建的主逻辑: java public void rebuildSelector() { if (!this.inEventLoop()) { this.execute(new Runnable() { public void run() { NioEventLoop.this.rebuildSelector(); } }); } else { Selector oldSelector = this.selector; if (oldSelector != null) { Selector newSelector; try { newSelector = this.openSelector(); } catch (Exception var9) { logger.warn("Failed to create a new Selector.", var9); return; } int nChannels = 0; label69: while(true) { try { //拿到老的选择器上的已经轮询到的就绪的事件的keys Iterator i$ = oldSelector.keys().iterator(); while(true) { if (!i$.hasNext()) { break label69; } SelectionKey key = (SelectionKey)i$.next(); Object a = key.attachment(); try { if (key.isValid() && key.channel().keyFor(newSelector) == null) { int interestOps = key.interestOps(); key.cancel(); //注册老选择器上的channel到新的选择器上 SelectionKey newKey = key.channel().register(newSelector, interestOps, a); if (a instanceof AbstractNioChannel) { ((AbstractNioChannel)a).selectionKey = newKey; } ++nChannels; } } catch (Exception var11) { logger.warn("Failed to re-register a Channel to the new Selector.", var11); if (a instanceof AbstractNioChannel) { AbstractNioChannel ch = (AbstractNioChannel)a; ch.unsafe().close(ch.unsafe().voidPromise()); } else { NioTask 这个方法比较简单,就不多解释了。大意就是重新创建个选择器然后把旧的selecter上的channel重新注册到新的selecter上去。
processSelectedKeys();
实测证明,在run方法中调用的 processSelectedKeys方法的 selectedKeys入参在没有连接的情况下仍不为Null(他是一个长度为0的数组),如下: 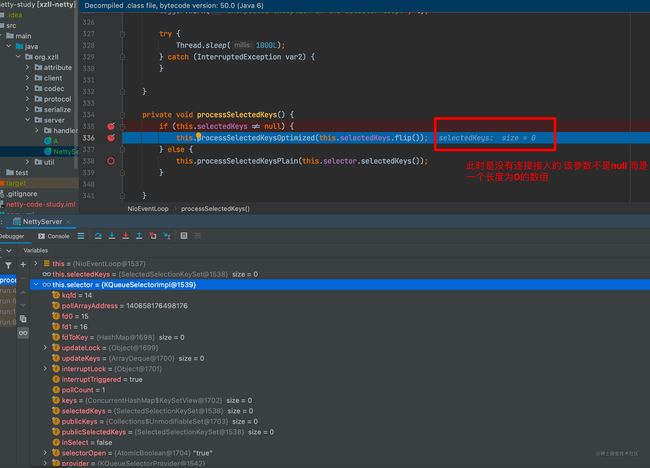
所以这里我们进入processSelectedKeysOptimized方法
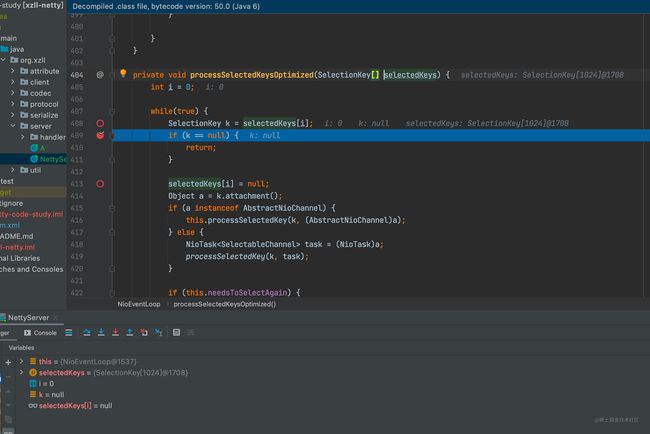 上图可以看到,因为没有客户端连接接入。自然也就无法读取到操作系统的各种IO事件,所以此处
k==null成立,于是return;
but: 因为没有客户端连接接入时,此处永远是 k==null,所以,如果想往下走,我们就需要发起一个请求,这样我们才能debug方式分析后边的代码,否则没发往下走呀。
ps: 有个小细节,就是上边截图中的代码在新的netty版本中有个优化(应该是和GC回收相关的,可见大师是多么的在意效率),具体见下边这段代码: ```java private void processSelectedKeysOptimized() { for (int i = 0; i < selectedKeys.size; ++i) { final SelectionKey k = selectedKeys.keys[i]; // null out entry in the array to allow to have it GC'ed once the Channel close // See https://github.com/netty/netty/issues/2363 selectedKeys.keys[i] = null;//此处的优化应该是为了更快的被回收调
final Object a = k.attachment(); if (a instanceof AbstractNioChannel) { processSelectedKey(k, (AbstractNioChannel) a); } else { @SuppressWarnings("unchecked") NioTasktask = (NioTask ) a; processSelectedKey(k, task); } if (needsToSelectAgain) { // null out entries in the array to allow to have it GC'ed once the Channel close // See https://github.com/netty/netty/issues/2363 selectedKeys.reset(i + 1); selectAgain(); i = -1; } } } ```
暂时我们不关心定时任务类型的SelectionKey,只关心io事件这种的 SelectionKey,所以我们直接看
processSelectedKey(SelectionKey k, AbstractNioChannel ch)方法,略过processSelectedKey(SelectionKey k, NioTask方法。 ```java private void processSelectedKey(SelectionKey k, AbstractNioChannel ch) { final AbstractNioChannel.NioUnsafe unsafe = ch.unsafe(); if (!k.isValid()) { final EventLoop eventLoop; try { eventLoop = ch.eventLoop(); } catch (Throwable ignored) { // If the channel implementation throws an exception because there is no event loop, we ignore this // because we are only trying to determine if ch is registered to this event loop and thus has authority // to close ch. return; } // Only close ch if ch is still registered to this EventLoop. ch could have deregistered from the event loop // and thus the SelectionKey could be cancelled as part of the deregistration process, but the channel is // still healthy and should not be closed. // See https://github.com/netty/netty/issues/5125 if (eventLoop == this) { // close the channel if the key is not valid anymore unsafe.close(unsafe.voidPromise()); } return; }task) try { int readyOps = k.readyOps(); // 在尝试触发 read(...) 或 write(...) 之前,我们首先需要调用 finishConnect(),否则 NIO JDK 通道实现可能会抛出 NotYetConnectedException if ((readyOps & SelectionKey.OP_CONNECT) != 0) { // 删除 OP_CONNECT 否则 Selector.select(..) 将始终返回而不会阻塞 // See https://github.com/netty/netty/issues/924 int ops = k.interestOps(); ops &= ~SelectionKey.OP_CONNECT; k.interestOps(ops); unsafe.finishConnect(); } // 首先处理 OP_WRITE,因为我们可能已经能够强制写入一些正在排队的缓冲区,从而释放内存。 if ((readyOps & SelectionKey.OP_WRITE) != 0) { // 如果没有什么可写的,调用 forceFlush 也会负责清除 OP_WRITE //通过unsafe将内核缓冲区的数据写到网卡 ch.unsafe().forceFlush(); } // Also check for readOps of 0 to workaround possible JDK bug which may otherwise lead // to a spin loop if ((readyOps & (SelectionKey.OP_READ | SelectionKey.OP_ACCEPT)) != 0 || readyOps == 0) { //通过unsafe读取内核缓冲区的数据 unsafe.read(); } } catch (CancelledKeyException ignored) { unsafe.close(unsafe.voidPromise()); }} ```
上面的各种if其实就是在判断事件的类型,然后执行不同策略(
连接 OP_CONNECT,应答OP_ACCEPT,读OP_READ,写OP_WRITE)。为了更明了些,我们把jdk抽象类:
SelectionKey类中定义的各个事件类型的枚举值贴出来java 类:SelectionKey public static final int OP_READ = 1 << 0; //1 public static final int OP_WRITE = 1 << 2; //4 public static final int OP_CONNECT = 1 << 3; //8 public static final int OP_ACCEPT = 1 << 4; //16一般情况下
bossGroup负责accept事件,然后将任务交给workGroup进行读 or 写 这类的操作
测试accept 类的 I/O事件
接下来我们通过Iterm2终端发起一个请求,好分析后边的代码
sheel telnet 127.0.0.1 12476
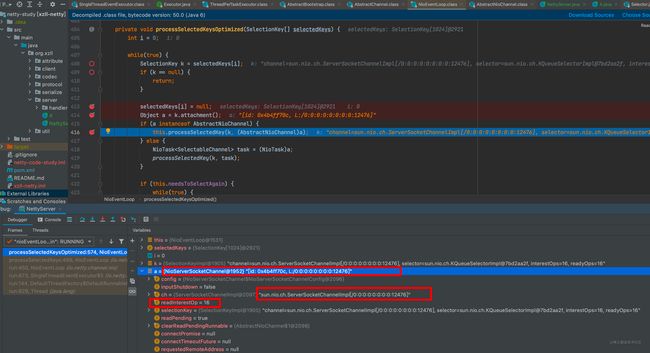
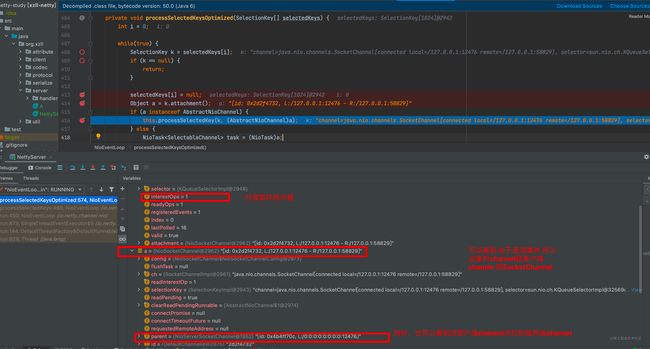
我们可以看到 此处的 k 将不再是null ,同时,我们也能看到其里边的信息,包括ip, 端口,remote端口,以及他的channel类型是 ServerSocketChannel 类型,代表他是一条服务端的连接。同时,还可以看到该连接注册在了哪个选择器上`。等等信息
思考?为什么此处是ServerSocketChannel? 而不是SocketChannel? 因为,这是客户端第一次与服务端建立连接 ,io事件是 16 也就是accept事件,而注册选择器时,选择对accept事件感兴趣的,是服务端的channel,而不是客户端channel,如果忘记的可以戳此处看之前的文章有描述
紧接着下面我们debug到processSelectedKey(k, (AbstractNioChannel)a)这个方法中看下 从上图可以看到,此处的事件为accept 事件,于是 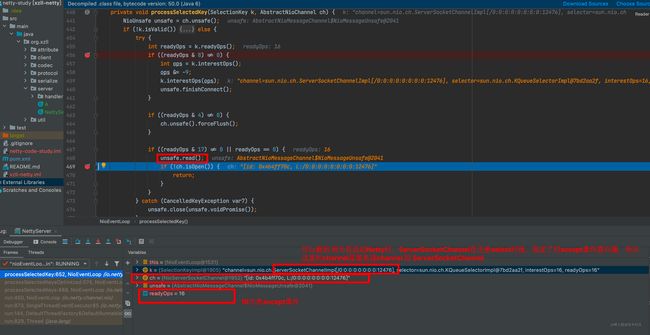
走到上图这个if中,来进行读操作,待讨论问题: accept事件为啥要进行读操作?
由于上边代码是编译后的,全是魔法值,所以我们贴下源码,好知道各个数字代表的啥 ```java try { int readyOps = k.readyOps(); // We first need to call finishConnect() before try to trigger a read(...) or write(...) as otherwise // the NIO JDK channel implementation may throw a NotYetConnectedException. if ((readyOps & SelectionKey.OPCONNECT) != 0) { // remove OPCONNECT as otherwise Selector.select(..) will always return without blocking // See https://github.com/netty/netty/issues/924 int ops = k.interestOps(); ops &= ~SelectionKey.OP_CONNECT; k.interestOps(ops);
unsafe.finishConnect();
}

// Process OP_WRITE first as we may be able to write some queued buffers and so free memory.
if ((readyOps & SelectionKey.OP_WRITE) != 0) {
    // Call forceFlush which will also take care of clear the OP_WRITE once there is nothing left to write
    ch.unsafe().forceFlush();
}

// Also check for readOps of 0 to workaround possible JDK bug which may otherwise lead
// to a spin loop
if ((readyOps & (SelectionKey.OP_READ | SelectionKey.OP_ACCEPT)) != 0 || readyOps == 0) {
    unsafe.read();
}
} catch (CancelledKeyException ignored) { unsafe.close(unsafe.voidPromise()); } ```
测试connect类的事件
这里我们就不debug了直接看下对应的代码过一下
java if ((readyOps & SelectionKey.OP_CONNECT) != 0) { // remove OP_CONNECT as otherwise Selector.select(..) will always return without blocking // See https://github.com/netty/netty/issues/924 int ops = k.interestOps(); ops &= ~SelectionKey.OP_CONNECT; k.interestOps(ops); //当在连接建立完成后,将会进入下边这段逻辑,他将会把连接建立完成的事件传播到下边的类型的handler中去。 unsafe.finishConnect(); } 跟进 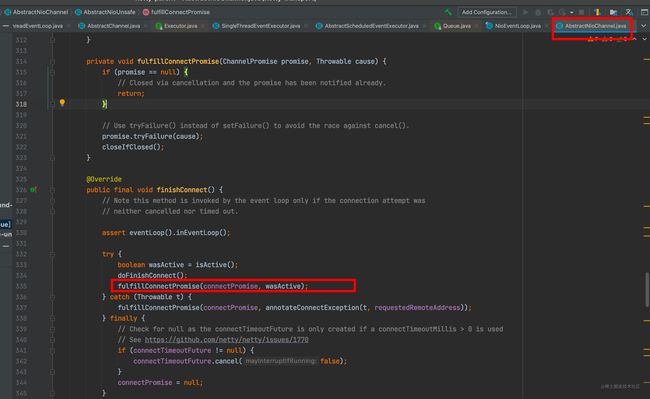 跟进
跟进 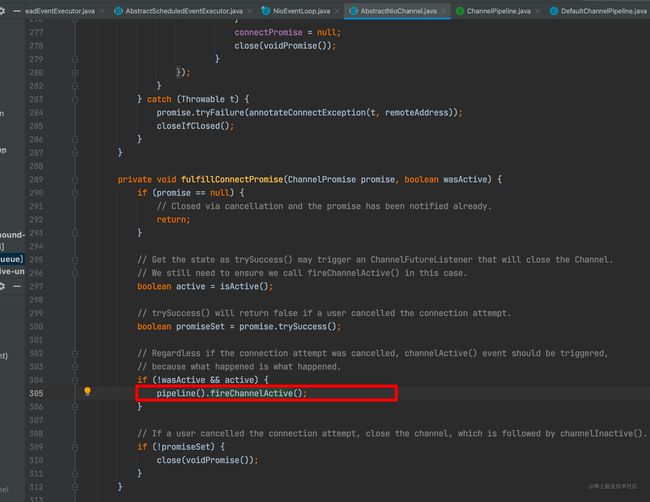
最终我们可以看到这里其实就是回调各个实现了ChannelInboundHandler的handler,来通知这些handler: 连接建好了啊! 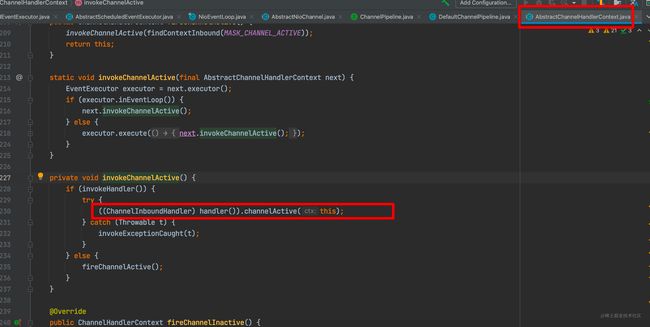
测试读read 类的 I/O事件
好accept事件我们基本就看完了,接着我们在终端随便输入点东西看下读事件
由于输入了中文导致乱码,暂且忽略这个乱码问题,总之我们知道,输入点东西一回车,就是发起了一个tcp 请求,而这个请求会被网卡读到从而写入了内核缓冲区中,然后select选择器会轮询到这个事件(注意这个事件对客户端来说是
写,但是在服务端角度来说是读)。
debug跟进processSelectedKey(SelectionKey k, AbstractNioChannel ch)方法 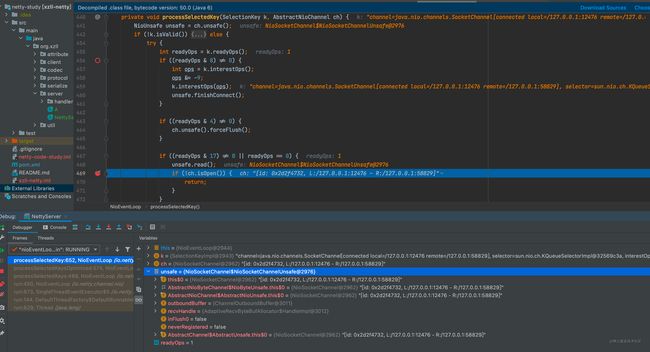
unsafe.read();
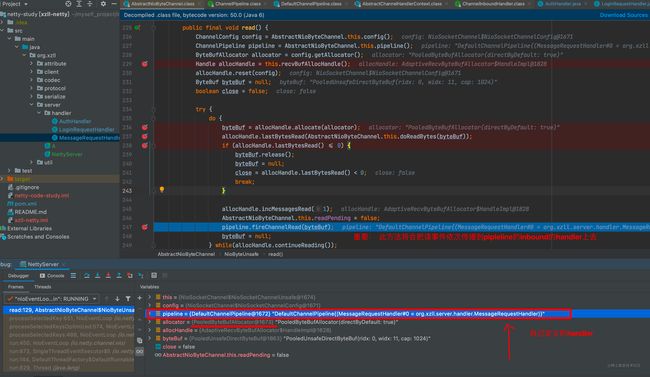
接下来我们看下unsafe.read();方法干了啥
将读事件传播到pipleline的inbound类型的handler上去,注意这里的传播(其实就是回调)是netty的一个很重要的概念,在我们写业务逻辑时自定义的handler中 各种
channelRegistered
channelUnregistered channelActive channelInactive channelRead channelReadComplete userEventTriggered
方法都是通过各种时机 读/写/注册/取消注册/读完成/连接建立成功 等等时机来传播到我们下边的业务的handler的。ps: 其实传播说通俗点就是回调函数哈哈 各种hook,很多框架都有这种设计比如spring中各种各样的回调函数来让我们插手bean信息的修改以及创建等等
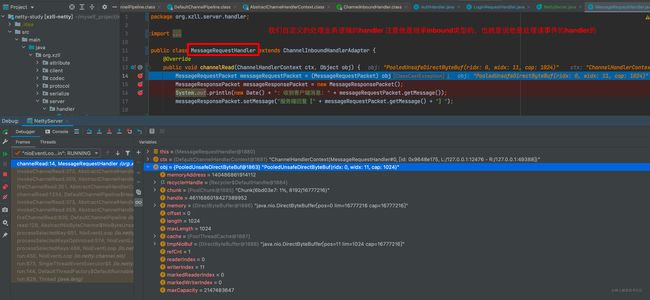
通过fireChannelRead(byteBuf)传播到自定义的handler (inbound类型的)
下边我们截图看下传播 (回调到我们自定义的handler)中的是什么样子。
可以看到,netty是把读到的数据放到了 ByteBuffer中,然后供我们使用里边的数据,但是怎么读取呢?这里就涉及到编解码器了
(因为我们不会再业务handler中去做这个解码操作,那样的话耦合太严重,而且实际编码中 ,业务handler可能有很多个,所以我们可以定义个inbound类型的解码器在添加handler到pipleine时,将其添加到业务handler的前边,到业务handler的时候,数据已经是解码后的了,这样我们就可以愉快的取数据来做各种处理啦!)
netty内置了各种各样的编解码器 ,当然我们也可以自定义,在实际使用中,因为我们使用了websocket协议,所以可以使用HttpServerCodec (后续会自动升级协议为websocket)来进行对ByteBuffer的编解码工作
而如果我们想自定义解码器 那就继承他就好了(当然也可能有其他方式) 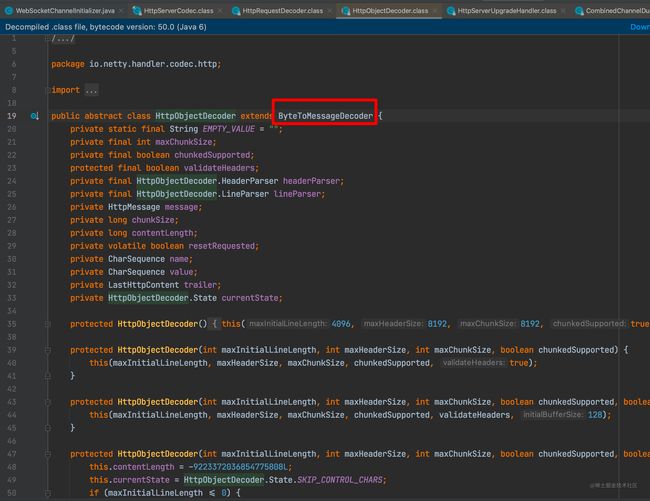
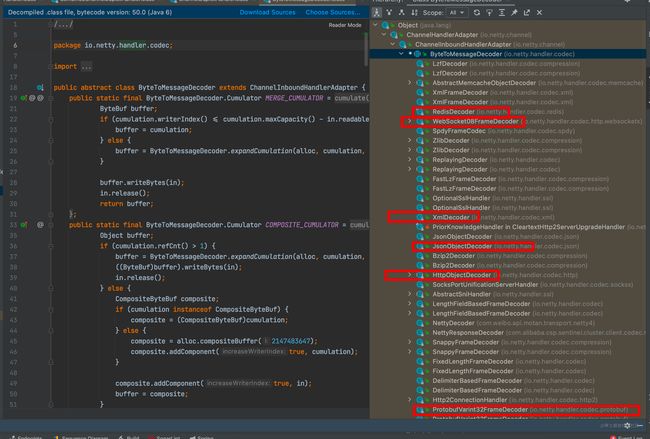
最后我们简单看下实现了ByteToMessageDecoder的解码器都有哪些
1.在需要时,我们也可以参考这些解码器的逻辑来定义自己的解码器
2.注意ByteToMessageDecoder 也是个inbound类型的handler!!因为解码肯定是在读的时候 3.可以看到在下图中,有很多很眼熟的对吧?一般情况下其实是够用了!
到此,processSelectedKeys方法就差不多了,接下来看下runAllTasks();
runAllTasks();
在netty 中, 一个NioEventLoop 通常需要肩负起两种任务, 第一个是作为 I/O 线程, 处理 I/O 操作, 第二个就是作为任务线程, 处理 taskQueue 中的任务.
在netty中,普通类型的
注意runnable这样添加到taskqueue(本质是个mpqsQueue(多生产,单消费)类型的队列)NioEventLoop并没有实现execute方法,这个execute方法是在NioEventLoop的父类SingleThreadEventExecutor中实现的java NioEventLoop实例对象.execute(new Runnable({xxx}));在netty中,定时类型的
注意NioEventLoop并没有实现schedule方法,这个schedule方法是在NioEventLoop的父类runnable这样添加到scheduledTaskQueue(本质是个PriorityQueue类型的队列)SingleThreadEventExecutor的父类AbstractScheduledEventExecutor中实现的java NioEventLoop实例对象.schedule(Runnable command, long delay, TimeUnit unit) ;
接下来我们看下普通的任务一般都是这么添加的,举个例子(拿绑定端口这段逻辑来说吧):
普通runnable任务添加到taskQueue
```java private static void doBind0(final ChannelFuture regFuture, final Channel channel, final SocketAddress localAddress, final ChannelPromise promise) { //channel.eventLoop() 这里的channel.eventLoop就是nioEventLoop的实例对象, //最终该runnable会被提交到taskqueue中 ,在 SingleThreadEventExecutor类的run方法中,将会被runAlltask()从 taskqueue队列中取出,然后给执行掉。 channel.eventLoop().execute(new Runnable() { public void run() { if (regFuture.isSuccess()) { channel.bind(localAddress, promise).addListener(ChannelFutureListener.CLOSEONFAILURE); } else { promise.setFailure(regFuture.cause()); }
}
});
} `` 上边这段代码是在绑定端口时,提交的runnable,其实跟进代码我们可以知道,他最终是添加进了taskqueue`中了
最终来到这里,也就是SingleThreadEventExecutor类的 execute方法,其实我们不用跟也知道,由于NioEventLoop没有实现execute方法。而是他的父类SingleThreadEventExecutor实现了Executors的execute方法,所以当调用 java channel.eventLoop().execute(new Runnable() {xxxx}) 方法时,本质上就是在调用 SingleThreadEventExecutor 的execute方法。 所以这里我们给出SingleThreadEventExecutor 的execute方法的debug示例 如下: 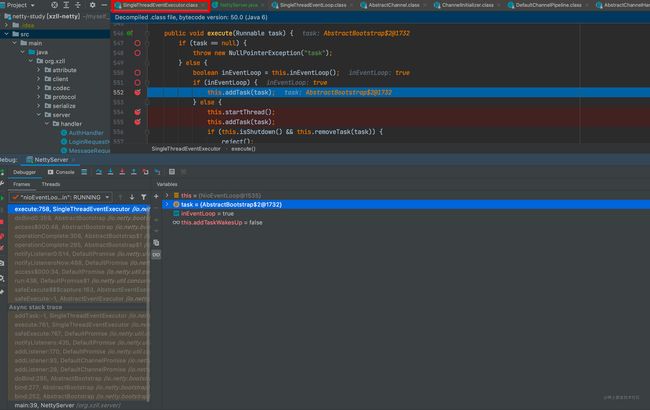
最终会调用这个, ```java final boolean offerTask(Runnable task) { if (this.isShutdown()) { reject(); }
return this.taskQueue.offer(task);} `` 添加到taskqueue队列中去,那么添加进队列后 此runnable` 在什么时候执行呢?往下看。
我们知道在
NioEventLoop中有个run()方法,里边有三个主要步骤,分别是select(),processSelectedKeys()和runAllTasks(),而runAllTask其实就是检测已经可以执行的定时任务类型的runnable和普通的runnbale任务(比如端口绑定,以及初始化服务端channel时等等很多地方,都会会提交此类runnable) ,我们简单看下runAllTasks()的逻辑:
```java protected boolean runAllTasks() { assert inEventLoop(); boolean fetchedAll; boolean ranAtLeastOne = false;
do {
    fetchedAll = fetchFromScheduledTaskQueue();
    //取出并运行队列中的runnable
    if (runAllTasksFrom(taskQueue)) {
        ranAtLeastOne = true;
    }
} while (!fetchedAll); // keep on processing until we fetched all scheduled tasks.

if (ranAtLeastOne) {
    lastExecutionTime = ScheduledFutureTask.nanoTime();
}
afterRunningAllTasks();
return ranAtLeastOne;
} ```
接着我们看下具体是怎么执行的,我们可以看到这个方法很简单,就是不断循环从队列中取出来任务(直到队列里边没有runnable了才停止),来安全的(safeExecute(task)),为什么这里是安全的呢?因为这个taskqueue队列本质上是mpscQueue类型的队列 (也就是多生产----单消费类型的队列) 说白了就是在取的时候保持了串行的特征。 java protected final boolean runAllTasksFrom(Queue
定时任务
上边我们提到过,可以通过调用 NioEventLoop.execute 来将一个 runnable 提交到 taskqueue 中, 也可以通过调用 NioEventLoop.schedule 来提交一个 schedule 任务到 scheduledTaskQueue 中. 在此方法的一开始调用的 fetchFromScheduledTaskQueue() 其实就是将 scheduledTaskQueue 中已经可以执行的(即定时时间已到的 schedule 任务) 拿出来并添加到 taskQueue 中, 作为可执行的 task 等待被调度执行.\ 代码如下: java private boolean fetchFromScheduledTaskQueue() { if (scheduledTaskQueue == null || scheduledTaskQueue.isEmpty()) { return true; } long nanoTime = AbstractScheduledEventExecutor.nanoTime(); for (;;) { //搜索符合既定时间或既定频率 的定时任务 Runnable scheduledTask = pollScheduledTask(nanoTime); if (scheduledTask == null) { return true; } if (!taskQueue.offer(scheduledTask)) { // No space left in the task queue add it back to the scheduledTaskQueue so we pick it up again. scheduledTaskQueue.add((ScheduledFutureTask) scheduledTask); return false; } } }
接下来 runAllTasks() 方法就会不断调用 scheduledTask = pollScheduledTask() 从 scheduledTaskQueue 中获取一个可执行的 task, 然后调用它的 run() 方法来运行此 scheduledTask
三、总结
NioEventLoop工作线程的启动时的调用链java bind register execute startThread doStartThreadNioEventLoop通过内部的三板斧阻塞select(select()方法),处理io就绪的channel(processSelectedKeys)来实现了对i/o事件的响应,处理,传播,并通过runAllTask来处理普通任务和定时任务。
本文到这里就结束了,有什么疑问欢迎提出
