android Tabhost
把官网上的tabhost demo 写下来给大家共享下。在两个月前看这个代码还不会的,英语本来就差,现在感觉好接受一点了
To create a tabbed UI, you need to use a TabHost and a TabWidget. The TabHost must be the root node for the layout, which contains both the TabWidget for displaying the tabs and a FrameLayout for displaying the tab content
大致翻译:创建个tab UI,你需要使用一个TabHost和一个Tabwidget.其中TabHost里必须有个布局,其中TabWiget是用来现在tabs(标签)的,FrameLayout用来显示tab里的内容。
First, create three separate Activity classes in your project: ArtistsActivity, AlbumsActivity, and SongsActivity. These will each represent a separate tab. For now, make each one display a simple message using a TextView
首先,在你工程里创建三个Activity:ArtistsActivity, AlbumsActivity, and SongsActivity,目的是给每个tab显示内容用的。
ArtistsActivity.java的代码
 View Code
 1 package cn.shaoyangjiang.com;
 2
 3 import android.app.Activity;
 4 import android.os.Bundle;
 5 import android.widget.TextView;
 6
 7 public class ArtistsActivity extends Activity{
 8     @Override
 9     protected void onCreate(Bundle savedInstanceState) {
10         super.onCreate(savedInstanceState);
11         super.onCreate(savedInstanceState);
12         TextView textview = new TextView(this);
13         textview.setText("This is the Artists tab");
14         setContentView(textview);
15     }
16 }
AlbumsActivity.java的代码和上面的一样
 View Code
 1 package cn.shaoyangjiang.com;
 2
 3 import android.app.Activity;
 4 import android.os.Bundle;
 5 import android.widget.TextView;
 6
 7 public class AlbumsActivity extends Activity{
 8
 9     @Override
10     protected void onCreate(Bundle savedInstanceState) {
11         super.onCreate(savedInstanceState);
12         super.onCreate(savedInstanceState);
13         TextView textview = new TextView(this);
14         textview.setText("This is the Albums tab");
15         setContentView(textview);
16     }
17
18 }
SongsActivity.java的代码:
 View Code
 1 package cn.shaoyangjiang.com;
 2
 3 import android.app.Activity;
 4 import android.os.Bundle;
 5 import android.widget.TextView;
 6
 7 public class SongsActivity extends Activity{
 8     @Override
 9     protected void onCreate(Bundle savedInstanceState) {
10         super.onCreate(savedInstanceState);
11         super.onCreate(savedInstanceState);
12         TextView textview = new TextView(this);
13         textview.setText("This is the Songs tab");
14         setContentView(textview);
15     }
16 }
第二步:You need an icon for each of your tabs. For each icon, you should create two versions: one for when the tab is selected and one for when it is unselected. The general design recommendation is for the selected icon to be a dark color (grey), and the unselected icon to be a light color (white). (See the Icon Design Guidelines.) For example:
大致翻译:你需要图片来作为你的tabs,每张图片你要有那个版本,一般我们默认是灰色是选择,白色是不选择
这里,我是在res文件夹下又创建了一个文件anim,里面新建了三个.xml文件,分别命名为ic_tab_artists.xml,ic_tab_albums.xml,ic_tab_songs.xml
三个xml文件里的内容是一样的,具体代码是
 View Code
1 <?xml version="1.0" encoding="utf-8"?><selector xmlns:android="http://schemas.android.com/apk/res/android">
<!-- When selected, use grey -->
<item android:drawable="@drawable/ic_tab_artists_grey" android:state_selected="true" />
<!-- When not selected, use white-->
<item android:drawable="@drawable/ic_tab_artists_white" /></selector>
第三步:打开main.xml文件,写入代码:
 View Code
 1 <?xml version="1.0" encoding="utf-8"?>
 2 <TabHost xmlns:android="http://schemas.android.com/apk/res/android"
 3     android:id="@android:id/tabhost"
 4     android:layout_width="fill_parent"
 5     android:layout_height="fill_parent">
 6     <LinearLayout
 7         android:orientation="vertical"
 8         android:layout_width="fill_parent"
 9         android:layout_height="fill_parent"
10         android:padding="5dp">
11         <TabWidget
12             android:id="@android:id/tabs"
13             android:layout_width="fill_parent"
14             android:layout_height="wrap_content" />
15         <FrameLayout
16             android:id="@android:id/tabcontent"
17             android:layout_width="fill_parent"
18             android:layout_height="fill_parent"
19             android:padding="5dp" />
20     </LinearLayout>
21 </TabHost>
This is the layout that will display the tabs and provide navigation between each Activity created above.
The TabHost requires that a TabWidget and a FrameLayout both live somewhere within it. To position the TabWidget and FrameLayout vertically, a LinearLayout is used. The FrameLayout is where the content for each tab goes, which is empty now because the TabHost will automatically embed each Activity within it.
Notice that the TabWidget and the FrameLayout elements have the IDs tabs and tabcontent, respectively. These names must be used so that the TabHost can retrieve references to each of them. It expects exactly these names.
大致翻译:TabHost需要有TabWiget和FrameLayout,为了让它们垂直布局,这里用了linearLayout。这里FrameLayout里面是每个tab的内容,TabHost会自动把Activity加进去。这里还注意到了TabWiget和FrameLayout都有IDs,这样是为了让TabHost可以辨别。
第四步:编写HelloTabWight.java,这里继承了TabAcitvity
package cn.shaoyangjiang.com;


import android.app.TabActivity;

import android.content.Intent;

import android.content.res.Resources;

import android.os.Bundle;

import android.widget.TabHost;


public class MyTabHostActivity extends TabActivity {

    /** Called when the activity is first created. */

    @Override

    public void onCreate(Bundle savedInstanceState) {

        super.onCreate(savedInstanceState);

        setContentView(R.layout.main);


		Resources res = getResources(); // Resource object to get Drawables

		TabHost tabHost = getTabHost(); // The activity TabHost

		TabHost.TabSpec spec; // Resusable TabSpec for each tab

		Intent intent; // Reusable Intent for each tab


		// Create an Intent to launch an Activity for the tab (to be reused)

		intent = new Intent().setClass(this, ArtistsActivity.class);


		// Initialize a TabSpec for each tab and add it to the TabHost

		spec = tabHost.newTabSpec("artists").setIndicator("Artists", res.getDrawable(R.anim.ic_tab_artists)).setContent(intent);

		tabHost.addTab(spec);


		// Do the same for the other tabs

		intent = new Intent().setClass(this, AlbumsActivity.class);

		spec = tabHost.newTabSpec("albums").setIndicator("Albums", res.getDrawable(R.anim.ic_tab_albums)).setContent(intent);

		tabHost.addTab(spec);


		intent = new Intent().setClass(this, SongsActivity.class);

		spec = tabHost.newTabSpec("songs").setIndicator("Songs", res.getDrawable(R.anim.ic_tab_songs)).setContent(intent);

		tabHost.addTab(spec);


		tabHost.setCurrentTab(2);

    }

}
A reference to the TabHost is first captured with getTabHost(). Then, for each tab, a TabHost.TabSpec is created to define the tab properties. The newTabSpec(String) method creates a new TabHost.TabSpec identified by the given string tag. For each TabHost.TabSpec, setIndicator(CharSequence, Drawable) is called to set the text and icon for the tab, and setContent(Intent) is called to specify the Intent to open the appropriate Activity. Each TabHost.TabSpec is then added to the TabHost by calling addTab(TabHost.TabSpec).
At the very end, setCurrentTab(int) opens the tab to be displayed by default, specified by the index position of the tab.
Notice that not once was the TabWidget object referenced. This is because a TabWidget must always be a child of a TabHost, which is what you use for almost all interaction with the tabs. So when a tab is added to the TabHost, it's automatically added to the child TabWidget.
最后还有注意到每个Activity都必须在AndroidMainFest注册
 View Code
 1         <activity
 2             android:name=".AlbumsActivity"
 3             android:label="@string/app_name">
 4         </activity>
 5         <activity
 6             android:name=".ArtistsActivity"
 7             android:label="@string/app_name">
 8         </activity>
 9         <activity
10             android:name=".SongsActivity"
11             android:label="@string/app_name">
12         </activity>
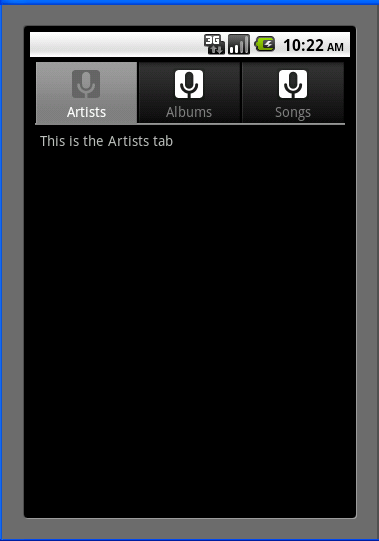
还算比较简单的,给看个效果图吧:

