Spring Security 基于角色的授权示例
了解 RBAC
在 RBAC 模型中存在三个关键实体。他们是,
- 用户或主题 ——执行操作的系统参与者。它可以代表一个自然人、一个自动帐户,甚至是另一个应用程序。
- 角色 ——由职位、部门或职能层次结构定义的权限级别。
- 特权——执行操作的批准或许可
话虽如此,以下是这些实体如何相互映射的说明。
基本上,用户可以执行操作。要执行操作,他们需要具有一定的权限或特权。这就是为什么将权限分配给角色而将角色分配给用户的原因。让我们看看如何实现这些。
本指南向您展示如何在Spring Security中配置基于角色的授权。要使用 Spring Security 授权,我们必须根据登录的用户角色覆盖并授权每个请求的方法。configure(HttpSecurity http)WebSecurityConfigurerAdapter
我们将建造什么
在此示例中,我们将创建一个 Spring Boot 应用程序并根据登录的用户角色授权每个请求。为此,我们需要以下内容:
1. 分配给用户授权访问 URL/页面的用户的角色:
private static final String ROLE_1 = "ADMIN";
private static final String ROLE_2 = "USER";2.不同角色的用户:
@Override
protected void configure(AuthenticationManagerBuilder auth) throws Exception {
	auth.inMemoryAuthentication()
			.withUser("admin")
			.password(passwordEncoder().encode("admin@123"))
			.roles(ROLE_1)
			.and()
			.withUser("user")
			.password(passwordEncoder().encode("user@123"))
			.roles(ROLE_2);
}为了演示,我们使用了 In-Memory 身份验证。
3.根据登录的用户角色授权每个请求:
@Override
protected void configure(HttpSecurity http) throws Exception {
	http.authorizeRequests()
			.antMatchers("/admin").hasRole(ROLE_1)
			.antMatchers("/user").hasAnyRole(ROLE_2, ROLE_1)
			.antMatchers("/all").permitAll()
			.and().formLogin();
}4. 以及用户根据分配的角色访问的一些端点。
类似帖子:
- 带有 JPA 身份验证和 MySQL 的 Spring Boot + Spring Security
- 使用 Spring Boot 进行 Spring Security JDBC 身份验证
使用的技术
查找此应用程序中使用的所有技术的列表。
- 弹簧工具套件 4
- JDK 8
- Spring Boot 2.1.7.RELEASE
- Spring Security 5.1.6.RELEASE
- Maven 3
所需的依赖项
要解决 JAR 依赖关系,请将以下代码添加到您的pom.xml中。
	4.0.0

		org.springframework.boot
		spring-boot-starter-parent
		2.1.7.RELEASE


	org.websparrow
	spring-security-authorization
	0.0.1-SNAPSHOT
	spring-security-authorization
	Demo project for Spring Secuirty Authorization

		1.8


			org.springframework.boot
			spring-boot-starter-security


			org.springframework.boot
			spring-boot-starter-web


				org.springframework.boot
				spring-boot-maven-plugin
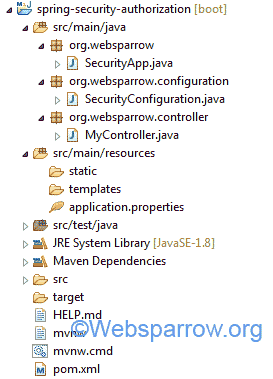
项目结构
我们在 STS 4 IDE 中的应用程序的最终项目结构将如下所示:
现在,让我们跳到实际的代码部分。
1. 用户端点
根据角色创建一些供用户访问的端点/页面。在这个控制器中,我创建了 3 个 REST 端点,即
- /admin → 用户访问的角色为“ ADMIN ”。
- /user → 用户访问的角色为“ USER/ADMIN ”。当然,ADMIN可以访问所有内容。
- /all → 所有人都可以访问。无需登录。
package org.websparrow.controller;
import org.springframework.web.bind.annotation.GetMapping;
import org.springframework.web.bind.annotation.RestController;
@RestController
public class MyController {
@GetMapping("/admin")
public String admin() {
return "Welcome Admin!
";
}
@GetMapping("/user")
public String user() {
return "Welcome User!
";
}
@GetMapping("/all")
public String all() {
return "Hello Everyone!
";
}
}2.安全配置
为了限制用户的访问,我们需要扩展WebSecurityConfigurerAdapter类并覆盖它的方法,并根据登录的用户角色授权每个请求。configure(HttpSecurity http)
1. /admin → 用户访问的角色为“ ADMIN ”。
2. /user → 用户访问的具有“ USER/ADMIN ”角色。当然,ADMIN可以访问所有内容。
3. /all → 被所有人访问。无需登录。
package org.websparrow.configuration;

import org.springframework.context.annotation.Bean;
import org.springframework.context.annotation.Configuration;
import org.springframework.security.config.annotation.authentication.builders.AuthenticationManagerBuilder;
import org.springframework.security.config.annotation.web.builders.HttpSecurity;
import org.springframework.security.config.annotation.web.configuration.EnableWebSecurity;
import org.springframework.security.config.annotation.web.configuration.WebSecurityConfigurerAdapter;
import org.springframework.security.crypto.bcrypt.BCryptPasswordEncoder;
import org.springframework.security.crypto.password.PasswordEncoder;

@Configuration
@EnableWebSecurity
public class SecurityConfiguration extends WebSecurityConfigurerAdapter {

	// Roles for users
	private static final String ROLE_1 = "ADMIN";
	private static final String ROLE_2 = "USER";

	// In-memory users with roles
	@Override
	protected void configure(AuthenticationManagerBuilder auth) throws Exception {
		auth.inMemoryAuthentication()
				.withUser("admin")
				.password(passwordEncoder().encode("admin@123"))
				.roles(ROLE_1)
				.and()
				.withUser("user")
				.password(passwordEncoder().encode("user@123"))
				.roles(ROLE_2);
	}

	// Password encoding
	@Bean
	public PasswordEncoder passwordEncoder() {
		return new BCryptPasswordEncoder();
	}

	// Authorized the request based on role
	@Override
	protected void configure(HttpSecurity http) throws Exception {
		http.authorizeRequests()
				.antMatchers("/admin").hasRole(ROLE_1)
				.antMatchers("/user").hasAnyRole(ROLE_2, ROLE_1)
				.antMatchers("/all").permitAll()
				.and().formLogin();
	}
}不要忘记在自定义安全配置类的类级别添加
@Configuration和注释。@EnableWebSecurity
3. 运行应用程序
该类SecurityApp包含主要方法并负责启动应用程序。
SecurityApp.java
package org.websparrow;

import org.springframework.boot.SpringApplication;
import org.springframework.boot.autoconfigure.SpringBootApplication;

@SpringBootApplication
public class SecurityApp {

	public static void main(String[] args) {
		SpringApplication.run(SecurityApp.class, args);
	}
}4. 测试应用
要测试应用程序,请通过执行上述类启动 Spring Boot 应用程序并按照以下步骤操作:
对于 /admin 页面:
- 点击 localhost:8080/admin,它会将您重定向到登录页面。
- 使用具有“ ADMIN ”角色的用户登录,成功验证后,它将显示管理页面。
- 同样,尝试使用不具有“ ADMIN ”角色的用户(用户具有“ USER ”角色)访问管理 URL,Spring Security 将阻止您访问管理页面。
对于 /user 页面:
- 点击 localhost:8080/user,它会将您重定向到登录页面。
- 使用具有角色“ USER ”的用户登录,成功验证后,它将显示用户页面。
- 用户具有“管理员”角色也可以访问它。
对于/所有页面:
- Spring Security 允许所有人访问 localhost:8080/all URL。它不需要经过身份验证。
下载源码:spring-security-role-based-authorization-example.zip
参考
- Spring Security 入门
- Spring Security-如何更改默认用户名和密码
- Spring Security - 授权请求

