《Spring Boot整合篇》笔记
说明
- 这篇笔记是根据尚硅谷免费发布在B站的视频(https://www.bilibili.com/video/BV1KW411F7oX)进行总结的;
- 雷丰阳老师在 SpringBoot 整合篇中没有像在基础篇中做笔记,且在整个 SpringBoot 教程中,都是使用 Spring Boot 1.5。所以我基于自己对老师所授知识的理解和在 SpringBoot 2 中的实践,写了这篇笔记,进行分享;
- 如果有笔记上的错漏或者理解上的不到位,希望能在评论区里指正;
1、JSR-107
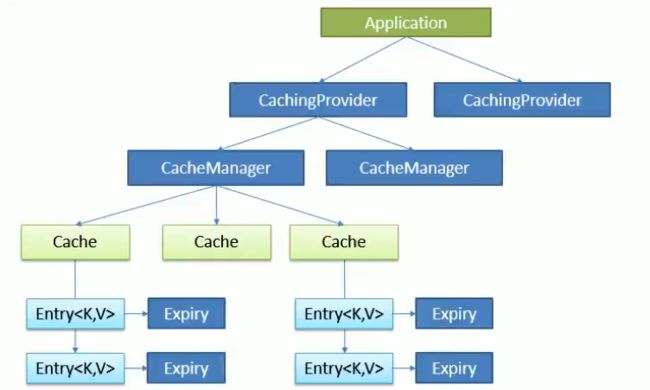
Java Caching 定义了5个核心接口,分别是 CachingProvider,CacheManager,Cache,Entry,Expiry。
可以在javax.cache:cache-api中查看。
- CachingProvider 定义了创建、配置、获取、管理和控制多个 CacheManager。一个应用可以在运行期访问多个 CacheProvider。
- CacheManager 定义了创建、配置、获取、管理和控制多个唯一命名的 Cache,这些 Cache 存在于 CacheManager 的上下文中。一个 CacheManager 仅被一个 CachingProvider 所拥有。
- Cache 是一个类似Map的数据结构并临时存储以Key为索引的值。一个 Cache 仅被一个 CacheManager 所拥有。
- Entry 是一个存储在 Cache 中的key-value对。
- Expiry 每一个存储在 Cache 中的条目有一个定义的有效期。一旦超过这个时间,条目为过期的状态。一旦过期,条目将不可访问、更新和删除。缓存有效期可以通过 ExpiryPolicy 设置。

2、Spring 缓存抽象
Spring 从3.1开始定义了 org.springframework.cache.Cache 和 org.springframework.cache.CacheManager 接口来统一不同的缓存技术;并支持使用JCache注解简化开发。
| Cache | 缓存接口,定义缓存操作。实现有:RedisCache、EhCacheCache、ConcurrentMapCache等 |
| CacheManager | 缓存管理器,管理各种缓存组件Cache |
| @Cacheable | 主要针对方法配置,能够根据方法的请求参数对其结果进行缓存 |
| @CacheEvict | 清空缓存 |
| @CachePut | 保证方法被调用,又希望结果被缓存 |
| @EnableCaching | 开启基于注解的缓存 |
| keyGenerator | 缓存数据时key生成策略 |
| serialize | 缓存数据时value序列化策略 |
3、缓存的使用
将方法的运行结果进行缓存,以后再要相同数据,直接从缓存中获取,不再调用方法。
-
引入 spring-boot-starter-cache 模块
-
@EnableCaching 开启缓存
-
使用缓存注解(@Cacheable、@CachePut、@CacheEvit)
-
(切换为其他缓存)
4、缓存工作原理&@CacheEnable工作流程
4.1、缓存工作原理
-
自动配置类 CacheAutoConfiguration,会导入一系列 XXXCacheConfiguration(有顺序),这些配置类通过 @Conditional 注解进行判断是否生效,默认只有 SimpleCacheAutoConfiguration 生效。
-
SimpleCacheConfiguration 给容器中注册了一个 CacheManager:ConcurrentMapCacheManager。
@Bean ConcurrentMapCacheManager cacheManager(CacheProperties cacheProperties, CacheManagerCustomizers cacheManagerCustomizers) { ConcurrentMapCacheManager cacheManager = new ConcurrentMapCacheManager(); List<String> cacheNames = cacheProperties.getCacheNames(); if (!cacheNames.isEmpty()) { cacheManager.setCacheNames(cacheNames); } return cacheManagerCustomizers.customize(cacheManager); } -
ConcurrentMapCacheManager 可以获取和创建 ConcurrentMapCache 类型的 Cache 组件
public Cache getCache(String name) { Cache cache = this.cacheMap.get(name); if (cache == null && this.dynamic) { synchronized (this.cacheMap) { cache = this.cacheMap.get(name); if (cache == null) { cache = createConcurrentMapCache(name); this.cacheMap.put(name, cache); } } } return cache; } -
ConcurrentMapCache 的作用是将数据保存在 ConcurrentMap 中
4.2、@Cacheable运行流程
-
该注解标注的方法运行之前,通过 CacheManager,根据 cacheNames 查询 Cache 缓存组件,第一次获取缓存如果没有组件会自动创建
-
去 Cache 中使用Key,查找缓存的Value。
Key可以直接指定或者指定生成器,默认是使用 SimpleKeyGenerator 生成的,它的生成策略:
- 如果没有参数,key=new SimpleKey()
- 如果有一个参数,key=参数的值
- 如果有多个参数,key=new SimpleKey(params)
-
如果查到,就不需要调用目标方法;如果没有查到缓存就调用目标方法,将目标方法返回的结果,放进缓存中。
5、缓存注解
5.1、@Cacheable的几个属性
-
cacheNames/value:指定缓存组件的名字,即将方法的返回结果放在哪个缓存中,可以指定多个缓存
-
key:缓存数据使用的key值,可以直接指定,默认是使用方法参数的值,可以编写 SpEL
-
keyGenerator:key的生成器,key和keyGenerator二选一使用
@Bean public KeyGenerator myKeyGenerator(){ return new KeyGenerator() { @Override public Object generate(Object target, Method method, Object... params) { return method.getName()+"["+ Arrays.asList(params)+"]"; } }; } //========================= @Cacheable(cacheNames = {"employee"}, keyGenerator = "myKeyGenerator") //指定key生成器 public Employee getEmployeeById(Integer id) { //…… } -
cacheManager:指定缓存管理器,或者cacheResolver指定获取解析器
-
condition:指定符合条件的情况下才缓存
@Cacheable(cacheNames = {"employee"}, condition="#a0>1") //表示第一个参数的值>1时才进行缓存 -
unless:当unless指定的条件为true,方法的返回值就不会被缓存
-
sync:是否使用异步模式,默认方法执行完,将结果以同步的方式存入缓存中
5.2、@CachePut
修改了数据库的某个数据,同时更新缓存,运行时先调用目标方法,将目标方法的结果缓存起来。
@Cacheable(cacheNames = {"employee"})
public Employee getEmployeeById(Integer id) {
    return employeeMapper.getEmployeeById(id);
}

@CachePut(cacheNames = {"employee"}, key = "#result.id")
public Employee updateEmployeeById(Employee employee) {
    employeeMapper.updateEmployeeById(employee);
    return employee;
}
在以上示例中,更新函数的缓存 Key 值如果和查询函数的 Key 值不一致,那么更新后查询函数查询的结果是旧的数据。
5.3、@CacheEvict
缓存清除
- key:指定要清除的数据
- allEntries:默认false,如果为true,表示清除这个缓存中所有数据
- beforeInvocation:缓存的清除是否在方法之前,默认false,即缓存清除在方法执行后进行,如果方法出现异常缓存就不会清除。如果设为true,则表示清除缓存在方法运行之前,无论方法是否出现异常,缓存都要被清除
5.4、其他
-
@Caching
@Caching是缓存的结合体
@Caching( cacheable = { @Cacheable(value={"employee"}) }, put = { @CachePut(value={"employee"}) } ) // 该示例函数的返回值是执行函数完的结果 -
@CacheConfig
加在类上,抽取缓存的公共配置
@CacheConfig(cacheNames={"employee"})
public class EmployeeServiceImpl{}
6、整合Redis
默认使用的是 ConcurrentMapCacheManager 和 ConcurrentMapCache ,开发中多使用 redis、memcached、encache。
- 导入
spring-boot-starter-data-redis - 配置文件配置 redis 的地址
6.1、RedisTemplate & StringRedisTemplate
在 RedisAutoConfiguration 中自动配置了 RedisTemplate 和 StringRedisTemplate,可直接使用。
当你的redis数据库里面本来存的是字符串数据或者你要存取的数据就是字符串类型数据的时候,那么你就使用StringRedisTemplate即可。但是如果你的数据是复杂的对象类型,而取出的时候又不想做任何的数据转换,直接从Redis里面取出一个对象,那么使用RedisTemplate是更好的选择。
Redis常见的五大数据类型和RedisTemplate的相关API如下,
- redisTemplate.opsForValue() 【String】
- redisTemplate.opsForList() 【List】
- redisTemplate.opsForSet() 【Set】
- redisTemplate.opsForHash() 【Hash】
- redisTemplate.opsForZSet() 【ZSet】
6.2、序列化
RedisTemplate 使用的序列化类是 JdkSerializationRedisSerializer,而 StringRedisTemplate 使用的是 StringRedisSerializer。
如果要更改序列化规则,如将数据以 JSON 形式保存,可以自定义 RedisTemplate 设置序列化规则并注入容器中。
@Bean
public RedisTemplate<Object, Object> jsonRedisTemplate(RedisConnectionFactory redisConnectionFactory)
        throws UnknownHostException {
    RedisTemplate<Object, Object> template = new RedisTemplate<>();
    template.setConnectionFactory(redisConnectionFactory);
    Jackson2JsonRedisSerializer<Object> serializer = new Jackson2JsonRedisSerializer<>(Object.class);
    template.setDefaultSerializer(serializer);
    return template;
}
7、自定义CacheManager
引入 Redis 的 starter 后,容器中注册的但是 RedisCacheManager,SimpleCacheManager 失效。RedisManager 帮助我们创建 RedisCache 来作为缓存组件,RedisCache 通过操作 redis 缓存数据。
-
我本来以为在手动注入自定义 RedisTemplate 后,RedisCacheManager 创建使用的是从容器中获取到的自定义的 RedisTemplate。追查源码发现,RedisCacheManager 创建使用的 RedisCacheConfiguration,设置序列化器是用手动创建的 JDK 序列化器。
org.springframework.data.redis.cache.RedisCacheConfiguration config = org.springframework.data.redis.cache.RedisCacheConfiguration .defaultCacheConfig(); config = config.serializeValuesWith( SerializationPair.fromSerializer(new JdkSerializationRedisSerializer(classLoader))); -
自定义 CacheManger 的方法
@Bean RedisCacheManager cacheManager(RedisConnectionFactory redisConnectionFactory) { // 使用缓存的默认配置 RedisCacheConfiguration config = RedisCacheConfiguration.defaultCacheConfig(); // 使用 GenericJackson2JsonRedisSerializer 作为序列化器 config = config.serializeValuesWith( RedisSerializationContext.SerializationPair.fromSerializer( new GenericJackson2JsonRedisSerializer())); RedisCacheManager.RedisCacheManagerBuilder builder = RedisCacheManager.builder(redisConnectionFactory).cacheDefaults(config); return builder.build(); } -
Jackson2JsonRedisSerializer 用的是json的序列化方式,能解决 JdkSerializationRedisSerializer 带来的缺陷,但复杂类型(集合,泛型,实体包装类)反序列化时会报错。GenericJackson2JsonRedisSerializer 不需要指明序列化的类,实现原理是在json数据中放一个@class属性,指定了类的全路径包名,方便反序列化。
二、SprinigBoot 和 消息队列
1、概述
在大多应用中,可通过消息服务中间件来提升系统异步通信、扩展解耦能力。
JMS(Java Message Service)JAVA 消息式服务,是基于 JVM 消息代理的规范,ActiveMQ 是 JMS 实现。
AMQP(Advanced Message Queuing Protocol)是高级消息队列协议,也是一个消息代理的规范,兼容 JMS,RabbitMQ 是 AMQP 的实现。
2、Rabbit MQ 中的一些概念
-
Message
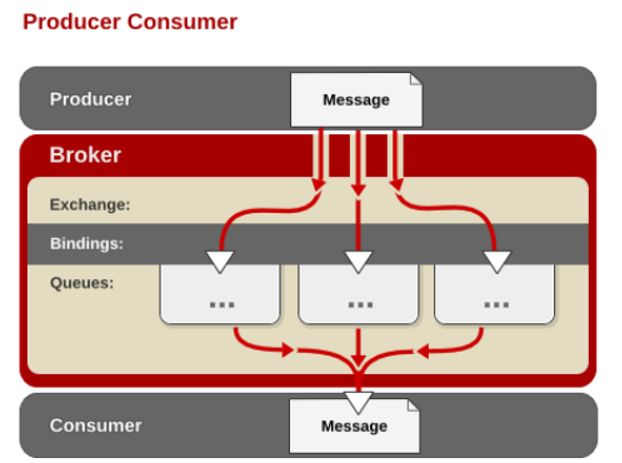
消息,消息是不具名的,它由消息头和消息体组成。消息体是不透明的,而消息头则由一系列的可选属性组成,这些属性包括routing-key(路由键)、priority(相对于其他消息的优先权)、delivery-mode(指出该消息可能需要持久性存储)等。
-
Publisher
消息的生产者,也是一个向交换器发布消息的客户端应用程序。
-
Exchange
交换器,用来接收生产者发送的消息并将这些消息路由给服务器中的队列。
Exchange有4种类型:direct(默认),fanout, topic, 和headers,不同类型的Exchange转发消息的策略有所区别。 -
Queue
消息队列,用来保存消息直到发送给消费者。它是消息的容器,也是消息的终点。一个消息可投入一个或多个队列。消息一直在队列里面,等待消费者连接到这个队列将其取走。
-
Binding
绑定,用于消息队列和交换器之间的关联。一个绑定就是基于路由键将交换器和消息队列连接起来的路由规则,所以可以将交换器理解成一个由绑定构成的路由表。 Exchange和Queue的绑定可以是多对多的关系。
-
Connnection
网络连接,比如一个TCP连接。
-
Channel
信道,多路复用连接中的一条独立的双向数据流通道。信道是建立在真实的TCP连接内的虚 拟连接,AMQP命令都是通过信道发出去的,不管是发布消息、订阅队列还是接收消息,这些动作都是通过信道完成。因为对于操作系统来说建立和销毁 TCP 都是非常昂贵的开销,所以引入了信道的概念,以复用一条 TCP 连接
-
Consumer
消息的消费者,表示一个从消息队列中取得消息的客户端应用程序。
-
Virtual Host
虚拟主机,表示一批交换器、消息队列和相关对象。虚拟主机是共享相同的身份认证和加密环境的独立服务器域。每个 vhost 本质上就是一个 mini 版的 RabbitMQ 服务器,拥有自己的队列、交换器、绑定和权限机制。vhost 是 AMQP 概念的基础,必须在连接时指定, RabbitMQ 默认的 vhost 是 /。
-
Broker
表示消息队列服务器实体。

3、Rabbit MQ 运行机制
3.1、AMQP中的消息路由
AMQP 中消息的路由过程和 Java 开发者熟悉的 JMS 存在一些差别,AMQP 中增加了Exchange 和 Binding 的角色。生产者把消息发布到 Exchange 上,消息最终到达队列并被消费者接收,而 Binding 决定交换器的消息应该发送到哪个队列。

3.2、Exchange类型
Exchange分发消息时根据类型的不同分发策略有区别,目前共四种类型:direct、fanout、topic、headers 。headers 匹配 AMQP 消息的 header 而不是路由键, headers 交换器和 direct 交换器完全一致,但性能差很多,目前几乎用不到了,所以直接看另外三种类型。
-
Direct
消息中的路由键(routing key)如果和 Binding 中的 binding key 一致, 交换器就将消息发到对应的队列中。
-
Fanout
每个发到 fanout 类型交换器的消息都会分到所有绑定的队列上去。fanout 交换器不处理路由键, 只是简单的将队列绑定到交换器上,每个发送到交换器的消息都会被转发到与该交换器绑定 的所有队列上。fanout 类型转发消息是最快的。
-
Topic
topic 交换器通过模式匹配分配消息的路由键属性,将路由键和某个模式进行匹配,此时队列需要绑定到一个模式上。它将路由键和绑定键的字符串切分成单词,这些单词之间用点隔开。它同样也会识别两个通配符:符号“#”和符号 “* ” 。# 匹配 0 个或多个单词, *匹配一个单词。
4、Docker 安装 RabbitMQ
docker run -d -p 5673:5672 -p 15673:15672 --name rabbitmq01 rabbitmq:3-management
5、SpringBoot 整合 RabbitMQ
<dependency>
    <groupId>org.springframework.bootgroupId>
    <artifactId>spring-boot-starter-amqpartifactId>
dependency>
<dependency>
    <groupId>org.springframework.amqpgroupId>
    <artifactId>spring-rabbit-testartifactId>
    <scope>testscope>
dependency>
5.1、RabbitAutoConfiguration
-
ConnectionFactory
连接工厂
-
RabbitProperties
封装了RabbitMQ的配置
-
RabbitTemplate
给RabbitMQ发送和接收消息
-
AmqpAdmin
RabbitMQ系统管理功能组件
5.2、RabbitTemplate
-
rabbitTemplate.send(exchange, routeKey, message)
Message 需要自己构造,包括消息体内容和消息头
-
rabbitTemplate.convertAndSend(exchange, routeKey, object)
object 默认当成消息体,只需要传入要发送的对象,会自动序列化发送给 rabbitmq
-
rabbitTemplate.receiveAndConvert(queueName)
从队列接收消息,并自动反序列化
Map<String, Object> map = new HashMap<>();
map.put("sender", "林达");
map.put("data", Arrays.asList("2020", "10", "27"));
rabbitTemplate.convertAndSend("mytest.direct", "linda", map);

Object o = rabbitTemplate.receiveAndConvert("linda");
System.out.println(o.getClass()); // java.util.HashMap
System.out.println(o); // {data=[2020, 10, 27], sender=林达}
5.3、序列化机制
RabbitTemplate 默认使用 SimpleConverter (即JDK反序列规则),但如果容器中注入了自定义的 MessageConverter,就会使用我们自定义的。
// RabbitTemplate
protected void initDefaultStrategies() {
    setMessageConverter(new SimpleMessageConverter());
}
// RabbitTemplateConfigurer
if (this.messageConverter != null) {
    template.setMessageConverter(this.messageConverter);
}
如果我们要将序列化规则设置为 JSON 形式,则可以使用如下方法:
@Bean
public Jackson2JsonMessageConverter jsonMessageConverter() {
    return new Jackson2JsonMessageConverter();
}
5.4、监听队列
在消费者应用中,通常需要监听队列,以获取消息。在 Spring Boot 中如何要监听队列,需要开启 @EnableRabbit,然后用 @RabbitListener 进行监听。
@SpringBootApplication
@EnableRabbit
public class Springboot07AmqpApplication {
    public static void main(String[] args) { SpringApplication.run(Springboot07AmqpApplication.class, args); }
}
@RabbitListener(queues = "linda")
void receive1(HashMap<?,?> map) {
    System.out.println(map);
}
@RabbitListener(queues = "linda.news")
void receive2(Message message) {
    System.out.println(message.getMessageProperties());
    System.out.println(message.getBody());
}
5.5、AmqpAdmin 管理组件的使用
AmqpAdmin 可以帮助我们创建和删除 Queue,Exchange,Binding。
@Test
void test() {
    amqpAdmin.declareExchange(new DirectExchange("amqpadmin.exchange"));
    amqpAdmin.declareQueue(new Queue("amqpadmin.queue", true));
    amqpAdmin.declareBinding(
            new Binding("amqpadmin.queue", Binding.DestinationType.QUEUE, "amqpadmin.exchange", "amqpamin.queue", null)
    );
}
三、SpringBoot 和 检索
1、检索简介
我们的应用经常需要添加检索功能,开源的 ElasticSearch 是目前全文搜索引擎的首选。他可以快速的存储、搜索和分析海量数据。Spring Boot通过整合Spring Data ElasticSearch为我们提供了非常便捷的检索功能支持。
Elasticsearch是一个分布式搜索服务,提供Restful API,底层基于Lucene,采用多shard(分片)的方式保证数据安全,并且提供自动resharding的功能,github 等大型的站点也是采用了ElasticSearch作为其搜索服务。
2、快速入门 Elasticsearch
2.1、了解 ElasticSearch
Elasticsearch 是面向文档的,意味着它存储整个对象或文档。Elasticsearch 不仅存储文档,而且索引每个文档的内容,使之可以被检索。在 Elasticsearch 中,我们对文档进行索引、检索、排序和过滤,而不是对行列数据。
Elasticsearch 使用 JavaScript Object Notation(或者 JSON)作为文档的序列化格式。JSON 序列化为大多数编程语言所支持,并且已经成为 NoSQL 领域的标准格式。 它简单、简洁、易于阅读。
存储数据到 Elasticsearch 的行为叫做索引,但在索引一个文档之前,需要确定将文档存储在哪里。一个 Elasticsearch 集群可以包含多个索引 ,相应的每个索引可以包含多个类型。这些不同的类型存储着多个文档,每个文档又有多个属性。
中文文档:https://www.elastic.co/guide/cn/elasticsearch/guide/current/_finding_your_feet.html
2.2、Docker 安装 ElasticSearch
docker run -e ES_JAVA_OPTS="-Xms256m -Xmx256m" -d -p 9201:9200 -p 9301:9300 --name ES01 elasticsearch
2.3、ElasticSearch的简单使用
-
添加一个员工信息
POST /megacorp/employee/1 { "first_name" : "John", "last_name" : "Smith", "age" : 25, "about" : "I love to go rock climbing", "interests": [ "sports", "music" ] } -
查找员工信息
-
按ID查找
GET /megacorp/employee/1 -
轻量搜索
GET /megacorp/employee/_search GET /megacorp/employee/_search?q=last_name:Smith -
查询表达式
GET /megacorp/employee/_search { "query" : { "match" : { "last_name" : "Smith" } } } -
还有更多方式的查询
-
3、Spring Boot整合Elasticsearch
新版改动较大,我实践了其中一种方式。参考了博客:https://blog.csdn.net/jacksonary/article/details/82729556
<dependency>
    <groupId>org.elasticsearch.clientgroupId>
    <artifactId>elasticsearch-rest-clientartifactId>
    <version>5.6.12version>

dependency>
# application.properties
spring.elasticsearch.rest.uris=http://106.52.239.138:9201
@SpringBootTest
class Springboot08EsApplicationTests {
    @Autowired
    RestClientBuilder restClientBuilder;
    @Test
    void contextLoads() throws Exception{
        Article article = new Article(1,"好消息","Linda","hello, Elasticsearch");
        RestClient restClient = restClientBuilder.build();
        String method = "GET";
        String endpoint = "/megacorp/employee/_search";
        Response response = restClient.performRequest(method, endpoint);
        System.out.println(EntityUtils.toString(response.getEntity()));
    }

}
四、Spring Boot和任务
1、异步任务
在Java应用中,绝大多数情况下都是通过同步的方式来实现交互处理的;但是在处理与第三方系统交互的时候,容易造成响应迟缓的情况,之前大部分都是使用多线程来完成此类任务,其实,在Spring 3.x之后,就已经内置了@Async来完美解决这个问题。
使用方法是在配置类上用 @EnableAsync 开启异步支持,将 @Async 标注在异步函数上。
@Configuration
@EnableAsync
public class MyConfig {
}
@Async
public void test() throws  Exception{
    Thread.sleep(5000);
    System.out.println("异步任务执行中……");
}
2、定时任务
项目开发中经常需要执行一些定时任务,比如需要在每天凌晨时候,分析一次前一天的日志信息。
如果要在 Spring Boot 中设置定时任务,需要在配置类上加上 @EnableScheduling 开启定时任务支持,然后在定时函数上标注 @Schedule,并设置 cron 表达式。
@Configuration
@EnableScheduling
public class MyConfig {
}
@Service // 需要注入到容器中
public class ScheduleService {
    @Scheduled(cron = "0/4 * * * * MON-SAT")
    public void test() {
        System.out.println("定时任务执行");
    }
}
3、邮件任务
-
邮件发送需要引入 spring-boot-starter-mail
<dependency> <groupId>org.springframework.bootgroupId> <artifactId>spring-boot-starter-mailartifactId> dependency> -
关于邮件的自动配置在 MailSenderAutoConfiguration 中
-
如果使用QQ邮箱发送,则QQ邮箱需要开启 POP3/SMTP 服务并获取一个密码
[email protected] spring.mail.password=gtstkoszjelabijb spring.mail.host=smtp.qq.com spring.mail.properties.mail.smtp.ssl.enable=true -
发送邮件
@Autowired
JavaMailSenderImpl mailSender;

@Test
public void test1() {
    SimpleMailMessage message = new SimpleMailMessage();
    message.setSubject("通知");
    message.setText("今晚7:30开会");
    message.setTo("[email protected]");
    message.setFrom("[email protected]");
    mailSender.send(message);
}

@Test
public void test2() throws Exception {
    MimeMessage mimeMessage = mailSender.createMimeMessage();
    MimeMessageHelper helper = new MimeMessageHelper(mimeMessage, true);
    helper.setSubject("通知");
    helper.setText("今晚7:30开会", true);
    helper.setTo("[email protected]");
    helper.setFrom("[email protected]");
    helper.addAttachment("1.jpg", new File("D:\\1.jpg"));
    mailSender.send(mimeMessage);
}
五、SpringBoot 与安全
1、Spring Security 简介
在 SpringBoot 中常用的安全框架有 Spring Security、Shiro。
Spring Security 是针对 Spring 项目的安全框架,也是 Spring Boot 底层安全模块默认的技术选型。他可以实现强大的 web 安全控制。对于安全控制,只需要引入 spring-boot-starter-security 模块,进行少量的配置,即可实现强大的安全管理。
<dependency>
    <groupId>org.springframework.bootgroupId>
    <artifactId>spring-boot-starter-securityartifactId>
dependency>
2、登录 & 认证 & 授权 & 注销 & 记住我
@EnableWebSecurity
public class MySecurityConfig extends WebSecurityConfigurerAdapter {
    @Override
    protected void configure(HttpSecurity http) throws Exception {
        // 定制请求的授权规则
        http.authorizeRequests().antMatchers("/").permitAll()
                .antMatchers("/level1/**").hasRole("VIP1")
                .antMatchers("/level2/**").hasRole("VIP2")
                .antMatchers("/level3/**").hasRole("VIP3");
        //开启自动配置的登录功能,/login来到登录页,登录失败重定向到/login?error,支持更多详细定制
        http.formLogin();
        //开启自动配置的注销功能,/logout来到注销页,清空session,注销成功会返回 /login?logout页面
        http.logout().logoutSuccessUrl("/"); //设置注销成功后来到首页
        //开启记住我功能
        http.rememberMe();
    }

    @Override
    protected void configure(AuthenticationManagerBuilder auth) throws Exception {
        //从spring security 5.X开始,需要使用密码编码器,也就是需要对你的明文密码进行加密
        auth.inMemoryAuthentication().passwordEncoder(new BCryptPasswordEncoder()).withUser("linda").password(new BCryptPasswordEncoder().encode("123456")).roles("VIP2")
                .and()
                .withUser("admin").password(new BCryptPasswordEncoder().encode("123456")).roles("VIP1","VIP2","VIP3");
    }
}
3、Spring Security 与 Thymeleaf
<dependency>
    <groupId>org.thymeleaf.extrasgroupId>
    <artifactId>thymeleaf-extras-springsecurity5artifactId>
    <version>3.0.4.RELEASEversion>
dependency>
<dependency>
    <groupId>org.springframework.bootgroupId>
    <artifactId>spring-boot-starter-thymeleafartifactId>
dependency>
<html xmlns:th="http://www.thymeleaf.org"
		 xmlns:sec="http://www.thymeleaf.org/thymeleaf-extras-springsecurity5">
<head>
<meta http-equiv="Content-Type" content="text/html; charset=UTF-8">
<title>Insert title heretitle>
head>
<body>
<h1 align="center">欢迎光临武林秘籍管理系统h1>
<div sec:authorize="!isAuthenticated()">
	<h2 align="center">游客您好,如果想查看武林秘籍 <a th:href="@{/login}">请登录a>h2>
div>
<form th:action="@{/logout}" method="post">
	<input type="submit" value="注销"/>
form>
<hr>
<div sec:authorize="hasRole('VIP1')">
	<h3>普通武功秘籍h3>
	<ul>
		<li><a th:href="@{/level1/1}">罗汉拳a>li>
		<li><a th:href="@{/level1/2}">武当长拳a>li>
		<li><a th:href="@{/level1/3}">全真剑法a>li>
	ul>
div>
<div sec:authorize="hasRole('VIP2')">
	<h3>高级武功秘籍h3>
	<ul>
		<li><a th:href="@{/level2/1}">太极拳a>li>
		<li><a th:href="@{/level2/2}">七伤拳a>li>
		<li><a th:href="@{/level2/3}">梯云纵a>li>
	ul>
div>
<div sec:authorize="hasRole('VIP3')">
	<h3>绝世武功秘籍h3>
	<ul>
		<li><a th:href="@{/level3/1}">葵花宝典a>li>
		<li><a th:href="@{/level3/2}">龟派气功a>li>
		<li><a th:href="@{/level3/3}">独孤九剑a>li>
	ul>
div>
body>
html>
4、自定义登录页
Spring Security 支持自定义登录页,只需要在安全配置类中做些设置,同时按照约定的规则编写 html 页面即可。
六、Spring Boot和分布式
1、分布式应用
在分布式系统中,国内常用 zookeeper + dubbo 组合,而 Spring Boot 推荐使用全栈的 Spring,Spring Boot + Spring Cloud。
2、Zookeeper和Dubbo
2.1、简介
-
Zookeeper
Zookeeper 是一个分布式,开放源码的分布式应用程序协调服务。它是一个为分布式应用提供一致性服务的软件,提供的功能包括:配置维护、域名服务、分布式同步、组服务等。
-
Dubbo
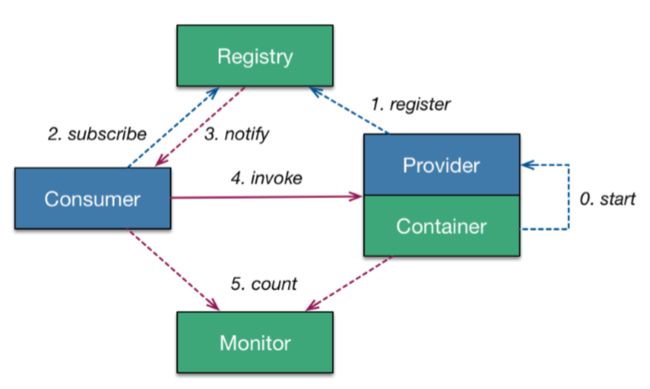
Dubbo 是 Alibaba 开源的分布式服务框架,它最大的特点是按照分层的方式来架构,使用这种方式可以使各个层之间解耦合(或者最大限度地松耦合)。从服务模型的角度来看,Dubbo 采用的是一种非常简单的模型,要么是提供方提供服务,要么是消费方消费服务,所以基于这一点可以抽象出服务提供方(Provider)和服务消费方(Consumer)两个角色。

2.2、Zookeeper 安装
docker pull zookeeperdocker run --name zk01 -p 2182:2181 --restart always -d zookeeper
2.3、使用
-
导入依赖
<dependency> <groupId>org.apache.dubbogroupId> <artifactId>dubbo-spring-boot-starterartifactId> <version>2.7.3version> dependency> <dependency> <groupId>org.apache.curatorgroupId> <artifactId>curator-frameworkartifactId> <version>2.8.0version> dependency> <dependency> <groupId>org.apache.curatorgroupId> <artifactId>curator-recipesartifactId> <version>2.8.0version> dependency> <dependency> <groupId>org.apache.curatorgroupId> <artifactId>curator-clientartifactId> <version>2.8.0version> dependency> -
配置注册中心
服务提供者
dubbo.application.name=ticket_provider
dubbo.registry.address=zookeeper://106.52.239.138:2182
dubbo.scan.base-packages=com.linda.service
服务消费者
dubbo.application.name=user_provider dubbo.registry.address=zookeeper://106.52.239.138:2182 server.port=8000 # -
注册服务
@Component @Service // Dubbo public class TicketServiceImpl implements TicketService { @Override public String getTicket() { return "《夏洛特烦恼》"; } } // 另外需要在配置类或启动类中开启@EnableDubbo注解 -
引用服务
@RestController
public class TestController {
    @Reference
    TicketService ticketService;
    @GetMapping("/test")
    public String test(){
        System.out.println(ticketService.getTicket());
        return "ok";
    }
}
3、Spring Cloud
3.1、简介
Spring Cloud 是一个分布式的整体解决方案。Spring Cloud 为开发者提供了在分布式系统(配置管理,服务发现,熔断,路由,微代理,控制总线,一次性token,全局锁,leader选举,分布式session,集群状态)中快速构建的工具,使用 Spring Cloud 的开发者可以快速启动服务或构建应用、同时能够快速和云平台资源进行对接。
Spring Cloud分布式开发五大常用组件:
- 服务发现——Netflix Eureka
- 客户端负载均衡——Netflix Ribbon
- 断路器——Netflix Hystrix
- 服务网关——Netflix Zuul
- 分布式配置——Spring Cloud Config
3.2、示例
-
eureka-server
<dependency>
    <groupId>org.springframework.cloudgroupId>
    <artifactId>spring-cloud-starter-netflix-eureka-serverartifactId>
dependency>
# application.yml server: port: 8761 eureka: instance: hostname: eureka-server # eureka实例的主机名 client: register-with-eureka: false # 不把自己注册到eureka上 fetch-registry: false # 不从eureka上获取服务的注册信息 service-url: defaultZone: http://localhost:8761/eureka/// 主启动类 @SpringBootApplication @EnableEurekaServer // 开启Eureka服务中心功能 public class EurekaServerApplication { public static void main(String[] args) { SpringApplication.run(EurekaServerApplication.class, args); } }可访问 Eureka 管理界面:localhost:8761
-
provider
<dependency>
    <groupId>org.springframework.cloudgroupId>
    <artifactId>spring-cloud-starter-netflix-eureka-clientartifactId>
dependency>
# application.yml server: port: 8002 eureka: instance: prefer-ip-address: true # 注册服务的时候使用服务的ip地址 client: service-url: defaultZone: http://localhost:8761/eureka/ spring: application: name: provider// TicketController.java @RestController public class TicketController { @Autowired TicketService ticketService; @GetMapping("/ticket") public String getTicket() { return ticketService.getTicket(); // return "《夏洛特烦恼》" } } -
consumer
<dependency>
    <groupId>org.springframework.cloudgroupId>
    <artifactId>spring-cloud-starter-netflix-eureka-clientartifactId>
dependency>
# application.yml spring: application: name: consumer server: port: 8200 eureka: instance: prefer-ip-address: true client: service-url: defaultZone: http://localhost:8761/eureka/// 主启动类 @SpringBootApplication @EnableDiscoveryClient //开启发现服务功能 public class ConsumerApplication { public static void main(String[] args) { SpringApplication.run(ConsumerApplication.class, args); } @LoadBalanced // 使用负载均衡功能 @Bean public RestTemplate restTemplate(){ return new RestTemplate(); } }// BuyController.java @RestController public class BuyController { @Autowired RestTemplate restTemplate; @GetMapping("/buy") public String buy() { String ticket = restTemplate.getForObject("http://provider/ticket", String.class); return "购买"+ticket; } }
七、Spring Boot 和热部署
在开发中我们修改一个 Java 文件后想看到效果不得不重启应用,这导致大量时间花费,我们希望在不重启应用的情况下,程序可以自动部署(热部署)。有以下四种方式可以实现热部署:
-
模板引擎
-
Spring Loaded
-
JRebel
-
Spring Boot Devtools(推荐)
-
引入依赖
<dependency> <groupId>org.springframework.bootgroupId> <artifactId>spring-boot-devtoolsartifactId> dependency> -
IDEA 使用 ctrl + F9
-
Eclipse 使用 ctrl + S
-
八、Spring Boot与监控管理
1、简介
Actuator 是 Spring Boot 提供的对应应用系统的自省和监控功能。通过 Actuator,可以使用数据化的指标去度量应用的运行情况,比如查看服务器的磁盘、内存、CPU等信息,系统的线程、gc、运行状态等等。
Actuator 通常通过使用 Http 和 JMX 来管理和监控应用,大多数情况使用 HTTP 的方式。
2、使用
项目依赖(通过 http://localhost:8080/actuator 可查看暴露的监控端点)
<dependency>
    <groupId>org.springframework.bootgroupId>
    <artifactId>spring-boot-starter-actuatorartifactId>
dependency>
<dependency>
    <groupId>org.springframework.bootgroupId>
    <artifactId>spring-boot-starter-webartifactId>
dependency>
配置文件
# 启动所有端点,默认只开放health和info
management.endpoints.enabled-by-default=true
management.endpoints.web.exposure.include=*
3、常用端点
-
health
主要用来检测应用的运行状况,是使用最多的一个监控点。监控软件通常使用该接口实时监测应用运行状况,在系统出现故障时把报警信息推送给相关人员,如磁盘空间使用情况、数据库和缓存等的一些健康指标。
默认情况下 health 端点是开放的,访问 http://127.0.0.1:8080/actuator/health 即可看到应用运行状态。
如要查看详细信息可添加配置
management.endpoint.health.show-details=always -
info
当前应用信息,在配置文件中进行配置,如:
info.app.name=spring boot actuator demo -
env
当前环境信息
-
beans
所有Bean的信息
-
conditions
通过 conditions 可以在应用运行时查看代码了某个配置在什么条件下生效,或者某个自动配置为什么没有生效。
-
loggers
系统的日志信息
-
mappings
应用@RequestMapping映射路径
-
heapdump
自动生成一个 GZip 压缩的 Jvm 的堆文件 heapdump,我们可以使用 JDK 自带的 Jvm 监控工具 VisualVM 打开此文件查看
-
threaddump
获取系统线程的转储信息,主要展示了线程名、线程ID、线程的状态、是否等待锁资源等信息
-
shutdown
该端点默认关闭,如需开启需要配置,开启后可以通过 POST 请求该端点关闭应用
management.endpoint.shutdown.enabled=true -
metrics
系统度量指标信息
4、自定义监控端点
SpringBoot 2 支持自定义监控端点
@Endpoint(id="myEndPoint")
@Component
public class MyEndPoint {
    @ReadOperation
    public Map<String, Object> getInfo(String name) {
        System.out.println(name);
        Map<String, Object> map = new HashMap<>();
        map.put("author", "linda");
        map.put("time", new Date());
        return map;
    }
}