利用yolov7训练自己的数据集; yolov7的安装与使用 ; yolov7源码解读
*免责声明:
1\此方法仅提供参考
2\搬了其他博主的操作方法,以贴上路径.
3*
场景一:Anconda环境基本操作
场景二:yolov7的使用
场景三:yolov7训练自己的数据集
场景四:实用工具
场景五:yolov7源码解读
…
场景一: Anconda环境基本操作
1:基本命令
查看Anaconda的版本信息 conda -V
查看python版本信息 python
打开Jupyter Notebook命令 jupyter notebook 或者 ipython notebook
退出python输入环境: ctrl+z
命令行终止正在运行的程序命令 : ctrl + c
查看 opencv版本信息:
![]()
2:创建使用自己的虚拟环境
生成一个名叫 jiance的环境,用来进行做识别任务:
conda create -n jiance python=3.7
进入这个环境,也就是激活这个环境
source activate jiance windows下: activate jiance
接下来就是 在这个环境中可以下载你所需要的包 pip insatll numpy 或者是conda install numpy=1.10
退出这个环境 :source deactivate
查看创建了哪些环境:conda info --envs
查看创建了包:conda list
退出这个jiance环境: linux 下source deactivate windows下 deactivate
3:删除包 、删除环境 或者更新包
删除numpy 包:conda remove numpy 或者指定 conda remove numpy=1.10
更新numpy包: conda update numpy
更新jiance里面所有包: conda update - -all
搜索numpy包: conda search numpy
删除jiance这个环境的命令: conda env remove -n jiance
4: 共享环境
例如我现在的jiance这个环境好多包我下载了,配好了识别的环境,别人想用我的环境或者是我想快速把项目从我的电脑上移植到其他电脑上:
首先进入我的环境: activate jiance 执行这条语句conda env export > 名字.yaml
例如 conda env export > environment.yaml
命令的第一部分 conda env export 用于输出环境中的所有包的名称
通过后半部分environment.yaml将其保存到并命名为“environment.yaml”
![]()
别人需要做的是拿到这个yaml文件: conda env create -f environment.yaml
场景二: yolov7的使用
1:安装pytorch
切换到上面的jiance的环境
activate jianceorsource activate jiance
无GPU环境
conda install pytorch==1.8.0 torchvision==0.9.0 torchaudio==0.8.0 cpuonly
GPU环境
进入pytorch官网,获取conda命令。pytorch网址
conda install pytorch torchvision torchaudio cudatoolkit=11.3 -c pytorch
2:下载yolo v7
yolo v7 github地址
3:将下载好的项目进行解压,用pycharm打开,然后将项目关联到上面在Anaconda中创建的虚拟环境
4: 下载依赖
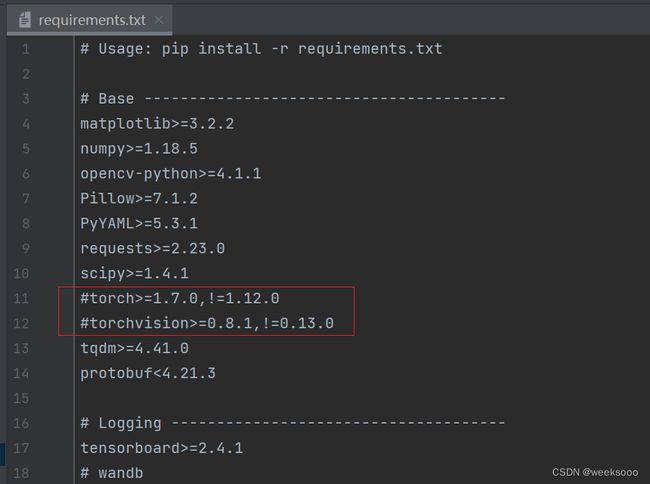
前面已经下载过torch,所以可以把这里的requirements.txt里面的torch相关信息注释掉
方式一:在pycharm终端中执行pip install -r requirements.txt

方式二:在项目文件夹中的最上方输入cmd 就可以在windows终端打开到该项目文件夹下 ,切换到虚拟环境 activate jiance 然后再输入命令 pip install -r requirements.txt

5:下载权值文件
权值文件下载地址
6: 测试
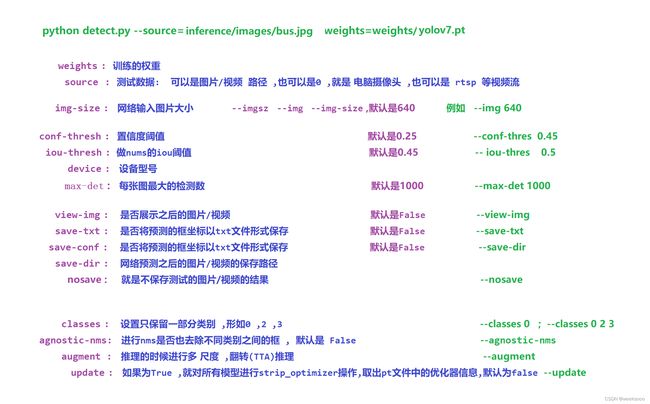
python detect.py --source=inference/images/bus.jpg
python detect.py --source=inference/images/bus.jpg --weights=weights/yolov7.pt
置信度超过0.4显示出来
python detect.py --source=inference/images/bus.jpg --weights=weights/yolov7.pt --conf 0.4
测试视频
python detect.py --source=inference/images/1.mp4 --weights=weights/yolov7.pt
测试摄像头
python detect.py --source 0
python detect.py --source 0 --weights=weights/yolov7.pt
模型集成检测
python detect.py --source=inference/images/bus.jpg --weights=weights/yolov7.pt yolov7_1.pt
更改测试保存路径
…
场景三: yolov7训练自己的数据集
1.1: 训练技巧
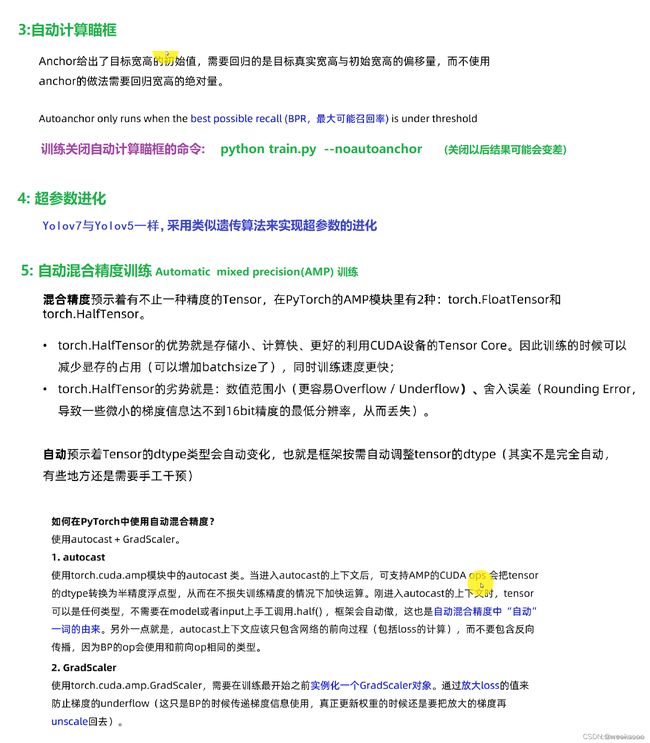
yolov7 和 yolov5的代码工程高度相似,应该是yolov5直接改过来的,所以yolov5拥有的技巧,yolov7继续沿用。
目标检测 YOLOv5 anchor设置
yolov5 anchors设置详解
【Python】计算VOC格式XML文件中目标面积和长宽比并生成直方图
![]()

记得放在jyputer上计算方便保存和看结果
# -*- coding: utf-8 -*-
"""
Created on Sun Jan 10 21:48:48 2021

@author: YaoYee
"""

import os
import xml.etree.cElementTree as et
import numpy as np
import matplotlib.pyplot as plt
from tqdm import tqdm
import cv2

path = ".......................\Annotations" #你的xml路径
files = os.listdir(path)

area_list = []
ratio_list = []


def file_extension(path):
    return os.path.splitext(path)[1]


for xmlFile in tqdm(files, desc='Processing'):
    if not os.path.isdir(xmlFile):
        if file_extension(xmlFile) == '.xml':
            tree = et.parse(os.path.join(path, xmlFile))
            root = tree.getroot()
            filename = root.find('filename').text
            # print("--Filename is", xmlFile)

            for Object in root.findall('object'):
                bndbox = Object.find('bndbox')
                xmin = bndbox.find('xmin').text
                ymin = bndbox.find('ymin').text
                xmax = bndbox.find('xmax').text
                ymax = bndbox.find('ymax').text

                area = (int(ymax) - int(ymin)) * (int(xmax) - int(xmin))
                area_list.append(area)
                # print("Area is", area)

                ratio = (int(ymax) - int(ymin)) / (int(xmax) - int(xmin))
                ratio_list.append(ratio)
                # print("Ratio is", round(ratio,2))

square_array = np.array(area_list)
square_max = np.max(square_array)
square_min = np.min(square_array)
square_mean = np.mean(square_array)
square_var = np.var(square_array)
plt.figure(1)
plt.hist(square_array, 20)
plt.xlabel('Area in pixel')
plt.ylabel('Frequency of area')
plt.title('Area\n' \
          + 'max=' + str(square_max) + ', min=' + str(square_min) + '\n' \
          + 'mean=' + str(int(square_mean)) + ', var=' + str(int(square_var))
          )
plt.savefig('aabb1.jpg')


ratio_array = np.array(ratio_list)
ratio_max = np.max(ratio_array)
ratio_min = np.min(ratio_array)
ratio_mean = np.mean(ratio_array)
ratio_var = np.var(ratio_array)


plt.figure(2)
plt.hist(ratio_array, 20)
plt.xlabel('Ratio of length / width')
plt.ylabel('Frequency of ratio')
plt.title('Ratio\n' \
          + 'max=' + str(round(ratio_max, 2)) + ', min=' + str(round(ratio_min, 2)) + '\n' \
          + 'mean=' + str(round(ratio_mean, 2)) + ', var=' + str(round(ratio_var, 2))
          )
plt.savefig('aabb.jpg')
先统计宽高比 , 然后在 yolov7 程序中创建一个新的 python 文件 test.py, 手动计算锚定框:
import utils.autoanchor as autoAC

# 对数据集重新计算 anchors
new_anchors = autoAC.kmean_anchors('./data/mydata.yaml', 9, 640, 5.0, 1000, True)
print(new_anchors)
输出的 9 组新的锚定框即是根据自己的数据集来计算的,可以按照顺序替换到你所使用的配置文件*.yaml中(比如 cfg/training/yolov7.yaml) , 就可以重新训练了。
超参数进化 Hyperparameter Evolution
![]()
python train.py --resume
多GPU训练
在训练时 , 当你的图片的尺寸假如是 320x256,你想让模型的输入也是 320x256.那么你只需要加
--img 320 --rect
1.2: 训练自己的数据集
第一步:使用labelImg标注自己的数据集
不要有中文路径
B站教学视频—>LabelImg打标签工具使用说明
训练思路: yolov7支持两种训练方式:第一种直接将训练文件的路径写入txt文件传入。第二种直接传入训练文件所在文件夹。
第二步:划分训练集/测试集
我们按照第二种方式:
.
新建如下几个文件夹,在yolov7下创建mydata文件夹,然后在mydata文件夹下.
all_images文件夹放图片
all_xml文件夹放xml文件
make_txt.py 文件用来划分数据集
train_val.py 文件夹用来转换 labels
注意两个py文件要建在mydata文件夹下
![]()
运行make_txt.py
import os
import random
#什么都不用改 ,只需要改下面的划分比例
trainval_percent = 0.1
train_percent = 0.9
xmlfilepath = 'all_images'
txtsavepath = 'ImageSets'
total_xml = os.listdir(xmlfilepath)
num = len(total_xml)
list = range(num)
tv = int(num * trainval_percent)
tr = int(tv * train_percent)
trainval = random.sample(list, tv) #从所有list中返回tv个数量的项目
train = random.sample(trainval, tr)
if not os.path.exists('ImageSets/'):
    os.makedirs('ImageSets/')
ftrainval = open('ImageSets/trainval.txt', 'w')
ftest = open('ImageSets/test.txt', 'w')
ftrain = open('ImageSets/train.txt', 'w')
fval = open('ImageSets/val.txt', 'w')
for i in list:
    name = total_xml[i][:-4] + '\n'
    if i in trainval:
        ftrainval.write(name)
        if i in train:
            ftest.write(name)
        else:
            fval.write(name)
    else:
        ftrain.write(name)
ftrainval.close()
ftrain.close()
fval.close()
ftest.close()
第三步: 接下来准备labels,也就是将voc格式转换为yolo格式
运行train_val.py,该文件一方面将all_xml中xml文件转为txt文件存于all_labels文件夹中,另一方面生成训练所需数据存放架构。(这里如果你的数据直接是txt的标签的话将标签转化的功能注释掉即可)代码如下:
![]()
train_val.py
import xml.etree.ElementTree as ET
import pickle
import os
import shutil
from os import listdir, getcwd
from os.path import join
sets = ['train', 'trainval']
#改这里...............
classes = ['dog' , 'cat']
def convert(size, box):
    dw = 1. / size[0]
    dh = 1. / size[1]
    x = (box[0] + box[1]) / 2.0
    y = (box[2] + box[3]) / 2.0
    w = box[1] - box[0]
    h = box[3] - box[2]
    x = x * dw
    w = w * dw
    y = y * dh
    h = h * dh
    return (x, y, w, h)
def convert_annotation(image_id):
    in_file = open('all_xml/%s.xml' % (image_id))
    out_file = open('all_labels/%s.txt' % (image_id), 'w')
    tree = ET.parse(in_file)
    root = tree.getroot()
    size = root.find('size')
    w = int(size.find('width').text)
    h = int(size.find('height').text)
    for obj in root.iter('object'):
        difficult = obj.find('difficult').text
        cls = obj.find('name').text
        if cls not in classes or int(difficult) == 1:   #这里过滤了difficult为1的标签值,如果转换的数目不一样多,即(图像的数目 与转换后的label数目不一样),可以去掉这个过滤条件。
            continue
        cls_id = classes.index(cls)
        xmlbox = obj.find('bndbox')
        b = (float(xmlbox.find('xmin').text), float(xmlbox.find('xmax').text), float(xmlbox.find('ymin').text),
             float(xmlbox.find('ymax').text))
        bb = convert((w, h), b)
        out_file.write(str(cls_id) + " " + " ".join([str(a) for a in bb]) + '\n')
wd = getcwd()
print(wd)
for image_set in sets:
    if not os.path.exists('all_labels/'):
        os.makedirs('all_labels/')
    image_ids = open('ImageSets/%s.txt' % (image_set)).read().strip().split()
    image_list_file = open('images_%s.txt' % (image_set), 'w')
    labels_list_file=open('labels_%s.txt'%(image_set),'w')
    for image_id in image_ids:
        image_list_file.write('%s.jpg\n' % (image_id))
        labels_list_file.write('%s.txt\n'%(image_id))
        convert_annotation(image_id) #如果标签已经是txt格式,将此行注释掉,所有的txt存放到all_labels文件夹。
    image_list_file.close()
    labels_list_file.close()


def copy_file(new_path,path_txt,search_path):#参数1:存放新文件的位置  参数2:为上一步建立好的train,val训练数据的路径txt文件  参数3:为搜索的文件位置
    if not os.path.exists(new_path):
        os.makedirs(new_path)
    with open(path_txt, 'r') as lines:
        filenames_to_copy = set(line.rstrip() for line in lines)
        # print('filenames_to_copy:',filenames_to_copy)
        # print(len(filenames_to_copy))
    for root, _, filenames in os.walk(search_path):
        # print('root',root)
        # print(_)
        # print(filenames)
        for filename in filenames:
            if filename in filenames_to_copy:
                shutil.copy(os.path.join(root, filename), new_path)

#按照划分好的训练文件的路径搜索目标,并将其复制到yolo格式下的新路径
copy_file('./images/train/','./images_train.txt','./all_images')
copy_file('./images/val/','./images_trainval.txt','./all_images')
copy_file('./labels/train/','./labels_train.txt','./all_labels')
copy_file('./labels/val/','./labels_trainval.txt','./all_labels')
![]()
第四步: 创建自己的yaml文件,可以copy一下 yolov7中data下的coco.yaml为mydata.yaml
train:  ./mydata/images/train/
val:  ./mydata/images/val/


nc: 2
names: ['dog' ,'cat']
第五步: 修改网络模型的配置文件,修改cfg/training/yolov7.yaml的内容,根据自己实际运行模型的参数需要选择一个.yaml进行修改,我选择的是yolov7.yaml。
主要修改类别数nc的值 当然你也可以修改为自己的网络结构.
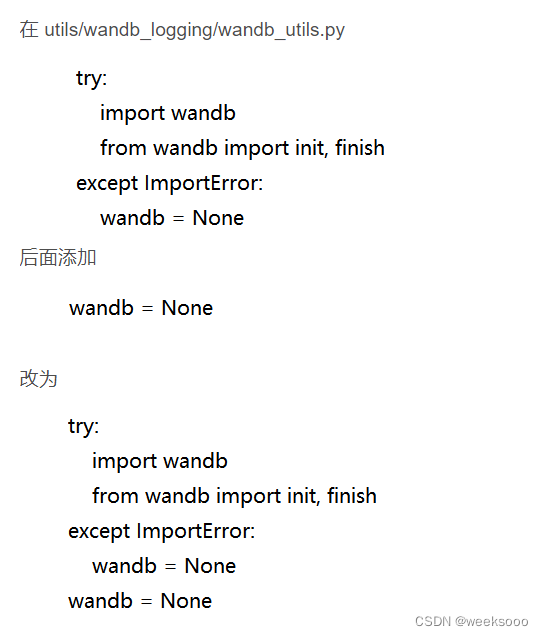
第六步: 关掉wandb (可选操作)
第七步: 训练
训练技巧在上面,当然也可以去train.py中修改对应属性的默认值.
python train.py --data data/coco.yaml(数据信息,一般也是指定我们自己的) --cfg cfg/training/yolov7.yaml (网络结构信息,也可以使用自己的) --weights '' (这里的weights就是指定要不要在别人的基础之上训练) --batch-size 64
1.3: 性能评估
验证模型
python val.py --data data/coco128.yaml --weights weighs/myyolo.pt --batch-size 6
训练过程可视化:
tensorboard --logdir ./runs
然后在浏览器端输入 http://localhsot:6006/#scalars 具体还是看上面的命令返回什么
…
场景四: 实用工具
1.1:统计有哪些标签
import os
from tqdm import tqdm
import xml.dom.minidom

def ReadXml(FilePath):
    if os.path.exists(FilePath) is False:
        return None
    dom = xml.dom.minidom.parse(FilePath)
    root_ = dom.documentElement
    object_ = root_.getElementsByTagName('object')
    info = []
    for object_1 in object_:
        name = object_1.getElementsByTagName("name")[0].firstChild.data
        bndbox = object_1.getElementsByTagName("bndbox")[0]
        xmin = int(bndbox.getElementsByTagName("xmin")[0].firstChild.data)
        ymin = int(bndbox.getElementsByTagName("ymin")[0].firstChild.data)
        xmax = int(bndbox.getElementsByTagName("xmax")[0].firstChild.data)
        ymax = int(bndbox.getElementsByTagName("ymax")[0].firstChild.data)
        info.append([xmin, ymin, xmax, ymax, name])
    return info


def CountLabelKind(Path):
    LabelDict = {}
    print("Star to count label kinds....")
    for root, dirs, files in os.walk(Path):
        for file in tqdm(files):
            if file[-1] == 'l':
                Infos = ReadXml(root + "\\" + file)
                for Info in Infos:
                    if Info[-1] not in LabelDict.keys():
                        LabelDict[Info[-1]] = 1
                    else:
                        LabelDict[Info[-1]] += 1

    return dict(sorted(LabelDict.items(), key=lambda x: x[0]))


if __name__ == '__main__':

    # 修改这里----------------------传入数据集的xml路径-------------------------------
    SrcDir = r"G:\Temp\Temp5"

    LabelDict = CountLabelKind(SrcDir)
    KeyDict = sorted(LabelDict)
    print("%d kind labels and %d labels in total:" % (len(KeyDict), sum(LabelDict.values())))
    print(KeyDict)
    print("Label Name and it's number:")
    for key in KeyDict:
        print("%s\t: %d" % (key, LabelDict[key]))
1.2:批量修改标签值
#coding=utf-8
import  os.path
import  xml.etree.ElementTree as  xee

#---------------------xml的存放路径---------------------------
path  = r"D:\2"

# 获取路径下的所有文件的名字
filenames = os.listdir(path)

i = 0

for  xmlfile  in  filenames:   # 遍历文件
    if not os.path.isdir(xmlfile):   # 判断文件是否是文件夹,如果不是文件夹则打开

        # 获取这个xml文件的绝对路径
        xmlfile_path = os.path.join( path , xmlfile)

        # 将xml文件放入到xee去解析
        dom = xee.parse( xmlfile_path )

        # 获取所有节点的内容
        root  = dom.getroot()

        # 获取节点是object的节点内容
        objects = root.findall('object')

        # 遍历每一个object
        for object in  objects:

            # 修改标签值为2的标签为标签1--------------------------------------------
            if object[0].text == "2":
                object[0].text = "1"

                i = i + 1

                # 当然也可打印包含标签值为2的文件名字
                print(xmlfile_path)

        dom.write(xmlfile_path)

print("修改"+str(i)+"处")
…
场景五: yolov7源码解读
yolov7与yolov5代码相似,可以先看我的另外一篇关于yolov5的源码解读,后续将在这里补充完整关于yolov7改进地方的源码解读。
利用yolov5训练自己的数据集; yolov5的安装与使用 ; yolov5源码解读
…
you did it
![]()


