SpringCloud Stream 消息驱动
在实际的企业开发中,消息中间件是至关重要的组件之一。消息中间件主要解决应用解耦,异步消息,流量削峰等问题,实现高性能,高可用,可伸缩和最终一致性架构。不同的中间件其实现方式,内部结构是不一样的。如常见的 RabbitMQ 和 Kafka,由于这两个消息中间件的架构上的不同,向 RabbitMQ 有 Exchange,Kafka 有 Topic,partitions 分区,这些中间件的差异性给我们实际项目开发造成了一定的困扰。我们如果用了两个消息队列的其中一种,后面的业务需求,需要往另外一种消息队列进行迁移,这时候无疑就是灾难性的,一大堆的东西都要推倒重新做,因为它跟我们的系统耦合了,而 SpringCloud Stream 给我们提供了一种解耦合的方式。
一、概述
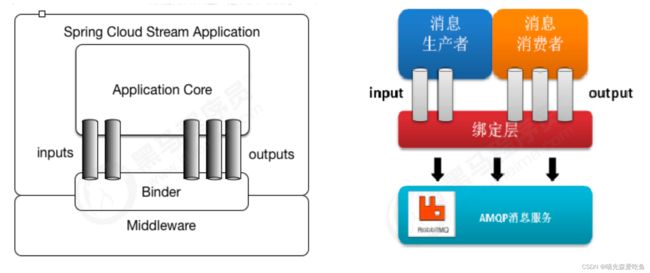
SpringCloud Stream 由一个中间件中立的核组成。应用通过 SpringCloud Stream 插入的 input(相当于消费者 consumer,它是从队列中接收消息的)和 output(相当于生产者 producer,它是从队列中发送消息的)通道与外界交流。通道通过指定中间件的 Binder 实现与外部代理连接。业务开发者不再关注具体消息中间件,只需关注 Binder 对应用程序提供的抽象概念,通过这些抽象概念来使用消息中间件实现业务即可。
说明:
最底层是消息服务,中间层是绑定层,绑定层和底层的消息服务进行绑定,顶层是消息生产者和消息消费者,顶层可以向绑定层生产消息和获取消息消费。
二、核心概念
2.1 绑定器
Binder 绑定器是 SpringCloud Stream 中一个非常重要的概念。在没有绑定器这个概念的情况下,我们的 SpringBoot 应用要直接与消息中间件进行信息交互的时候,由于各消息中间件构建的初衷不同,它们的实现细节上会有较大的差异性,这使得我们实现的消息交互逻辑就会非常笨重,因为对具体的中间件实现细节有太重的依赖,当中间件有较大的变动升级、或是更换中间件的时候,我们就需要付出非常大的代价来实施。
通过定义绑定器作为中间层,实现了应用程序与消息中间件(Middleware)细节之间的隔离。通过向应用程序暴露统一的 Channel 通道,使得应用程序不需要再考虑各种不同的消息中间件的实现。当需要升级消息中间件,或者是更换其他消息中间件产品时,我们需要做的就是更换对应的 Binder 绑定器,而不需要修改任何应用逻辑,甚至可以任意的改变中间件的类型,而不需要修改一行代码。
SpringCloud Stream 支持各种 Binder 实现。通过配置把应用和 SpringCloud Stream 的 Binder 绑定在一起,之后只需要修改 Binder 的配置来达到动态修改 topic、exchange、type 等一系列信息,而不需要修改一行代码。
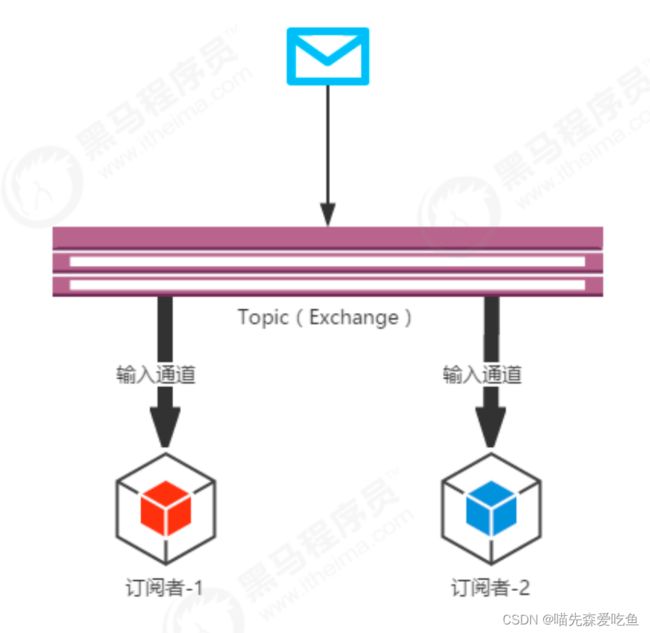
2.2 发布/订阅模型
在 SpringCloud Stream 中的消息通信方式遵循了发布-订阅模式,当一条消息被投递到消息中间件之后,它会通过共享的 Topic 主题进行广播,消息消费者在订阅的主题中收到它并触发自身的业务逻辑处理。这里所提到的 Topic 主题是 SpringCloud Stream 中的一个抽象概念,用来代表发布共享消息给消费者的地方。在不同的消息中间件中,Topic 可能对应着不同的概念,比如:在 RabbitMQ 中,它对应了 Exchange,而在 Kafka 中则对应了 Topic。
三、SpringCloud Stream 标准流程及常用注解
3.1 标准流程

- Binder:很方便的连接中间件,屏蔽了不同消息中间件之间的差异
- Channel:通道,是队列 Queue 的一种抽象,在消息通讯系统中就是实现存储和转发的媒介,通过 Channel 对队列进行配置
- Source 和 Sink:可理解为参照对象是 SpringCloud Stream 自身,从 Stream 发布消息就是输出,接收消息就是输入。
3.2 编码 API 和常用注解
| 组成 | 说明 |
|---|---|
| Middleware | 中间件,目前只支持 RabbitMQ 和 Kafka |
| BInder | Binder 是应用与消息中间件之间的封装,目前实现了 Kafka 和 RabbitMQ 的 Binder,通过 Binder 可以很方便的连接中间件,可以动态的改变消息类型(对应于 kafka 的 topic,RabbitMQ 的 exchange),这些都可以通过配置文件来实现 |
| @Input | 注解标识输入通道,通过该输入通道接收到的消息进入应用程序 |
| @Output | 注解输出通道,发布的消息将通过该通道离开应用程序 |
| @StreamListener | 监听队列,用于消费者的队列的消息接收 |
| @EnableBinding | 指信道 channel 和 exchange 绑定在一起 |
四、入门案例
创建 cloud-stream-rabbitmq-provider8801, 作为生产者进行发消息模块
创建 cloud-stream-rabbitmq-consumer8802,作为消息接收模块
创建 cloud-stream-rabbitmq-consumer8803,作为消息接收模块
4.1 消息生产者 8801
4.1.1 pom.xml
在这里插入代码片
<project xmlns="http://maven.apache.org/POM/4.0.0"
         xmlns:xsi="http://www.w3.org/2001/XMLSchema-instance"
         xsi:schemaLocation="http://maven.apache.org/POM/4.0.0 http://maven.apache.org/xsd/maven-4.0.0.xsd">
    <parent>
        <artifactId>cloud2020artifactId>
        <groupId>com.atguigu.springcloudgroupId>
        <version>1.0-SNAPSHOTversion>
    parent>
    <modelVersion>4.0.0modelVersion>

    <artifactId>cloud-stream-rabbitmq-consumer8803artifactId>

    <properties>
        <maven.compiler.source>8maven.compiler.source>
        <maven.compiler.target>8maven.compiler.target>
    properties>

    <dependencies>
        <dependency>
            <groupId>org.springframework.cloudgroupId>
            <artifactId>spring-cloud-starter-netflix-eureka-clientartifactId>
        dependency>
        <dependency>
            <groupId>org.springframework.bootgroupId>
            <artifactId>spring-boot-starter-webartifactId>
        dependency>
        <dependency>
            <groupId>org.springframework.bootgroupId>
            <artifactId>spring-boot-starter-actuatorartifactId>
        dependency>
        <dependency>
            <groupId>org.springframework.bootgroupId>
            <artifactId>spring-boot-starter-testartifactId>
        dependency>
        <dependency>
            <groupId>org.springframework.cloudgroupId>
            <artifactId>spring-cloud-starter-stream-rabbitartifactId>
        dependency>
        <dependency>
            <groupId>org.projectlombokgroupId>
            <artifactId>lombokartifactId>
        dependency>
    dependencies>
project>
4.1.2 application.yml
server:
port: 8801
spring:
application:
name: cloud-stream-provider
cloud:
stream:
binders: # 在此处配置要绑定的 rabbitmq 的服务信息;
defaultRabbit: # 消息组件类型
type: rabbit # 设置 rabbitmq 的相关的环境配置
environment:
spring:
rabbitmq:
host: localhost
port: 5672
username: guest
password: guest
bindings: # 服务的整合处理
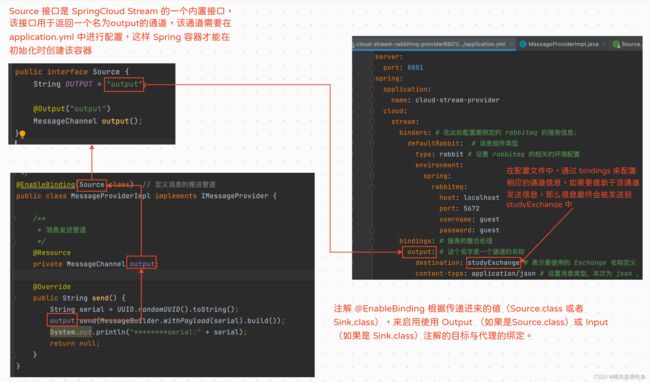
output: # 这个名字是一个通道的名称
destination: studyExchange # 指定了消息发送的目的地,对应 RabbitMQ,会发送到 exchange 是 studyExchange 的所有消息队列中
content-type: application/json # 设置消息类型,本次为 json ,文本则设置 “text/plain”
binder: defaultRabbit # 设置要绑定的消息服务的具体设置
eureka:
client:
service-url:
defaultZone: http://localhost:7001/eureka
instance:
lease-expiration-duration-in-seconds: 5 # 如果现在超过了 5 秒的间隔(默认是 90 秒)
lease-renewal-interval-in-seconds: 2 # 设置心跳的时间间隔(默认是 30 秒)
instance-id: send-8801.com # 在信息列表时显示主机名称
prefer-ip-address: true # 访问的路径变为 IP 地址
4.1.3 主启动类
@SpringBootApplication
public class StreamMQMain8801 {
    public static void main(String[] args) {
        SpringApplication.run(StreamMQMain8801.class, args);
    }
}
4.1.4 业务类-Service 层
接口 IMessageProvider:
public interface IMessageProvider {
    public String send();
}
接口实现类:
@EnableBinding(Source.class)  // 定义消息的推送管道
public class MessageProviderImpl implements IMessageProvider {

    /**
     * 消息发送管道
     */
    @Resource
    private MessageChannel output;

    @Override
    public String send() {
        String serial = UUID.randomUUID().toString();
        output.send(MessageBuilder.withPayload(serial).build());
        System.out.println("********serial:" + serial);
        return null;
    }
}
4.1.5 业务类-Controller 层
@RestController
public class SendMessageController {

    @Resource
    private IMessageProvider messageProvider;

    @GetMapping("/sendMessage")
    public String sendMessage(){
        return messageProvider.send();
    }
}
4.1.6 测试
先启动 eureka7001,再启动该服务,然后访问:http://localhost:8801/sendMessage
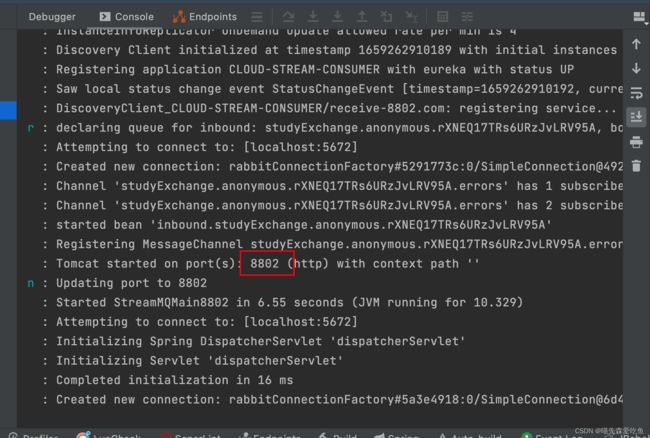
4.1.7 执行过程分析
4.2 消息消费者 8802
4.2.1 pom.xml
同 8801
4.2.2 application.yml
server:
  port: 8802

spring:
  application:
    name: cloud-stream-consumer
  cloud:
    stream:
      binders:
        defaultRabbit:
          type: rabbit
          environment:
            spring:
              rabbitmq:
                host: localhost
                port: 5672
                username: guest
                password: guest
      bindings:
        input:
          destination: studyExchange
          content-type: application/json

eureka:
  client:
    service-url:
      defaultZone: http://localhost:7001/eureka
  instance:
    lease-expiration-duration-in-seconds: 5 # 如果现在超过了 5 秒的间隔(默认是 90 秒)
    lease-renewal-interval-in-seconds: 2 # 设置心跳的时间间隔(默认是 30 秒)
    instance-id: receive-8802.com # 在信息列表时显示主机名称
    prefer-ip-address: true # 访问的路径变为 IP 地址
4.2.3 主启动类
@SpringBootApplication
public class StreamMQMain8802 {
    public static void main(String[] args) {
        SpringApplication.run(StreamMQMain8802.class, args);
    }
}
4.2.4 业务类-Controller 层
@Controller
@EnableBinding(Sink.class)
public class ReceiveMessageListenerController {
@Value("${server.port}")
private String serverPort;
@StreamListener(Sink.INPUT)
public void input(Message<String> message){
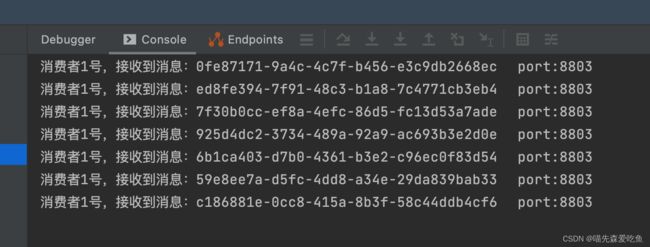
System.out.println("消费者1号,接收到消息:" + message.getPayload() + "\t port:" + serverPort);
}
}
注解 @StreamListener 用于监听 binding 为 Sink.INPUT 通道(或队列)上的消息。
所有发送到 exchange 为 “studyExchange” 的 MQ 消息都会被投递到这个临时队列上去,并且触发上述的方法。
4.2.5 执行过程分析

4.3 消息消费者 8803
8803 基本同 8802 一致,只需将 application.yml 进行修改即可。
server:
  port: 8803

spring:
  application:
    name: cloud-stream-consumer
  cloud:
    stream:
      binders:
        defaultRabbit:
          type: rabbit
          environment:
            spring:
              rabbitmq:
                host: localhost
                port: 5672
                username: guest
                password: guest
      bindings:
        input:
          destination: studyExchange
          content-type: application/json

eureka:
  client:
    service-url:
      defaultZone: http://localhost:7001/eureka
  instance:
    lease-expiration-duration-in-seconds: 5 # 如果现在超过了 5 秒的间隔(默认是 90 秒)
    lease-renewal-interval-in-seconds: 2 # 设置心跳的时间间隔(默认是 30 秒)
    instance-id: receive-8803.com # 在信息列表时显示主机名称
    prefer-ip-address: true # 访问的路径变为 IP 地址
4.4 整体测试
先启动 eureka7001,再启动 streamProvider8801,接着将 streamConsumer8802 和 streamConsumer8803 启动。
访问地址:http://localhost:8801/sendMessage,效果如下:

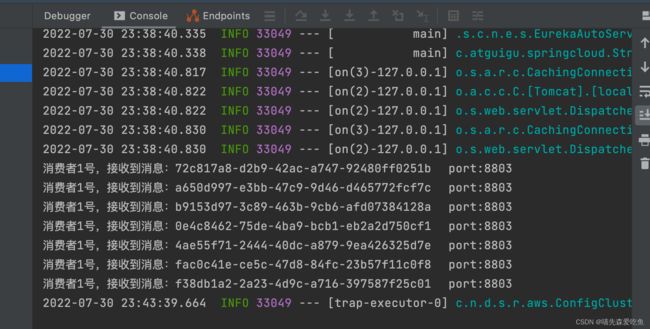
8802 与 8803 均接收到消息
五、消息分组
5.1 消息重复消费问题
根据入门案例,我们可以看到 8802 与 8803 均接收到了消息,存在重复消费的问题。
通常在生产环境,我们的每个服务都不会以单节点的方式运行在生产环境,当同一个服务启动多个实例的时候,这些实例都会绑定到同一个消息通道的目标主题(Topic)上。默认情况下,当生产者发出一条消息到绑定通道上,这条消息会产生多个副本被每个消费者实例接收和处理,但是有些业务场景之下,我们希望生产者产生的消息只被其中一个实例消费,这个时候我们需要为这些消费者设置消费组来实现这样的功能。
举个例子:
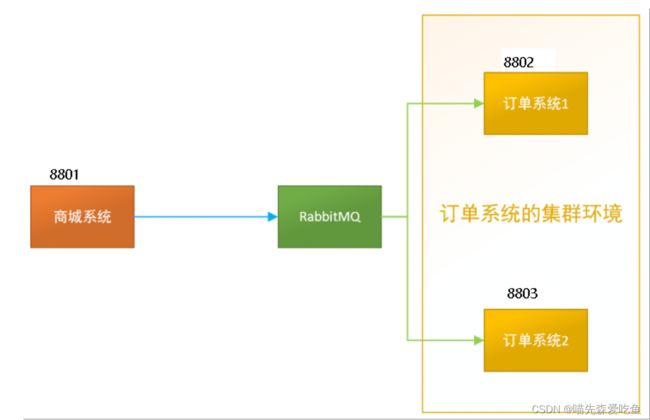
比如在如下场景中,订单系统我们做了集群部署,都会从 RabbitMQ 中获取订单信息,如果一个订单同时被两个服务获取到,就会造成数据错误。这时,我们可以使用 Stream 中的消息分组来解决。
注意在 Stream 中处于同一个 group 中的多个消费者是竞争关系,这样就能够保证消息只会被其中一个应用消费一次。不同组是可以全面消费的(重复消费),同一组内会发生竞争关系,只有其中一个可以消费。
这里组的概念对应 RabbitMQ 中的 Queue 队列。
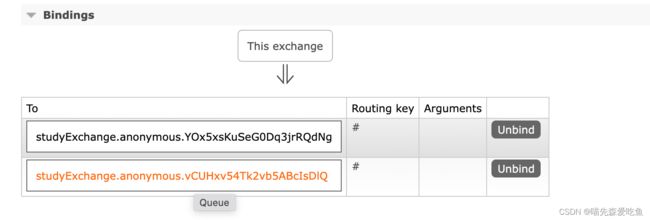
RabbitMQ的消息发送过程:生产者将消息发送至交换机,在发送消息时会携带有 RoutingKey,队列通过 BindingKey 与交换机进行绑定。当生产者发送消息时所携带的 RoutingKey 与绑定时的 BindingKey 相匹配时,消息即被存入相应的队列之中。消费者可以订阅相应的队列来获取消息。
当前交换机下绑定了两个不同的队列,而这两个队列分别由 8802 与 8803 进行监听,当消息生产者产生一次消息时,两个队列都会接收到该条消息,所以也就产生了重复消费的问题。
5.2 消息分组
消息分组的实现方式非常简单,只需要在服务消费者端设置 spring.cloud.stream.bindings.input.group 属性即可。
修改 8802 的 application.yml:
server:
  port: 8802

spring:
  application:
    name: cloud-stream-consumer
  cloud:
    stream:
      binders:
        defaultRabbit:
          type: rabbit
          environment:
            spring:
              rabbitmq:
                host: localhost
                port: 5672
                username: guest
                password: guest
      bindings:
        input:
          destination: studyExchange
          content-type: application/json
          group: A

eureka:
  client:
    service-url:
      defaultZone: http://localhost:7001/eureka
  instance:
    lease-expiration-duration-in-seconds: 5 # 如果现在超过了 5 秒的间隔(默认是 90 秒)
    lease-renewal-interval-in-seconds: 2 # 设置心跳的时间间隔(默认是 30 秒)
    instance-id: receive-8802.com # 在信息列表时显示主机名称
    prefer-ip-address: true # 访问的路径变为 IP 地址
修改 8803 的 application.yml:
server:
  port: 8803

spring:
  application:
    name: cloud-stream-consumer
  cloud:
    stream:
      binders:
        defaultRabbit:
          type: rabbit
          environment:
            spring:
              rabbitmq:
                host: localhost
                port: 5672
                username: guest
                password: guest
      bindings:
        input:
          destination: studyExchange
          content-type: application/json
          group: A

eureka:
  client:
    service-url:
      defaultZone: http://localhost:7001/eureka
  instance:
    lease-expiration-duration-in-seconds: 5 # 如果现在超过了 5 秒的间隔(默认是 90 秒)
    lease-renewal-interval-in-seconds: 2 # 设置心跳的时间间隔(默认是 30 秒)
    instance-id: receive-8803.com # 在信息列表时显示主机名称
    prefer-ip-address: true # 访问的路径变为 IP 地址
重启 8802 和 8803,访问 http://localhost:8801/sendMessage
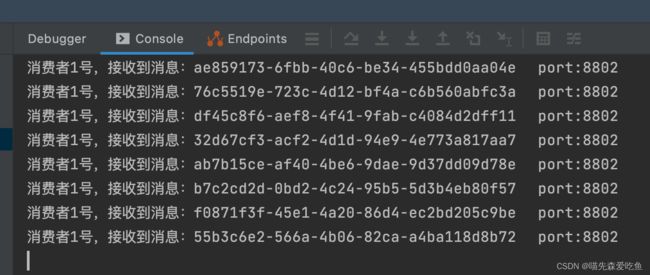
8802 和 8803 接收到消息不同。同一个组的多个微服务实例,每次只会有一个拿到消息。
5.3 消息持久化
通过上述方式,解决了消息重复消费的问题,再来看看持久化问题。停止 8802 和 8803,并去除掉 8802 的分组 group:A,保留 8803 的分组 group。然后通过 8001 先发送 4 条消息到 rabbitmq。先启动 8802,无分组属性配置,后台没有打印出消息。再启动 8803,有分组属性配置,后台打印出了 MQ 上的消息。
8802 后台信息:
8803 后台信息:
