Spring Cloud框架学习-Spring Cloud Stream
文章目录
-
- 1. 基本介绍
- 2. 设计思想
- 3. 常用注解
- 4. 简单入门
- 5. 自定义消息通道
- 6. 消息分组-处理消息重复消费
- 7. 消息分区
- 8. 延时消息
-
- 8.1 安装插件
- 8.2 具体实现
1. 基本介绍
Spring Cloud Stream 用一个构建消息驱动微服务的框架。Spring Cloud Stream 中,提供了一个微服务和消息中间件之间的一个粘合剂,这个粘合剂叫做Binder,Binder 负责与消息中间件进行交互。而我们开发者则通过 inputs 或者 outputs 这样的消息通道与 Binder 进行交互。

Spring Cloud Stream 通过使用Spring Integration来连接消息代理中间件以实现消息事件驱动,为流行的消息中间件产品(Spring Cloud Stream 原生支持RabbitMQ,Kafka。阿里在官方基础上提供了RocketMQ的支持)提供了个性化的自动化配置实现,引用了发布-订阅,消费组,分区的三大核心概念。
2. 设计思想
那么Spring Cloud Stream是怎么屏蔽底层差异的呢?它通过定义绑定器Binder作为中间层,实现了应用程序与消息中间件细节之间的隔离。向应用程序暴露统一的 Channel 通道,使得应用程序不需要再考虑各种消息中间件的实现
绑定器Binder的说明:
在没有绑定器这个概念的情况下,Spring Boot应用要直接与消息中间件进行信息交互的时候,由于各消息中间件构建的初衷不同,它们的实现细节上会有较大的差异性。通过定义绑定器作为中间层,可以完美地实现应用程序与消息中间件细节之间的隔离。Stream对消息中间件的进一步封装,可以做到代码层面对中间件的无感知,甚至于动态的切换中间件,实现微服务和具体消息中间件的解耦,使得微服务可以关注更多自己的业务流程。一个集成Spring Cloud Stream 程序的框架示意图,如下图所示:


Binder中的INPUT和OUTPUT针对Binder本身而言,INPUT对应于消费者,OUTPUT对应于生产者。 。INPUT接收消息生产者发送的消息,OUTPUT发送消息给到消息消费者消费。
Spring Cloud Stream处理消息的业务流程图如下:

-
binder: 目标绑定器,目标指的是 kafka 还是 RabbitMQ,绑定器就是封装了目标中间件的包。如果操作的是 kafka 就使用 kafka binder ,如果操作的是 RabbitMQ 就使用 rabbitmq binder。
-
Source和Sink:可理解为参照对象是Spring Cloud Stream自身,从Stream发布消息就是输出,接收消息就是输入。Source用于获取数据(要发送到MQ的数据),Sink用于提供数据(要接收MQ发送的数据,提供数据给消息消费者)
-
Channel:通道,是队列Queue的一种抽象,在消息通讯系统中就是实现存储和转发的媒介。用于存放source接收到的数据,或者是存放binder拉取的数据。
-
Message:一种规范化的数据结构,生产者和消费者基于这个数据结构通过外部消息系统与目标绑定器和其他应用程序通信。
3. 常用注解
4. 简单入门
创建一个Maven项目,在pom.xml添加三个依赖:Web、Rabbitmq、Spring Cloud Stream。具体要引入的依赖:
   <dependencies>
        <dependency>
            <groupId>org.springframework.bootgroupId>
            <artifactId>spring-boot-starter-amqpartifactId>
        dependency>
        <dependency>
            <groupId>org.springframework.bootgroupId>
            <artifactId>spring-boot-starter-webartifactId>
        dependency>
        <dependency>
            <groupId>org.springframework.cloudgroupId>
            <artifactId>spring-cloud-streamartifactId>
        dependency>
        <dependency>
            <groupId>org.springframework.cloudgroupId>
            <artifactId>spring-cloud-stream-binder-rabbitartifactId>
        dependency>

        <dependency>
            <groupId>org.springframework.bootgroupId>
            <artifactId>spring-boot-starter-testartifactId>
            <scope>testscope>
        dependency>
        <dependency>
            <groupId>org.springframework.amqpgroupId>
            <artifactId>spring-rabbit-testartifactId>
            <scope>testscope>
        dependency>
        <dependency>
            <groupId>org.springframework.cloudgroupId>
            <artifactId>spring-cloud-streamartifactId>
            <scope>testscope>
            <classifier>test-binderclassifier>
            <type>test-jartype>
        dependency>
    dependencies>
项目创建成功后,配置文件中添加RabbitMQ的配置信息。
spring.rabbitmq.host=101.43.30.128
spring.rabbitmq.port=5672
spring.rabbitmq.username=
spring.rabbitmq.password=
spring.rabbitmq.virtual-host=/learn
创建一个简单的消息接收器MsgReceiver 类:
//@EnableBinding 表示绑定 Sink 消息通道
@EnableBinding(Sink.class)
public class MsgReceiver {
    public final static Logger LOGGER = LoggerFactory.getLogger(MsgReceiver.class);

    @StreamListener(Sink.INPUT)
    public void receive(Object payload) {
        LOGGER.info(" MsgReceiver Received:" + payload.toString());
    }
}
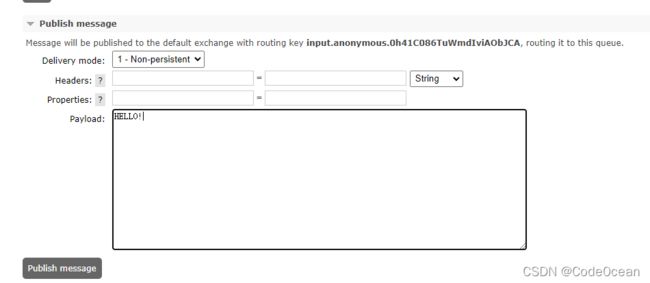
启动项目,然后在RabbitMQ 后台管理页面会创建一个匿名的队列,尝试去发送一条消息。


点击Publish message按钮,查看后台输出可以看到消息能够正常接收到,并且被成功消费。
5. 自定义消息通道
首先创建一个名为MyChannel的接口,定义通道channel:
public interface MyChannel {
    String HELLO_INPUT = "hello-input";
    String HELLO_OUTPUT = "hello-output";

    @Output(HELLO_OUTPUT)
    MessageChannel output();

    @Input(HELLO_INPUT)
    SubscribableChannel input();
}
- 注意,两个消息通道的名字是不一样的
- 从 F 版开始,默认使用通道的名称作为实例命令,所以这里的通道名字不可以相同(早期版本可
以相同),这样的话,为了能够正常收发消息,需要我们在 application.properties 中做一些额外
配置。
#消息绑定
spring.cloud.stream.bindings.hello-input.destination=hello-topic
spring.cloud.stream.bindings.hello-output.destination=hello-topic
接下来,自定义一个消息接收器,用来接收自己的消息通道里的消息:
@EnableBinding(MyChannel.class)
public class MsgReceiver2 {
    public final static Logger LOGGER = LoggerFactory.getLogger(MsgReceiver2.class);

    @StreamListener(MyChannel.HELLO_INPUT)
    public void receive(Object payload) {
        LOGGER.info("MsgReceiver receive2:" + payload);
    }
}
创建一个接口用于测试发送消息
@RestController
public class HelloController {

    @Autowired
    MyChannel myChannel;

    @GetMapping("/hello")
    public void hello(){
        myChannel.output().send(MessageBuilder.withPayload("hello spring cloud stream!").build());
    }
}
6. 消息分组-处理消息重复消费
在微服务架构下,通常集群部署微服务以实现服务的高可用和负载均衡。但是默认情况下使用Spring Cloud Stream,消费者程序默认分配一个匿名且独立的单成员消费者组,如果消费者是一个集群,因为消费者属于不同的组不存在竞争关系,一条消息会被多次消费。举例如图所示:

我们可以通过消息分组解决这个问题。每个消费者绑定都可以使用spring.cloud.stream.bindings.属性指定组名。在Spring Boot 项目中添加如下配置:
#消息分组
spring.cloud.stream.bindings.hello-input.group=g1
spring.cloud.stream.bindings.hello-output.group=g1
7. 消息分区
Spring Cloud Stream 支持在给定应用程序的多个实例之间对数据进行分区。通过消息分区可以实现相同特征的消息总是被同一个实例处理。即一个或多个生产者应用程序实例将数据发送到多个消费者应用程序实例,并确保有共同特征标识的数据由同一消费者实例处理。
添加配置示例:
#开启消息分区(消费者上配置)
spring.cloud.stream.bindings.hello-input.consumer.partitioned=true
# 消费者实例个数(消费者上配置)
spring.cloud.stream.instance-count=2
# 当前实例的下标(消费者上配置)
spring.cloud.stream.instance-index=0
# (生产者上配置)
spring.cloud.stream.bindings.hello-output.producer.partition-key-expression=1
# 消费端的节点数量(生产者上配置)
spring.cloud.stream.bindings.hello-output.producer.partition-count=2
接下来使用Maven打包项目为jar包
在控制台启动两个实例,注意启动时,spring.cloud.stream.instance-index 要动态修改。

java -jar stream-0.0.1-SNAPSHOT.jar --server.port=8080 --
spring.cloud.stream.instance-index=0
java -jar stream-0.0.1-SNAPSHOT.jar --server.port=8081 --
spring.cloud.stream.instance-index=1
调用接口/hello测试,可以看到多次发送同一个消息,消息只被一个消费者处理。
8. 延时消息
RabbitMQ实现发送延时消息需要安装插件rabbitmq_delayed_message_exchange,下载地址:https://github.com/rabbitmq/rabbitmq-delayed-message-exchange/releases/download/v3.8.0/rabbitmq_delayed_message_exchange-3.8.0.ez
8.1 安装插件
以Docker方式安装为例:
下载插件
wget https://github.com/rabbitmq/rabbitmq-delayed-message-exchange/releases/download/v3.8.0/rabbitmq_delayed_message_exchange-3.8.0.ez
将文件拷贝到Docker容器中
docker cp rabbitmq_delayed_message_exchange-3.8.0.ez 900822f303cd:/opt/rabbitmq/plugins
进入RabbitMQ容器
docker exec -it 900822f303cd /bin/sh
启用插件
rabbitmq-plugins enable rabbitmq_delayed_message_exchange
查看插件是否启动成功
rabbitmq-plugins list
重新启动RabbitMQ容器
8.2 具体实现
1.配置文件配置
在配置文件中配置开启通道的消息延迟功能
##开启消息延迟功能
spring.cloud.stream.rabbit.bindings.hello-input.consumer.delayed-exchange=true
spring.cloud.stream.rabbit.bindings.hello-output.producer.delayed-exchange=true
修改一下消息输入输出通道的destination定义:
spring.cloud.stream.bindings.hello-input.destination=delay_msg
spring.cloud.stream.bindings.hello-output.destination=delay_msg
2.创建接口测试
@RestController
public class HelloController {

    public final static Logger LOGGER = LoggerFactory.getLogger(HelloController.class);


    @Autowired
    MyChannel myChannel;

    @GetMapping("/hello")
    public void hello(){
        myChannel.output().send(MessageBuilder.withPayload("hello spring cloud stream!").build());
    }


    @GetMapping("/delay-hello")
    public void delayHello(){
        LOGGER.info("send msg:" + new Date());
        myChannel.output().send(MessageBuilder.withPayload("hello spring cloud stream!").setHeader("x-delay", 5000).build());
    }
}
测试可以发现该消息延迟5秒才消费。


