OpenCV之图像轮廓
1. 图像轮廓
OpenCV系列—本文底页有多个常用方法链接
1.1 findContours介绍
cv2.findContours(img, mode, method)
mode:轮廓检索模式
- RETR_EXTERNAL :只检索最外面的轮廓;
- RETR_LIST:检索所有的轮廓,并将其保存到一条链表当中;
- RETR_CCOMP:检索所有的轮廓,并将他们组织为两层:顶层是各部分 外部边界,第二层是空洞的边界;
- RETR_TREE:检索所有的轮廓,并重构嵌套轮廓的整个层次;
method:轮廓逼近方法
- CHAIN_APPROX_NONE:以Freeman链码的方式输出轮廓,所有其他方法输出多边形(顶点的序列)。
- CHAIN_APPROX_SIMPLE:压缩水平的、垂直的和斜的部分,也就是,函数只保留他们的终点部分。
1.2 绘制轮廓
import cv2


def cv_show(img, name):
    cv2.imshow(name, img)
    cv2.waitKey()
    cv2.destroyAllWindows()


img = cv2.imread('DataPreprocessing/img/contours.png')
gray = cv2.cvtColor(img, cv2.COLOR_BGR2GRAY)
ret, thresh = cv2.threshold(gray, 127, 255, cv2.THRESH_BINARY)
cv_show(thresh, 'thresh')
contours.png原图展示:

contours, hierarchy = cv2.findContours(thresh, cv2.RETR_TREE, cv2.CHAIN_APPROX_NONE)

draw_img = img.copy()
res = cv2.drawContours(draw_img, contours, -1, (0, 0, 255), 2)
cv_show(res, 'res')
“-1”表示显示所有轮廓,(B, G , R) = (0, 0, 255) 采用红色的显示全部轮廓,如下:

或者显示索引为1的轮廓,代码如下:
draw_img = img.copy()
res = cv2.drawContours(draw_img, contours, 1, (0, 0, 255), 2)
cv_show(res, 'res')
索引为1的是三角形的内轮廓,0是外轮廓:

1.3 轮廓特征
cnt = contours[0]

# 面积
print("面积: ", cv2.contourArea(cnt))

# 周长,True表示闭合的
print("周长: ", cv2.arcLength(cnt, True))
面积: 8500.5
周长: 437.9482651948929
2. 轮廓近似
2.1 轮廓
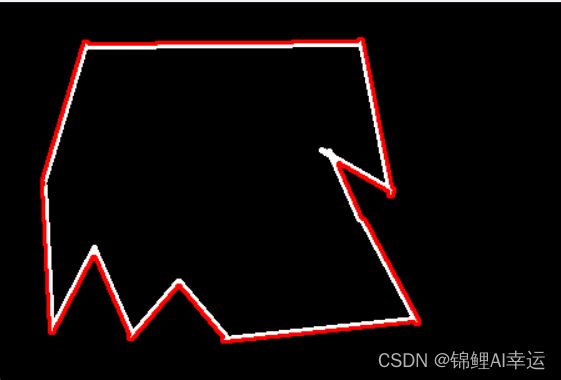
contours2.png原图 :

img = cv2.imread('DataPreprocessing/img/contours2.png')

gray = cv2.cvtColor(img, cv2.COLOR_BGR2GRAY)
ret, thresh = cv2.threshold(gray, 127, 255, cv2.THRESH_BINARY)
contours, hierarchy = cv2.findContours(thresh, cv2.RETR_TREE, cv2.CHAIN_APPROX_NONE)
cnt = contours[0]

draw_img = img.copy()
res = cv2.drawContours(draw_img, [cnt], -1, (0, 0, 255), 2)
cv_show(res, 'res')
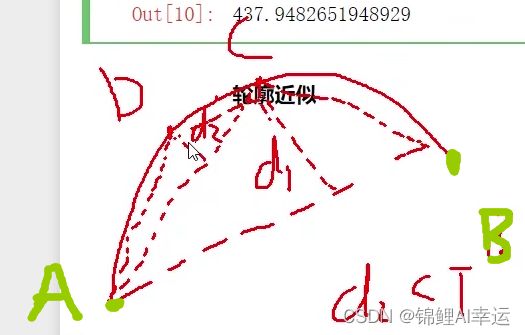
边缘检测:
原理:以这个弧线为例, A , B A,B A,B端连线,取弧线上一点 C C C离线段 A B AB AB的距离最大,判断 d 1 d_{1} d1是否小于设置的阈值 T T T, 不小于 T T T的,则以 A , C A,C A,C连接线段 A C AC AC,重复上面的操作,取得图中的 d 2 d_{2} d2,再同 T T T做比较,直至 d n d_{n} dn小于阈值得出线段为轮廓边缘。
2.2 边界矩形
img = cv2.imread('DataPreprocessing/img/contours.png')

gray = cv2.cvtColor(img, cv2.COLOR_BGR2GRAY)
ret, thresh = cv2.threshold(gray, 127, 255, cv2.THRESH_BINARY)
contours, hierarchy = cv2.findContours(thresh, cv2.RETR_TREE, cv2.CHAIN_APPROX_NONE)
cnt = contours[0]

x, y, w, h = cv2.boundingRect(cnt)
img = cv2.rectangle(img, (x, y), (x + w, y + h), (0, 255, 0), 2)
cv_show(img, 'img')

2.3 外界多边形及面积
area = cv2.contourArea(cnt)
x, y, w, h = cv2.boundingRect(cnt)
rect_area = w * h
extent = float(area) / rect_area
print('轮廓面积与边界矩形比', extent)
轮廓面积与边界矩形比 0.5154317244724715
外接圆形:
(x, y), radius = cv2.minEnclosingCircle(cnt)
center = (int(x), int(y))
radius = int(radius)
img = cv2.circle(img, center, radius, (0, 255, 0), 2)
cv_show(img, 'img')
结果展示:

三、其他OpenCV系列方法链接
- OpenCV之图片预处理方法
- OpenCV之形态学操作(开运算与闭运算)
- OpenCV之图像梯度
- OpenCV之图像轮廓
- OpenCV之直方图均衡化