SSM整合步骤(超详细)
SSM整合(超详细)
我们整合ssm,并实现一个查询数据库里的博客,并展示在页面上的功能。
一、工具
- idea
- MySQL 8.0.22
- Tomcat 9
项目结构:
二、数据库准备
- 创建一个存放博客的数据库表,并插入一些数据
create table blog(
	id int primary key comment '博客id',
	title varchar(100) not null comment '博客标题',
	author varchar(30) not null comment '博客作者',
	create_time varchar(50) not null comment '创建时间',
	views int(30) not null comment '浏览量'
)

insert into blog values(1,'javaWeb教程','黑马程序员',now(),1000)
insert into blog values(2,'安卓软件开发','周世凯,陈小龙',now(),1000)
insert into blog values(3,'数据结构','清华大学出版社',now(),10000)
insert into blog values(4,'人文基础与应用','毛灿月',now(),560)
insert into blog values(5,'java教程','小钱',now(),123456)
insert into blog values(6,'C语言','谭浩强',now(),10000)
insert into blog values(7,'C语言','小毛',now(),10000)
三、基本环境搭建
1. 新建一个Maven项目,并添加web的支持
2. 在pom.xml导入我们需要用到的依赖
如果我们的MySQL版本高于8.0,就需要导入高于MySQL以上的版本,否则可能会报Connections could not be acquired from the underlying database!
 <dependencies>

        <dependency>
            <groupId>mysqlgroupId>
            <artifactId>mysql-connector-javaartifactId>
            <version>8.0.22version>
        dependency>

        <dependency>
            <groupId>com.mchangegroupId>
            <artifactId>c3p0artifactId>
            <version>0.9.5.2version>
        dependency>

        <dependency>
            <groupId>junitgroupId>
            <artifactId>junitartifactId>
            <version>4.13version>
        dependency>

        <dependency>
            <groupId>javax.servletgroupId>
            <artifactId>servlet-apiartifactId>
            <version>2.5version>
        dependency>
        <dependency>
            <groupId>javax.servlet.jspgroupId>
            <artifactId>jsp-apiartifactId>
            <version>2.2version>
        dependency>
        <dependency>
            <groupId>javax.servletgroupId>
            <artifactId>jstlartifactId>
            <version>1.2version>
        dependency>

        <dependency>
            <groupId>org.mybatisgroupId>
            <artifactId>mybatisartifactId>
            <version>3.5.1version>
        dependency>
        <dependency>
            <groupId>org.mybatisgroupId>
            <artifactId>mybatis-springartifactId>
            <version>2.0.1version>
        dependency>


        <dependency>
            <groupId>org.springframeworkgroupId>
            <artifactId>spring-webmvcartifactId>
            <version>5.2.0.RELEASEversion>
        dependency>
        <dependency>
            <groupId>org.springframeworkgroupId>
            <artifactId>spring-jdbcartifactId>
            <version>5.1.8.RELEASEversion>
        dependency>
        <dependency>
            <groupId>org.projectlombokgroupId>
            <artifactId>lombokartifactId>
            <version>1.18.12version>
        dependency>
        <dependency>
            <groupId>org.projectlombokgroupId>
            <artifactId>lombokartifactId>
            <version>RELEASEversion>
            <scope>compilescope>
        dependency>
        <dependency>
            <groupId>org.projectlombokgroupId>
            <artifactId>lombokartifactId>
            <version>RELEASEversion>
            <scope>compilescope>
        dependency>
    dependencies>
3. 在pom.xml中添加Maven资源过滤,预防资源无法导出
 <build>
        <resources>
            <resource>
                <directory>src/main/resourcesdirectory>
                <includes>
                    <include>**/*.propertiesinclude>
                    <include>**/*.xmlinclude>
                includes>
                <filtering>truefiltering>
            resource>
            <resource>
                <directory>src/main/javadirectory>
                <includes>
                    <include>**/*.propertiesinclude>
                    <include>**/*.xmlinclude>
                includes>
                <filtering>truefiltering>
            resource>
        resources>
    build>
4. 建立基本结构和配置框架!
- com.mq.controller
- com.mq.dao
- com.mq.pojo
- com.mq.service
- mybatis-config.xml
<configuration>


configuration>
- applicationContext.xml
<beans xmlns="http://www.springframework.org/schema/beans"
       xmlns:xsi="http://www.w3.org/2001/XMLSchema-instance"
       xmlns:context="http://www.springframework.org/schema/context"
       xmlns:mvc="http://www.springframework.org/schema/mvc"
       xsi:schemaLocation="http://www.springframework.org/schema/beans
        http://www.springframework.org/schema/beans/spring-beans.xsd
        http://www.springframework.org/schema/context
        http://www.springframework.org/schema/context/spring-context.xsd
        http://www.springframework.org/schema/mvc
        https://www.springframework.org/schema/mvc/spring-mvc.xsd">

beans>
四、MyBatis层编写
1. 数据库配置文件 database.properties
注意: 数据库连接可能会碰到:驱动问题、SSL安全访问的问题和时区问题。
MySQL 8.0以上的版本要配置时区,serverTimezone=GMT%2B8
高版本的驱动已经由:"com.mysql.jdbc.Driver"
变为:"com.mysql.cj.jdbc.Driver"
否则会报500错误:Failed to obtain JDBC Connection; nested exception is java.sql.SQLException: Connections could not be acquired from the underlying database!
jdbc.driver=com.mysql.cj.jdbc.Driver
# mysql 8.0+,要配置时区
jdbc.url=jdbc:mysql://localhost:3306/firend_mq?useSSL=false&useUnicode=&characterEncodeing=UTF-8&serverTimezone=GMT%2B8
jdbc.username=root
jdbc.password=root
2. 使用idea连接数据库
3. 编写实体类
在pojo包下创建Blog实体类,使用lombok插件要导入依赖。
package com.mq.pojo;
import lombok.AllArgsConstructor;
import lombok.Data;
import lombok.NoArgsConstructor;

@Data
@AllArgsConstructor
@NoArgsConstructor
public class Blog {
    private int id;
    private String title;
    private String author;
    private String create_time;
    private int views;
}
4. 编写dao层接口和Mapper.xml
如果只是单纯整合,那么不用写接口,我这里为了测试。
- 在dao包下创建BlogMapper接口
package com.mq.dao;

import com.mq.pojo.Blog;

import java.util.List;

public interface BlogMapper {

    //查询所有的博客
    List<Blog> queryAllBLog();
}
- 编写BlogMapper对应的mapper.xml文件
<mapper namespace="com.mq.dao.BlogMapper">

        <select id="queryAllBLog" resultType="Blog">
                select * from firend_mq.blog
        select>
mapper>
5. 编写MyBatis的核心配置文件
我们把配置数据源的步骤交给spring去做。
关于Mybatis的配置详情可以看MyBatis的配置详解
<configuration>


    <typeAliases>
        <package name="com.mq.pojo"/>
    typeAliases>


    <mappers>
        <mapper class="com.mq.dao.BlogMapper"/>
    mappers>
configuration>
6. 编写Service层的接口和实现类
接口:
package com.mq.service;

import com.mq.pojo.Blog;

import java.util.List;

public interface BlogService {
    //查询所有的博客
    List<Blog> queryAllBLog();
}
实现类:
package com.mq.service;

import com.mq.dao.BlogMapper;
import com.mq.pojo.Blog;

import java.util.List;

public class BlogServiceImpl implements BlogService{

    //调用dao层的操作,设置一个set接口,方便Spring管理
    private BlogMapper blogMapper;

    public BlogServiceImpl(BlogMapper blogMapper) {
        this.blogMapper = blogMapper;
    }


    @Override
    public List<Blog> queryAllBLog() {
        return blogMapper.queryAllBLog();
    }

    public void setBlogMapper(BlogMapper blogMapper) {
    }
}
五、Spring层编写
这里我们将spring编写拆成三个配置的编写,每一个相当于整合两种。方便理解。

1.spring-dao.xml
Spring整合Mybatis的相关的配置文件,主要就是我们以前在mybatis-config.xml需要配置数据源的工作,现在交给spring去做了,以及获取到SqlSessionFactory对象等全部由spring去做。代码有详细注释。
<beans xmlns="http://www.springframework.org/schema/beans"
       xmlns:xsi="http://www.w3.org/2001/XMLSchema-instance"
       xmlns:context="http://www.springframework.org/schema/context"
       xmlns:mvc="http://www.springframework.org/schema/mvc"
       xsi:schemaLocation="http://www.springframework.org/schema/beans
        http://www.springframework.org/schema/beans/spring-beans.xsd
        http://www.springframework.org/schema/context
        http://www.springframework.org/schema/context/spring-context.xsd
        http://www.springframework.org/schema/mvc
        https://www.springframework.org/schema/mvc/spring-mvc.xsd">


    <context:property-placeholder location="classpath:database.properties"/>


    <bean id="dataSource" class="com.mchange.v2.c3p0.ComboPooledDataSource">

        <property name="driverClass" value="${jdbc.driver}"/>
        <property name="jdbcUrl" value="${jdbc.url}"/>
        <property name="user" value="${jdbc.username}"/>
        <property name="password" value="${jdbc.password}"/>

        <property name="maxPoolSize" value="30"/>
        <property name="minPoolSize" value="10"/>

        <property name="autoCommitOnClose" value="false"/>

        <property name="checkoutTimeout" value="10000"/>

        <property name="acquireRetryAttempts" value="2"/>
    bean>


    <bean id="sqlSessionFactory" class="org.mybatis.spring.SqlSessionFactoryBean">

        <property name="dataSource" ref="dataSource"/>

        <property name="configLocation" value="classpath:mybatis-config.xml"/>
    bean>


    <bean class="org.mybatis.spring.mapper.MapperScannerConfigurer">

        <property name="sqlSessionFactoryBeanName" value="sqlSessionFactory"/>

        <property name="basePackage" value="com.mq.dao"/>
    bean>
beans>
2. spring-service.xml
编写spring Ioc的依赖注入
<beans xmlns="http://www.springframework.org/schema/beans"
       xmlns:xsi="http://www.w3.org/2001/XMLSchema-instance"
       xmlns:context="http://www.springframework.org/schema/context"
       xmlns:mvc="http://www.springframework.org/schema/mvc"
       xsi:schemaLocation="http://www.springframework.org/schema/beans
        http://www.springframework.org/schema/beans/spring-beans.xsd
        http://www.springframework.org/schema/context
        http://www.springframework.org/schema/context/spring-context.xsd
        http://www.springframework.org/schema/mvc
        https://www.springframework.org/schema/mvc/spring-mvc.xsd">


    <context:component-scan base-package="com.mq.service" />


    <bean id="BlogServiceImpl" class="com.mq.service.BlogServiceImpl">
        <property name="blogMapper" ref="blogMapper"/>
    bean>

    <bean id="transactionManager" class="org.springframework.jdbc.datasource.DataSourceTransactionManager">

    <property name="dataSource" ref="dataSource" />
    bean>
beans>
六、SpringMVC层编写
1. spring-mvc.xml
主要编写注册视图解析器 :InternalResourceViewResolver
注解驱动。
<beans xmlns="http://www.springframework.org/schema/beans"
       xmlns:xsi="http://www.w3.org/2001/XMLSchema-instance"
       xmlns:context="http://www.springframework.org/schema/context"
       xmlns:mvc="http://www.springframework.org/schema/mvc"
       xsi:schemaLocation="http://www.springframework.org/schema/beans
        http://www.springframework.org/schema/beans/spring-beans.xsd
        http://www.springframework.org/schema/context
        http://www.springframework.org/schema/context/spring-context.xsd
        http://www.springframework.org/schema/mvc
        https://www.springframework.org/schema/mvc/spring-mvc.xsd">


    <mvc:annotation-driven/>

    <mvc:default-servlet-handler/>

    <context:component-scan base-package="com.mq.controller"/>


    <bean class="org.springframework.web.servlet.view.InternalResourceViewResolver">
        <property name="viewClass" value="org.springframework.web.servlet.view.JstlView"/>
        <property name="prefix" value="/WEB-INF/jsp/"/>
        <property name="suffix" value=".jsp"/>
    bean>
beans>
2. 编写applicationContext.xml
<beans xmlns="http://www.springframework.org/schema/beans"
       xmlns:xsi="http://www.w3.org/2001/XMLSchema-instance"
       xmlns:context="http://www.springframework.org/schema/context"
       xmlns:mvc="http://www.springframework.org/schema/mvc"
       xsi:schemaLocation="http://www.springframework.org/schema/beans
        http://www.springframework.org/schema/beans/spring-beans.xsd
        http://www.springframework.org/schema/context
        http://www.springframework.org/schema/context/spring-context.xsd
        http://www.springframework.org/schema/mvc
        https://www.springframework.org/schema/mvc/spring-mvc.xsd">

    <import resource="spring-mvc.xml"/>
    <import resource="spring-dao.xml"/>
    <import resource="spring-service.xml"/>
beans>
3. web.xml
<web-app xmlns="http://xmlns.jcp.org/xml/ns/javaee"
         xmlns:xsi="http://www.w3.org/2001/XMLSchema-instance"
         xsi:schemaLocation="http://xmlns.jcp.org/xml/ns/javaee
         http://xmlns.jcp.org/xml/ns/javaee/web-app_4_0.xsd"
         version="4.0">

    <servlet>
        <servlet-name>DispatcherServletservlet-name>
        <servlet-class>org.springframework.web.servlet.DispatcherServletservlet-class>
        <init-param>

            <param-name>contextConfigLocationparam-name>
            <param-value>classpath:applicationContext.xmlparam-value>
        init-param>
        <load-on-startup>1load-on-startup>
    servlet>
    <servlet-mapping>
        <servlet-name>DispatcherServletservlet-name>
        <url-pattern>/url-pattern>
    servlet-mapping>


    <filter>
        <filter-name>encodingFilterfilter-name>
        <filter-class>org.springframework.web.filter.CharacterEncodingFilterfilter-class>
        <init-param>
            <param-name>encodeingparam-name>
            <param-value>utf-8param-value>
        init-param>
    filter>
    <filter-mapping>
        <filter-name>encodingFilterfilter-name>
        <url-pattern>/*url-pattern>
    filter-mapping>


    <session-config>
        <session-timeout>15session-timeout>
    session-config>
web-app>
到这里我们的整合就已经结束了!
我们来测试一下
七、测试
1. 在controller新建BlogController类测试
package com.mq.controller;

import com.mq.pojo.Blog;
import com.mq.service.BlogService;
import org.springframework.beans.factory.annotation.Autowired;
import org.springframework.beans.factory.annotation.Qualifier;
import org.springframework.stereotype.Controller;
import org.springframework.ui.Model;
import org.springframework.web.bind.annotation.RequestMapping;

import java.util.List;

@Controller
@RequestMapping("/blog")
public class BlogController {

    @Autowired
    @Qualifier("BlogServiceImpl")
    private BlogService service;

    @RequestMapping("/allblog")
    public String alllist(Model model){
        List<Blog> blogs = service.queryAllBLog();
        model.addAttribute("blog",blogs);
        return "allblog";
    }
}
2. 编写视图层
index.jsp
<%--
Created by IntelliJ IDEA.
User: hp
Date: 2021/5/21
Time: 13:18
To change this template use File | Settings | File Templates.
--%>
<%@ page contentType="text/html;charset=UTF-8" language="java" %>
$Title$
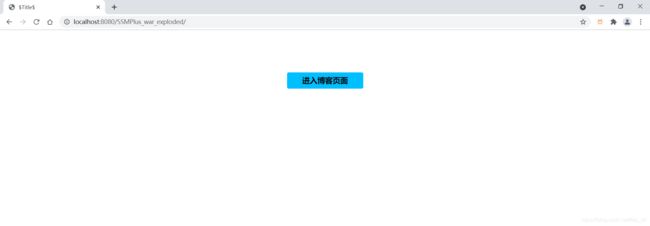
进入博客页面
allblog.jsp
<%@ taglib prefix="c" uri="http://java.sun.com/jsp/jstl/core" %>
<%--
  Created by IntelliJ IDEA.
  User: hp
  Date: 2021/5/21
  Time: 14:28
  To change this template use File | Settings | File Templates.
--%>
<%@ page contentType="text/html;charset=UTF-8" language="java" %>


    博客展示


                    博客列表


                    博客编号
                    博客标题
                    博客作者
                    博客创建时间
                    博客浏览量


                            ${blog.id}
                            ${blog.title}
                            ${blog.author}
                            ${blog.create_time}
                            ${blog.views}
- 运行结果:
到这里我们的整合并且测试已经完成了!


