PYQT图片处理
开发一个图像处理程序。要求:
1、开发一个界面,点击界面上按钮后从文件读取图像,在界面中显示(使用提供的图像文件)。
2、通过鼠标滚轮实现图像放大缩小显示。
3、使用鼠标在图片上画框或通过界面文本框设置图片中某个区域位置和尺寸,实现从图像中截取局部图片并在新的框中显示。
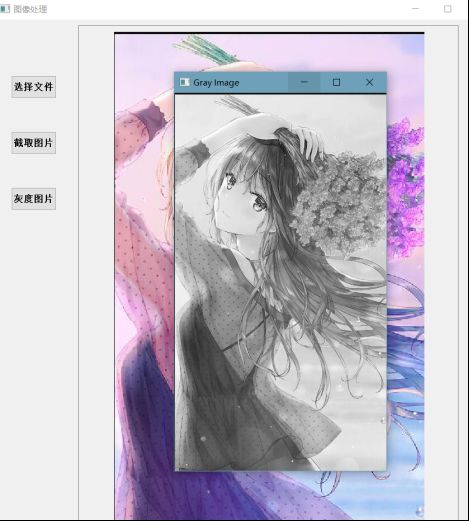
4、将获取的图像转成灰度图片。
考核:
1、文件操作
2、基本的图像显示和处理
1. 转灰度图片
 # 读取彩色图像
        color_img = cv2.imread(path_img)
        # 在窗口中显示图像,该窗口和图像的原始大小自适应
        #cv2.imshow('original image', color_img)
        # cvtColor的第一个参数是处理的图像,第二个是RGB2GRAY
        gray_img = cv2.cvtColor(color_img, cv2.COLOR_RGB2GRAY)
        # gray_img此时还是二维矩阵表示,所以要实现array到image的转换
        gray = Image.fromarray(gray_img)
        # 将图片保存到当前路径下,参数为保存的文件名
        hd = path_img[0:-4] + '.jpg'
        print(hd)
        gray.save(hd)
        cv2.imshow('Gray Image', gray_img)
        # 如果想让窗口持久停留,需要使用该函数
        cv2.waitKey(0)
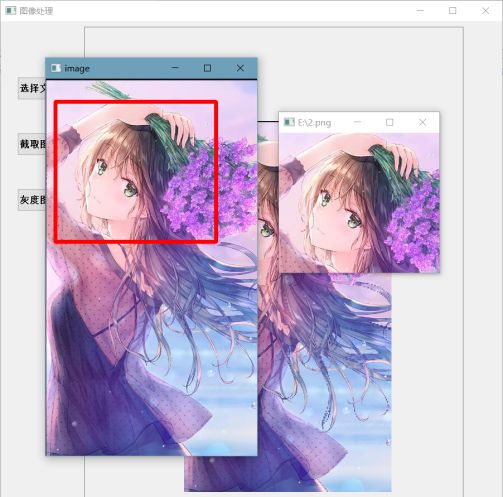
2. 在图片上使用鼠标画矩形并截图
img2 = img.copy()
        if event == cv2.EVENT_LBUTTONDOWN:  # 左键点击
            point1 = (x, y)
            cv2.circle(img2, point1, 10, (0, 255, 0), 5)
            cv2.imshow('image', img2)
        elif event == cv2.EVENT_MOUSEMOVE and (flags & cv2.EVENT_FLAG_LBUTTON):  # 按住左键拖曳
            cv2.rectangle(img2, point1, (x, y), (255, 0, 0), 5)
            cv2.imshow('image', img2)
        elif event == cv2.EVENT_LBUTTONUP:  # 左键释放
            point2 = (x, y)
            cv2.rectangle(img2, point1, point2, (0, 0, 255), 5)
            print(point1, point2)
            cv2.imshow('image', img2)

            left = point1[0]
            upper = point1[1]
            right = point2[0]
            lower = point2[1]
            crop = img[upper:lower, left:right]
            # cv2.imshow(cut)
            cv2.imwrite(r'E:\2.png', crop)
            cv2.imshow(r'E:\2.png', crop)
3. 完整代码
# -*- coding: utf-8 -*-
import sys
from PyQt5 import QtCore, QtGui, QtWidgets
from PyQt5.QtGui import QImageReader
from PyQt5.QtWidgets import QWidget, QApplication, QVBoxLayout, QHBoxLayout, QPushButton, QLabel, QFileDialog
from PyQt5.Qt import QPixmap, QPoint, Qt, QPainter, QIcon
from PyQt5.QtCore import QSize
import cv2
from PIL import Image


path_img = ''

global img, point1, point2

class ImageBox(QWidget):
    def __init__(self):
        super(ImageBox, self).__init__()
        self.img = None
        self.scaled_img = None
        self.start_pos = None
        self.end_pos = None
        self.left_click = False
        self.wheel_flag = False

        self.scale = 1
        self.old_scale = 1
        self.point = QPoint(0, 0)
        self.x = -1
        self.y = -1
        self.new_height = -1
        self.new_width = -1

    def init_ui(self):
        self.setWindowTitle("ImageBox")

    def set_image(self, img_path):
        self.img = QPixmap(img_path)
        print(type(img_path))
        global path_img
        path_img = img_path
        width, height = self.img.width(), self.img.height()
        if height / width > 990 / 660:
            new_height = 990
            new_width = width * 990 / height
        else:
            new_height = height * 660 / width
            new_width = 660
        self.point = QPoint(int((660 - new_width) * 0.5), int((990 - new_height) * 0.5))
        self.img = self.img.scaled(new_width, new_height, Qt.KeepAspectRatio)
        self.scaled_img = self.img

        self.new_height = new_height
        self.new_width = new_width
        self.scale = 1

    def paintEvent(self, e):
        if self.scaled_img:
            painter = QPainter()
            painter.begin(self)
            painter.scale(self.scale, self.scale)
            if self.wheel_flag:  # 定点缩放
                self.wheel_flag = False
                # 判断当前鼠标pos在不在图上
                this_left_x = self.point.x() * self.old_scale
                this_left_y = self.point.y() * self.old_scale
                this_scale_width = self.new_width * self.old_scale
                this_scale_height = self.new_height * self.old_scale

                # 鼠标点在图上,以鼠标点为中心动作
                gap_x = self.x - this_left_x
                gap_y = self.y - this_left_y
                if 0 < gap_x < this_scale_width and 0 < gap_y < this_scale_height:
                    new_left_x = int(self.x / self.scale - gap_x / self.old_scale)
                    new_left_y = int(self.y / self.scale - gap_y / self.old_scale)
                    self.point = QPoint(new_left_x, new_left_y)
                # 鼠标点不在图上,固定左上角进行缩放
                else:
                    true_left_x = int(self.point.x() * self.old_scale / self.scale)
                    true_left_y = int(self.point.y() * self.old_scale / self.scale)
                    self.point = QPoint(true_left_x, true_left_y)
            painter.drawPixmap(self.point, self.scaled_img)  # 此函数中还会用scale对point进行处理
            painter.end()

    def wheelEvent(self, event):
        angle = event.angleDelta() / 8  # 返回QPoint对象,为滚轮转过的数值,单位为1/8度
        angleY = angle.y()
        self.old_scale = self.scale
        self.x, self.y = event.x(), event.y()
        self.wheel_flag = True
        # 获取当前鼠标相对于view的位置
        if angleY > 0:
            self.scale *= 1.08
        else:  # 滚轮下滚
            self.scale *= 0.92
        if self.scale < 0.3:
            self.scale = 0.3
        self.adjustSize()
        self.update()

    def mouseMoveEvent(self, e):
        if self.left_click:
            self.end_pos = e.pos() - self.start_pos  # 当前位置-起始位置=差值
            self.point = self.point + self.end_pos / self.scale  # 左上角的距离变化
            self.start_pos = e.pos()
            self.repaint()

    def mousePressEvent(self, e):
        if e.button() == Qt.LeftButton:
            self.left_click = True
            self.start_pos = e.pos()

    def mouseReleaseEvent(self, e):
        if e.button() == Qt.LeftButton:
            self.left_click = False


class Ui_Form(QWidget):
    def setupUi(self, Form):
        Form.setObjectName("图片处理")
        Form.resize(900, 1080)
        self.scrollArea = QtWidgets.QScrollArea(Form)
        self.scrollArea.setGeometry(QtCore.QRect(150, 10, 680, 990))
        self.scrollArea.setHorizontalScrollBarPolicy(QtCore.Qt.ScrollBarAlwaysOff)
        self.scrollArea.setVerticalScrollBarPolicy(QtCore.Qt.ScrollBarAlwaysOff)
        # self.scrollArea.setWidgetResizable(True)
        self.scrollArea.setObjectName("scrollArea")

        self.scrollAreaWidgetContents = QtWidgets.QWidget()
        self.box = ImageBox()

        self.scrollAreaWidgetContents.setGeometry(QtCore.QRect(0, 0, 680, 990))
        self.scrollAreaWidgetContents.setMinimumSize(QtCore.QSize(100, 100))
        self.scrollAreaWidgetContents.setObjectName("scrollAreaWidgetContents")
        self.gridLayout = QtWidgets.QGridLayout(self.scrollAreaWidgetContents)
        self.gridLayout.setObjectName("gridLayout")

        self.gridLayout.addWidget(self.box, 0, 0, 1, 1)
        self.scrollArea.setWidget(self.scrollAreaWidgetContents)

        self.open_file = QtWidgets.QPushButton(Form)
        self.open_file.setGeometry(QtCore.QRect(30, 100, 81, 41))
        font = QtGui.QFont()
        font.setFamily("Aharoni")
        font.setPointSize(10)
        font.setBold(True)
        font.setWeight(75)
        self.open_file.setFont(font)
        self.open_file.setObjectName("open_file")
        self.open_file.clicked.connect(self.open_image)

        self.jietu = QtWidgets.QPushButton(Form)
        self.jietu.setGeometry(QtCore.QRect(30, 200, 81, 41))
        font = QtGui.QFont()
        font.setFamily("Aharoni")
        font.setPointSize(10)
        font.setBold(True)
        font.setWeight(75)
        self.jietu.setFont(font)
        self.jietu.setObjectName("jietu")
        self.jietu.clicked.connect(self.jietu_image)


        self.huidu = QtWidgets.QPushButton(Form)
        self.huidu.setGeometry(QtCore.QRect(30, 300, 81, 41))
        font = QtGui.QFont()
        font.setFamily("Aharoni")
        font.setPointSize(10)
        font.setBold(True)
        font.setWeight(75)
        self.huidu.setFont(font)
        self.huidu.setObjectName("huidu")
        self.huidu.clicked.connect(self.huidu_image)

        self.retranslateUi(Form)
        QtCore.QMetaObject.connectSlotsByName(Form)

    def retranslateUi(self, Form):
        _translate = QtCore.QCoreApplication.translate
        Form.setWindowTitle(_translate("Form", "图像处理"))
        self.open_file.setText(_translate("Form", "选择文件"))
        self.jietu.setText(_translate("Form", "截取图片"))
        self.huidu.setText(_translate("Form", "灰度图片"))

    def open_image(self):
        img_name, _ = QFileDialog.getOpenFileName(None, "Open Image File", "", "All Files(*);;*.jpg;;*.png;;*.jpeg")
        self.box.set_image(img_name)

    def on_mouse(slef,event, x, y, flags, param):
        global img, point1, point2
        img2 = img.copy()
        if event == cv2.EVENT_LBUTTONDOWN:  # 左键点击
            point1 = (x, y)
            cv2.circle(img2, point1, 10, (0, 255, 0), 5)
            cv2.imshow('image', img2)
        elif event == cv2.EVENT_MOUSEMOVE and (flags & cv2.EVENT_FLAG_LBUTTON):  # 按住左键拖曳
            cv2.rectangle(img2, point1, (x, y), (255, 0, 0), 5)
            cv2.imshow('image', img2)
        elif event == cv2.EVENT_LBUTTONUP:  # 左键释放
            point2 = (x, y)
            cv2.rectangle(img2, point1, point2, (0, 0, 255), 5)
            print(point1, point2)
            cv2.imshow('image', img2)

            left = point1[0]
            upper = point1[1]
            right = point2[0]
            lower = point2[1]
            crop = img[upper:lower, left:right]
            # cv2.imshow(cut)
            cv2.imwrite(r'E:\2.png', crop)
            cv2.imshow(r'E:\2.png', crop)

    def jietu_image(self):
        global path_img,img
        img = cv2.imread(path_img)
        cv2.namedWindow('image')
        cv2.setMouseCallback('image', self.on_mouse)
        cv2.imshow('image', img)
        cv2.waitKey(0)
        aaa.main()
        pass
    def huidu_image(self):
        print(path_img)
        # 读取彩色图像
        color_img = cv2.imread(path_img)
        # 在窗口中显示图像,该窗口和图像的原始大小自适应
        #cv2.imshow('original image', color_img)
        # cvtColor的第一个参数是处理的图像,第二个是RGB2GRAY
        gray_img = cv2.cvtColor(color_img, cv2.COLOR_RGB2GRAY)
        # gray_img此时还是二维矩阵表示,所以要实现array到image的转换
        gray = Image.fromarray(gray_img)
        # 将图片保存到当前路径下,参数为保存的文件名
        hd = path_img[0:-4] + '.jpg'
        print(hd)
        gray.save(hd)
        cv2.imshow('Gray Image', gray_img)
        # 如果想让窗口持久停留,需要使用该函数
        cv2.waitKey(0)
        pass


if __name__ == "__main__":
    app = QtWidgets.QApplication(sys.argv)
    MainWindow = QtWidgets.QMainWindow()
    ui = Ui_Form()
    ui.setupUi(MainWindow)
    MainWindow.show()
    sys.exit(app.exec_())
4. 效果展示
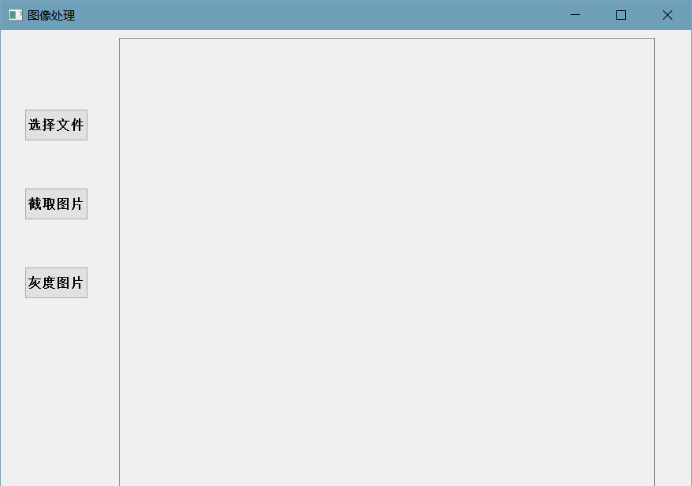
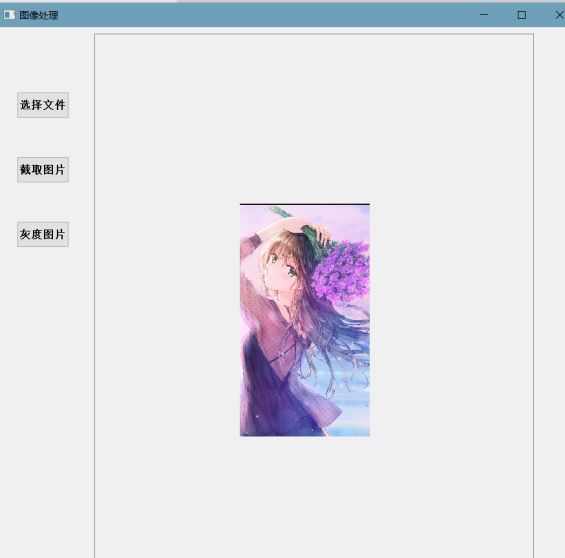
4.1 主界面
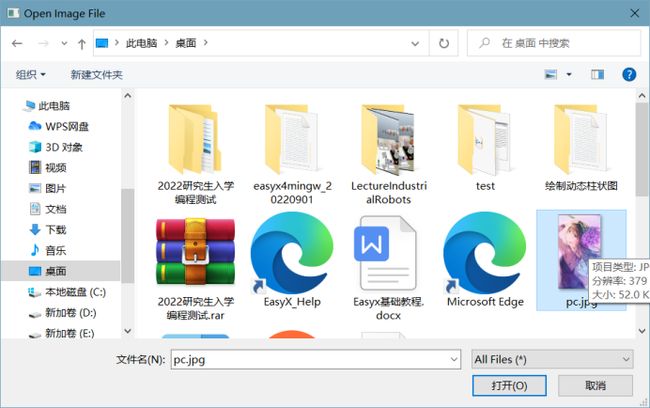
4.2 选择图片
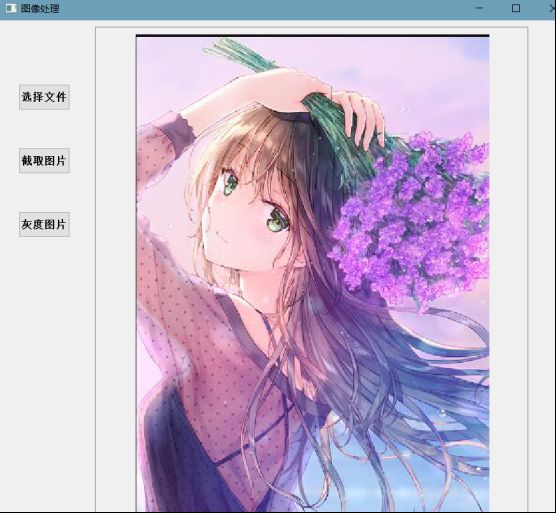
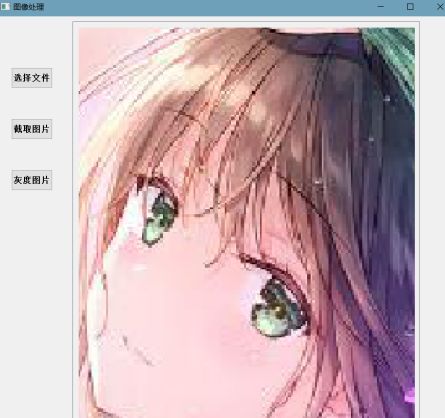
4.3 显示图片
4.4 鼠标滑动放大图片
4.5 鼠标滑动缩小图片
4.6 截取图片
4.7 转化为灰度图片