docker搭建深度学习炼丹炉
docker搭建深度学习炼丹炉
什么场景下需要?
在深度学习的炼丹过程中,业界普遍使用的TensorFlow和Pytorch往往需要通过NVIDIA的GPU进行模型训练的加速。其并行加速最重要的依赖是NVIDIA开发的cuda-toolkit软件包
学术界paper对应代码中依赖的TensorFlow和Pytorch的版本和其所依赖往往错综复杂,Anaconda的虚拟环境虽然能解决TensorFlow和Pytorch版本不同的问题,却不能方便解决cuda-toolkit版本不同的问题,如果多篇论文复现或实现所依赖的cuda-toolkit的版本有冲突,往往需要重装系统,费时费力。
本文通过docker在Ubuntu等Linux上搭建深度学习炼丹炉的方法,能好的解决以上问题,让科研工作者把时间投入更重要的算法和模型优化上。
原理
用户只要在Linux系统中安装好显卡驱动,不需要安装cuda-toolkit,cuda-toolkit、TensorFlow和Pytorch都在docker容器中
NVIDIA Container Toolkit
docker炼丹炉的原理架构图
系统要求
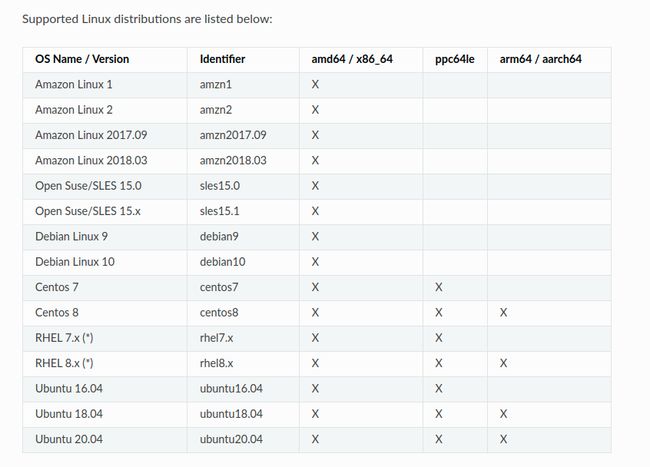
gpu版本的docker炼丹炉支持以下OS,基本上只支持Linux

docker安装
更多详细过程参考
脚本安装方法
curl -fsSL get.docker.com -o get-docker.sh
sudo sh get-docker.sh --mirror Aliyun
启动docker
sudo systemctl enable docker
sudo systemctl start docker
建立 docker 用户组
默认情况下,docker 命令会使用 Unix socket 与 Docker 引擎通讯。而只有 root 用户和 docker 组的用户才可以访问 Docker 引擎的 Unix socket。出于安全考虑,一般 Linux 系统上不会直接使用 root 用户。因此,更好地做法是将需要使用 docker 的用户加入 docker 用户组。
建立 docker 组:
sudo groupadd docker
将当前用户加入 docker 组:
sudo usermod -aG docker ${USER}
sudo systemctl restart docker
su root
su ${USER}
测试 Docker 是否安装正确
docker run --rm hello-world
镜像加速
- 阿里云加速器(点击管理控制台 -> 登录账号(淘宝账号) -> 右侧镜像中心 -> 镜像加速器 -> 复制地址
NVIDIA Container Toolkit
NVIDIA容器架构, windows用户不支持
Ubuntu安装
Setup the stable repository and the GPG key:
distribution=$(. /etc/os-release;echo $ID$VERSION_ID) \
   && curl -s -L https://nvidia.github.io/nvidia-docker/gpgkey | sudo apt-key add - \
   && curl -s -L https://nvidia.github.io/nvidia-docker/$distribution/nvidia-docker.list | sudo tee /etc/apt/sources.list.d/nvidia-docker.list
Install the nvidia-docker2 package (and dependencies) after updating the package listing:
sudo apt-get update
sudo apt-get install -y nvidia-docker2
/etc/docker/daemon.json需要出现以下内容
设置默认的runtime为nvidia
{
    "default-runtime": "nvidia",
    "runtimes": {
        "nvidia": {
            "path": "nvidia-container-runtime",
            "runtimeArgs": []
        }
    }
}
Restart the Docker daemon to complete the installation after setting the default runtime:
sudo systemctl restart docker
At this point, a working setup can be tested by running a base CUDA container:
sudo docker run --rm --gpus all nvidia/cuda:11.0-base nvidia-smi
tensorflow-docker
TensorFlow安装
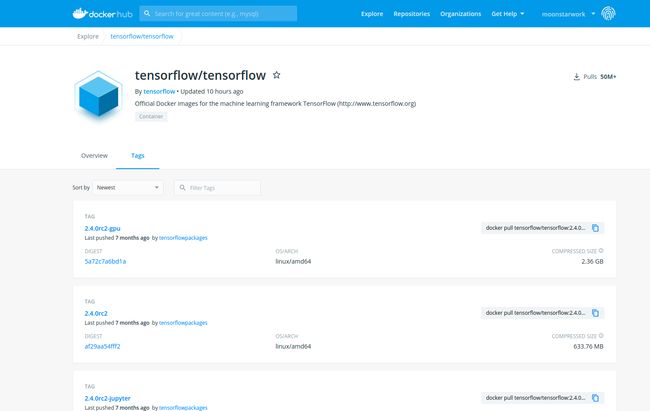
dockerhub中有各种版本的tensorflow,复现代码时只要选择对应的版本后docker pull就行
其他依赖安装
新建一个Dockerfile, 把类似OpenCV等其他依赖写到Dockerfile里面,docker build镜像之后便可使用
FROM tensorflow/tensorflow:1.4.0-gpu-py3
RUN pip install Keras==2.1.2 \
    && pip install numpy==1.13.3 \
    && pip install opencv-python==3.3.0.10 \
    && pip install h5py==2.7.1

RUN apt-get update \
    && apt-get install -y libsm6 \
    && apt-get install -y libxrender1 \
    && apt-get install -y libxext-dev
Dockerfile如果包含apt等从国外源中安装依赖的命令,其过程会很慢甚至会卡住,其解决方案可以是挂载代理(挖坑后续文章)或使用阿里云镜像服务的海外机器进行构建(挖坑后续文章)
docker build -t dockerImageName:version .
pytorch-docker
pytorch和TensorFlow类似
https://hub.docker.com/r/pytorch/pytorch/tags?page=1&ordering=last_updated
pycharm调试docker和运行docker
设置Python环境镜像
设置run debug configuration
--entrypoint -v /home/tml/vansin/paper/pix2code:/opt/project --rm
以上的配置为挂载本地的文夹到docker目录,让训练好的数据保存在本地,而不是docker中
Reference
https://docs.nvidia.com/datacenter/cloud-native/container-toolkit/install-guide.html#getting-started
https://www.tensorflow.org/install/docker?hl=zh-cn


