Android Fragment学习(一)
说明
Fragment是在Android3.0(即API 11)才出现的,如果在之前的版本要使用,需要添加support库。
Fragment可以认为是Actvity模块化的组件,可以很方便地被添加,删除,替换到Activity的视图结构中。通过FragmentTransaction来执行这些操作。
Fragment还有个重要的特点是:拥有自己的生命周期,受Activity直接影响。
例子
MainActivity直接继承了FragmentActivity(support库中的)。
因为API 11之前的Activity无法获取到FragmentManager。在FragmentActivity中可以使用getSupportFragmentManager()。
如果使用的是API 11以上的,可直接从Activity.getFragmentManager()获得,即无需继承FragmentActivity了。
向Activity添加Fragment的方式:
1.Activity布局文件中使用<Fragment>属性;
2.代码中,通过FragmentTransaction可以添加、删除、替换Fragment。
下面的例子,是在代码中添加Fragment。
 1 package com.dann.fragmentdemo;

 2

 3 import android.os.Bundle;

 4 import android.support.v4.app.Fragment;

 5 import android.support.v4.app.FragmentActivity;

 6 import android.support.v4.app.FragmentManager;

 7 import android.support.v4.app.FragmentTransaction;

 8 import android.view.LayoutInflater;

 9 import android.view.View;

10 import android.view.ViewGroup;

11

12 public class MainActivity extends FragmentActivity {

13

14     @Override

15     protected void onCreate(Bundle savedInstanceState) {

16         super.onCreate(savedInstanceState);

17         setContentView(R.layout.activity_main);// Activity的布局

18

19         Fragment fragment = new MyFragement();

20         FragmentManager fragmentManager = getSupportFragmentManager();

21         FragmentTransaction transaction = fragmentManager.beginTransaction();// 打开事务

22         transaction.add(R.id.fragment_container, fragment);// 向View容器添加Fragment。两个参数:容器(ViewGroup)的标识,添加的fragment

23         transaction.commit();// 提交事务

24

25     }

26

27     /**

28      * 如果Fragment是有界面的(可以没),就需要继承onCreateView()方法,返回表示Fragment界面的View

29      *

30      */

31     public static class MyFragement extends Fragment {

32

33         @Override

34         public View onCreateView(LayoutInflater inflater, ViewGroup container,

35                 Bundle savedInstanceState) {

36             ViewGroup root = (ViewGroup) inflater.inflate(

37                     R.layout.fragment_layout, null);

38

39             return root;

40         }

41

42     }

43 }
layout_main.xml
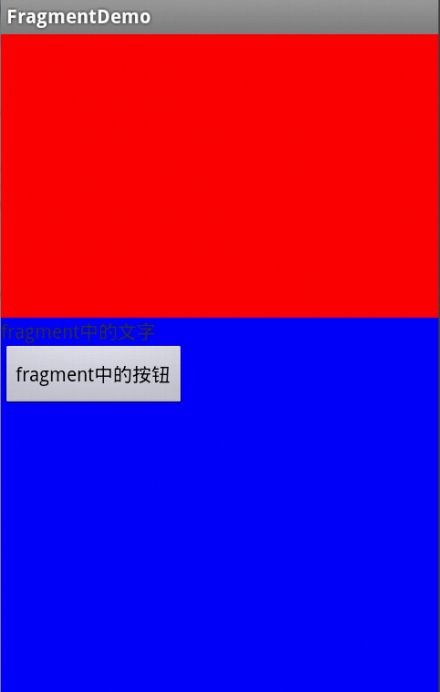
根View是LinearLayout,背景色为红色;两个子View,分别是LinearLayout和FrameLayout,大小相同,其中的FrameLayout是提供Fragment存放的容器。
 1 <LinearLayout xmlns:android="http://schemas.android.com/apk/res/android"

 2     xmlns:tools="http://schemas.android.com/tools"

 3     android:layout_width="match_parent"

 4     android:layout_height="match_parent"

 5     android:background="#FF0000"

 6     android:orientation="vertical" >

 7

 8     <LinearLayout

 9         android:id="@+id/lin_main"

10         android:layout_width="match_parent"

11         android:layout_height="wrap_content"

12         android:layout_weight="1"

13         android:orientation="vertical" />

14

15     <FrameLayout

16         android:id="@+id/fragment_container"

17         android:layout_width="match_parent"

18         android:layout_height="wrap_content"

19         android:layout_weight="1" >

20     </FrameLayout>

21

22 </LinearLayout>
fragment_layout.xml
根View是LinearLayout,背景色为蓝色。有一个TextView,一个Button。
 1 <?xml version="1.0" encoding="utf-8"?>

 2 <LinearLayout xmlns:android="http://schemas.android.com/apk/res/android"

 3     android:layout_width="match_parent"

 4     android:layout_height="match_parent"

 5     android:background="#0000FF"

 6     android:orientation="vertical" >

 7

 8     <TextView

 9         android:layout_width="wrap_content"

10         android:layout_height="wrap_content"

11         android:text="@string/txt_fragment" />

12

13     <Button

14         android:layout_width="wrap_content"

15         android:layout_height="wrap_content"

16         android:text="@string/btn_fragment" />

17

18 </LinearLayout>
执行结果:

可以看到,我自定义的MyFragment添加到了Activity布局中的FrameLayout里(蓝色部分)。因为FrameLayout本来应该是红色的,但Fragment添加进去后,背景色与Fragment一致(即蓝色)。
代码:http://yunpan.cn/QnLn2LzKA8aEd (访问密码:bd8c)