QT With OpenGL(泛光)(Bloom)
文章目录
- 一、渲染场景到HDR帧缓存
-
- 1. HDR帧缓存需要两个颜色纹理--MRT(Multiple Render Targets,多渲染目标)
- 2. 将场景渲染到HDR帧缓存,提取高光图。
-
- 修改shader,使用多颜色缓冲渲染
- 3. 将HDR帧缓存渲染到屏幕,并可切换查看颜色缓冲1、2
- 二、 高斯模糊
-
-
- 理论
-
- 性质
- 垂直过滤器
- 图解
- 对高光图应用高斯模糊
-
- (1)编写高斯模糊shader
- (2)使用两个FBO
- (3)高斯模糊
- 结果
-
- 三、把两个纹理混合
-
- 结果
- 维护
一、渲染场景到HDR帧缓存
1. HDR帧缓存需要两个颜色纹理–MRT(Multiple Render Targets,多渲染目标)
HDRFBO = new QOpenGLFramebufferObject(size(),QOpenGLFramebufferObject::CombinedDepthStencil,GL_TEXTURE,GL_RGBA16F);
HDRFBO->addColorAttachment(size(),GL_RGBA16F);
core = QOpenGLContext::currentContext()->versionFunctions<QOpenGLFunctions_3_3_Core>();
GLenum buffers[] = { GL_COLOR_ATTACHMENT0, GL_COLOR_ATTACHMENT1 };
core->glDrawBuffers(2, buffers);
HDRFBO->release();
使用QOpenGLFunctions_3_3_Core调用glDrawBuffers显式告知OpenGL渲染到多个颜色缓冲。
补充:
QOpenGLFunctions 是OpenGL ES 2.0 API,所以只有部分接口可用。
The QOpenGLFunctions class provides cross-platform access to the OpenGL ES 2.0 API. More…
在官方文档中可以看到ES中没有glDrawBuffers。
2. 将场景渲染到HDR帧缓存,提取高光图。
修改shader,使用多颜色缓冲渲染
//输出
layout (location = 0) out vec4 FragColor;
layout (location = 1) out vec4 BrightColor;
       //检查该像素亮度是否高于阈值
       float brightness = dot(FragColor.rgb, vec3(0.2126, 0.7152, 0.0722));
       if(brightness > 1.0) BrightColor = vec4(FragColor.rgb, 1.0);
3. 将HDR帧缓存渲染到屏幕,并可切换查看颜色缓冲1、2
HDRFBO->release();
    //HDR输出
    glViewport(0,0,width(),height());
    glClear(GL_COLOR_BUFFER_BIT | GL_DEPTH_BUFFER_BIT|GL_STENCIL_BUFFER_BIT);
    BloomShader->bind();//shader
    BloomShader->setUniformValue("RenderResult",0);
    glActiveTexture(GL_TEXTURE0);
    glBindTexture(GL_TEXTURE_2D,HDRFBO->textures().at(HDRNUM));
    renderQuad();
    BloomShader->release();

提取高光效果并没有想象中的好,按照直觉,应该只提取发光物的高光效果,但是环境中也出现了大量提取点。
且,若背对光源(发光面不可见,但发光物体可见),则不会出现泛光现象,与想象中不同。
二、 高斯模糊
理论
性质
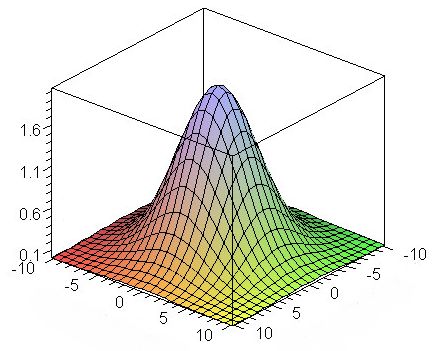
高斯函数的这两个性质都给我们提供了优化的空间。
垂直过滤器
uniform sampler2D image;

out vec4 FragmentColor;

uniform float offset[5] = float[](0.0, 1.0, 2.0, 3.0, 4.0);
uniform float weight[5] = float[](0.2270270270, 0.1945945946, 0.1216216216,
                                  0.0540540541, 0.0162162162);

void main(void) {
    FragmentColor = texture2D(image, vec2(gl_FragCoord) / 1024.0) * weight[0];
    for (int i=1; i<5; i++) {
        FragmentColor +=
            texture2D(image, (vec2(gl_FragCoord) + vec2(0.0, offset[i])) / 1024.0)
                * weight[i];
        FragmentColor +=
            texture2D(image, (vec2(gl_FragCoord) - vec2(0.0, offset[i])) / 1024.0)
                * weight[i];
    }
}
引用GPU硬件加速,使用GPU双线性滤波器优化
uniform sampler2D image;

out vec4 FragmentColor;

uniform float offset[3] = float[](0.0, 1.3846153846, 3.2307692308);
uniform float weight[3] = float[](0.2270270270, 0.3162162162, 0.0702702703);

void main(void) {
    FragmentColor = texture2D(image, vec2(gl_FragCoord) / 1024.0) * weight[0];
    for (int i=1; i<3; i++) {
        FragmentColor +=
            texture2D(image, (vec2(gl_FragCoord) + vec2(0.0, offset[i])) / 1024.0)
                * weight[i];
        FragmentColor +=
            texture2D(image, (vec2(gl_FragCoord) - vec2(0.0, offset[i])) / 1024.0)
                * weight[i];
    }
}
图解
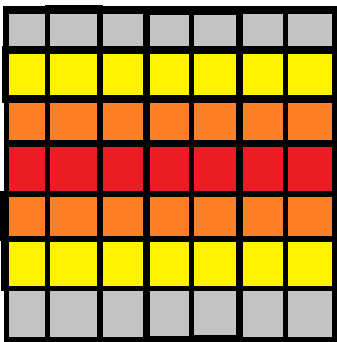
垂直过滤一次:红色色块的颜色为上下5个色块颜色的加权和
- 红色权重表示:0.227027
- 橙色权重表示:0.1945946
- 黄色权重表示:0.1216216
- 灰色权重表示:0.054054
- 白色权重表示(没画):0.054054

再将红色色块进行一次水平过滤,即将该范围内的像素进行了如下加权(红色色块为最终得到的像素块,其他颜色色块仅表示加权权值)
如: - 红色色块加权为 0.227027 * 0.227027
- 红色上方色块(暗黄色,柠檬黄,灰色)加权分别为:0.1945946 ,0.1216216, 0.054054
- 红色右方色块(橘黄色,土黄色,淡绿色)加权分别为:
0.227027 * 0.1945946
0.227027 * 0.1216216
0.227027 * 0.054054 - 棕色加权为0.1945946 * 0.1945946
- 其他类推

可以看出以这种形式组成的高斯模糊,并非是严格意义上的高斯模糊,而是一种近似。但若继续循环如上的垂直-水平过滤器,则结果与实际高斯模糊效果近似。循环次数越多,模糊效果越强。
对高光图应用高斯模糊
(1)编写高斯模糊shader
使用LearnOpenGL代码
#version 450 core
out vec4 FragColor;
in vec2 TexCoords;
uniform sampler2D image;
uniform bool horizontal;
uniform float weight[5] = float[] (0.227027, 0.1945946, 0.1216216, 0.054054, 0.016216);
void main()
{
    vec2 tex_offset = 1.0 / textureSize(image, 0); // gets size of single texel
    vec3 result = texture(image, TexCoords).rgb * weight[0]; // current fragment's contribution
    if(horizontal)
    {
        for(int i = 1; i < 5; ++i)
        {
            result += texture(image, TexCoords + vec2(tex_offset.x * i, 0.0)).rgb * weight[i];
            result += texture(image, TexCoords - vec2(tex_offset.x * i, 0.0)).rgb * weight[i];
        }
    }
    else
    {
        for(int i = 1; i < 5; ++i)
        {
            result += texture(image, TexCoords + vec2(0.0, tex_offset.y * i)).rgb * weight[i];
            result += texture(image, TexCoords - vec2(0.0, tex_offset.y * i)).rgb * weight[i];
        }
    }
    FragColor = vec4(result, 1.0);
}
(2)使用两个FBO
//高斯模糊缓冲
GBHorizontal = new QOpenGLFramebufferObject(size(),QOpenGLFramebufferObject::NoAttachment,GL_TEXTURE_2D,GL_RGBA16F);
GBVertical = new QOpenGLFramebufferObject(size(),QOpenGLFramebufferObject::NoAttachment,GL_TEXTURE_2D,GL_RGBA16F);
注意再resizeGL中也要设置。
(3)高斯模糊
//高斯模糊
    GLboolean horizontal = true, first_iteration = true;
    GLuint amount = 10;
    GaussianBlurShader->bind();
    for (GLuint i = 0; i < amount; i++)
    {
        if(horizontal)GBHorizontal->bind();
        else GBVertical->bind();
        //glClear(GL_COLOR_BUFFER_BIT);
        GaussianBlurShader->setUniformValue("horizontal",horizontal);
        GaussianBlurShader->setUniformValue("image",0);
        glActiveTexture(GL_TEXTURE0);
        unsigned int id = 0;
        if(first_iteration){
            id = HDRFBO->textures().at(1);
        }
        else{
            if(horizontal)id = GBVertical->texture();
            else id = GBHorizontal->texture();
        }
        glBindTexture(GL_TEXTURE_2D, id);
        renderQuad();
        horizontal = !horizontal;
        if (first_iteration)
            first_iteration = false;
    }
    glBindFramebuffer(GL_FRAMEBUFFER, 0);
结果
三、把两个纹理混合
有了场景的HDR纹理和模糊处理的亮区纹理,我们只需把它们结合起来就能实现泛光或称光晕效果了。最终的像素着色器(大部分和HDR教程用的差不多)要把两个纹理混合:
最简单的混合(直接相加)
#version 450 core
out vec4 FragColor;

in vec2 TexCoords;

uniform sampler2D RenderResult;
uniform sampler2D bloomBlur;

void main()
{
    vec3 hdrColor = texture(RenderResult, TexCoords).rgb;
    vec3 bloomColor = texture(bloomBlur, TexCoords).rgb;
    if(addBloom) hdrColor += bloomColor;

    FragColor = vec4(hdrColor , 1.0f);
}
结果

头顶光源出现泛光现象

但除了光源其他物体也有泛光现象(这不合理)。
应该修改为只有光源才出现泛光现象
维护
待更新…


