数据增强实测之GridMask
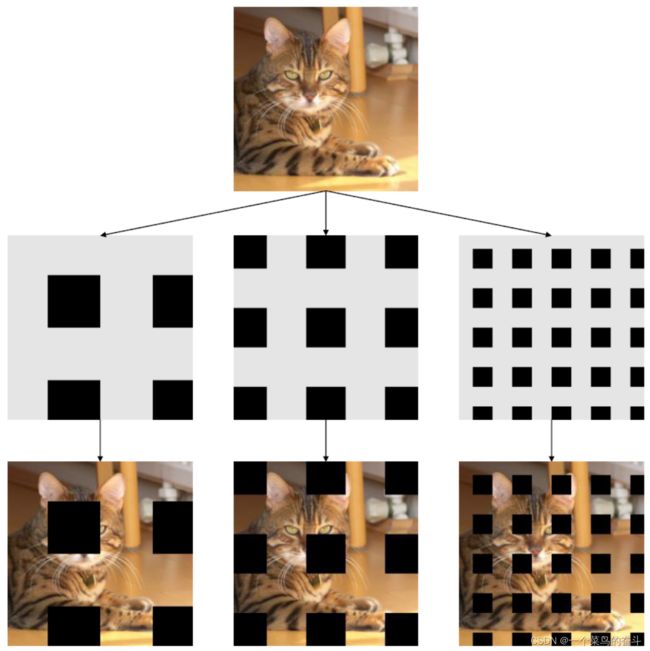
GridMask是2020年arXiv上的一篇论文,可以认为是直接对标Hide_and_Seek方法。与之不同的是,GridMask采用了等间隔擦除patch的方式,有点类似空洞卷积,或许可以取名叫空洞擦除?
GridMask Data Augmentation
paper: https://arxiv.org/pdf/2001.04086
code: GitHub - dvlab-research/GridMask
核心操作如下图所示,看一下基本就能明白。
实现代码相比于其他方法要复杂一些,如下:
import torch
import torch.nn as nn
import numpy as np
from PIL import Image
import pdb
import math


class Grid(object):
    def __init__(self, d1, d2, rotate=1, ratio=0.5, mode=0, prob=1.):
        self.d1 = d1
        self.d2 = d2
        self.rotate = rotate
        self.ratio = ratio
        self.mode = mode
        self.st_prob = self.prob = prob

    def set_prob(self, epoch, max_epoch):
        self.prob = self.st_prob * min(1, epoch / max_epoch)

    def __call__(self, img):
        if np.random.rand() > self.prob:
            return img
        h = img.size(1)
        w = img.size(2)

        # 1.5 * h, 1.5 * w works fine with the squared images
        # But with rectangular input, the mask might not be able to recover back to the input image shape
        # A square mask with edge length equal to the diagnoal of the input image
        # will be able to cover all the image spot after the rotation. This is also the minimum square.
        hh = math.ceil((math.sqrt(h * h + w * w)))

        d = np.random.randint(self.d1, self.d2)
        # d = self.d

        # maybe use ceil? but i guess no big difference
        self.l = math.ceil(d * self.ratio)

        mask = np.ones((hh, hh), np.float32)
        st_h = np.random.randint(d)
        st_w = np.random.randint(d)
        for i in range(-1, hh // d + 1):
            s = d * i + st_h
            t = s + self.l
            s = max(min(s, hh), 0)
            t = max(min(t, hh), 0)
            mask[s:t, :] *= 0

        for i in range(-1, hh // d + 1):
            s = d * i + st_w
            t = s + self.l
            s = max(min(s, hh), 0)
            t = max(min(t, hh), 0)
            mask[:, s:t] *= 0

        r = np.random.randint(self.rotate)
        mask = Image.fromarray(np.uint8(mask))
        mask = mask.rotate(r)
        mask = np.asarray(mask)
        mask = mask[(hh - h) // 2:(hh - h) // 2 + h, (hh - w) // 2:(hh - w) // 2 + w]

        mask = torch.from_numpy(mask).float().cuda()
        if self.mode == 1:
            mask = 1 - mask

        mask = mask.expand_as(img)
        img = img * mask

        return img


class GridMask(nn.Module):
    def __init__(self, d1=96, d2=224, rotate=360, ratio=0.4, mode=1, prob=0.8):
        super(GridMask, self).__init__()
        self.rotate = rotate
        self.ratio = ratio
        self.mode = mode
        self.st_prob = prob
        self.grid = Grid(d1, d2, rotate, ratio, mode, prob)

    def set_prob(self, epoch, max_epoch):
        self.grid.set_prob(epoch, max_epoch)

    def forward(self, x):
        if not self.training:
            return x

        n, c, h, w = x.size()
        y = []
        for i in range(n):
            y.append(self.grid(x[i]))

        y = torch.cat(y).view(n, c, h, w)

        return y
直接在单张图像上测试会有点问题,上面代码里面需要修改两个地方:
原代码:mask = torch.from_numpy(mask).float().cuda()
新代码:mask = torch.from_numpy(mask).float()
原代码:
def forward(self, x):
if not self.training:
return x
n, c, h, w = x.size()
y = []
for i in range(n):
y.append(self.grid(x[i]))
y = torch.cat(y).view(n, c, h, w)
return y
新代码:
def forward(self, x):
if not self.training:
return x
return self.grid(x)看看在图像上执行GridMask是什么效果,代码如下:
import cv2
from torchvision import transforms
from gridmask import GridMask

img = cv2.imread('cat.png')
img = transforms.ToTensor()(img)
grid_mask = GridMask()
img = grid_mask(img)

img = img.mul(255).byte()
img = img.numpy().transpose((1, 2, 0))
cv2.imwrite('gridmask.png', img)
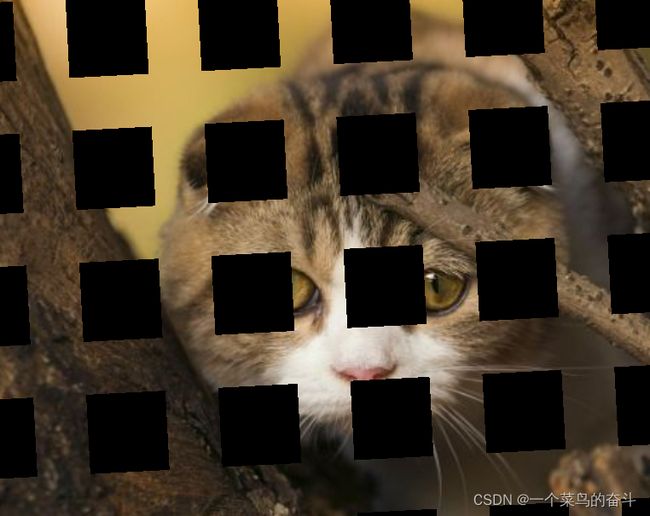
由于代码中加入了rotate,所以擦除的patch会有一定的旋转,实际效果如下:
直接看实际测试结果,见下表。
| Method | CIFAR-10 | CIFAR-100 |
| ResNet-50 | 96.76/96.82/96.81/96.79 96.72/96.69/96.60/96.82 (96.75) |
83.80/83.66/84.19/83.26 83.89/83.90/83.57/83.69 (83.74) |
| ResNet-50+GridMask | 96.72/96.76/96.62/96.72 96.66/96.66/96.56/96.59 (96.66) |
83.35/83.35/83.54/83.29 83.26/83.43/83.15/83.10 (83.31) |
从上表中的结果来看,没有明显的提升效果。
GridMask有两个非常明显的问题:(1)self.grid.set_prob(epoch, max_epoch),需要引入epoch参数,根据epoch的增加来调整概率,因此无法作为transform在数据load的时候就进行处理,加上for循环等计算,实际训练中会带来额外的时间开销。(2)在实测的时候,发现随着训练批次的增加,训练速度会变得越来越慢,GPU利用率非常低,而CPU全都跑满了,可能是存在着大量的内存与显存之间的拷贝问题,随着训练的推进形成了阻塞。
在github上有人询问过CIFAR-10的精度比不过baseline的问题。作者回复:“epochs要大一些(280),其次d的取值大一些(24,32)”。可以看出,如果是与baseline相同的设置,加上不去仔细调参的话,想得到性能提升也是比较困难的。
数据增强实测之cutout_一个菜鸟的奋斗-CSDN博客
数据增强实测之mixup_一个菜鸟的奋斗-CSDN博客
数据增强实测之Random Erasing_一个菜鸟的奋斗-CSDN博客
数据增强实测之RICAP_一个菜鸟的奋斗-CSDN博客
数据增强实测之Hide-and-Seek_一个菜鸟的奋斗-CSDN博客

