Pytorch常用API总结
文章目录
- 前言
- 1、torch.sum()
-
- 1.1 torch.sum(input, dtype=None) --> Tensor
- 1.2 torch.sum(input, dim, keepdim) --> Tensor
- 2、torch.repeat()
- 3、torch.expand()
- 4、torch.max()
-
- 4.1 torch.max(input)
- 4.2 torch.max(input, dim, keepdim)
- 5、torch.Tensor.new_full()
- 6、切片细节
- 7、torch.nonzero
- 8、torch.randperm(n)
- 9、unique
- 10、gather
- 11、cat
- 12、torch.split(src, [], dim)
- 12、两个张量切片做乘法
- 13、permute和transpose
- 14、torch.matmul(arg1, arg2)维度变换小结
- 15、view和contiguous
- 16、将tensor转成bool张量
- 17、torch.bmm()矩阵相乘api
- 18、判断一个tensor的shape是否等于某个值
- 19、masked_fill_
- 20、torch.cumsum(input, dim)
- 21、torch.div()
- 22、F.interpolate()
- 23、一个深浅拷贝示例-->共享权重
- 24、tensor.new_zeros() + torch.as_tensor()
- 25、torch.prod(input, dim,keepdim)
- 26、torch.stack(list(tensors),dim)
- 27、torch.as_tensor(data, dtype, device)
- 28、torch.linespace(start, end, step)
- 29、torch.meshgrid(*tensors)
- 30、torch.unbind(tensor, dim) --> 元祖
- 31、nn.AdaptiveAvgPool2d(output_size)
- 31、List能够直接转成Tensor
- 32、F.one-hot函数
前言
本文主要用于记录pytorch中常用API的使用方法以及注意事项。很多api在pytorch的官网已经给出了详细的解释,但本人还想整理自己一份。本文不定期更新。
1、torch.sum()
1.1 torch.sum(input, dtype=None) --> Tensor
首先将张量input转换成dtype格式,之后将input中所有元素累加求和,返回一个一维的张量。
a = torch.tensor([[1.,3.],[2.,4.]])
b = torch.sum(a,dtype=torch.int)      # tensor(10, dtype=torch.int32)
1.2 torch.sum(input, dim, keepdim) --> Tensor
a、这个api网上有很多画图的教程,容易理解但也容易忘记。所以,只介绍一个好记的方式:首先获取input的shape,比如(2,3),维度dim=0的位置对应2,维度dim=1的位置对应3;现在我们要对dim=0求和,则求和后的shape为(1,3),也就是将dim=0的维度压缩成1维度,之后若keepdim=TRUE,则最终shape为(1,3),否则为(3,)。
a = torch.tensor([[1,2,3],[4,5,6]])     # a.shape: [2,3]
a1 = torch.sum(a, dim=0, keepdim=True)  # 对dim=0求和,keepdim=T, 故a1.shape: torch.Size([1, 3])  a1: tensor([[5, 7, 9]])
a2 = torch.sum(a, dim=0, keepdim=False) # 对dim=0求和,keepdim=F, 故a2.shape: torch.Size([3])  a2: tensor([5, 7, 9])
简单一句话,在哪个dim上求和则将该dim压成成1!
b、另外,在使用过程中,会看到dim是个list。比如dim=[1,0],同理,遍历list中元素,先将dim=1压缩成1之后将dim=0压缩成1。和在两个dim上分别执行两次sum效果一样。
a = torch.tensor([[1,2,3],[4,5,6]])     # a.shape: [2,3]
a_list = torch.sum(a, dim=(1,0))        # tensor(21)
a1 = torch.sum(a,dim=1)                 # tensor([ 6, 15])
a2 = torch.sum(a1,dim=0)
print(a2 == a_list)                     # tensor(True)
2、torch.repeat()
该函数会开辟新的内存。以生成图像中各个像素点二维坐标组合为例理解该函数:
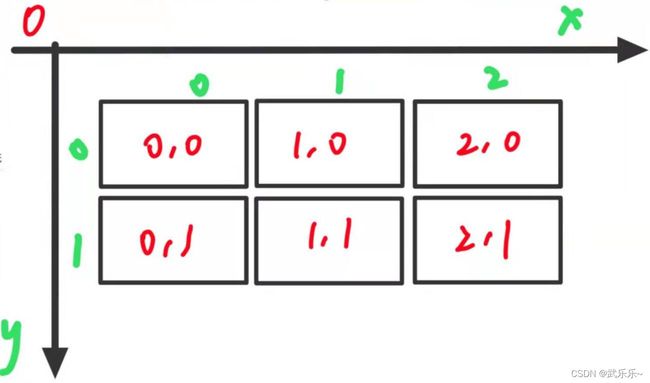
接收两个横纵坐标:x和y,目的生成红色坐标值:即x最终为[0,1,2,0,1,2],y最终为[0,0,0,1,1,1]。可以通过下面repeat实现。
    x = torch.tensor([0,1,2]) # size = (3)
    y = torch.tensor([0,1])   # size = (2)
    xx = x.repeat(len(y))     # size: 3 --> 3*2 =6
    # size: (2) --> (2,1) --> 在第一个维度上重复一次还是(2,1) -->
    # 在第二个维度上重复3次(2,1*3) --> .view(6)
    yy = y.view(-1, 1).repeat(1, len(x)).view(-1)
    print(xx, yy) # xx = [0,1,2,0,1,2] yy = [0,0,0,1,1,1]
其中xx的生成过程容易理解:直接将x重复len(y)次。这里yy生成我简单以图说下:

由于yy的repeat是(1,3)即维度0上重复1次,在维度1上重复3次,需要依次的变换yy。关键是首先确定每步repeat后张量的size变成啥样了,再来推导张量中的元素。
3、torch.expand()
不会开辟新内存,且返回的tensor在内存上不连续的,除非使用.contiguous()函数。官方给的文档就四句英语,对应下面四个例子。建议直接看代码。
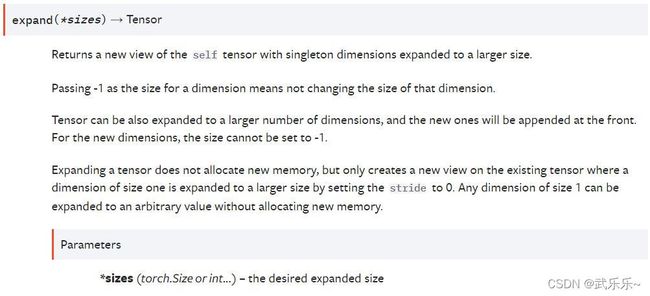
# 只能在当前维度为1的维度上进行expand,否则报错
a = torch.Tensor([[1],[2],[3]]) # [3,1]
a = a.expand(3,4)               # [3,1] --> [3,4]
b = torch.randn(2,1,3)
b = b.expand(2,2,3)
# -1 表示当前维度不变
c = torch.Tensor([[1],[2],[3]])
c = c.expand(-1,3)              # [3,1] --> [3,3]
# 可以拓展更高的维度:[3,2] --> [2,3,2], 注意:只能在最前面维度进行拓展。
d = torch.randn(3,2)
d = d.expand(2,-1,-1)
print(d)
4、torch.max()
4.1 torch.max(input)
返回input张量中最大的数值。代码示例:
    a = torch.randn(2,3)
    print(torch.max(a))   # tensor(2.242)
4.2 torch.max(input, dim, keepdim)
该api类比torch.sum理解即可,即按照dim维度来返回input上最大值以及最大值对应的索引。keepdim=False表示输出的张量不保持和input维度相同。代码示例:
    a = torch.Tensor([[1,2,3,4],[8,7,6,5]])
    # shape变化: [2,4] --> [1,4] --> [4]
    max_value, argmax = torch.max(a, dim=0, keepdim=False)
    # tensor([8., 7., 6., 5.]) tensor([1, 1, 1, 1])
    print(max_value, argmax)
5、torch.Tensor.new_full()
Tensor.new_full(size, fill_value, dtype=None, device=None, requires_grad=False) → Tensor
该api用于返回指定size且填充满fill_value的一个Tensor。如下代码所示:默认返回和a一样类型一样device的Tensor。通常只需要指定前两个参数即可。
a = torch.ones((2,), dtype= torch.long) #tensor([1, 1])
b = a.new_full((3,4), 666, dtype= torch.long, requires_grad=False)
print(b)
6、切片细节
假如有一个二维的张量,分别执行下述两种切片,得到的维度注意看变化:
    a = torch.Tensor([[1,2,3,4],[5,6,7,8]]) # [2,4]
    b = a[:,0]     # [2]
    c = a[:,0::4]  # [2,1]
用双引号切片的会多一个维度。
7、torch.nonzero
这个就是找出张量中非0元素的索引。as_tuple参数控制返回是否是元祖形式。一般都是False。
a = torch.Tensor([-1,0,1,1,0])             # 构造一个一维张量
ind1 = torch.nonzero(a, as_tuple=False)    # tensor([[0], [2], [3]])
ind2 = torch.nonzero(a>0, as_tuple=False)  # tensor([[2], [3]])
ind3 = torch.nonzero(a, as_tuple=True)     # (tensor([0, 2, 3]),)
ind4 = torch.nonzero(a>0, as_tuple=True)   # (tensor([2, 3]),)

b = torch.Tensor([[1,0,0,0],[0,0,2,0]])    # 构造一个二维张量
id1 = torch.nonzero(b, as_tuple=False)  # tensor([[0, 0],  [1, 2]])
id2 = torch.nonzero(b, as_tuple=True) # (tensor([0, 1]), tensor([0, 2]))
8、torch.randperm(n)
该函数用于返回一个[0,n-1]的随机序列,n是个int。
a = torch.Tensor([2,1,3,5,6])
random_id = torch.randperm(a.numel()) # tensor([0, 1, 3, 2, 4])
9、unique
对张量进行取集合操作。
output = torch.unique(torch.tensor([1, 3, 2, 3], dtype=torch.long))
#output: tensor([1, 2, 3])
output, inverse_indices = torch.unique(torch.tensor([1, 3, 2, 3], dtype=torch.long), sorted = True, return_inverse = True)
# output: tensor([1, 2, 3])
# inverse_indices: tensor([0, 2, 1, 2])
output, inverse_indices = torch.unique(torch.tensor([[1, 3], [2, 3]], dtype=torch.long), sorted = True, return_inverse = True)
# output: tensor([1, 2, 3])
# inverse_indices: tensor([[0, 2],[1, 2]])
sorted = True控制返回的集合张量是否是升序排列;而return_inverse=True,则多返回一个索引的张量。该张量表示:在原始张量中各个元素在集合张量中的索引。比如1在集合张量中的第0号位置;2在集合张量中的1号位置。
10、gather
torch.gather(input, dim, index, *, sparse_grad=False, out=None) → Tensor
input是输入向量;dim就是按照哪个维度;index就是提供索引的张量。该函数内部逻辑如下:
out[i][j]= input[index[i][j]][j]  # if dim == 0
out[i][j] = input[i][index[i][j]]  # if dim == 1
一般来说,out的shape和index的shape是一致的。就是按照dim在index里面查找索引之后从input里面提取出对应元素。
11、cat
torch.cat(tensors, dim=0, *, out=None) → Tensor
tensors是个元祖;dim是维度。
12、torch.split(src, [], dim)
gt_ellipse = torch.randn(b,m,5)
gt_ctr, gt_wh, gt_thetas = torch.split(                        # [b,m,2] [b,m,2] [b,m,1]
    gt_ellipse, [2,2,1], dim=2
)
12、两个张量切片做乘法
import torch
import numpy as np
pi = 3.1415926
m = 1
x = torch.Tensor([[[1,1, 2,2, 0.5],[4,4,5,5,0.5]], [[7,7,8,8,1], [10,10,11,11,1]]])  # [2,2,5]
wh = torch.Tensor([[10,3],[20,4]])                      # [2,2]


wh = wh[:,None,:]


# 把wh进行resize,并把theta还原成弧度制。
x[:,:,0] = x[:,:,0] * wh[:,:,0]
x[:,:,1] = x[:,:,1] * wh[:,:,1]
x[:,:,2] = x[:,:,2] * wh[:,:,0]
x[:,:,3] = x[:,:,3] * wh[:,:,1]
x[:,:,4] = x[:,:,4] * 180 /180 * pi

if __name__ == '__main__':
    print(x)
13、permute和transpose
import torch
import torch.nn as nn

x = torch.randn(2,3,5)      # [2,3,5]
y = x.transpose(0,1)        # [3,2,5]
z = x.permute(2,0,1)        # [5,2,3]

print(id(x) == id(y))        # False
print(id(x.storage) == id(y.storage) == id(z.storage)) # True
上述xyz占用同一块内存,但是Tensor的数据结构除了内存外,还有一个“存储shape的信息区”,
显然,permute和transpose仅改变信息区,不改变内存。 另外,transpose应该仅交换两个维度,permute可交换多个。
14、torch.matmul(arg1, arg2)维度变换小结
下面是本文亲测的参数一和参数2分别为1D-4D的代码,两两任意组合均能实现乘法。但万变不离其宗,核心就两条:1)1D2D要在1D前插1个维度,完成计算后在去掉;2D1D则是在1D后插一个1维度,完成计算后移除;2)对于前后两个参数shape不等,首先按照二者对应维最大进行各自广播,然后按照第一条规则计算最后两维的运算,最后在添加上广播后维度即可。
欢迎调试下方代码。
# 1D * 2D 首先将1D添加一个维度1,之后矩阵乘法,得到后再把1去掉
# [3] * [3,2] --> [1,3] * [3,2] --> [1,2] --> [2]
a3 = torch.Tensor([1,2,3])
b3 = torch.Tensor([
    [1,1],
    [2,2],
    [3,3]
])
c3 = torch.matmul(a3,b3)
print(c3,c3.size())

# 1D * 3D
# [2] * [1,2,3] --> 添加一个维度[1,2] * [1,2,3] --> [1,1,3]-->
# 把添加维度删掉-->[1,3]
a6 = torch.Tensor([1,2])       # [2]
b6 = torch.Tensor([[[1,1,1],[10,10,10]]])   # [1,2,3]
c6 = torch.matmul(a6, b6)
print(c6, c6.size())

# 1D * 4D
# [2] * [1,1,2,3] --> 添加一个维度[1,2] * [1,1,2,3] --> [1,1,1,3]-->
# 把添加维度删掉-->[1,1,3]
a6 = torch.Tensor([1,2])       # [2]
b6 = torch.Tensor([[[[1,1,1],[10,10,10]]]])   # [1,1,2,3]
c6 = torch.matmul(a6, b6)
print(c6, c6.size())

# 2D * 1D: 往1D后插1,计算完后,在去掉1
# [1,3] * [3] --> [1,3] * [3,1] --> [1,1] --> [1]
a5 = torch.Tensor([[1,2,3]])   # [1,3]
b5 = torch.Tensor([1,1,1])     # [3]
c5 = torch.matmul(a5,b5)
print(c5, c5.size())

# 2D * 3D
# [1,2] * [1,2,3] --> [1,1,3]
a6 = torch.Tensor([[1,2]])       # [1,2]
b6 = torch.Tensor([[[1,1,1],[10,10,10]]])   # [1,2,3]
c6 = torch.matmul(a6, b6)
print(c6, c6.size())

# 2D * 4D
# [1,2] * [1,1,2,3] --> [1,1,1,3]
a6 = torch.Tensor([[1,2]])       # [1,2]
b6 = torch.Tensor([[[[1,1,1],[10,10,10]]]])   # [1,1,2,3]
c6 = torch.matmul(a6, b6)
print(c6, c6.size())


# 3D * 1D
# [2,1,3] * [3] --> 将第一维度batch=2拆开,得到两个[1,3]的矩阵;
# 在分别和[3]进行乘法,类似进行了一次广播 --> [2,1]
a7 = torch.Tensor([[[1,1,1]],[[10,10,10]]])   # [2,1,3]
b7 = torch.Tensor([1,2,3])       # [3]
c7 = torch.matmul(a7, b7)        # [2,1]
print(c7, c7.size())

# 3D * 2D
# [2,1,3] * [3,2] --> 将第一维度展开,分别2D*2D计算;
# --> [2,1,2]
a8 = torch.Tensor([[[1,1,1]],[[10,10,10]]])   # [2,1,3]
b8 = torch.Tensor([[1,1],[2,2],[3,3]])        # [3,2]
c8 = torch.matmul(a8, b8)        #
print(c8,c8.size())

# 3D * 3D
# [2,1,3] * [2,3,1] --> 将第一维拆开分别计算两个[1,3]和[3,1]矩阵乘法
a9 = torch.Tensor([[[1,1,1]],[[10,10,10]]])   # [2,1,3]
b9 = torch.Tensor([[[1],[1],[1]], [[2],[2],[2]]])   # [2,3,1]
c9 = torch.matmul(a9, b9)                     # [2,1,1]
print(c9,c9.size())

# 3D * 3D
# [2,1,3] * [1,3,1] --> 将第一维拆开分别计算两个[1,3]和[3,1]矩阵乘法
# 其中第二个矩阵的第一个维度完成广播
a9 = torch.Tensor([[[1,1,1]],[[10,10,10]]])   # [2,1,3]
b9 = torch.Tensor([[[1],[1],[1]]])            # [1,3,1]
c9 = torch.matmul(a9, b9)                     # [2,1,1]
print(c9,c9.size())

# 3D * 4D: 此处在第一个维度和第二个维度上均进行了广播!!
# [2,1,3] * [1,1,3,1] --> [1,2,1,1]
a1 = torch.Tensor([[[1,1,1]],[[10,10,10]]])   # [2,1,3]
b1 = torch.Tensor([[[[1],[1],[1]]]])          # [1,1,3,1]
c1 = torch.matmul(a1, b1)                     # [1,2,1,1]
print(c1,c1.size())

# 4D * 1D: 结果会少一维度
# [1,1,3,1] * [1] --> 最后两个维度:[3,1]*[1] --> [3,1] * [1,1]
# --> [3,1] --> [3] -- > [1,1,3]
a1 = torch.Tensor([[[[1],[2],[3]]]])          # [1,1,3,1]
b1 = torch.Tensor([2])                        # [1]
c1 = torch.matmul(a1, b1)                     # [1,1,3]
print(c1,c1.size())

# 4D * 2D
# [1,1,3,1] * [1,2] --> [1,1,3,2]
a1 = torch.Tensor([[[[1],[2],[3]]]])          # [1,1,3,1]
b1 = torch.Tensor([[2,3]])                    # [1,2]
c1 = torch.matmul(a1, b1)                     # [1,1,3,2]
print(c1,c1.size())

# 4D * 3D
# [1,1,3,1] * [2,1,2] --> [1,2,3,2]
a1 = torch.Tensor([[[[1],[2],[3]]]])          # [1,1,3,1]
b1 = torch.Tensor([[[1,1]],[[2,3]]])          # [2,1,2]
c1 = torch.matmul(a1, b1)                     # [1,1,3,2]
print(c1,c1.size())

# 4D * 4D
# [1,1,3,1] * [2,2,1,2] --> [2,2,3,2]
a1 = torch.Tensor([[[[1],[2],[3]]]])          # [1,1,3,1]
b1 = torch.Tensor([[[[1,1]],[[2,3]]],[[[1,1]],[[2,3]]]])       # [2,2,1,2]
c1 = torch.matmul(a1, b1)                     # [1,1,3,2]
print(c1,c1.size())

等你调试完官方的英语你就懂了。。。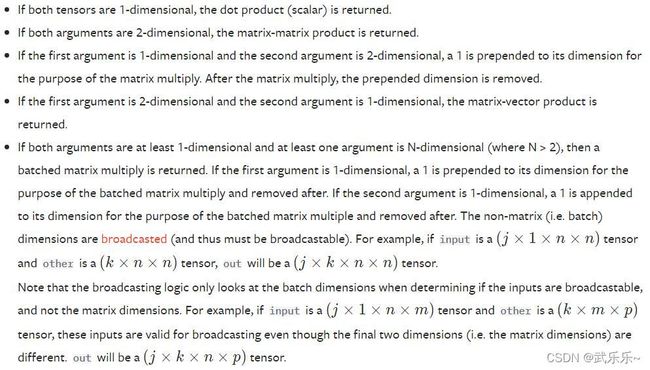
另外注意和*进行区分:*表示的是 两个矩阵逐元素进行相乘。对矩阵的维度的限制没有上述那么严格。
    # [1,2] * [4,2] --> [4,2]
    x = torch.Tensor([[1,2]])
    y = torch.Tensor([[1,2],[2,3],[3,4],[4,5]])
    c = x*y
15、view和contiguous
核心一句话:若单纯改变张量形状,则不需contiguous;若还需要交换张量的维度,则在view之前必须加上contiguous。
看两个例子:代码来自pytorch官方实现的multiheadattn函数。
q = torch.randn(5,2,512)
q1 = q.view(5,16,64)
q2 = q.contiguous().view(5, 2 * 8, 64).transpose(0, 1)   # [16,5,64]
q3 = q.transpose(0,1).contiguous().view(2,8,5,64)        # [2,8,5,64]

####################
feat = feat.flatten(2).transpose(1, 2) # flatten操作不需要continuous()
即从上述例子可以看出,只要涉及transpose/permute操作,就始终在view之前调用contiguous()方法。另外,torch.reshape == .continuous().view()操作,reshape函数更加鲁棒。
16、将tensor转成bool张量
 torch.tensor()可以指定张量的类型及设备; torchTensor不行;另外,调用.dtype方法无括号。
a = torch.tensor(data = [1,0,3], dtype= torch.uint8, device='cpu')
if a.dtype == torch.uint8:   # 调用.dtype无括号。
    a = a.to(torch.bool)     #tensor([ True, False,  True])
17、torch.bmm()矩阵相乘api
该函数注意和14节的torch.matmul函数区分:

必须接收两个三维矩阵;且包含矩阵数量相同,可以理解为batch相同;另外,不支持自动广播,这是和matmul最大的不同。
q = k = torch.randn(5,16,64)
if list(q.size()) == [5,16,64]:
    scores = torch.bmm(q, k.transpose(1,2))   # [5,16,16]
18、判断一个tensor的shape是否等于某个值
将其转成list进行比较
if list(q.size()) == [5,16,64]:
    print('True')
19、masked_fill_
该函数在transformer计算attention时经常用到,需要mask掉后续softmax看到的信息。

mask是bool型矩阵,将self tensor中True位置用value进行替换。前提,mask必须广播到和tensor一样dim。
分别举两个例子:以multiheadAttn中attn_mask和key_padding_mask为例,一个上三角矩阵进行mask,一个将填充部分进行填充。
# attn_mask
attn_mask = torch.tensor([[0,1,1],[0,0,1],[0,0,0]],dtype=torch.uint8).to(torch.bool)
attn_mask = attn_mask.unsqueeze(0)      # [3,3] --> [1,3,3], 此处将attn_mask拓展到三D。
x = torch.randn(2,3,3)
x.masked_fill_(attn_mask, float('-inf'))
print(x)
key_padding_mask = torch.tensor([[0,0,1],[0,1,1]], dtype=torch.uint8).to(torch.bool) # [batch,3]
key_padding_mask = key_padding_mask.unsqueeze(1).unsqueeze(2)  # [b,1,1,3],将mask转成4D
x = torch.randn(2,1,3,3)  # 在batch = 0 , 用[0,0,1] mask; batch == 1, 用[0,1,1] mask。
x.masked_fill_(key_padding_mask, float('-inf'))
20、torch.cumsum(input, dim)
在对应维度上累积求和。
mask = torch.tensor([[[0,0,1],[0,0,1],[1,1,1]]], dtype= torch.uint8)
y_embed = torch.cumsum(mask,1)
x_embed = torch.cumsum(mask,2)
这里画一张草图,其实最终产生的效果类比torch.sum维度的变换。

21、torch.div()
该函数主要用于归一化张量。类似torch.matmul,支持自动广播机制。
在切片时候,加不加冒号会多或少一个维度!!!
y = torch.tensor([[[1,1,0],[2,2,0],[2,2,0]]],dtype=torch.uint8) # [1,3,3]
y1 = y[:,-1:,:]        # 切片最后一行, [[[2,2,0]]]
y2 = y[:,-1,:]
res = torch.div(y,y1)  # y1.shape = [1,1,3] --> 广播[1,3,3] ---> [1,3,3]/[1,3,3]-->[1,3,3]对应元素相除
print(y1.shape,y2.shape)
print(res)
还有另外一种情况,可以借助除法来扩充张量的维度。即将0-8每个元素均除以5个数,从而扩充了维度。
x = torch.arange(9).view(1,3,3)
x = x[:,:,:,None]         # [1,3,3] --> [1,3,3,1]
dim_t = torch.arange(1,6) # [5]
res = x / dim_t           # [1,3,3,1] / [5] --> [1,3,3,5]
print(res)
22、F.interpolate()
该函数主要是前三个参数:input就是待采样的特征向量;size就是采样后的尺寸;scale_factor表示采样的倍数,一般和size参数指定一个即可;mode表示采样的方法:最近邻采样/双线性插值等。
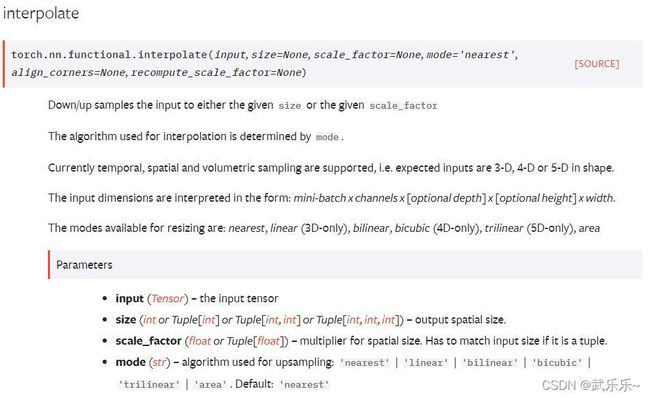
提供一个例子:
import torch
import torch.nn as nn
import torch.nn.functional as F

mask = torch.randn(2,512,800)  # [b,h,w]
x = torch.randn(2,256,51,80)   # [b,c,h,w]
res = F.interpolate(mask.unsqueeze(1), size= x.shape[-2:])
print(res.shape)               # [2,1,51,80]
值得注意的是:input和size的dims必须一样,所以mask需要增加一维。
对于4D向量来说,代表[b,c,h,w],这里可以参照detr和deformable detr中对于mask所采样的区别。
23、一个深浅拷贝示例–>共享权重
深拷贝的两种写法,浅拷贝一种写法(先实例化对象,在写)
layer = nn.Linear(256,4)
out1 = nn.ModuleList([copy.deepcopy(layer) for _ in range(6)]) # 深拷贝一种写法
out1 = nn.ModuleList([nn.Linear(256,4) for _ in range(6)])     # 深拷贝二种写法
out2 = nn.ModuleList([layer for _ in range(6)]) # 浅拷贝
print(id(out1[0]) == id(out1[1]) == id(layer))  # False
print(id(out2[0]) == id(out2[1]) == id(layer))  # True
我这里举了个例子实际观察下:
'''
nn.ModuleList是浅拷贝,即共享权重;
要想支持深拷贝需要copy模块
'''
import os
import copy
import torch
import torch.nn as nn
import torch.optim as optim

os.environ['CUDA_VISIBLE_DEVICES'] = '1'

# 创建一个线性层
layer = nn.Linear(256,4)
# 深拷贝
out1 = nn.ModuleList([copy.deepcopy(layer) for _ in range(6)])
# 查看深拷贝方式的layer层初始化参数
print('深拷贝的不同层的初始化权重:\n',out1[0].weight.data, '\n', out1[1].weight.data)

# 验证深拷贝
print('验证深拷贝:')
input = torch.randn(1,256)
label = torch.ones((1,4), dtype= torch.float32)
# 取出第一层layer来作为net
net1 = out1[0]
optimizer1 = optim.SGD(net1.parameters(), lr=0.1)
criterion1 = nn.SmoothL1Loss()

# 迭代
for i in range(1):
    optimizer1.zero_grad()
    res1 = net1(input)
    loss1 = criterion1(res1, label)
    loss1.backward()
    optimizer1.step()
    print('更新后的网络参数:\n',net1.weight.data)
    print('其余层网络参数:\n',out1[1].weight.data)

print('#-------------------------------------------------------#')
# 浅拷贝
out2 = nn.ModuleList([layer for _ in range(6)])
print('浅拷贝不同层的初始化权重:\n',out2[0].weight.data, '\n', out2[1].weight.data)
# 验证浅拷贝
print('验证浅拷贝:')
input = torch.randn(1,256)
label = torch.ones((1,4), dtype= torch.float32)
# 取出第一层layer来作为net
net2 = out2[0]
optimizer2 = optim.SGD(net2.parameters(), lr=0.1)
criterion2 = nn.SmoothL1Loss()

# 迭代
for i in range(1):
    optimizer2.zero_grad()
    res2 = net2(input)
    loss2 = criterion1(res2, label)
    loss2.backward()
    optimizer2.step()
    print('更新后的网络参数:\n',net2.weight.data)
    print('其余层网络参数:\n',out2[1].weight.data)

#print(id(out1[0]) == id(out1[1]) == id(layer))  # False
#print(id(out2[0]) == id(out2[1]) == id(layer))  # True
24、tensor.new_zeros() + torch.as_tensor()
将list转成tensor。
spatial_shapes = [(100, 134), (50, 67), (25, 34), (13, 17)]
# list--> tensor:[4,2]
spatial_shapes = torch.as_tensor(spatial_shapes, dtype=torch.long, device='cpu')
out = spatial_shapes.new_zeros((1,))  # [0]
25、torch.prod(input, dim,keepdim)
返回指定维度上所有元素的乘积。
26、torch.stack(list(tensors),dim)
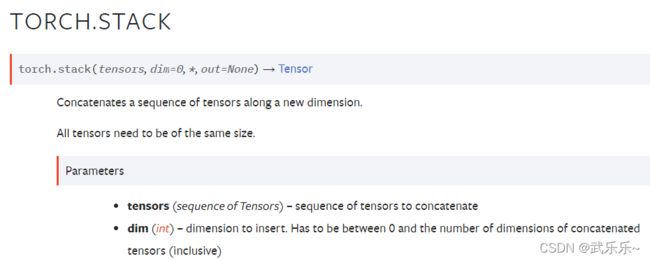
官方给的比较简单,该函数含义是:沿着一个新的维度来拼接张量且待拼接的张量必须有相同的shape。该函数会增加张量的一个维度。
这里举个简单例子:假如待拼接的两个张量的shape=[1],沿着dim=1进行拼接,则最终将在dim=1的维度上拼接两个张量,[1,2]。
# 2个shape为[1]的在dim=1上进行拼接,则得到[1,2]
a = b = torch.Tensor([1])
out = torch.stack([a,b],dim=1) # [1,2]
# 2个shape为[3,3]的张量在dim=0上拼接,则得到[2,3,3]
x = torch.arange(0,3)
y = torch.arange(3,6)
# 生成一个3*3的网格
grid_y, grid_x = torch.meshgrid([y,x]) # 对应输出网格的纵坐标和横坐标
'''
tensor([[3, 3, 3],
        [4, 4, 4],
        [5, 5, 5]])
tensor([[0, 1, 2],
        [0, 1, 2],
        [0, 1, 2]])
'''
# 在dim = 0上将grid_y和grid_x进行堆叠,shape为: 2个[3,3] --> [2,3,3]
coords = torch.stack([grid_y, grid_x], dim=0)
27、torch.as_tensor(data, dtype, device)
将list转成tensor:
a = [1.,2.]
b = torch.as_tensor(a,dtype= torch.long, device = 'cpu')
28、torch.linespace(start, end, step)

该函数用于生成一个一维的张量序列。起始位置是start,结束位置是end,总共生成steps个序列,而间隔的计算公式如上式所示。
x = torch.linspace(start = 1, end = 5, steps = 5) #tensor([1., 2., 3., 4., 5.])
29、torch.meshgrid(*tensors)
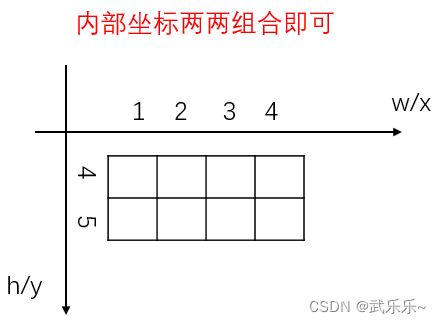
该函数接收若干个tensor,常用来生成网格坐标。以deformable Detr中生成参考点坐标为例:
w = torch.Tensor([1,2,3,4])  # 在图像中w是x方向
h = torch.Tensor([4,5])      # 在图像中h是y方向
grid_y, grid_x = torch.meshgrid(h,w)
'''
grid_x =
 tensor([[1., 2., 3., 4.],
        [1., 2., 3., 4.]])
 grid_y =
 tensor([[4., 4., 4., 4.],
        [5., 5., 5., 5.]])
'''
该函数比较困惑的是输入参数和输出之间对应关系。其实很简单,h对应y轴,且h是第一个输入参数,所以返回值的第一个grid_y也是y;w对应x轴,w作为第二个参数,则返回值的第二个grid_x是x。另外,grid_x和gird_y二者的shape一样,为[第一个输入参数维度,第二个输入参数的维度]。在本示例中,grid_y.shape == grid_x.shape = [2,4]。
30、torch.unbind(tensor, dim) --> 元祖
该函数用于 去除tensor的dim维度,并返回一个list/元祖,里面各个元素是拆封后的各个张量,以拆封一个boxes为例:
# [2,4]的boxes
boxes = torch.tensor([[1,2,3,4],[5,6,7,8]],dtype=torch.float32)
cx,cy,w,h = boxes.unbind(dim=1)     # shape = [2], cx = [1,5]
31、nn.AdaptiveAvgPool2d(output_size)
输入:四维/三维张量;输出:四维/三维,自适应步长来进行均值池化。
在图像分类任务中,在模型最后一层特征图[B,C,H,W]往往需要经过一层GAP(全局平均池化)层来将其拉成一维的特征向量[B,C,1,1],而GAP也可以用该API实现,指定output为(1,1)即可。

# target output size of 5x7
m = nn.AdaptiveAvgPool2d((5,7))
input = torch.randn(1, 64, 8, 9)
output = m(input)   # [1,64,5,7]
print(output.shape)

# target output size of 7x7 (square)
m = nn.AdaptiveAvgPool2d(7)
input = torch.randn(1, 64, 10, 9)
output = m(input)   # [1,64,7,7]
print(output.shape)

# target output size of 10x7
m = nn.AdaptiveAvgPool2d((None, 7))
input = torch.randn(1, 64, 10, 9)
output = m(input)   # [1,64,10,7]
print(output.shape)
31、List能够直接转成Tensor
batch_size = 4
target = torch.FloatTensor([[1, 0] for _ in range(batch_size//2)] + \
[[0, 1] for _ in range(batch_size//2)])
'''
target =
	tensor([[1., 0.],
	        [1., 0.],
	        [0., 1.],
	        [0., 1.]])
'''
