(02)Cartographer源码无死角解析-(04) 熟悉bag文件,配置.launch与.lua文件,初步调参
本人讲解关于slam一系列文章汇总链接:史上最全slam从零开始,针对于本栏目讲解(02)Cartographer源码无死角解析-接如下:
(02)Cartographer源码无死角解析- (00)目录_最新无死角讲解:https://blog.csdn.net/weixin_43013761/article/details/127350885
文末正下方中心提供了本人 联系方式, 点击本人照片即可显示 W X → 官方认证 {\color{blue}{文末正下方中心}提供了本人 \color{red} 联系方式,\color{blue}点击本人照片即可显示WX→官方认证} 文末正下方中心提供了本人联系方式,点击本人照片即可显示WX→官方认证
一、前言
再上一篇博客中,使用了新的数据集,在给出的下载链接中,launch 文件夹中存在很多 .launch 后缀文件,该文件在前面已经对齐进行过简单介绍,另外在 configuration_files 文件夹中存在很多 .luo 后缀文件,下面呢,会对其进行一个详细的讲解。一般来说呢,配置 launch 与 lua 文件,分为三个步骤:了解 bag 文件,配置 launch 文件,配置 lua 文件。
二、bag 文件
bag 文件是可以对齐进行播放的,当然这里不是类似视频意义上的播放。首先我们启动五个终端,分别执行如下指令:
roscore # 第一个终端,启动 rosmaster
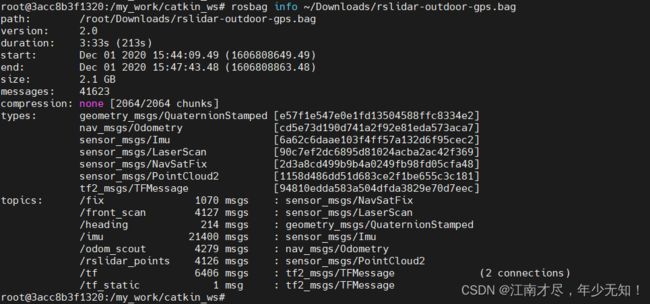
rosbag info rslidar-outdoor-gps.bag # 第二个终端,了解 bag 中 topic 的名称与类型
rosbag play --clock ~/Downloads/rslidar-outdoor-gps.bag -l # 第三个终端,开始播放(空格建可暂停), --clock 可加可不加,-l表示循环播放
rqt # 第四个终端,了解 bag 中的 tf 树.
rviz # 可视化雷达数据与 tf 数据,刚打开什么都没有,不用着急
rqt 的所有显示插件都在菜单栏的 plugins 内, 再点击 visualization→ tf tree, 即可显示视频中的 tf 树的可视化界面。rviz 左侧最顶上的 Fixed frame 除了下拉菜单可以选择之外,还是可以手动输入的, 现在手动输入成 odom。左侧下方的 Add 按钮, 可以添加显示的插件, 自己选择添加 pointcloud2, laserscan 等格式的数据, 之后把插件订阅的 topic 选择一下, 如果不会可以自己多玩玩, 很简单的。
第二个终端 → {\color{blue}{第二个终端}}→ 第二个终端→本人打印如下:

duration→持续时常;start(end)→开始结束时间;messages→消息数量;types→消息类型;topics→会话名称,其中 /fix 表示GPS的topic;/front_scan→单线雷达数据;/heading→两个GPS确定出来的航向;/imu→惯性里程计;/odom_scout→里程计数据;/rslidar_points→16线雷达的点云数据;其上有 /tf 与 /tf_static 两个话题,他们的区别在后面进行讲解。
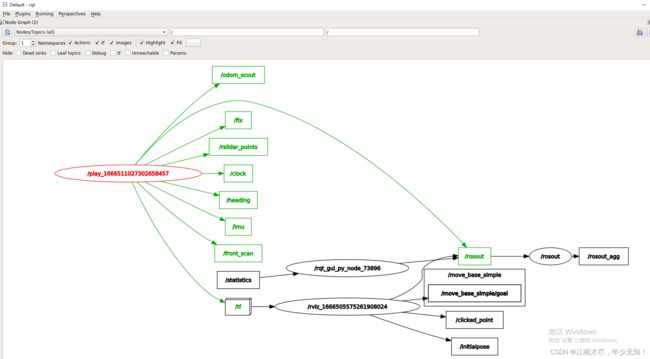
第四个终端 → {\color{blue}{第四个终端}}→ 第四个终端→通过左上角点击Plugins→introspection→Node Graph,还能够查看节点图,如下:

另外通过左上角点击 plugins→visualization→ tf tree,本人显示类似于下:

最上面的节点叫 odom,指向关系为 odom→footprint→base_link。但是从这里看不出来什么是 tf 或 tf_static。先来看看几个名词的介绍:
base_link→是固定在机器人本体上的坐标系,通常选择机器人腰部。
base_footprint(footprint)→表示机器人base_link原点在地面上的投影,区别base_link之处是其“z”坐标不同。
总的来说可以把 odom 理解为世界坐标系,base_link 理解机器人坐标系,footprint 理解为机器人的影子,随着机器人移动,odom→footprint 的 tf 是在变化的。但是 footprint→base_link 通常是不变的,也就是所谓的 tf_static。
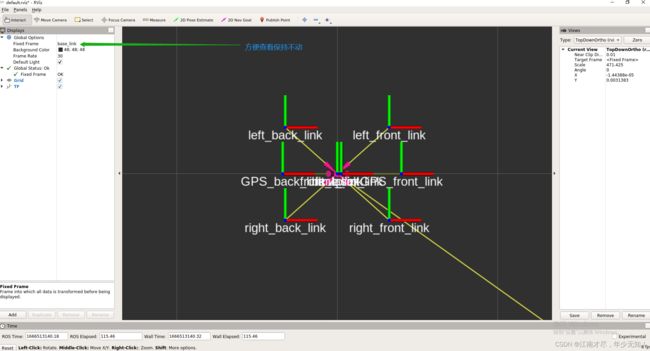
第五个终端 → {\color{blue}{第五个终端}}→ 第五个终端→该启动时什么都没有,通过点击左上角 Fixed Frame 默认为map,重新选择为 odom(base_link )。然后左下角点击 add→tf。如下图,就是机器人的机构,他们 link 之间的tf 可以理解为 tf_static。

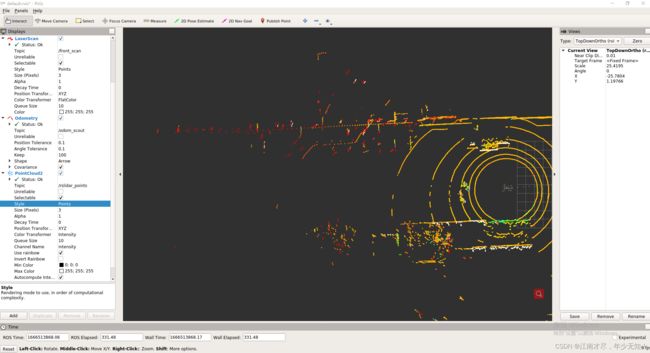
另外还能看到 odom 与 机器人之间的一根连线,连接世界坐标系原点,那就是 tf,会发生变换的。另外还可以add一些其他的显示部件,如LaserScan(单线雷达)、Pointcloud2(16线雷达)等、但是都要记得选择Topic。

三、配置 .launch 文件
launch 文件中需要如下几个设置:
1、bag 文件的地址与 bag 文件的名字
2、lua 文件的名字
3、topic 需要 remap 成 bag 文件中发布的 topic
下面针对前面使用的 zwh_rs16_2d_outdoor.launch 进行讲解,其位于 src/cartographer_ros/cartographer_ros/launch/ 文件中:
<!--
>

  <arg name="bag_filename" default="$(env HOME)/Downloads/rslidar-outdoor-gps-notf.bag"/>


  <param name="/use_sim_time" value="true" />


  <node name="cartographer_node" pkg="cartographer_ros"
      type="cartographer_node" args="
          -configuration_directory $(find cartographer_ros)/configuration_files
          -configuration_basename lx_rs16_2d_outdoor.lua"
      output="screen">
    <remap from="points2" to="rslidar_points" />
    <remap from="scan" to="front_scan" />
    <remap from="odom" to="odom_scout" />
    <remap from="imu" to="imu" />
  node>


  <node name="cartographer_occupancy_grid_node" pkg="cartographer_ros"
      type="cartographer_occupancy_grid_node" args="-resolution 0.05" />


  <node name="rviz" pkg="rviz" type="rviz" required="true"
      args="-d $(find cartographer_ros)/configuration_files/lx_2d.rviz" />


  <node name="playbag" pkg="rosbag" type="play"
      args="--clock $(arg bag_filename)" />

launch>
如果以后大家配置自己的 .launch 文件, 首先配置bag的路径,对应.lua文件路径,然后设置订阅的话题。如上面的
三、配置 .lua 文件
该文件需要配置的如下:
( 01 ) : \color{blue}(01): (01): tracking_frame 有 imu 的 link 就设置成 imu 的 link, 没有就设置成 base_link
( 02 ) : \color{blue}(02): (02): published_frame cartographer 发布的 tf 的最下边一个坐标系, 就是 bag 文件中 tf 树的最上边的一个坐标系。
( 03 ) : \color{blue}(03): (03): provide_odom_frame 的作用是使得坐标系之间经过如下转换以后再发布:published_frame->odom_frame->map_frame。如果不是true,则是 published_frame ->map_frame进行发布。
( 04 ) : \color{blue}(04): (04): use_odometry 是否使用里程计的传感器数据, 如果为 true, tf 树中一定要存在odom 这个坐标系
( 05 ) : \color{blue}(05): (05): num_laser_scans/num_point_clouds 单线点云与多线点云的话题的数量, 可以同时为 1, 不可以同时为 0
( 06 ) : \color{blue}(06): (06): TRAJECTORY_BUILDER_2D.use_imu_data 是否使用 imu, 如果用 imu, tracking_frame 一定要设置成 imu 的 link
( 07 ) : \color{blue}(07): (07): TRAJECTORY_BUILDER_2D.min_z 点云的最小 z 的范围, 单线点云不能设置大于 0 的值(不设置), 多线点云的这个值要大于 0
( 08 ) : \color{blue}(08): (08): use_pose_extrapolator = false 这个一定要设置成 false
( 09 ) : \color{blue}(09): (09): use_nav_sat/use_landmarks 是否订阅里程计话题的数据, 以及 landmark 话题的数据
( 10 ) : \color{blue}(10): (10): num_subdivisions_per_laser_scan 一帧点云数据会被分成几次处理, 设置成 1 就行了
( 11 ) : \color{blue}(11): (11): MAP_BUILDER.use_trajectory_builder_2d = true 建二维图时一定要有这句话, 建三维图就把 2d 改成 3d
这里以 src/cartographer_ros/cartographer_ros/configuration_files/backpack_2d.lua 文件进行示例
include "map_builder.lua"
include "trajectory_builder.lua"

options = {
  map_builder = MAP_BUILDER,
  trajectory_builder = TRAJECTORY_BUILDER,
  map_frame = "map",
  tracking_frame = "base_link",
  published_frame = "base_link",
  odom_frame = "odom",
  provide_odom_frame = true,
  publish_frame_projected_to_2d = false,
  use_pose_extrapolator = true,
  use_odometry = false,
  use_nav_sat = false,
  use_landmarks = false,
  num_laser_scans = 0,
  num_multi_echo_laser_scans = 1,
  num_subdivisions_per_laser_scan = 10,
  num_point_clouds = 0,
  lookup_transform_timeout_sec = 0.2,
  submap_publish_period_sec = 0.3,
  pose_publish_period_sec = 5e-3,
  trajectory_publish_period_sec = 30e-3,
  rangefinder_sampling_ratio = 1.,
  odometry_sampling_ratio = 1.,
  fixed_frame_pose_sampling_ratio = 1.,
  imu_sampling_ratio = 1.,
  landmarks_sampling_ratio = 1.,
}

MAP_BUILDER.use_trajectory_builder_2d = true
TRAJECTORY_BUILDER_2D.num_accumulated_range_data = 10

return options
以上是原版,那么如何修改成适配我们的版本呢?
tracking_frame = 'imu_link',  --1.在第四个终端,选择 plugins→visualization→ tf tree之后,可以看到其是存在Imu_link。
published_frame = "odom",  -- tf tree最上面的坐标系
provide_odom_frame = false, --在tf tree已经存在odom了,所以一定要设置为false
use_pose_extrapolator = false,  --这个一定要设置成 false
use_odometry = false, --已经有odom坐标系,所以可以不用
num_laser_scans = 0, --不订阅单线雷达
num_multi_echo_laser_scans = 0, --多回身波雷达,很少使用
num_subdivisions_per_laser_scan = 1, --默认为1即可
num_point_clouds = 1, --订阅点云数据
TRAJECTORY_BUILDER_2D.use_imu_data = ture, --使用imu数据
TRAJECTORY_BUILDER_2D.min_z = 0.2 --注意单线点云不能设置大于0的数,多线点云数据如果打到地面可以通过这个值过滤掉
四、前言
通过该篇博客,对.launch与.lua文件文件的设置,进行了简单介绍,如果还需要设置其他的参数,可以自行百度一下。另外需要注意的就是,修改.launch与.lua文件之后,需要重新编译。