VUE学习笔记
VUE学习笔记
一、Vue基础
(一)、认识Vue.js
1. 官网
- 英文官网:https://vuejs.org/
- 中文官网:https://cn.vuejs.org/
2. 简介
- vue是一套用于构建用户界面的渐进式框架
- Vue 采用自底向上增量开发的设计
- Vue 的核心库只关注视图层
3. Vue的特点
- 遵循MVVM模式
- 代码简洁,体积小,运行效率高,适合移动/PC端开发
- 它本身只关注UI,可以轻松引入vue插件或者其他第三方库开发项目
4. 与其他前端JS框架的关联
- 借鉴Angular的结构模板和数据绑定技术
- 借鉴React的组件化和虚拟DOM技术
5. Vue扩展插件
- vue-cil:vue脚手架
- vue-resource、axios:ajax请求
- vue-router:路由
- vuex:状态管理
- mint-ui/vant:基于vue的UI组件库(移动端)
- element-ui:基于vue的UI组件库(PC端)
…
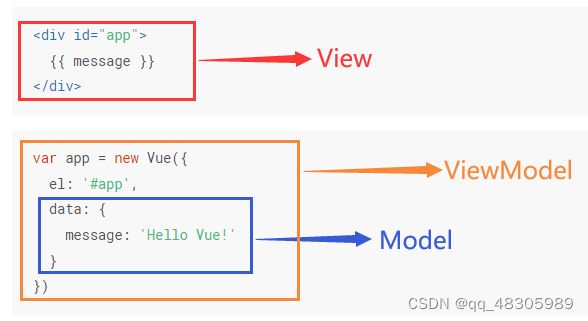
(二)、Vue的MVVM模型
- M:模型(Model):对应data中的数据
- V:视图(View):模板代码(类似于React中的jsx,是html+js的混合体)
- VM:视图模型(ViewModel):Vue实例对象,是MVVM的核心
例子:
el:用于指定当前Vue实例为哪个容器服务,值是选择器的字符串,选择的写法类似于jQuery
data:是存储数据的地方,为root容器提供数据,值为一个对象,相当于React中的state
{{××××}}:××××会读取data中的××××属性
(三)、Vue的三种安装方式
1. 下载vue.js直接引入
<script src="vue.js"></script>
2. CDN加载
-
对于初学者,可以使用最新版本的CND链接:包含了帮助的命令行警告
<script src="https://cdn.staticfile.org/vue/2.2.2/vue.js"></script> -
对于生产环境,建议链接到一个明确的版本号和构建文件,以避免新版本造成的不可预期的破坏:
<script src="https://cdn.jsdelivr.net/npm/[email protected]"></script> -
如果使用原生 ES Modules,这里也有兼容的 ES Module 的构建文件:
<script type="module">
     import Vue from 'https://cdn.jsdeliver.net/npm/[email protected]/dist/vue.esm.browser.js'
 </script>
3. npm 安装
-
npm install -g vue-clinpm run dev启动项目(2.0)npm run serve(3.0)
npm run build打包项目 -
赋值粘贴镜像地址
npm install -g cnpm --registry=https://registry.npm.taobao.org(淘宝镜像 https://npm.taobao.org/)
**注:**可以安装cnpm(npm 的地址是在国外,传输速度很慢,所以可以用淘宝提供的镜像文件下载 cnmp 工具)
检测cnpm是否安装成功:cnpm -v
(四)、Vue的基本使用
除了上面提到的el和 data外,还有以下几个属性:
methods 方法,使用 方法名() 的方式调用;
computed 计算,使用 方法名 的方式调用;
watch 监听,监听数据中的某一个,格式为方法名(val),其中val为更新后的值;
var test=new Vue({
    el:"#test",
    data:{
        message:'测试文本',
        number:16
    },
    methods:{
        total:function(){
                //方法
        }
    },
    computed:{
        getNum:function(){
                //方法
        }
    }
    watch:{
        message:function(val){	//监听message这个属性,在变动时调用此方法
                //方法
        }
    }
})
二、Vue的模板语法
HTML中包含了一些JS语法代码,语法分为两种,分别为:
- 插值语法(双大括号表达式)
- 指令(以v-开头的标签属性)
(一)、插值语法
1.功能:用于解析标签体内容
2.语法:
{{××××}},××××会读取data中的××××属性,作为js表达式解析
(二)、指令
用于解析标签属性、解析标签体内容、绑定事件的回调…
1.内容渲染指令
-
v-text:只能渲染纯文本内容,指令会覆盖元素内默认值
lihua
-
{{}}: 差值表达式,专门用来解决v-text会覆盖默认文本内容的问题。在实际开发中用的最多,只是内容的占位符不会覆盖掉原有内容。
<body> <div id="app"> <p>姓名:{{username}}p> <p>性别:{{gender}}p> div> body> <script src="../lib/vue.js">script> <script> var vm = new Vue({ el:'#app', data:{ username: 'zss', gender: '女' } }) script> -
v-html:把包含html标签的字符串渲染为页面html元素
//注意:如果变量作为属性值的话,不需要加{{}}
v-html和v-text区别?
- v-html相当于
innerHTML,可以识别标签和文本,表单提交的时候不能使用,有xss风险(可以通过html书写病毒,攻击网站) - v-text相当于
txtContent,只可以识别文本,识别不了标签,把标签当做字符串处理
2.属性绑定指令
-
v-bind:动态绑定属性和class样式 可以用语法糖:简写为
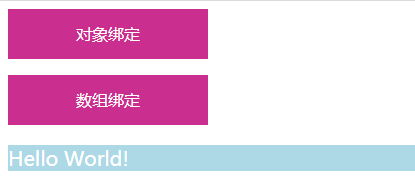
:1.class属性绑定 :分别有对象语法、数组语法、style属性
<style> .bgColor{ background-color: rgb(202, 46, 142); width: 200px; height: 50px; line-height: 50px; text-align: center; } .txt{ color: white; } style> <body> <div id="app"> <p v-bind:class="{bgColor:isActive,txt:isActive}">对象绑定p> <p v-bind:class=[bg,txt]>数组绑定p> <p v-bind:style="{color:'white',background:'lightblue',fontSize:'20px'}">Hello World!p> div> <script src="https://cdn.staticfile.org/vue/2.2.2/vue.js">script> <script> const vm = new Vue({ el:'#app', data:{ isActive:true, bg:'bgColor', txt:'txt' } }) script> body>2.属性绑定:使用v-bind属性绑定期间,如果绑定内容需要进行动态绑定值,则字符串外面应该包裹单引号。
<div id="app">
    <input type="text" v-bind:placeholder="msg">

    <input type="text" :placeholder="msg">
div>
<script src="https://cdn.staticfile.org/vue/2.2.2/vue.js">script>
<script>
    const vm = new Vue({
        el:'#app',
        data:{
            msg:'请输入账号/用户名/邮箱'
        }
    })
script>
3.事件绑定指令
- v-on:绑定事件,用来辅助程序员为DOM元素绑定事件监听。语法糖:简写为
@
- v-on参数传递问题:
-
如果该方法不需要额外参数,方法后面的()可以不加;
<div id="app"> <h2>点击次数:{{counter}}h2> <button @click="btn1Click">按钮1button> <button @click="btn1Click()">按钮1button> div> <script src="https://cdn.staticfile.org/vue/2.2.2/vue.js">script> <script> const vm = new Vue({ el:'#app', data:{ counter:0 }, methods:{ btn1Click(){ console.log('按钮1被点击') //两个按钮都生效 } } }) script> -
如果方法本身有一个参数, 会默认将原生事件event参数传递进去
<button @click="btnClick2(3)">按钮2button>  //3
<button @click="btnClick2">按钮2button>     //PointerEvent
<button @click="btnClick2()">按钮2button>   //undefined

<script>
    const vm = new Vue({
        el:'#app',
        data:{
            counter:0
        },
        methods:{
           btn2Click(a) {
               console.log('按钮2被点击', a);
           },
        }
    })
script>
运行结果:
-
定义方法时,需要参数同时需要event时,可以通过
$event传入事件<button @click="btn3Click(10, $event)">按钮3button> <script> const vm = new Vue({ el:'#app', data:{ counter:0 }, methods:{ btn3Click(a) { console.log('按钮3被点击', a); }, } }) script>
-
v-on修饰符:在某些情况下,我们拿到event的目的是进行一些事件处理
.stop 阻止事件冒泡,调用event.stopPropagation() .prevent 阻止事件默认行为,调用event.preventDefault() .capture 使用事件捕获模式 .self 阻止事件委派(只能当前元素触发事件而不是子元素) .once 事件只触发一次<div @click="divClick"> <button @click.stop="btnClick">按钮button> div> <a href="http://www.baidu.com" @click.prevent="subClick">跳转百度a> <input type="text" @keyup.enter="keyUp"> <button @click.once="btn2Click">点击一次button> <script> const vm = new Vue({ methods:{ divClick() { console.log('divClick'); }, btnClick() { console.log('btnClick'); }, subClick() { console.log('subClick'); }, keyUp() { console.log('keyUp'); }, btn2Click() { console.log('btnClick'); } } }) script>
4.双向绑定指令
双向绑定,当M层数据更改时自动更新V层数据,反之V层更改时自动更新M层数据。
- v-model:用来实现表单元素和数据的双向绑定
{{message}} //DOM的message发生改变时了, data里面的message就改变了, 所以实现了双向绑定
- v-model原理:
- v-bind绑定一个value属性
- v-on指令给当前元素绑定input事件
等同于
结果显示
-
v-model是双向绑定,data里面的值改变的时候,界面上的值也会跟着改变。界面上的值改变的时候也会改变data的值。 -
v-bind是单向绑定,数据方向是从data层像视图层改变的,要实现双向绑定要结合:value和@input使用
-
v-model结合radio类型的使用
您选择的性别是: {{sex}}
-
v-model结合checkbox类型的使用
<div id="app"> <label for="license"> <input type="checkbox" id="license" v-model="isLicense">同意协议 label> <h2>您的选择是:{{isLicense}}h2> <buttion :disabled="!isLicense">下一步button> div> <div id="app"> <input type="checkbox" value="唱歌" v-model="hobbies">唱歌 <input type="checkbox" value="打游戏" v-model="hobbies">打游戏 <input type="checkbox" value="听歌" v-model="hobbies">听歌 <h2>您的爱好是: {{hobbies}}h2> div> <script> const app = new Vue({ el: '#app', data: { isLicense: false, hobbies:[] } }) script> -
v-model结合selectx类型的使用(不常用)
<div id="app"> <select v-model="selected"> <option disabled value="">请选择option> <option>Aoption> <option>Boption> <option>Coption> select> <p>Selected: {{ selected }}p> <select v-model="selecteds" multiple style="width: 50px;"> <option>Aoption> <option>Boption> <option>Coption> select> <p>Selected: {{ selected }}p> div> <script> const app = new Vue({ el: '#app', data: { isLicense: false, selected: '', selecteds: [] } }) script> -
v-model修饰符
-
lazy修饰符
-
v-model默认是在input事件中实时同步输入框的数据的,一旦有数据发生改变对应的data数据也会发生改变
-
lazy修饰符可以让数据只有在失去焦点或回车时才会更新
<input type="text" v-model.lazy="输入">
-
-
number修饰符
-
默认情况下, 在输入框中无论输入字母或者数字, 都会被当做字符串类型进行处理
-
如果想要处理数字类型,直接将内容数字进行处理
<input type="number" v-model.number="输入">
-
-
trim修饰符
-
输入的内容首尾有很多空格,希望将其去除
-
trim修饰符可以过滤掉内容左右两边的空格
<input type="text" v-model.trim="输入">
-
5.条件渲染指令
条件渲染指令用来辅助开发者控制DOM的显示与隐藏,主要有两个:v-show,v-if
-
v-show:<body> <div id="app"> <p v-show="status === 1 ">当status 为 1 时显示改行p> div> <script src="https://unpkg.com/vue/dist/vue.min.js">script> <script> var app = new Vue({ el:'#app', data:{ status:2 } }) script> body> -
v-if:v-if配套的指令:- v-else-if
- v-else
<div id="app">
 <template v-if="type==='phone'">
  <label>手机号:label>
  <input placeholder="请输入手机号">
 template>
 <template v-else>
  <label>邮箱:label>
  <input placeholder="请输入邮箱">
 template>
 <button @click="changeAccount">切换账号button>
div>
<script>
    var app = new Vue({
     el: '#app',
     data: {
      type: 'phone'
     },
     methods: {
      changeAccount: function () {
       this.type = (this.type === 'phone' ? 'mail' : 'phone');
      }
     }
    });
script>
注:v-show和v-if的区别:
-
v-show是通过动态的为元素添加或移除display:none来进行显示与隐藏。如果需要频繁切换元素的显示状态,用v-show性能会更好。 -
v-if是通过动态的创建或移除元素来实现元素的显示和隐藏。如果不需要频繁切换元素的显示状态,用v-if性能会更好。
6.列表渲染指令
用 v-for 指令基于一个数组来渲染一个列表。v-for 指令需要使用 item in items 形式的特殊语法,其中 items 是源数据数组,而 item 则是被迭代的数组元素的别名(自定义名称)。
-
用
v-for遍历数组<ul id="example-1"> <li v-for="item in items" :key="item.message"> 要加关键字:key,可以渲染出来,但是控制台会报错 {{ item.message }} li> ul> <script> var example1 = new Vue({ el: '#example-1', data: { items: [ { message: 'Foo' }, { message: 'Bar' } ] } }) script>1.
key的值只能是字符串或数字类型2.
key值必须具有唯一性(key的值不能重复)3.建议将数据项的id值作为key值
4.使用
v-for时一定要指定key值(即提升性能,又防止列表的状态紊乱) -
用
v-for遍历对象<ul id="v-for-object" class="demo"> <li v-for="value in object"> {{ value }} li> <div v-for="(value, name) in object"> {{ name }}: {{ value }} div> ul> <script> new Vue({ el: '#v-for-object', data: { object: { title: 'How to do lists in Vue',//(键:值) author: 'Jane Doe', publishedAt: '2016-04-10' } } }) script>
三、计算属性和监听器
1.计算属性:computed
- 计算属性:可以理解为能够在里面写一些计算逻辑的属性,通过一系列运算最终得到一个值。这个值可以被模板结构和 method方法使用。
具有如下的作用:
-
减少模板中的计算逻辑。
-
数据缓存。当我们的数据没有变化的时候,不会再次执行计算的过程。
-
依赖固定的数据类型(响应式数据),不能是普通的传入的一个全局数据。
转自:https://blog.csdn.net/jdrunk/article/details/102670513
在数据量比较大的时候,计算属性可以帮助我们提高性能,因为计算属性只会在数据变化的时候才会计算。
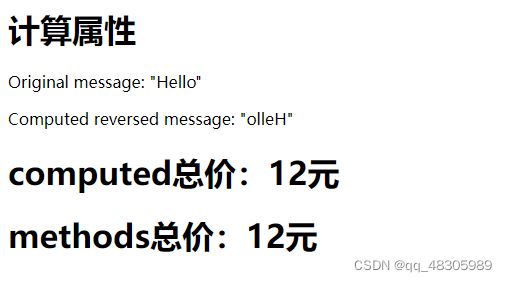
示例:
 <div id="app">
        <h1>计算属性h1>
        <p>Original message: "{{ message }}"p>

         <p>Computed reversed message: "{{ reversedMessage }}"p>
         <h1>computed总价:{{totalPrice}}元h1>
         <h1>methods总价:{{getTotalPrice()}}元h1>
    div>

   <script src="https://cdn.staticfile.org/vue/2.2.2/vue.js">script>
   <script>
       const app = new Vue({
        el: '#app',
        data: {
           message: 'Hello',
           count:3,
           price:4
       },
       methods:{
            getTotalPrice(){
                return this.count*this.price
            }
       },
       computed: {
           // 计算属性的 getter
           reversedMessage: function () {
               // `this` 指向 vm 实例
               return this.message.split('').reverse().join('')
           },
           totalPrice:function(){
               return this.count*this.price
           }
       }
    })
   script>
运行结果:
总结:computed和method区别:
-
methods: 在模板中被调用,如果这个方法依赖data,data的值发生了变化,这个方法就会重新执行,计算属性也有这个特征。但是methods每次调用都会重新执行
-
computed: 计算属性计算出来的结果会被缓存起来,下次无需计算直接显示, 不变的情况下只调用一次
- 计算属性的setter和getter
计算属性默认只有 getter,不过在需要时你也可以提供一个 setter:
<div id='app'>
    <h2>{{fullName}}h2>
div>

<script src="https://cdn.staticfile.org/vue/2.2.2/vue.js">script>
<script>
    const app = new Vue({
        el: '#app',
        data:{
            firstName: 'lucky',
            lastName: 'dog'
        },
        computed: {
            fullName: {
                // 一般没有set方法
                set: function (value) {
                    var names = newValue.split(' ')
                    this.firstName = names[0]
                    this.lastName = names[names.length - 1]
                },
                // 只读属性
                get: function () {
                    return this.firstName + '' + this.lastName
                }
            }
        }

    })
script>
2.监听器:watch
-
监听器(侦听器):当你有一些数据需要随着其它数据变动而变动时,就可以使用Watch来监听他们之间的变化。当需要在数据变化时执行异步或开销较大的操作时,这个方式是最有用的。
方式一:全局监听
监听的内容发生改变则触发函数
vm.$watch(监听的内容,function(){

})

方式二:局部监听   推荐使用
  watch:{
      //写法一:不能深度监听
      items(){
		  Storage.save('todoList',this.items)
	  }
      //写法二(重点)
	  // 当items发生改变则自动调用handler函数
	  items:{
		  // 必须为handler函数
		  handler(){
			  Storage.save('todoList',this.items)
		  },
              deep:true//深度监听,可检测到数组中某个对象属性的变化
	  }
  }
四、组件
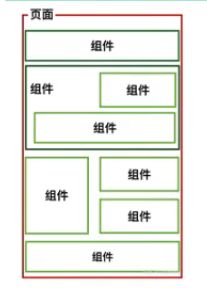
(一)、vue组件化思想
组件:是可复用的vue实例,将一个页面拆分成一个个小的功能模块,每个模块都是独立的
组件化开发:根据封装的思想,将页面上可以重用的UI结构封装为组件,从而方便项目的维护和开发。文件名:.vue
- 组件化是vue.js中的重要思想
- 他提供一种抽象,让我们可以开发出一个个独立可复用的小组件来构造我们的应用
- 任何的应用都会被抽象成一颗组件树
- 组件化思想的应用
- 有了组件化的思想,在之后的开发中就充分利用它
- 尽可能的将页面拆分成一个个小的、可复用的组件。
- 可以让我们的代码方便组织管理,扩展性强
(二)、组件化的实现和使用步骤
1.vue组件的三个组成部分
- template:组件的模板结构
- script:组件的JavaScript行为
- style:组件的样式
2.组件的使用步骤:
-
定义组件:在
components文件下新建.vue文件作为组件<template> {{msg}} template> <script> //默认导出,固定写法 export default { //vue 规定:组件中的data 必须是一个函数,不能直接指向一个数据对象,在return里面定义数据 data(){ return{ msg:"hello" } } } script> <style scoped> style> -
引入组件:
语法:import 自定义组件名 from ‘组件路径’
注意:
- 若导入的文件名为vue后缀则可以省略(vue中可以自动识别.vue文件后缀)
- 导入的路径可以写绝对路径(@默认代表项目中的src目录)
import Header from "./components/Header/Header.vue"; import Header from "./components/header/Header"; import SysDialog from "@/components/system/SysDialog.vue"; -
注册组件:(多个组件之间采用逗号连接)
components: { Header:Header, SysDialog:SysDialog } 简写为: components: { Header,SysDialog } -
使用组件:
第一种: <自定义的组件名 />(建议使用)第二种: <自定义的组件名><自定义的组件名 /> 注意:写成双标签的形式,一般标签内不能写任何html代码
3.组件的全局注册和局部注册
-
全局注册
注册全局组件时,在
main.js入口文件中,通过Vue.component()方法,代码如下://导入需要全局注册的组件 import Header from '@/components/Header.vue' //参数1:字符串格式,表示组件的"注册名称" //参数2:需要被全局注册的那个组件 Vue.component('Header',Header) -
局部注册
<template>
    <div>
      <p>Hello my Vuep>
      <test>test>
    div>
template>

<script type="text/ecmascript-6">
  //Vue2.0直接抛出作为组件
  var testDiv = {
    template: '{{msg}}',
    data:function(){
      return {msg:'一个局部组件在这里'}
    }
  };

export default {
    name: 'agg',
    data () {
        return {
        }
    },
    components :{
      'test': testDiv   //在该实例中注册
    }
}
script>

<style>
style>
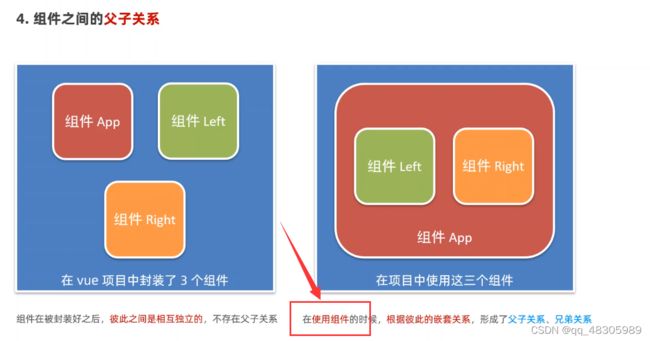
4.父组件和子组件
5.父子组件之间的通信/传值(重)
-
父级向子级传递(props传值)
props的值有两种方式:字符串数组和对象
-
第一步:在父组件绑定一个属性值
<template> <div class="home"> <HelloWorld :username="username"/> //在父组件绑定属性'username' div> template> <script> // @ is an alias to /src import HelloWorld from '@/components/HelloWorld.vue' export default { name: 'Home', data(){ return{ username:'我是父组件传递过来的值' } }, components: { HelloWorld } } script> -
第二步:在子组件内定义props接收自定义属性(和父组件定义的属性同名)
<template>
  <div class="hello">
    <h1>{{ username }}h1>
  div>
template>

<script>
export default {
  name: 'HelloWorld',
  //声明接受props--完整写法:限制类型,控制必要性,指定默认值(一般这个不用,用下面两种)
  // props:{
	 //  username:{
		//   type:String,     //类型
		//   required:true,  //必要性
		//   default:'您好,世界' //默认值
	 //  }
  // },
  //声明接受props--一般写法(对象):限制类型
  // props: {
  //   username: String
  // }
  //声明接受props--精简写法(字符串数组):不限制,接收多个值用','隔开
  props:['username']
}
script>
效果截图:
-
-
子级向父级传递
子组件向父组件传值需要自定义事件 在子组件中,通过$emit()来触发事件。 在父组件中,通过$on()来监听事件-
第一步,在子组件里面自定义一个emit触发事件
<template> <div class="hello"> <h1>{{ username }}h1> <input type="text" v-model.lazy="childMessage" @blur="pass(childMessage)"/> <h4>{{childMessage}}h4> div> template> <script> export default { name: 'HelloWorld', data(){ return{ childMessage:'' } }, props:['username'],//父组件传递过来接收的值 methods:{ pass(val){ this.$emit('getChildData',val) //(事件名,参数) } } } script> -
第二步:在父组件内监听自定义的事件
<template>
  <div class="home">

    <HelloWorld :username="username" @getChildData="getChildData"/>
  div>
template>

<script>
// @ is an alias to /src
import HelloWorld from '@/components/HelloWorld.vue'

export default {
  name: 'Home',
  data(){
	return{
		username:'我是父组件传递过来的值'
	}
  },
  components: {
    HelloWorld
  },
  methods:{
	  getChildData(val){     //父组件接收子组件传递过来的值
		  console.log(val)
	  }
  }
}
script>
运行结果:
-
6.插槽—Slot
五、Vue-CLI
Vue CLI 是一个基于 Vue.js 进行快速开发的完整系统,使用vue-cli可以快速搭建Vue开发环境以及对应的webpack配置
(一)Vue-Cli的使用
1.使用前提-安装Node
-
安装NodeJS: 官网地址:http://nodejs.cn/download/
-
查看是否安装成功:
node -v -
什么是npm:全称:Node Package Manager
是一个NodeJS包管理和分发工具,会经常使用它来安装一些依赖包
-
cnpm安装:
由于国内直接使用npm官方镜像是非常慢的,一般推荐使用淘宝NPM镜像,可以使用淘宝定制的cnpm(gzip压缩支持)命令行工具代替默认的npm:
npm install -g cnpm --registry=https://registry.npm.taobao.org
安装成功后就可以使用cnpm命令来安装模块了
cnpm install [name]
2.使用前提-安装webpack
-
webpack全局安装:
npm install webpack -g
3.Vue Cli的使用
-
安装脚手架:
npm install -g @vue/cli
查看脚手架版本号
vue --version
注:上面安装的是Vue CLI3的版本,如果需要想按照Vue CLI2的方式初始化项目是不可以的
安装桥接工具,这个安装好之后脚手架2和3都可以使用 npm install -g @vue/cli-init -
Vue CLI2和3初始化项目
1.vue2:
vue init webpack 项目名
2.vue3:
vue create 项目名
(二)、Vue CLI2
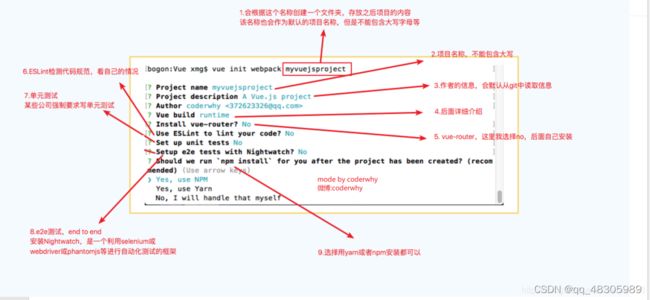
1.初始化项目
2.Vue CLI2的目录结构解析
3.启动项目
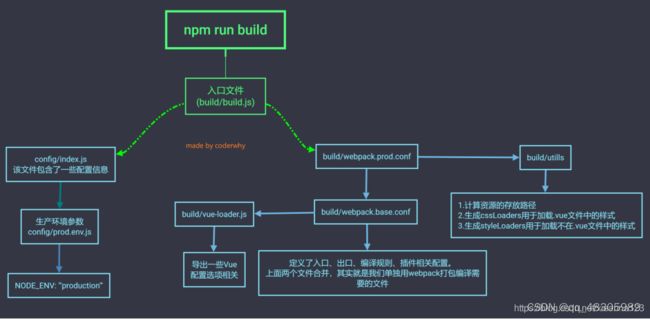
npm run build
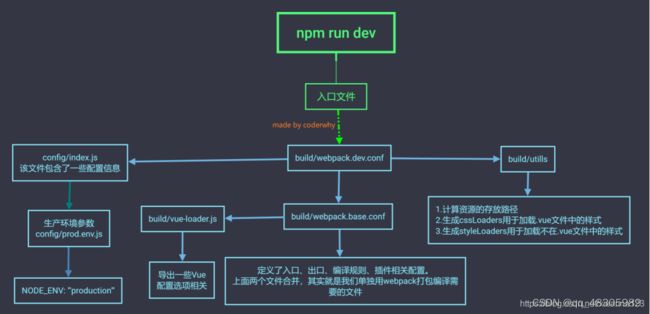
npm run dev
运行图解:
(三)、Vue CLI3
1.vue cli介绍
vue-cli 3 与 2 版本有很大区别

1.vue-cli3 是基于 webpack 4 打造,vue-cli 2 还是 webapck 3
2.vue-cli3 的设计原则是“0配置”,移除的配置文件根目录下的,build和config等目录
3.vue-cli3 提供了 vue ui 命令,提供了可视化配置,更加人性化
4.移除了static文件夹,新增了public文件夹,并且index.html移动到public中
2.初始化项目
开始初始化项目:运行指令:(npm run serve)
3.vue cli3目录结构解析
六、Vue-Router
(一)、认识路由
路由表本质上就是一个映射表, 决定了数据包的指向
-
后端路由:对于普通的网站,所有的超链接都是URL地址,所有的URL地址都对应服务器上对应的资源,服务器会通过正则对该URL进行匹配, 并且最后交给一个Controller进行处理,Controller进行各种处理, 最终生成HTML或者数据, 返回给前端,这个对应关系就是后端中的路由;
-
前端路由:对于单页面应用程序来说,主要通过URL中的hash(#号)来实现不同页面之间的切换,同时,hash有一个特点:HTTP请求中不会包含hash相关的内容;所以,单页面程序中的页面跳转主要用hash实现;
-
在单页面应用程序中,这种通过hash改变来切换页面的方式,称作前端路由(区别于后端路由);
(二)、vue-router基本使用
1.安装和使用vue-router
- 安装路由
npm install vue-router --save
- 使用路由
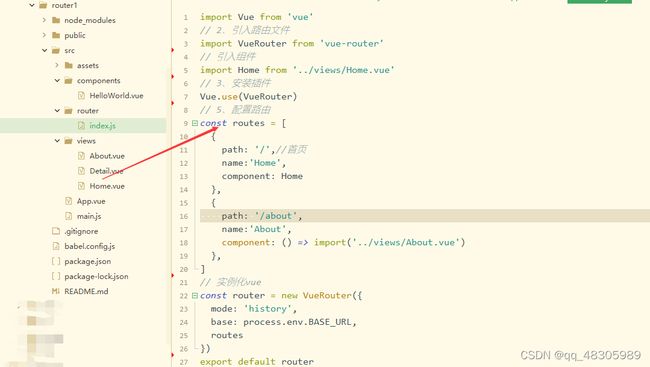
-
在 router下的
index.js导入路由对象,并且调用 Vue.use(VueRouter)import Vue from 'vue' // 1、安装路由 npm install vue-router --save // 2、引入路由文件 import VueRouter from 'vue-router' // 引入组件 import Home from '../views/Home.vue' // 3、安装插件 Vue.use(VueRouter) -
创建路由实例,并且传入路由映射配置
-
步骤一:创建路由组件
Home.vue,About.vue -
步骤二:配置组件和路径的映射关系,就是上面引入的组件和配置路由
-
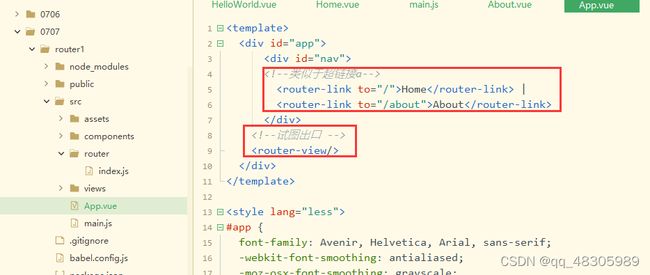
步骤三:使用路由
1.: 该标签是一个vue-router中已经内置的组件, 它会被渲染成一个标签. 2. : 该标签会根据当前的路径, 动态渲染出不同的组件. 3.网页的其他内容, 比如顶部的标题/导航, 或者底部的一些版权信息等会和 处于同一个等级. 4.在路由切换时, 切换的是 挂载的组件, 其他内容不会发生改变.
-
-
在Vue实例中挂载创建的,在
main.js里面挂载路由import Vue from 'vue' import App from './App.vue' //引入路由文件 import router from './router' new Vue({ router,//挂载路由 render: h => h(App) }).$mount('#app')
2.配置路由的默认路径
//只需要配置多配置一个映射就可以了.
//path配置的是根路径: /
//redirect是重定向, 也就是我们将根路径重定向到/home的路径下, 这样就可以默认到首页了.
const routes = [
  {
    path: '/',//首页
	redirect:'/home'
  },
]
3.HTML的History模式
在默认情况下,路径的改变使用的URL的hash,如果希望使用HTML5的history模式, 在index.js进行如下配置即可
// 实例化vue
const router = new VueRouter({
  mode: 'history',  //history模式
  routes
})
HTML5的history模式和hash模式
直观区别:
hash       带一个#
history    没有#

各自特点:
hash:      仅 hash 符号之前的内容会被包含在请求中,**因此对于后端来说,即使没有做到对路由的全覆盖,也不会返回 404 错误。**(这就是前端人员比较喜欢的,不用出404)
history:  前端的 URL 必须和实际向后端发起请求的 URL 一致,如 http://www.abc.com/book/id。
如果后端缺少对 /book/id 的路由处理,将返回 404 错误。
4.router-link
-
在
router-link中,常用属性:to,用于指定跳转路径。 -
-
tag:tag可以指定router-link渲染成什么组件,默认是a,可以渲染成其他属性:button、li…<router-link to='/home' tag='button'> -
replace:不会留下history记录,所以指定replace的情况下,后退键返回不能返回到上一个页面中<router-link to='/home' replace> -
active-class:对应的路由匹配成功时, 会自动给当前元素设置一个router-link-active的class, 设置active-class可以修改默认的名称;- 在进行高亮显示的导航菜单或者底部tabbar时,会使用该类
- 通常不会修改类的属性,会直接使用默认的
router-link-active即可
-
修改
linkActiveClass:该class具体名称也可以通过router实例属性进行修改//在index.js下面,实例化router下面,添加下面这句代码 // 实例化vue const router = new VueRouter({ mode: 'history', //history模式 routes, linkActiveClass:'active' })
5.路由的跳转
除了router-link方式进行跳转,还可以用js代码进行实现
<div id="nav">

    <button @click="linkHome">首页button>
    <button @click="linkAbout">关于button>
div>

<script>
	export default{
		name:'App',
		methods:{
			linkHome(){
				this.$router.push('/home')
			},
			linkAbout(){
				this.$router.push('/about')
			}
		}
	}
script>
6.动态路由
- 在某些情况下,一个页面的path路径可能是不确定的,比如我们进入用户界面,希望是以下路径:
- /home/aaaa
- 除了有前面的/home之外,后面还跟上用户的ID
- 这种path和component的匹配关系,叫动态路由(也是路由传递数据的一种方式)
 {
	path: '/detail:goodsId',
	name:'Detail',
	component: () => import('../views/Detail.vue')
 }

 <router-link :to="'/detail/'+goodsId">详情页router-link>
 <script>
     name:'App',
     data(){
        return{
        	goodsId:'17642ancsic'
        }
     }
 script>

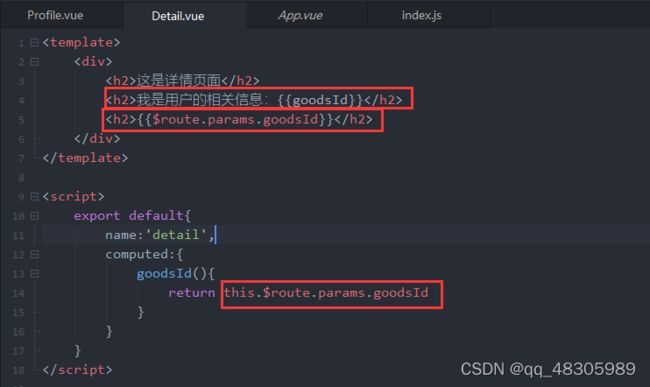
 <template>
     <div>{{goodsId}}div>

	<div>{{$route.params.goodsId}}div>
 template>
 <script>
 export default{
     name:'detail',
     computed:{
         goodsId(){
        	 return this.$route.params.goodsId, //这个goodsId需要和path路径后面的参数对应
         }
     }
 }
 script>
7.路由懒加载
-
为什么要使用路由懒加载:
在单页应用中,如果没有应用懒加载,运用webpack打包后的文件将会异常的大,
造成进入首页时,需要加载的内容过多,出现长时间的白屏,不利于用户体验,
运用懒加载可以将页面进行划分,按需加载页面,可以分担首页所承担的加载压力,减少加载用时。 -
懒加载的方式:vue异步组件加载 和ES中的import
- vue异步组件:语法:
component:resolve=>(require(['需要加载的路由的地址']),resolve)
import Vue from 'vue'
import Router from 'vue-router'
  /* 此处省去之前导入的HelloWorld模块 */
Vue.use(Router)

export default new Router({
  routes: [
    {
      path: '/',
      name: 'Header',
      component: resolve=>(require(["@/components/Header"],resolve))
    }
  ]
})
- ES中的import方法: 语法:
component: () => import('需要加载的模块地址')
import Vue from 'vue'
import Router from 'vue-router'
Vue.use(Router)

//const header = ()=>import("@/components/header")
export default new Router({
  routes: [
    {
      path: '/',
      name: 'Header',
      component: () => import('../components/Header.vue')
      //component:header
    }
  ]
})
(三)、vue-router嵌套路由
-
什么是嵌套路由:
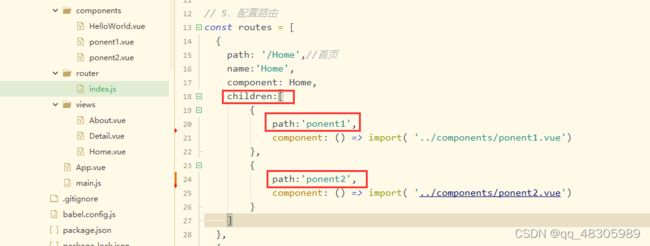
嵌套路由也就是二级路由,组件中可以有自己的路由导航和路由容器(
router-link、router-view),通过配置children可实现多层嵌套,在vue组件中使用 -
嵌套路由的使用场
应用最多的就是选项卡,在选项卡中,顶部有多个导航栏,中间的主体显示的是内容;这个时候,整个页面是一个路由,然后点击选项卡切换不同的路由来展示不同的内容,就是中间的主体显示的是内容就是页面路由下的子路由,这就是路由中嵌套路由。
-
URL对应的嵌套组件结构
/user/johnny/profile /user/johnny/posts +------------------+ +-----------------+ | User | | User | | +--------------+ | | +-------------+ | | | Profile | | +------------> | | Posts | | | | | | | | | | | +--------------+ | | +-------------+ | +------------------+ +-----------------+ -
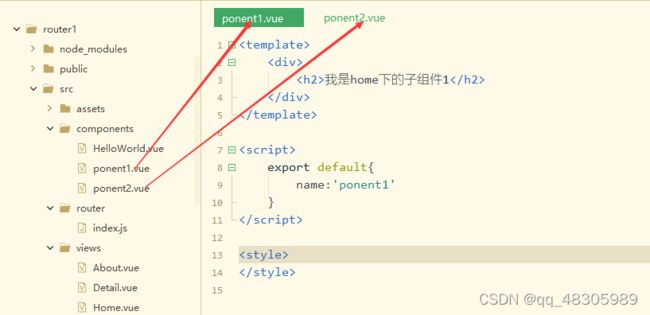
嵌套路由的使用步骤:
(四)、vue-router参数传递
1.vue-router传递参数的两种方式:params和query
params的类型:和动态路由原理相似
query的类型:一般传多个对象的时候使用
- 配置路由格式:
/router,普通配置 - 传递的方式:对象中使用query的key作为传递方式
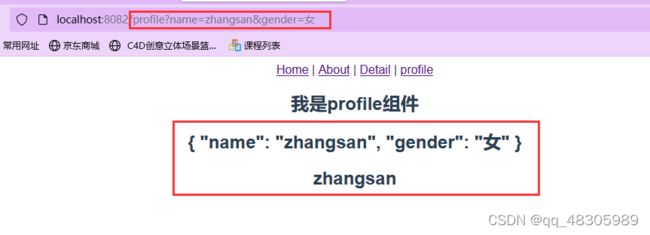
- 传递后形成的路径:
/router?id=123
新建组件profile.vue

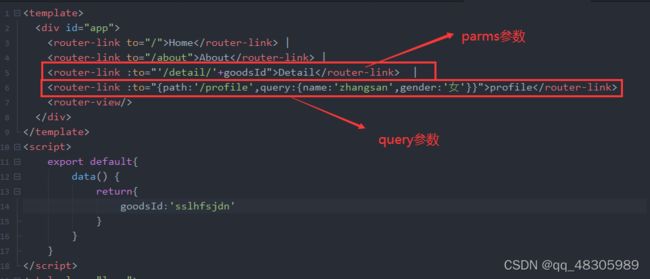
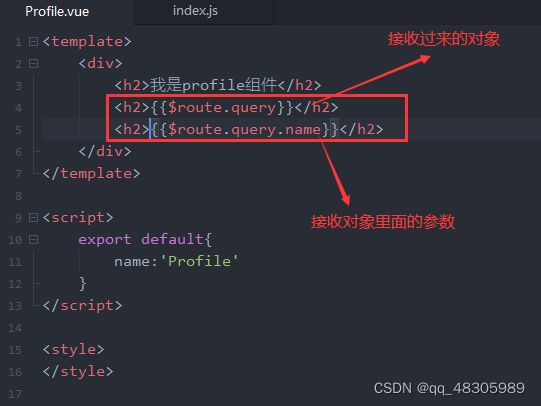
运行效果:
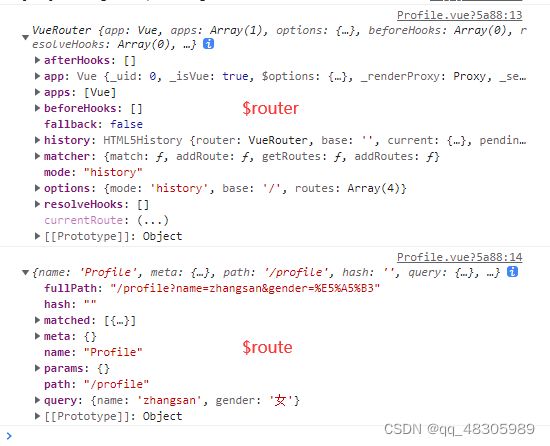
2.$router和 $route的区别
(五)、vue-router导航守卫
1.什么是导航守卫
- vue-router提供的导航守卫主要用来监听监听路由的进入和离开的.
- vue-router提供了beforeEach和afterEach的钩子函数, 它们会在路由即将改变前和改变后触发.
- 应用场景:路由跳转前做一些验证:登录验证,权限管理,是网站中的普遍需求
2.全局守卫
使用router.beforeEach注册一个全局前置守卫,在index.js下面注册
const router = new VueRouter({ ... })

router.beforeEach((to, from, next) => {
  // ...
})
to: Route: 即将要进入的目标 路由对象from: Route: 当前导航正要离开的路由对象next: Function: 一定要调用该方法来 resolve 这个钩子。执行效果依赖next方法的调用参数,才能进入下一个钩子函数 afterEach :
1.next():直接进to所指路由
2.next(false):中断当前路由
3.next('/login'):跳转指定路由
3.路由独享的守卫
这个守卫是写在路由里面的,只有当进入这个路由时才会调用的,这些守卫与全局前置守卫的方法参数是一样的
const router = new VueRouter({
  routes: [
    {
      path: '/foo',
      component: Foo,
      beforeEnter: (to, from, next) => {
        //具体操作
      }
    }
  ]
4.组件内的守卫
组件内守卫beforeRouteEnter,beforeRouteUpdate,beforeRouteLeave,
// 跟methods: {}等同级别书写,组件路由守卫是写在每个单独的vue文件里面的路由守卫
beforeRouteEnter (to, from, next) {
    // 注意,在路由进入之前,组件实例还未渲染,所以无法获取this实例,只能通过vm来访问组件实例
    next(vm => {})
}
beforeRouteUpdate (to, from, next) {
    // 同一页面,刷新不同数据时调用,
    // 可以访问组件实例 this
}
beforeRouteLeave (to, from, next) {
    // 离开当前路由页面时调用
     // 可以访问组件实例 this
}
七、Vuex
(一)、Vuex的定义
Vuex 是一个专为 Vue.js 应用程序开发的状态管理模式,Vuex 也集成到 Vue 的官方调试工具 devtools extension,提供了诸如零配置的 time-travel 调试、状态快照导入导出等高级调试功能
- 什么是状态管理:
- 将其看成把需要多个组件共享的变量全部存储在一个对象里面。
- 然后将这个对象放在顶层的Vue实例中,让其他组件可以使用。
(二)、Vuex的使用
-
安装vuex
npm i vuex --save
(三)、Vuex核心概念
1.state
state就是Vuex中的公共的状态, 我是将state看作是所有组件的data, 用于保存所有组件的公共数据.
const store = new Vuex.Store({
  state:{ //存数据
    students: [
      {name: 'zs', age: 20},
      {name: 'ls', age: 40},
    ]
  }
})
如何在组件内获取state里面的数据:
//StudentList.vue
export default {
    data () {
        return {
            students : this.$store.state.students //获取store中state的数据
        }
    }
}
2.getters
可以将getter理解为store的计算属性, getters的返回值会根据它的依赖被缓存起来,且只有当它的依赖值发生了改变才会被重新计算。
export default new Vuex.Store({
	state:{//state相当于普通组件中的data数据域
		 students: [
              {name: 'zs', num: 20},
              {name: 'ls', num: 40},
          ],
        price:5
	},
	getters:{//getter相当于computed对象
		addPrice(state){//state的数据会自动传入add的方法
			return state.price+5
		}
	}
})
组件内获取getters:
<template>
	<div id='Home'>
        <p>{{this.$store.state.students}}p>
        <p>{{students}}p>
        <p>{{this.$store.getters.addPrice}}p>
        <p>{{nowPrice}}p>
    div>
template>
<script>
export default {
    data () {
        return {
            students: this.$store.state.students //获取store中state的数据
            nowPrice: this.$store.getter.addPrice
        }
    }
}
script>
3.mutations
可以将mutaions理解为store中的methods, mutations对象中保存着更改数据的回调函数,可以直接修改数据, 第一个参数是state, 第二参数是payload, 也就是自定义的参数.
const store = new Vuex.Store({
  state:{ //存数据
    students: [
      {name: 'zs', age: 20},
      {name: 'ls', age: 40},
    ],
      price:5
  },
  getters:{//getter相当于computed对象
	  addPrice(state){//state的数据会自动传入add的方法
		return state.price+5
	  }
  }
   mutations:{ //添加mutations
    subPrice (state, payload ) {
      let newPrice = state.price - payload
    }
  }
})
在组件内调用mutaions中回调函数, 只能使用store.commit(type, payload):先在组件内添加一个点击事件,触发mutations里面的方法
<template>
	<div id='Home'>
       <p>{{this.$store.state.students}}p>
        <p>{{students}}p>
        <p>{{this.$store.getters.addPrice}}p>
        <p>{{nowPrice}}p>
        <p>
            <input type="text"  v-model="this.$store.state.price"/>
            <button @click="subPrice()">-button >
        p>
    div>
template>

<script>
export default{
	name:'Home',
     data () {
        return {
            students : this.$store.state.students //获取store中state的数据
            nowPrice: this.$store.getter.addPrice
        }
    },
	methods:{
		subPrice(){
            // this.$store.commit('evnetName',自定义的参数)
			this.$store.commit('subPrice',2) //提交`subPrice,payload为2
		},
	}
}
script>
4.actions
actions 类似于 mutations,不同在于:
actions提交的是mutations而不是直接变更状态actions中可以包含异步操作,mutations中绝对不允许出现异步actions中的回调函数的第一个参数是context, 是一个与store实例具有相同属性和方法的对象
举例:subPriceAsync采用setTimeout来模拟异步操作,延迟3s执行 该方法用于异步改变我们刚才在mutaions中定义的subPrice
const store = new Vuex.Store({
  state:{ //存数据
    students: [
      {name: 'zs', age: 20},
      {name: 'ls', age: 40},
    ],
      price:5
  },
  getters:{//getter相当于computed对象
	  addPrice(state){//state的数据会自动传入add的方法
		return state.price+5
	  }
  },
   mutations:{ //添加mutations
    subPrice (state, payload ) {
      let newPrice = state.price - payload
    }
  },
   actions:{
	 subPriceAsync(context,payload){
		setTimeout(()=>{
         //add为mutations内定义的函数
         //通过commit调用mutations内的函数
		   context.commit('subPrice',payload)
		},3000)
	 }
  },
})
在组件内添加一个点击事件,给点击事件触发subPriceAsync,通过 this.$store.dispatch调用actions内的异步方法
<template>
	<div id='Home'>
       <p>{{this.$store.state.students}}p>
        <p>{{students}}p>
        <p>{{this.$store.getters.addPrice}}p>
        <p>{{nowPrice}}p>
        <p>
            <input type="text"  v-model="this.$store.state.price"/>
            <button @click="subPrice()">-button >
            <button @click="subPriceAsync()">异步-button >
        p>
    div>
template>

<script>
export default{
	name:'Home',
     data () {
        return {
            students : this.$store.state.students //获取store中state的数据
            nowPrice: this.$store.getter.addPrice
        }
    },
	methods:{
		subPrice(){
            // this.$store.commit('evnetName',自定义的参数)
			this.$store.commit('subPrice',2) //提交`subPrice,payload为2
		},
        subPriceAsync(){
            this.$store.dispatch('subPriceAsync', 3);
        }
	}
}
script>
5.modules
-
Vue使用单一状态树,那么也意味着很多状态都会交给Vuex来管理.
-
当应用变得非常复杂时,store对象就有可能变得相当臃肿.
-
为了解决这个问题, Vuex允许我们将store分割成模块(Module), >- 而每个模块拥有自己的
state、mutations、actions、getters等const moduleA = { state: { ... }, mutations: { ... }, actions: { ... }, getters: { ... } } const moduleB = { state: { ... }, mutations: { ... }, actions: { ... } } const store = new Vuex.Store({ modules: { a: moduleA, b: moduleB } }) store.state.a // -> moduleA 的状态 store.state.b // -> moduleB 的状态参考文档:https://vuex.vuejs.org/zh/
https://www.jianshu.com/p/a804606ad8e9
https://blog.csdn.net/xieanna123/article/details/104340340
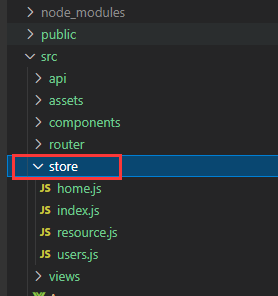
(四)、项目结构
Vuex并不限制代码结构。但是,它规定了一些需要遵守的规则:
- 应用层级的状态应该集中到单个 store 对象中。
- 提交 mutation 是更改状态的唯一方法,并且这个过程是同步的。
- 异步逻辑都应该封装到 action 里面。
只要你遵守以上规则,如何组织代码随你便。如果你的 store 文件太大,只需将 action、mutation 和 getter 分割到单独的文件。
对于大型应用,我们会希望把 Vuex 相关代码分割到模块中。下面是项目结构示例:
├── index.html
├── main.js
├── api
│   └── ... # 抽取出API请求
├── components
│   ├── App.vue
│   └── ...
└── store
    ├── index.js          # 我们组装模块并导出 store 的地方
    ├── actions.js        # 根级别的 action
    ├── mutations.js      # 根级别的 mutation
    └── modules
        ├── a.js       # a模块
        └── b.js       # b模块

