SpringBoot整合Swagger3.0详细使用
目录
-
- 一、简介
- 二、Maven依赖
- 三、核心配置类
-
- 3.1 SwaggerProperties只配置跟文档相关的信息
- 3.2 SwaggerConfig整合
- 3.3 SwaggerUiWebMvcConfigurer源码
- 四、实践
-
- 4.1 包装对象UserDto
- 4.2 控制层UserController(省略service)
- 4.3 配置文件
- 4.4 效果图
- 结语
一、简介
Swagger 是一个规范和完整的框架,用于生成、描述、调用和可视化RESTful风格的 Web 服务。常见组件如下:
- Swagger UI:提供了一个可视化的UI页面展示描述文件,可以在该页面中对相关接口进行查阅或做一些简单的接口请求
- Swagger Editor: 是一个基于Angular开源的编辑器,我们可以基于YAML等语法定义我们的RESTful API,支持实时预览
- Swagger Inspector:是API测试和生成文档的工具
- Swagger Codegen:是一个开源的代码生成器,通过Codegen 可以将描述文件生成html格式和cwiki形式的接口文档,同时也能生成多钟语言的服务端和客户端的代码
- Swagger Hub:是Swagger API 的一个集成服务网站,可提供 Swagger 的企业级服务需求
| 注解 | 含义(括号里是常用属性) |
|---|---|
| @API | 用于类上,表示标识这个类是swagger的资源(tags,value,hidden) |
| @ApiOperation | 用于方法上,表示一个http请求的动作(value,notes,httpMethod,hidden ) |
| @ApiParam | 用于方法,参数或字段说明,表示对参数的添加元数据,说明或是否必填等(name,value,required) |
| @ApiModel | 用于类上,表示对类进行说明,用于参数用实体类接收(value,description) |
| @ApiModelProperty | 用于方法或字段,表示对model属性的说明或者数据操作更改(value,name,dataType,required,example,hidden) |
| @ApiIgnore | 用于类,方法或方法参数上,表示这个类,或者方法或者参数被忽略(value) |
| @ApiResponses | 用于方法上,方法返回对象的说明(多个 @ApiResponse) |
| @ApiResponse | 用于方法上,每个参数的说明(code,message,response) |
| @ApiImplicitParams | 用于方法上,包含一组参数说明(多个 @ApiImplicitParam) |
| @ApiImplicitParam | 用于方法上,表示单独的请求参数(name,value,required,paramType,dataType,readOnly,allowEmptyValue,defaultValue) |
二、Maven依赖
pom.xml
<project xmlns="http://maven.apache.org/POM/4.0.0" xmlns:xsi="http://www.w3.org/2001/XMLSchema-instance"
         xsi:schemaLocation="http://maven.apache.org/POM/4.0.0 http://maven.apache.org/xsd/maven-4.0.0.xsd">
    <modelVersion>4.0.0modelVersion>

    <parent>
        <groupId>org.springframework.bootgroupId>
        <artifactId>spring-boot-starter-parentartifactId>
        <version>2.5.2version>
        <relativePath/>
    parent>

    <groupId>com.wtsdgroupId>
    <artifactId>swaggerartifactId>
    <version>0.0.1-SNAPSHOTversion>
    <packaging>jarpackaging>

    <name>swaggername>
    <description>Spring Boot整合swaggerdescription>

    <properties>
        <project.build.sourceEncoding>UTF-8project.build.sourceEncoding>
        <project.reporting.outputEncoding>UTF-8project.reporting.outputEncoding>
        <project.package.directory>targetproject.package.directory>
        <java.version>1.8java.version>
    properties>

    <dependencies>
        <dependency>
            <groupId>org.springframework.bootgroupId>
            <artifactId>spring-boot-starterartifactId>
            <version>${parent.version}version>
        dependency>

        <dependency>
            <groupId>org.springframework.bootgroupId>
            <artifactId>spring-boot-starter-webartifactId>
            <version>${parent.version}version>
        dependency>

        <dependency>
            <groupId>io.springfoxgroupId>
            <artifactId>springfox-boot-starterartifactId>
            <version>3.0.0version>
        dependency>

        <dependency>
            <groupId>org.apache.commonsgroupId>
            <artifactId>commons-lang3artifactId>
            <version>3.12.0version>
        dependency>

        <dependency>
            <groupId>org.projectlombokgroupId>
            <artifactId>lombokartifactId>
            <version>1.18.16version>
        dependency>

    dependencies>

    <build>
        <plugins>
            <plugin>
                <groupId>org.springframework.bootgroupId>
                <artifactId>spring-boot-maven-pluginartifactId>
            plugin>
        plugins>
    build>

project>
三、核心配置类
3.1 SwaggerProperties只配置跟文档相关的信息
SwaggerProperties.java
package com.alian.swagger.config;

import lombok.Data;
import org.springframework.boot.context.properties.ConfigurationProperties;
import org.springframework.stereotype.Component;

@Data
@Component
@ConfigurationProperties(value = "swagger")
public class SwaggerProperties {

    /**
     * 是否开启swagger,生产环境一般关闭,所以这里定义一个变量
     */
    private Boolean enable = false;

    /**
     * 项目信息
     */
    private String title = "";

    /**
     * 描述信息
     */
    private String description = "";

    /**
     * 版本信息
     */
    private String version = "";

    /**
     * 作者
     */
    private String author = "";

    /**
     * url
     */
    private String url = "";

    /**
     * email
     */
    private String email = "";

}
此配置类不懂的可以参考我另一篇文章:Spring Boot读取配置文件常用方式.
3.2 SwaggerConfig整合
整合过程的注意点:
- 注解@EnableOpenApi和@Configuration不能少
- 我这里使用的版本是DocumentationType.OAS_30
- 为了安全起见,建议生产上需要关闭掉文档生成功能,也就是本例中swaggerProperties.getEnable()为false;
- 生成https路径的文档,我个人觉得必要不大,测试或者开发环境http已经满足需求了
- 如果使用了apis(RequestHandlerSelectors.basePackage(“com.xxxx.xxx”)),而文档路径不在一个包下,则可以扫描共同的父路径;生成api的设置建议使用apis(RequestHandlerSelectors.withClassAnnotation(Api.class)),扫类上有@Api注解的类,虽说使用apis(RequestHandlerSelectors.withMethodAnnotation(ApiOperation.class))扫描有@ApiOperation注解的方法,但是这个方法缺少一个类的说明信息,这几种方式都屏蔽掉basic-error-controller的文档。
SwaggerConfig.java
package com.alian.swagger.config;

import io.swagger.annotations.Api;
import org.springframework.beans.factory.annotation.Autowired;
import org.springframework.context.annotation.Bean;
import org.springframework.context.annotation.Configuration;
import springfox.documentation.builders.ApiInfoBuilder;
import springfox.documentation.builders.PathSelectors;
import springfox.documentation.builders.RequestHandlerSelectors;
import springfox.documentation.oas.annotations.EnableOpenApi;
import springfox.documentation.service.ApiInfo;
import springfox.documentation.service.Contact;
import springfox.documentation.spi.DocumentationType;
import springfox.documentation.spring.web.plugins.Docket;

@EnableOpenApi
@Configuration
public class SwaggerConfig {

    @Autowired
    private SwaggerProperties swaggerProperties;

    @Bean
    public Docket createRestApi() {
        return new Docket(DocumentationType.OAS_30)
                .pathMapping("/")
                .enable(swaggerProperties.getEnable())//生产禁用
                .apiInfo(apiInfo())
                .select()
                .apis(RequestHandlerSelectors.withClassAnnotation(Api.class))//方法一、扫描类上有@Api的,推荐,不会显示basic-error-controller
//                .apis(RequestHandlerSelectors.withMethodAnnotation(ApiOperation.class))//方法二、扫描方法上有@ApiOperation,但缺少类信息,不会显示basic-error-controller
//                .apis(RequestHandlerSelectors.basePackage("com.alian.swagger.controller"))//按包扫描,也可以扫描共同的父包,不会显示basic-error-controller
//                .paths(PathSelectors.regex("/.*"))// 对根下所有路径进行监控
                .paths(PathSelectors.any())
                .build();
    }

    /**
     * API 页面上半部分展示信息
     */
    private ApiInfo apiInfo() {
        return new ApiInfoBuilder()
                .title(swaggerProperties.getTitle())//标题
                .description(swaggerProperties.getDescription())//描述
                .contact(new Contact(swaggerProperties.getAuthor(), swaggerProperties.getUrl(), swaggerProperties.getEmail()))//作者信息
                .version(swaggerProperties.getVersion())//版本号
                .build();
    }

}
注意:也许很多人会认为我配置的有问题,为什么不实现WebMvcConfigurer,对静态资源进行处理,废话不多说,直接看spring boot 整合swagger里的源码。这里有个前提那就是依赖使用的是:
<dependency>
    <groupId>io.springfoxgroupId>
    <artifactId>springfox-boot-starterartifactId>
    <version>3.0.0version>
dependency>
而不是
<dependency>
  <groupId>io.springfoxgroupId>
  <artifactId>springfox-swagger2artifactId>
  <version>3.0.0version>
dependency>

<dependency>
  <groupId>io.springfoxgroupId>
  <artifactId>springfox-swagger-uiartifactId>
  <version>3.0.0version>
dependency>
3.3 SwaggerUiWebMvcConfigurer源码
SwaggerUiWebMvcConfigurer.java
package springfox.boot.starter.autoconfigure;

import org.springframework.util.StringUtils;
import org.springframework.web.servlet.config.annotation.ResourceHandlerRegistry;
import org.springframework.web.servlet.config.annotation.ViewControllerRegistry;
import org.springframework.web.servlet.config.annotation.WebMvcConfigurer;

public class SwaggerUiWebMvcConfigurer implements WebMvcConfigurer {
    private final String baseUrl;

    public SwaggerUiWebMvcConfigurer(String baseUrl) {
        this.baseUrl = baseUrl;
    }

    public void addResourceHandlers(ResourceHandlerRegistry registry) {
        String baseUrl = StringUtils.trimTrailingCharacter(this.baseUrl, '/');
        registry.addResourceHandler(new String[]{baseUrl + "/swagger-ui/**"}).addResourceLocations(new String[]{"classpath:/META-INF/resources/webjars/springfox-swagger-ui/"}).resourceChain(false);
    }

    public void addViewControllers(ViewControllerRegistry registry) {
        registry.addViewController(this.baseUrl + "/swagger-ui/").setViewName("forward:" + this.baseUrl + "/swagger-ui/index.html");
    }
}
从源码我们就发现了,框架里已经帮我实现了我们要完成的功能了。当然如果你使用的不是springBoot整合的swagger那就需要进行相关配置了。我这里就不过多的讨论了,不然跑题了。
四、实践
4.1 包装对象UserDto
UserDto.java
package com.alian.swagger.dto;

import io.swagger.annotations.ApiModel;
import io.swagger.annotations.ApiModelProperty;
import lombok.Data;

import java.time.LocalDate;

@Data
@ApiModel
public class UserDto {

    @ApiModelProperty(value = "用户编号")
    private String id = "";

    @ApiModelProperty(value = "用户名")
    private String name = "";

    @ApiModelProperty(value = "年龄")
    private int age;

    @ApiModelProperty(value = "性别")
    private String gender = "";

    @ApiModelProperty(value = "工资")
    private double salary = 0.00;

    @ApiModelProperty(value = "性别")
    private String department = "";

    @ApiModelProperty(value = "入职时间")
    private LocalDate hireDate = LocalDate.of(2021, 8, 5);

    public UserDto(String id, String name, int age, String gender, double salary, String department, LocalDate hireDate) {
        this.id = id;
        this.name = name;
        this.age = age;
        this.gender = gender;
        this.salary = salary;
        this.department = department;
        this.hireDate = hireDate;
    }
}
4.2 控制层UserController(省略service)
为了简单易懂,我这里就不连接数据库了,直接模拟数据返回,以下是控制层的代码。
UserController.java
package com.alian.swagger.controller;

import com.alian.swagger.dto.UserDto;
import io.swagger.annotations.Api;
import io.swagger.annotations.ApiOperation;
import io.swagger.annotations.ApiParam;
import org.springframework.web.bind.annotation.RequestMapping;
import org.springframework.web.bind.annotation.RequestMethod;
import org.springframework.web.bind.annotation.RestController;

import java.time.LocalDate;
import java.util.Arrays;
import java.util.List;
import java.util.stream.Collectors;

@Api(tags = "User的相关信息接口")
@RestController
@RequestMapping("api/user")
public class UserController {

    /**
     * 模拟数据返回,这里不再使用service去数据库取数据
     */
    private List<UserDto> list = Arrays.asList(
            new UserDto("BAT001", "胡昊天", 20, "男", 6000.0, "销售部", LocalDate.of(2018, 3, 14)),
            new UserDto("BAT002", "唐鹏", 30, "男", 22000.0, "研发部", LocalDate.of(2015, 9, 15)),
            new UserDto("BAT003", "梁南生", 27, "男", 20000.0, "研发部", LocalDate.of(2019, 4, 8)),
            new UserDto("BAT004", "罗考聪", 35, "男", 18000.0, "测试部", LocalDate.of(2017, 11, 20))
    );

    @ApiOperation(value = "获取所有user", notes = "获取所有user,无需参数", httpMethod = "POST")
    @RequestMapping(value = "/queryAll", method = {RequestMethod.POST, RequestMethod.GET})
    public List<UserDto> queryAll() {
        //查出的所有用户信息
        return list;
    }

    @ApiOperation(value = "根据姓名获取user", notes = "根据姓名获取user", httpMethod = "POST")
    @RequestMapping(value = "/findByName", method = {RequestMethod.POST, RequestMethod.GET})
    public List<UserDto> findByName(@ApiParam(value = "姓名", example = "梁南生", required = true) String name) {
        //按姓名查出的用户信息
        return list.stream().filter(p -> p.getName().equals(name)).collect(Collectors.toList());
    }

}
4.3 配置文件
是不是你的页面会出现乱码?关键点在于:Spring Boot注解读取application.properties或者application-{profile}.properties文件时默认编码是ISO_8859_1,读取yaml配置文件时使用的是UTF-8的编码方式,如果有中文配置请使用.yml格式
application.yml
server:
  port: 8080
  servlet:
    context-path: /swagger

swagger:
  enable: true
  title: Spring Boot整合Swagger3的演示案例
  description: 用户信息操作
  version: 1.0.0
  author: Alian
  url: https://blog.csdn.net/Alian_1223
  email: [email protected]
4.4 效果图
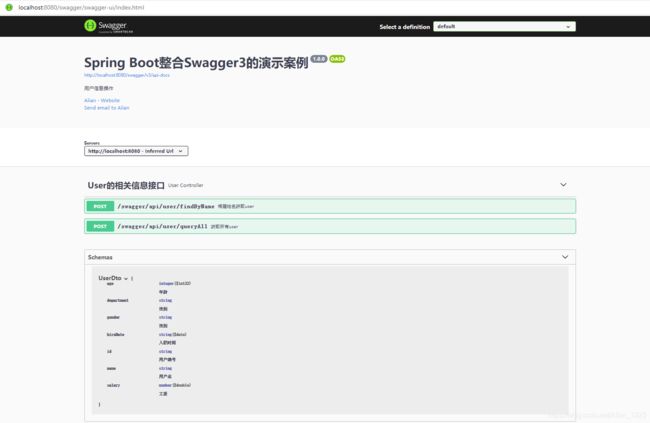
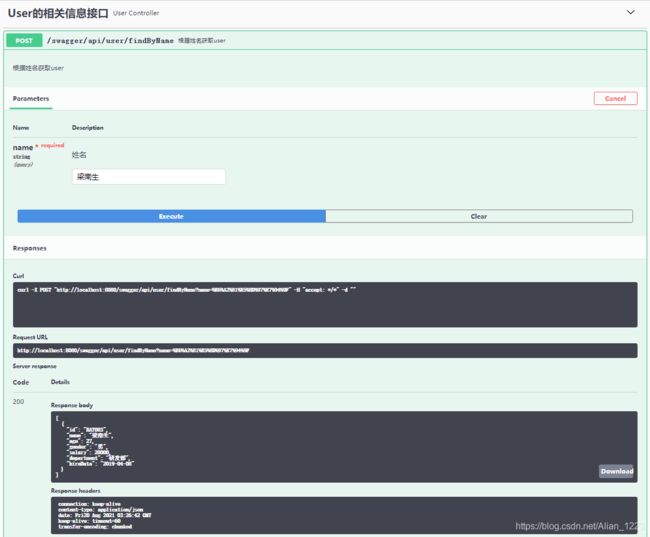
启动项目后,通过源码分析我们项目的访问路径可以为如下两种(记得不要漏了项目名swagger):
- http://localhost:8080/swagger/swagger-ui/
- http://localhost:8080/swagger/swagger-ui/index.html
结语
Spring boot整合的swagger3依赖少了,整合变得更加简单了,注解@EnableOpenApi和@Configuration不能少,生成api的设置建议使用apis(RequestHandlerSelectors.withClassAnnotation(Api.class)),扫类上有@Api注解的类,也能屏蔽掉basic-error-controller的文档。

