yolov3交通标志识别练习
目录
一、问题分析 3
1.问题描述 3
2. 数据集分析 3
3. 数据集标注 4
二、实验原理 5
论文摘要 5
Loss函数 7
内部网络架构 7
三、实验过程 8
- 实验环境 8
- 训练过程 8
- 实验结果 18
四、分析与总结 20 - 实验分析 20
- 心得体会 20
一、问题分析
##1.问题描述
随着城市道路交通的发展,交通标示作为智能交通系统的重要组成,对交通安全起到至关重要的作用,因此如何快速准确的定位及分类出交通标志被广泛研究。自然场景下的交通标志有着显著的颜色及形状特征,对交通标志的检测及识别提供了有利条件,但因光照多变,相近背景干扰及交通标志在场景图像所占比例较小,特征提取不足等问题,一定程度上影响了交通标志的检测及识别准确率。
如何快速、准确地定位图片或是视频中的交通标志,受到了许多研究人员的关注。
##2. 数据集分析
本次课程实验基于6000余张实景照片,标注其中所有的交通标志,实际
分类为5类。实际训练数据为实际场景下的照片,具备一定的实用性。
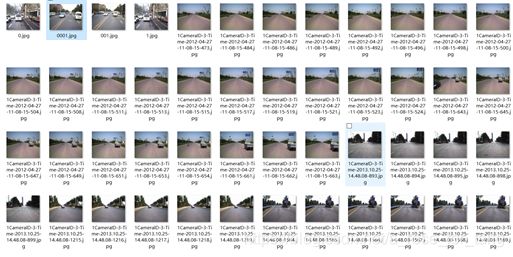
其中,照片的尺寸不完全相同,有12801024,也有720576等规格。
##3. 数据集标注
采用标注软件为colabeler。
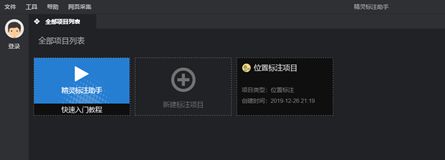
得到两个文件夹,分别放置图片与标签。

得到6336个对应照片的xml标注文件,其内容如下所示(举例)。
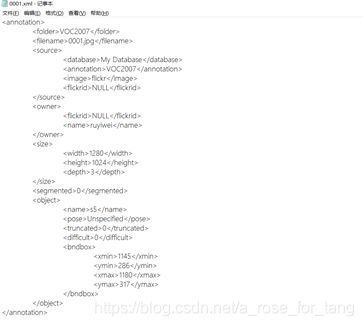
由于后期采用的网络框架为yolo,需要特定的标注格式,后期编写代码进行更改。
二、实验原理
基于论文You Only Look Once:Unified, Real-Time Object Detection.
论文摘要
提出了一种新的目标检测方法YOLO。先前关于对象检测的工作将重新定义分类器来执行检测。相反,我们将对象检测定义为一个回归问题,回归到空间分离的边界框和相关的类概率。在一次评估中,单个神经网络直接从完整图像预测边界盒和类概率。由于整个检测管道是一个单一的网络,可以直接从检测性能上进行端到端优化。我们的统一架构非常快。我们的基本YOLO模型以每秒45帧的速度实时处理图像。一个更小版本的网络,Fast YOLO,处理速度达到惊人的每秒155帧,同时仍然达到其他实时探测器地图的两倍。与最先进的检测系统相比,YOLO会产生更多的定位错误,但不太可能预测背景上的误报。最后,YOLO学习对象的一般表示。当从自然图像推广到艺术作品等其他领域时,它的性能优于其他检测方法,包括DPM和R-CNN。
方法:YOLO将输入图像分成SxS个格子,每个格子负责检测‘落入’该格子的物体。何为之落入?若某个物体的中心位置的坐标落入到某个格子,那么这个格子就负责检测出这个物体。如下图所示,图中物体狗的中心点(红色原点)落入第5行、第2列的格子内,所以这个格子负责预测图像中的物体狗。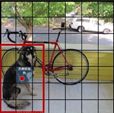
每个格子输出B个bounding box(包含物体的矩形区域)信息,以及C个物体属于某种类别的概率信息。Bounding box信息包含5个数据值,分别是x,y,w,h,和confidence。其中x,y是指当前格子预测得到的物体的bounding box的中心位置的坐标。w,h是bounding box的宽度和高度。注意:实际训练过程中,w和h的值使用图像的宽度和高度进行归一化到[0,1]区间内;x,y是bounding box中心位置相对于当前格子中心?位置的偏移值,并且被归一化到[0,1]。confidence反映当前bounding box是否包含物体以及物体位置的准确性,计算方式如下:
confidence = P(object)* IOU
其中,若bounding box包含物体,则P(object) = 1;否则P(object) = 0。
IOU(intersection over union)为预测bounding box与物体真实区域的交集面积(以像素为单位,用真实区域的像素面积归一化到[0,1]区间)。
因此,YOLO网络最终的全连接层的输出维度是 SS(B5 + C)。YOLO论文中,作者训练采用的输入图像分辨率是448x448,S=7,B=2;采用VOC 20类标注物体作为训练数据,C=20。因此输出向量为77*(20 + 25)=1470维。作者开源出的YOLO代码中,全连接层输出特征向量各维度对应内容如下:

Loss函数
YOLO使用均方和误差作为loss函数来优化模型参数,即网络输出的SS*(B5 + C)维向量与真实图像的对应SS*(B*5 + C)维向量的均方和误差。如下式所示。
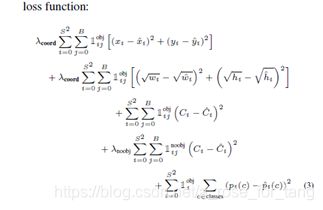 (分别为坐标误差+IOU误差+分类误差求和作为总的loss误差)
内部网络架构
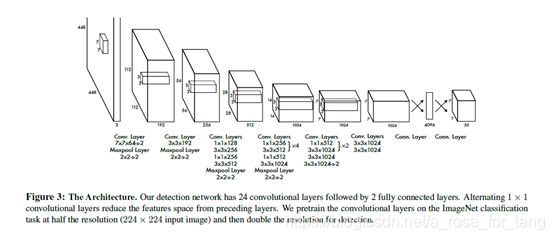
网络的初始卷积层从图像中提取特征,全连通层预测输出概率和坐标。有24层卷积层+2层全连接层。(yolov3有改进)
三、实验过程
- 实验环境
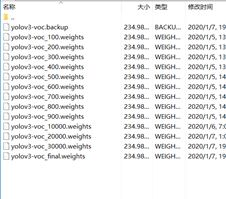
采用darknet(https://github.com/AlexeyAB/darknet)框架,系统为Ubuntu16环境下,gpu训练,python3.6编写脚本进行预数据数据处理以及得到最终结果。 - 训练过程
1.数据预处理:
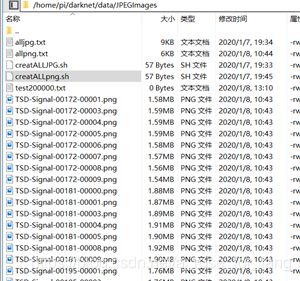
将所有的训练图片写入图片路径记录文本txt中,一行一个文件路径(绝对路径)。所使用的sh脚本为creatallpng.sh。(creatallpng.sh放在图片相同的路径下)脚本内容如下
#code
ls -R /home/pi/darknet/data/JPEGImages/*.png > allpng.txt
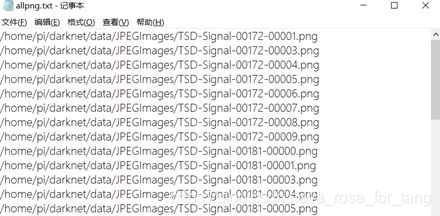
在该路径下运行该脚本,得到所有的图片的绝对路径。如下所示。
得到的txt为:
xml文件转换为txt格式
import xml.etree.ElementTree as ET
import pickle
import os
from os import listdir, getcwd
from os.path import join

sets=[('2018', 'train6336')]#读取要转换的xml的目录,这里只涉及训练集
#分为5类
classes = ["j", "z","s","l","d"]

#将xmin,ymin,xmax,ymax归一化到0-1之间

def convert(size, box):
    dw = 1./size[0]
    dh = 1./size[1]
    x = (box[0] + box[1])/2.0
    y = (box[2] + box[3])/2.0
    w = box[1] - box[0]
    h = box[3] - box[2]
    x = x*dw
    w = w*dw
    y = y*dh
    h = h*dh
    return (x,y,w,h)
#转换xml至txt
def convert_annotation(year, image_id):
    in_file = open('/home/wangxutao/darknet/voc/VOC%s/Annotations/%s.xml'%(year, image_id))
    #新生成的txt,写入到labels文件夹内
    out_file = open('/home/wangxutao/darknet/voc/VOC%s/labels/%s.txt'%(year, image_id), 'w')
    tree=ET.parse(in_file)
    root = tree.getroot()
    size = root.find('size')
    w = int(size.find('width').text)
    h = int(size.find('height').text)
    #该xml中的所有object的标签保存下来,一个一行
    for obj in root.iter('object'):
        difficult = obj.find('difficult').text
        cls = ((str)((obj.find('name')).text))[0]
        if (((int)(difficult)==1) or (cls not in classes)):continue
        cls_id = classes.index(cls)
        xmlbox = obj.find('bndbox')
        b = (float(xmlbox.find('xmin').text), float(xmlbox.find('xmax').text), float(xmlbox.find('ymin').text), float(xmlbox.find('ymax').text))
        bb = convert((w,h), b)
        out_file.write(str(cls_id) + " " + " ".join([str(a) for a in bb]) + '\n')

wd = getcwd()

for year, image_set in sets:
    if not os.path.exists('/home/wangxutao/darknet/voc/VOC%s/labels/'%(year)):
        os.makedirs('/home/wangxutao/darknet/voc/VOC%s/labels/'%(year))
    #读取所有的xml文件名,得到一个list
    image_ids = open('/home/wangxutao/darknet/voc/VOC%s/ImageSets/Main/%s.txt'%(year, image_set)).read().strip().split()
    list_file = open('%s_%s.txt'%(year, image_set), 'w')
    #一个一个处理image
    for image_id in image_ids:
        list_file.write('/home/wangxutao/darknet/voc/VOC%s/JPEGImages/%s.jpg\n'%(year, image_id))
        #变换xml到txt
        convert_annotation(year, image_id)
    list_file.close()
#finish
2.修改原框架步骤:
下载原框架
git clone https://github.com/pjreddie/darknet
cd darknet
修改makefile配置,使用GPU训练。
GPU=1 #如果使用GPU设置为1,CPU设置为0
CUDNN=1  #如果使用CUDNN设置为1,否则为0
OPENCV=0 #如果调用摄像头,还需要设置OPENCV为1,否则为0
OPENMP=0  #如果使用OPENMP设置为1,否则为0
DEBUG=0  #如果使用DEBUG设置为1,否则为0
CC=gcc
NVCC=/home/user/cuda-9.0/bin/nvcc #NVCC=nvcc 修改为自己的路径
执行make编译操作(在darknet目录下)
make
创建文件夹目录
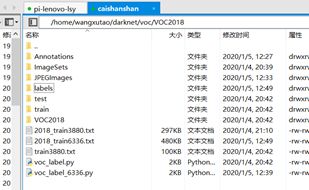
在darknet/voc/VOC2018目录下导入JPEGImages文件夹(内部保存训练图片),Annotations(内部保存所有的xml标签)
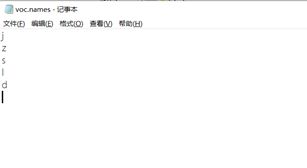
修改data下的voc.name文件。改为自定义的五类。
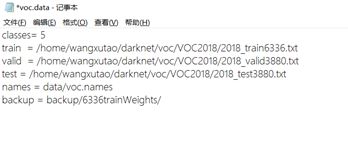
修改cfg文件夹下的voc.data文件,自定义训练集txt,即上面得到的alljpg.txt。
修改cfg/yolov3-voc.cfg
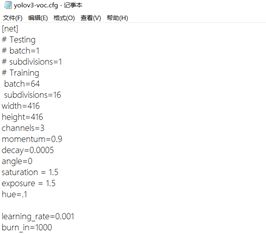
改为训练模式,并在此文件中搜索yolo,会出现三个yolo,我们需要将filters改成(classes+5)*3的数值,将classes改成自己的类别数,random=0为关闭多尺度训练。 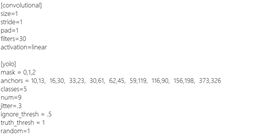
下载预训练模型
放在(darknet/scripts/文件目录下)
wget https://pjreddie.com/media/files/darknet53.conv.74
开始训练:
输入命令
./darknet detector train cfg/voc.data cfg/yolov3-voc.cfg scripts/darknet53.conv.74
./darknet detector test cfg/voc.data cfg/yolov3-voc.cfg backup/yolov3-voc_20000.weights xxx.jpg -out /darknet/data/testOut/xxx.txt
输出得到检测结果放在testout文件夹下。
如下所示:

对该命令进行批量测试,编写batch测试命令。
import os
import time
#start read txt on line by one line
for line in open('/home/pi/darknet/data/JPEGImages/allpng.txt'):
    print('start detect:------------',line)
    line =line.replace('\r\n','')
    line =line.replace('\n','')

    filepath =((str)(line))
    savefile =filepath.replace('/home/pi/darknet/data/JPEGImages/','')
    savefile =savefile.replace('.jpg','')
    savefile =savefile.replace('.png','')
    savefile =savefile.replace('.JPEG','')
    savefile =savefile.replace('.PNG','')
    savefile =savefile.replace('.JPG','')


    commond =str(' ./darknet detector test cfg/voc.data cfg/yolov3-voc.cfg backup/yolov3-voc_20000.weights {0}'.format(filepath))
    commond2 =str((commond)+str(r' -out data/testOut/{0}'.format(savefile)))+r'.txt'
    print(commond2)
    time.sleep(1)
    commond2=str(commond2)
    os.system(commond2)
    #time.sleep(3)#3s for stop wait for another img
#eachfile =
#os.system(' ./darknet detector test cfg/voc.data cfg/yolov3-voc.cfg backup/yolov3-voc.backup-15000 {0} -out data/testOut/{1}.txt'.format(eachfile,savefile))
得到批量结果:
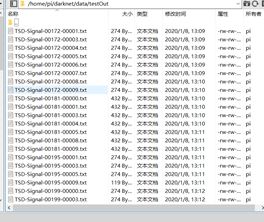
对结果进行处理得到规定格式的结果。编写pngchangetotxt.py 文件
import os
import  time

#find the path of picture
#like:
#/home/pi/darknet/data/JPEGImages/video2_33.jpg
#find all txt to change
'/home/pi/darknet/data/testImg/testALL.txt'
for line in open('/home/pi/darknet/data/JPEGImages/allpng.txt'):
    print('start detect',line)
    line =line.replace('\r\n','')
    line =line.replace('\n','')
    line =line.replace('.jpg','.txt').replace('.png','.txt').replace('.JPG','.txt').replace('JPEGImages','testOut')
    thistxt =str(line)


    for line in open(thistxt):
        #print('start find ',line)
        line =((str)(line))
        filename ='filename'
        class_id ='class_id'
        if filename in line :
            filename_start =(line.find(filename))+11
            filename_over =line.find(',')-1
            filename_path =str(line[filename_start:filename_over])
            print(filename_path)

    oldpath = '/home/pi/darknet/data/out/'
    filename_path =filename_path
    fileABSname = filename_path.replace('/home/pi/darknet/data/JPEGImages/','')
    savetxt = oldpath + (fileABSname.replace('.png', '.txt').replace('.jpg', '.txt').replace('JPG', '.txt'))
    if not os.path.exists(savetxt):
        os.mknod(savetxt)

    print(fileABSname)
    #how many bnd there is
    count =0
    for line in open(thistxt):
        #print('start find ',line)
        line =((str)(line))
        filename ='filename'
        class_id ='class_id'
        if class_id in  line :
            count =count+1

    print('there is {0} object in {1}'.format(count,fileABSname))
    num =0
    for line in open(thistxt):
        if num>=count:break
        line =((str)(line))
        filename ='filename'
        class_id ='class_id'
        if class_id in line :
            category=line[(line.find('name'))+7]
            center_x_start =line.find('center_x') +10
            center_x_over=line.find('center_x') + 18
            center_x=float(line[center_x_start:center_x_over])
            center_y_start = line.find('center_y') + 10
            center_y_over = line.find('center_y') + 18
            center_y = float(line[center_y_start:center_y_over])
            x_width_start =line.find('width') +7
            x_width_over =line.find('width') +15
            x_width =float(line[x_width_start:x_width_over])
            x_height_start = line.find('height') + 8
            x_height_over = line.find('height') + 15
            x_height= float(line[x_height_start:x_height_over])
            #get xmin ,xmax ,ymin,ymax
            #you change to really size you just *size here we get 1280*1024
            img_width =1280
            img_height =1024
            xmin =center_x - x_width
            xmin =int(xmin*img_width)

            xmax =center_x + x_width
            xmax =int(xmax*img_width)

            ymin =center_y - x_height
            ymin =int(ymin*img_height)

            ymax =center_y + x_height
            ymax =int(ymax*img_height)
            filename_path =str(line[filename_start:filename_over])
            #print(filename_path)
            #print(fileABSname+' '+ category+' '+str(xmin)+' '+str(ymin)+' '+str(xmax)+' '+str(ymax))
            writeline =fileABSname+' '+ category+' '+str(xmin)+' '+str(ymin)+' '+str(xmax)+' '+str(ymax)
            print(writeline)
            oldpath = '/home/pi/darknet/data/out/'
            savetxt =oldpath+(fileABSname.replace('.png','.txt').replace('.jpg','.txt').replace('JPG','.txt'))
            if not os.path.exists(savetxt):
                os.mknod(savetxt)
            with open(savetxt, "a+") as f:
                    print(f)
            f =open(savetxt,'a+')
            f.write(writeline+'\n')
            num =num+1
处理后的结果保存在darknet/data/out文件夹下,如下所示
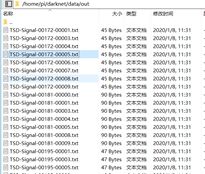
内部内容为

3. 实验结果
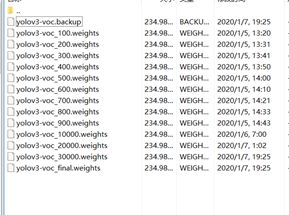
预训练设置3w次循环,得到预训练模型。
下面的图片为预测结果典型。
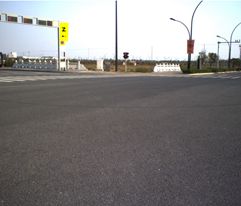
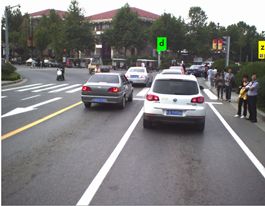
发现框架对较小的物体识别较好
自己实验的路标结果:
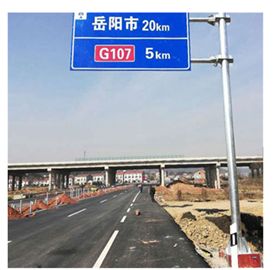
发现对残缺的交通标志识别效果较差。
对有的交通标志有遗漏的情况:
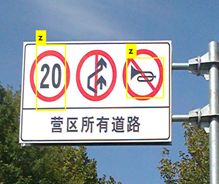

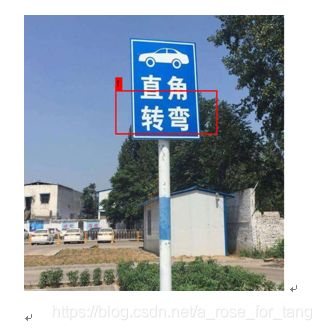
对较大尺寸的交通标志(且未出现过的训练集)识别效果也较差

对竖立的长方形标志定位效果不太好。(原因可能是训练集的数据大多数方形,平的长方形)
四、分析与总结
- 实验分析
实验涉及到许多环境的搭建等问题,关于预处理存在许多要处理的地方。基于论文进行自己实现难度较大,故采用darknet网络框架进行初步实验。实验采取训练集种类并不齐全,导致训练得到的模型会对有的交通标志无法识别,得到结果。且尺寸过大或过小(其实过小的标志人也无法识别)都无法得到准确识别。 - 心得体会
实验基于前人的经验,采取深度神经网络的方法,进行预训练加上测试。前期实验了普通的方法,采取颜色判别交通标志,效果较差,实际需要处理的情况较为复杂。神经网络的方法准确率较高,具备一定的实用性。但是网络训练等具备一定的硬件要求,且对训练数据的种类数量要求较高,这样才能保证后期的测试准确率。
参考文献
- 冯长华. 基于卷积神经网络的交通标志检测及识别[D].
- Redmon J , Divvala S , Girshick R , et al. You Only Look Once:Unified, Real-Time Object Detection[J]. 2015.
- 刘树艺,李静,胡春,王伟.基于卷积神经网络与集成学习的交通标志识别[J].计算机与现代化,2019(12):67-71+77.
- 龚祎垄,吴勇,陈铭峥.针对TT100K交通标志数据集的扩增策略[J].福建电脑,2019,35(11):70-71.
- Zhu Z , Liang D , Zhang S , et al. Traffic-Sign Detection and Classification in the Wild[C]// 2016 IEEE Conference on Computer
Vision and Pattern Recognition (CVPR). IEEE, 2016.
最后的最后,数据集丢在这吧。。。
地址:tangxiran.cn/film/大作业.zip
