Android开发必备——注解
前言
阅读官方源码以及各类第三方框架时可以发现,很多地方都有注解,作为一名Android程序员,掌握注解属于必不可少的一项技能。
1. 什么是注解
注解是以@符号开头的用来标识如类、字段、方法等的工具。说到注解,就不得不提另外一个概念——注释,两者其实都是做解释的功能,只不过注释是面向开发者,而注解则是针对程序。注解一般需要结合注解处理器或者反射等实现对应的功能,否者将没有实际的意义。两者的区别如下:
- 定义不同:
注解:英名为Annotation,它是JDK1.5及以后版本引入的一个特性。 与类、接口、枚举是在同一个层次,可以成为java 的一个类型。用一个词描述注解------元数据,它是一种描述数据的数据。所以,可以说注解就是源代码的元数据。
注释:是对源代码作介绍、评议或说明的文字。 - 作用不同:
注解是Java 编译器可以理解的部分,是给编译器看的。通过标记包、类、字段、方法、局部变量、方法参数等元素据,告诉jvm这些元素据的信息。
注释是程序员对源代码做一些记忆或提示性描述,是给人来看的。它能告诉开发者这段代码的逻辑、说明、特点等内容,对代码起到解释、说明的作用。
2. 元注解
元注解是由Java提供的一套用来注解其他注解的基础注解,听起来可能有点绕,其实就是Java编译器在对注解做处理的时候需要知道该注解的时效性、作用范围等一些信息,于是提供了一套用来对注解做限定的工具——元注解。
JDK1.5加入的元注解有如下:
- @Target:指定注解的作用范围
- @Retention:指定注解的作用时机
- @Inherited:被该注解修饰的注解,作用在某个类上,该类的此注解可以被子类继承
- @Documented:不常用,给Javadoc配置的,这里略过
2.1 @Target
此元注解用来指定注解的作用范围,参数如下:
- ElementType.TYPE:类、接口(包括注解类型)或枚举声明
- ElementType.FIELD:字段声明(包括枚举常量)
- ElementType.METHOD:方法声明
- ElementType.PARAMETER:形参声明
- ElementType.CONSTRUCTOR:构造函数声明
- ElementType.LOCAL_VARIABLE:局部变量声明
- ElementType.ANNOTATION_TYPE:注解类型声明
- ElementType.PACKAGE:包声明
- ElementType.TYPE_PARAMETER:类型参数声明——JDK1.8加入
- ElementType.TYPE_USE:类型的使用——JDK1.8加入
- ElementType.MODULE:模块声明——JDK1.9加入
2.2 @Retention
此元注解用来指定注解的作用时机,也就是说注解是在什么阶段有效,参数如下:
- RetentionPolicy.SOURCE:指定注解只在源码阶段有用,编译器编译之后将会丢弃,这类型的注解一般用来做代码限制或者提示等。如
Override用来提示方法重写了父类的方法,如果在没有重写父类方法的方法上面使用此注解,编译器会报错。 - RetentionPolicy.CLASS:指定注解将由编译器记录在类文件中,但在运行时虚拟机不会保留,如果不指定@Retention,此为@Retention默认的参数。Android中经常用到一些方法参数的限制中,如
LayoutRes、NonNull、IntRange等。 - RetentionPolicy.RUNTIME:指定注解会被编译器记录在类文件中,并在运行时虚拟机会保留,因此它们可以在程序运行时读取。
2.3 @Inherited
此元注解主要用来指定注解是否可以被继承,下面我们通过一个例子进行解释。
// 被@Inherited注解了的注解
@Inherited
@Retention(RetentionPolicy.RUNTIME)
@Target(ElementType.TYPE)
public @interface ExAnn {
}

// 没有@Inherited
@Retention(RetentionPolicy.RUNTIME)
@Target(ElementType.TYPE)
public @interface NoExAnn {
}
上面定义了两个注解,两者都是属于运行时可以获取,唯一的区别是@ExAnn使用了@Inherited
// 父类使用了上面两个注解
@ExAnn
@NoExAnn
public class Parent {
}

// 子类继承了父类,但是没有任何实现
public class Child extends Parent {
}
然后我们通过子类获取注解信息,测试代码如下:
private void test() {
    Annotation[] annotations = Child.class.getAnnotations();
    System.out.println("-----start-----");
    for (Annotation annotation : annotations) {
        System.out.println(annotation.toString());
    }
    System.out.println("------end------");
}
运行以上代码,最终会打印
System.out: -----start-----
System.out: @com.payne.annotation.demo.ExAnn()
System.out: ------end------
通过以上打印可以发现:父类里面的注解如果有被@Inherited注解,其子类才可以获取到父类的注解。
3. 自定义注解
3.1 运行时注解
以前在Android开发过程中,我们经常会使用到findViewById去获取View,大量的视图控件意味着我们会去重复多次使用findViewById,以至于后面出现了第三方框架ButterKnife,下面以findViewById做示例。
- 首先创建一个注解类,创建的注解类和接口有点像,只不过在
interface前面多了一个@符号,如下:
@Retention(RetentionPolicy.RUNTIME)
@Target({ElementType.FIELD, ElementType.METHOD})
public @interface BindView {
    int value();
}
- 其次在测试类中使用,代码如下:
public class MainActivity extends AppCompatActivity {

    @BindView(R.id.tv_show)
    TextView tvShow;

    @Override
    protected void onCreate(Bundle savedInstanceState) {
        super.onCreate(savedInstanceState);
        setContentView(R.layout.activity_main);
        processView(this);
        tvShow.setText("赋值成功");
    }

    /**
     * 反射处理findViewById
     */
    public static void processView(Activity activity) {
        // 获取Activity中所有的字段
        Field[] fields = activity.getClass().getDeclaredFields();
        if (fields == null) {
            return;
        }
        // 遍历字段数组,找到带有BindView注解的字段
        for (Field field : fields) {
            BindView bindView = field.getAnnotation(BindView.class);
            if (bindView == null) {
                continue;
            }
            // 获取注解值——即ViewID
            int value = bindView.value();
            // 通过ViewID找到View
            View viewById = activity.findViewById(value);
            try {
                // 给字段View赋值
                field.set(activity, viewById);
            } catch (IllegalAccessException e) {
                e.printStackTrace();
            }
        }
    }
}
下面是运行效果:
可以看到并没有直接给tvShow设置findViewById,但是运行之后TextView依然被成功设置为"赋值成功"。这是因为运行时在processView方法中通过反射获取并设值。
3.2 编译时注解
反射使用多了比较影响性能,翻看ButterKnife、Retrofit等第三方框架源码我们也能发现其并不是通过运行时反射赋值,而是通过编译工具在编译期间就对注解进行了处理,而处理注解需要使用到注解处理器,那什么是注解处理器呢?
注解处理器:英文为Annotation Processor,顾名思义,是用来处理注解的工具,其基本原理是将自定义注解处理器注册到编译器,编译器在编译阶段会去执行注册了的自定义注解处理器,完成对应的代码注入。
实现自定义注解处理器主要分为三步:
- 编写注解。
- 编写继承自
javax.annotation.processing包下的AbstractProcessor类的自定义注解处理器。 - 将自定义注解处理器注册到编译器。
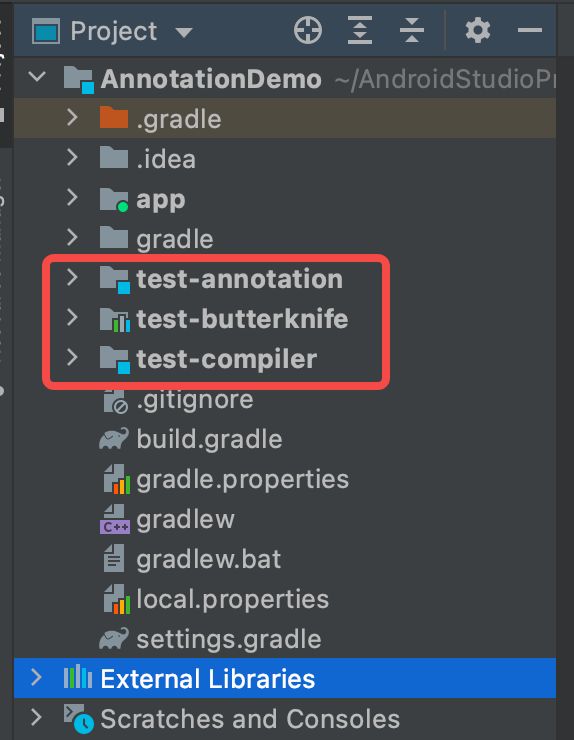
下面是自定义注解处理器的实现示例:

如上图,示例主要包括两个Java module和一个Android module。
- test-annotation:Java module,主要用来存放自定义注解。
- test-compiler:Java module,主要存放继承自
AbstractProcessor类的自定义注解处理器类。 - test-butterknife:Android module,主要存放工具类,用来反射获取编译器根据注解处理器生成的类。
3.2.1 定义注解
test-annotation模块下定义一个需要处理的注解类BindView
@Retention(RetentionPolicy.CLASS)
@Target({ElementType.FIELD})
public @interface BindView {
    int value();
}
3.2.2 实现注解处理器
public class AnnotationCompiler extends AbstractProcessor {

    /**
     * 设置支持的源版本,默认为RELEASE_6
     * 两种方式设置版本:
     * 1. 此处返回指定版本
     * 2. 类上面设置SupportedSourceVersion注解,并传入版本号
     */
    @Override
    public SourceVersion getSupportedSourceVersion() {
        return SourceVersion.latestSupported();
    }

    /**
     * 设置支持的注解类型,默认为空集合(都不支持)
     * 两种方式设置注解集合:
     * 1. 此处返回支持的注解集合
     * 2. 类上面设置SupportedAnnotationTypes注解,并传入需要支持的注解
     */
    @Override
    public Set getSupportedAnnotationTypes() {
        Set types = new HashSet<>();
        types.add(BindView.class.getCanonicalName());
        return types;
    }

    /**
     * 初始化操作
     *
     * @param processingEnv 环境
     */
    @Override
    public synchronized void init(ProcessingEnvironment processingEnv) {
        super.init(processingEnv);
    }

    /**
     * 处理注解
     *
     * @param set              待处理的注解集合
     * @param roundEnvironment RoundEnvironment
     * @return 返回true表示后续处理器不再处理
     */
    @Override
    public boolean process(Set set, RoundEnvironment roundEnvironment) {
        Set elements = roundEnvironment.getElementsAnnotatedWith(BindView.class);
        //TypeElement->类    ExecutableElement->方法   VariableElement->属性
        Map> map = new HashMap<>(16);
        for (Element element : elements) {
            //属性元素
            VariableElement variableElement = (VariableElement) element;
            //获取类名
            String activityName = variableElement.getEnclosingElement().getSimpleName().toString();
            //根据类名将属性元素保存在集合中
            List variableElements = map.get(activityName);
            if (variableElements == null) {
                variableElements = new ArrayList<>();
                map.put(activityName, variableElements);
            }
            variableElements.add(variableElement);
        }

        if (map.size() > 0) {
            for (String activityName : map.keySet()) {
                //根据类名获取属性元素集合
                List variableElements = map.get(activityName);
                //获取类元素
                TypeElement enclosingElement = (TypeElement) variableElements.get(0).getEnclosingElement();
                //获取类的包名
                String packageName = processingEnv.getElementUtils().getPackageOf(enclosingElement).toString();
                //生成对应的类
                generateClass(variableElements, packageName, activityName);
            }
        }
        return false;
    }

    /**
     * 根据注解信息生成对应的类,本方法中手动生成类文件内容
     * 我们还可以使用第三方工具JavaPoet优雅的生成,具体参考地址:https://github.com/square/javapoet
     *
     * @param variableElements 设置了对应注解的属性元素的集合
     * @param packageName      包名
     * @param activityName     类名
     */
    private void generateClass(List variableElements, String packageName, String activityName) {
        Writer writer = null;
        try {
            JavaFileObject sourceFile = processingEnv.getFiler().createSourceFile(packageName + "." + activityName + "_ViewBinding");
            writer = sourceFile.openWriter();
            //包名
            writer.write("package " + packageName + ";\n");
            //导入包
            writer.write("import com.payne.buf.IBinder;\n");
            //类名以及实现的接口名
            writer.write("public class " + activityName + "_ViewBinding implements IBinder<"
                    + packageName + "." + activityName + "> {\n");
            //实现接口中的方法
            writer.write("  @Override\n");
            writer.write("  public void bind(" + packageName + "." + activityName + " target) {\n");
            //遍历属性元素集合,根据信息生成findViewById操作
            for (VariableElement variableElement : variableElements) {
                String variableName = variableElement.getSimpleName().toString();
                int id = variableElement.getAnnotation(BindView.class).value();
                TypeMirror typeMirror = variableElement.asType();
                writer.write("      target." + variableName + " = (" + typeMirror + ") target.findViewById(" + id + ");\n");
            }
            writer.write("  }\n");
            writer.write("}\n");
        } catch (IOException e) {
            e.printStackTrace();
        } finally {
            if (writer != null) {
                try {
                    writer.close();
                } catch (IOException e) {
                    e.printStackTrace();
                }
            }
        }
    }
}
3.2.3 注册注解处理器
有两种方法将自定义注解处理器注册到编辑器。
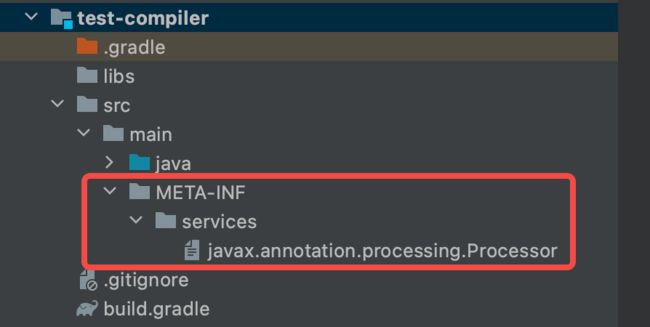
- 手动注册:在test-compiler模块下的
src/main/目录下创建META-INF/services/子目录,并创建文件名为javax.annotation.processing.Processor的文件,文件名是Processor类的全路径名,如下图:


文件中加入自定义注解处理器的全路径名com.payne.annotation.test_compiler.AnnotationCompiler,如下图:

- 自动注册:依赖于Google的工具框架。
首先在test-compiler模块下的build.gradle中加入依赖框架,然后在自定义注解处理器类上面添加@AutoService(Processor.class)注解即可。
implementation 'com.google.auto.service:auto-service:1.0'
annotationProcessor 'com.google.auto.service:auto-service:1.0'

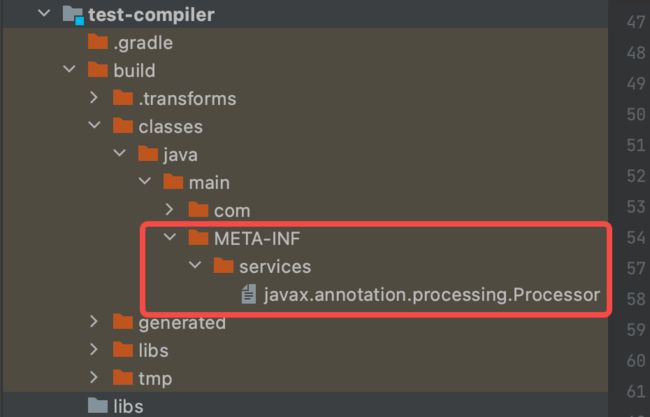
编译之后可以发现test-compiler模块下的build文件夹中自动生成了和我们手动注册一样的文件。

最后在test-butterknife模块下提供IBinder接口以及findViewById的绑定类供App调用。
public interface IBinder {
    void bind(T target);
}
public class PayneButterKnife {
    @SuppressWarnings("unchecked")
    public static void bind(Activity activity) {
        String name = activity.getClass().getName() + "_ViewBinding";
        try {
            Class aClass = Class.forName(name);
            IBinder iBinder = (IBinder) aClass.newInstance();
            iBinder.bind(activity);
        } catch (Exception e) {
            e.printStackTrace();
        }
    }
}
4. 小结
- 注释面向开发者,注解面向程序。
- 可以通过
Target元注解设置注解的作用范围,Retention元注解设置注解的作用时机。 - 源码时注解主要作用源码阶段,编译则被舍弃,主要面向编辑器等开发工具,用来在开发阶段提示开发者或者限制开发者使用范围。
- 编译时注解主要作用于编译阶段,编译之后则被舍弃,主要面向编译器,可以根据注解信息生成对应的类。
- 运行时注解主要作用于运行阶段,注解信息运行时依然存在,可以通过反射获取使用。
