SpringBoot
SpringBoot
SpringBoot介绍
1.SpringBoot是Spring的全家桶,SpringBoot是用来简便Spring应用开发的,约定大于配置,去繁从简,just run就能创建一个独立的,产品级别的应用
2.背景:J2EE笨重的开发、繁多的配置、低下的开发效率、复杂的部署流程、第三方技术集成难度大,所以现在程序员都是用SpringBoot开发,简化了很多很多步骤,和配置文件和依赖
3.优点
快速搭建项目,简化spring开发
内嵌了tomcat服务器,无序程序员手动部署
自定义启动器,完成自动装配
大量的自动配置
无xml配置文件,使用yaml格式的文件处理效果好
SpringBoot入门程序
创建一个SpringBoot工程
1.创建maven工程,勾选webapp骨架
2.导入依赖
<dependencies>
        <dependency>
            <groupId>org.springframework.bootgroupId>
            <artifactId>spring-boot-starter-webartifactId>
        dependency>

        <dependency>
            <groupId>org.springframework.bootgroupId>
            <artifactId>spring-boot-devtoolsartifactId>
            <scope>runtimescope>
            <optional>trueoptional>
        dependency>
        <dependency>
            <groupId>org.springframework.bootgroupId>
            <artifactId>spring-boot-configuration-processorartifactId>
            <optional>trueoptional>
        dependency>
        <dependency>
            <groupId>org.springframework.bootgroupId>
            <artifactId>spring-boot-starter-testartifactId>
            <scope>testscope>
        dependency>
 dependencies>
3.编写主类
@SpringBootApplication
public class HelloSpringBootApplicatio(){

		public static void main(String[] args){
		SpringApplication.run(HelloSpringBootApplication,args);
		}

}
4.运行,通过浏览器测试
使用IDEA创建SpringBoot工程
1.勾选想要的模块
2.手动创建源码文件夹、配置文件夹、测试类文件夹
SpringBoot加载原理
@SpringBootApplication
public class SpringBootTest{
	public static void main (String[] args){
		SpringApplication.run(SpringBootTest.class,args);
	}
}
@SpringBootApplication是一个主启动类注解:
1.@SpringBootConfiguration配置类
1.1@Configuration用这个注解修饰的类是SpringBoot的配置类
2.@EnableAutoConfiguration
2.1@AutoConfigurationPackage
	@Import({Register.class})
	public @interface AutoConfigurationPackage{
		String[] basePackages()default{}; //这代表了当前主启动类下面的子包都会被扫描,主类必须高于所有子包一级
		Class<?>[] basePackageClasses() defalut{};}
2.2@Import({AutoConfigurationImportSelector.class)}导入了一个自动配置选择器
2.2.1AutoConfigurationImportSelector
protected List<AutoConfigurationImportFilter> getAutoConfigurationImportFilters() {
        return SpringFactoriesLoader.loadFactories(AutoConfigurationImportFilter.class, this.beanClassLoader);
    }
//这个类下的属性FACTORIES_RESOURCE_LOCATION的值就是你当前需要加载的类
public final class SpringFactoriesLoader{
	public static final String FACTORIES_RESOURCE_LOCATION = "META-INF/spring.factories";
	}
//这个文件位置:
E:\mavenlocal\org\springframework\boot\spring-boot-autoconfigure\2.6.1\spring-boot-autoconfigure-2.6.1.jar!\META-INF\spring.factories

这个文件中有很多类,以下只是一小部分:
webMvc的自动装配,这个类中实例化处理器映射器、处理器适配器、视图解析器不需要手动配置类,自动配置org.springframework.boot.autoconfigure.web.servlet.webMvcAutoConfiguration
如果后期我们要拓展一个 interceptor,那我们就要拓展这个类,在这个类的基础上继续添加内容。

字符集的自动配置,在之前Springmvc时候需要在web.xml中配置字符集过滤器,现在不用了,org.springframework.boot.autoconfigure.web.servlet.HttpEncodingAutoConfiguration
	@ConditionalOnProperty(
        prefix = "server.servlet.encoding",
        value = {"enabled"},
        matchIfMissing = true
    )
    public class HttpEncodingAutoConfiguration {
        private final Encoding properties;

        public HttpEncodingAutoConfiguration(ServerProperties properties) {
            this.properties = properties.getServlet().getEncoding();
        }
    }
ServerProperties:这个类就是springboot默认的配置参数,自动装配默认参数
@ConfigurationProperties( 	这个注解修饰的类可以将配置文件的内容直接赋值给类的属性
      prefix = "server",
      ignoreUnknownFields = true
  )
  public class ServerProperties {
      private Integer port;
      private InetAddress address;
  }
这个类是SpringMVC的前台控制器,无需配置在web.xml中了,SpringBoot已经帮助我们配置好了 org.springframework.boot.autocconfigure.web.servlet.DispatcherServletAutoConfiguration
org.springframework.boot.autoconfigure.web.servlet.ServletWebServerFactoryAutoConfiguration
    3.@ComponentScan 扫描器
SpringBoot的依赖传递
我们在开发时需要导入这个依赖,这个依赖下有子依赖
<parent>
	<groupId>org.springframework.bootgroupId>
        <artifactId>spring-boot-starter-parentartifactId>
        <version>2.6.1version>
        <relativePath/>
parent>
子依赖,这个依赖下包含了所有SpringBoot默认的依赖,如果不够用,再自行导入
<parent>
    <groupId>org.springframework.bootgroupId>
    <artifactId>spring-boot-dependenciesartifactId>
    <version>2.6.1version>
parent>
这些starters几乎涵盖了javaee所有常用场景,SpringBoot对这些场景依赖的jar也做了严格的测试与版本控制,我们不必担心jar版本合适度问题
SpringBoot的配置文件
SpringBoot支持两种全局配置文件:功能是一模一样的,就是写法不同,可视化不同
1.application.properties(默认的)
server.port=8081
server.address=192.168.200.128
spring.thymeleaf.cache=false
spring.thymeleaf.prefix=classpath:/haha
spring.thymeleaf.encoding=UTF-8
spring.mvc.hiddenmethod.filter.enabled=true
2.aplication.yaml(新格式)yml格式的缩进必须加空格
#配置tomcat服务器的端口号
server:
  port: 8081  #这个必须加空格

#配置 springmvc的 RESTful 风格的请求方式
#spring:
#  mvc:
#    hiddenmethod:
#      filter:
#        enabled: true
3.配置好后,运行springboot:
2021-12-02 14:47:20.176  INFO 9100 --- [           main] o.s.b.w.embedded.tomcat.TomcatWebServer  : Tomcat started on port(s): 8081 (http) with context path ''
2021-12-02 14:47:20.204  INFO 9100 --- [           main] com.oracle.Springboot02Application      : Started Springboot02Application in 5.62 seconds (JVM running for 11.552)
YAML的语法结构
1.YAML基本语法
- 使用缩进表示
- 缩进时不允许使用tab键,只允许使用空格
- 缩进的空格数目不重要,只要相同层级的元素左侧对齐即可
- 大小写敏感
例如:
spring:
#配置数据库连接参数
  datasource:
    url: jdbc:mysql://localhost:3306?mysql?characterEncoding=UTF8
    driver-class-name: com.mysql.jdbc.Driver
    username: root
    password: root
Person.java
package com.oracle.pojo;

import org.springframework.boot.context.properties.ConfigurationProperties;
import org.springframework.context.annotation.Configuration;
import org.springframework.stereotype.Component;

import java.util.*;

/**
 *  spring的依赖注入有几种方式?
 *      1.构造器注入
 *      2.setter 方法注入
 *      3.p命名空间注入
 *      4.c命名空间注入
 */
@Component  //将Person 加载到Ioc容器中
@ConfigurationProperties(
        prefix = "person"
)
public class Person {

    private Integer pid;

    public Integer getPid() {
        return pid;
    }

    public void setPid(Integer pid) {
        this.pid = pid;
    }


    @Override
    public String toString() {
        return "Person{" +
                "pid=" + pid +
                '}';
    }
}
application.yml:
person:
  pid: 1
  lastName: "admin"
  age: 23
  address: 哈尔滨
  birth: 1999/09/08

  pet:
    name: 大黄
    age: 2

  hobbys:
    - 篮球
    - 羽毛球
    - 台球
  list:
    - 李四
    - 王五
  set: [1,2,3,4,5,56]
  map: {1: v1,2: v2}
单元测试:
@SpringBootTest
@SpringBootTest
class Springboot02ApplicationTests {
  	//自动注入Person实体,直接输出person对象,会在控制台上打印Person的toString方法
  	//你会观察到,配置文件中的数据,赋值到了Person对象的属性中
    @Autowired
    Person person;

    @Test
    void contextLoads() {
        System.out.println(person);
        Pet pet = person.getPet();
    	System.out.println(pet);
    }
}
运行结果:
Person{pid=1, lastName='admin', age=23, address='哈尔滨', birth=Wed Sep 08 00:00:00 CST 1999, hobbys=[篮球, 羽毛球, 台球], list=[李四, 王五], set=[1, 2, 3, 4, 5, 56], map={1=v1, 2=v2}}
Pet{name='大黄', age=2}
总结:application.yml,application.properties都是通过属性的setter方法给实体赋值的;给实体类赋值的话,要在实体类上面加上@ConfigurationProperties(prefix="person“)注解。要是给单个属性赋值用@Value。
@Value和@ConfigurationProperties获取值比较
| @ConfigurationProperties | @Value | |
|---|---|---|
| 功能 | 批量注入配置文件中的值给实体的属性 | 一个一个的指定 |
| 松散绑定(松散语法) | 支持 | 支持 |
| SpEL表达式(Spring Expression Language) | 不支持 | 支持 |
| JSR303数据校验 就是一批注解 | 支持 | 不支持 |
| 复杂数据类型,List,Set,Pet, Map | 支持 | 不支持 |
@Component //将当前的Person类放到spring的Ioc容器
@ConfigurationProperties(
        prefix = "person"
)
@Validated
public class Person {
	//@Value("${person.pid}")
    private Integer pid;
    //@Value("${person.last-name}")
    private String lastName;
    //@Value("#{2*4}")
    private Integer age;
    @Email   //JSR303 数据校验
    private String email;	//必须是邮箱格式
}
@PropertySource注解:这个注解的作用是用来加载指定配置文件的,但是application.yml优先级高
只支持xxx.properties文件,不支持person.yml文件(无效)
@PropertySource(Value= {"classpath:person.properties"})//只针对xxx.properties文件有效
	public class Person{
	}
@ImportResource:默认情况下SpringBoot是没有xml配置文件的,但是他可以引入那个需要这个注解
@ImportResource(location = {"classpath:beans.xml"})
public class Person{}
<beans xmlns="http://www.springframework.org/schema/beans"
       xmlns:xsi="http://www.w3.org/2001/XMLSchema-instance"
       xmlns:context="http://www.springframework.org/schema/context"
       xmlns:aop="http://www.springframework.org/schema/aop"
       xsi:schemaLocation="http://www.springframework.org/schema/beans
        https://www.springframework.org/schema/beans/spring-beans.xsd
        http://www.springframework.org/schema/context
        https://www.springframework.org/schema/context/spring-context.xsd
        http://www.springframework.org/schema/aop
        https://www.springframework.org/schema/aop/spring-aop.xsd">

    <bean id="userServiceImpl" class="com.oracle.serviceImpl.UserServiceImpl">bean>

beans>
@SpringBootTest
class SpringbootConfigApplicationTests {

    @Autowired
    private UserServiceImpl userService;

    @Test
    void contextLoads() {
        userService.login();
    }
}
SpringBoot默认是不推荐使用xml格式添加需求的,他推荐你使用给容器添加组件的方式添加功能,其实就是全注解形式
1.编写配置类@Configuration—>替换Spring的beans.xml配置文件
2.使用@Bean注解给容器添加组件
@Configuration  //替换spring的beans.xml配置文件吗
public class MyConfig {
    @Bean
    public UserServiceImpl userService(){
        System.out.println("配置类@Bean给容器添加了自定义的组件~~~");
        return new UserServiceImpl();
    }
 	//如果springboot需要整合持久层框架,需要用到数据源的化,通过@Bean形式添加进去即可
    @Bean
    public DruidDataSource dataSource(){
        return new DruidDataSource();
    }
}
运行结果:
  .   ____          _            __ _ _
 /\\ / ___'_ __ _ _(_)_ __  __ _ \ \ \ \
( ( )\___ | '_ | '_| | '_ \/ _` | \ \ \ \
 \\/  ___)| |_)| | | | | || (_| |  ) ) ) )
  '  |____| .__|_| |_|_| |_\__, | / / / /
 =========|_|==============|___/=/_/_/_/
 :: Spring Boot ::                (v2.6.1)

2021-12-03 10:41:34.085  INFO 1056 --- [           main] c.o.SpringbootConfigApplicationTests     : Starting SpringbootConfigApplicationTests using Java 1.8.0_77 on DESKTOP-AF2G3H5 with PID 1056 (started by If_You in C:\Users\GaoYuanze\IdeaProjects\springboot_config)
2021-12-03 10:41:34.087  INFO 1056 --- [           main] c.o.SpringbootConfigApplicationTests     : No active profile set, falling back to default profiles: default
****配置类@Bean给容器添加了自定义的组件~~~**** 这里说明了我们springboot容器启动时就直接加载了
2021-12-03 10:41:36.225  INFO 1056 --- [           main] c.o.SpringbootConfigApplicationTests     : Started SpringbootConfigApplicationTests in 3.293 seconds (JVM running for 6.937)

Person{pid=1, lastName='Tom', age=23, address='±³¾°', birth=null, email='null', hobbys=null, list=null, set=null, map=null}
我是登录方法
配置文件的占位符
1.随机数:SpringBoot配置文件中支持随机数
${random.uuid} ,${random.int(10)} 10以内的随机数
${random.long}
person:
  pid: 1
  last-name: admin${random.uuid}
  age: ${random.int(11)}
SpringBoot多文件配置profies
SpringBoot支持在不同场景下加载不同的配置文件,从而达到最终的效果,有开发模式、测试模式(对程序的要求极其严格)、上线模式。
编写配置文件格式,命名方式为:application-自定义.properties/yaml,其中一定要含有一个住配置文件
1.例如:
properites格式
application-dev.properties 开发模式
application-test.properties 测试模式
application-run.properties; 上线模式
spring.profiles.active=dev 激活需要指定的配置文件即可 ,激活开发模式的配置文件
2.yml格式
#第一行相当于主配置文件
#默认是8080
server:
  port: 8080
spring:
  prfiles:
    active: dev #主配置文件激活想要激活的环境配置文件
---
server:
 port: 8081
#开发环境
spring:
  profiles: dev #定义为那个环境的配置
---
server:
  port: 8082
# 测试环境
spring:
  profiles: test   #定义为哪个环境 ,测试环境
多文件所在的位置
SpringBoot在启动时会扫描以下位置的application.properties文件或application.yml的文件作为SpringBoot的默认配置文件
public class ConfigFileApplicationListener implements EnvironmentPostProcessor , SmartApplicationListener ,Ordered{
	private static final String DEFAULT_SEARCH_LOCATIONS="classpath:/,classpath:/config/,file:./,file:./config/";
	}
-file:./config/
-file:./
-classpath:./config/
-classpath:./
以上就是SpringBoot配置文件优先级加载顺序,从高到低,优先级高的会覆盖优先级低的配置
SpringBoot整合Web
web资源是SpringBoot自动整合,因为他是自动装配,就是SpringBoot自动配置的jar包中的spring.factories文件中配置了WebMvcAutoConfiguration,其中jar包中xxxAutoConfiguration就是帮助我们向容器中添加组件
处理器映射器:
@Bean
@Primary
public ReqeustMappingHandlerMapping requestMappingHandlerMapping(@Qualifier("mvcContentNegotiationManager") ContentNegotiationManager contentNegotiationManager, @Qualifier("mvcConversionService") FormattingConversionService conversionService, @Qualifier("mvcResourceUrlProvider") ResourceUrlProvider resourceUrlProvider){
return super.requestMappingHandlerMapping(contentNegotiationManager, conversionService, resourceUrlProvider);}
处理器适配器:
@Bean
public RequestMappingHandlerAdapter requestMappingHandlerAdapter(@Qualifier("mvcContentNegotiationManager") ContentNegotiationManager contentNegotiationManager, @Qualifier("mvcConversionService") FormattingConversionService conversionService, @Qualifier("mvcValidator") Validator validator) {
  RequestMappingHandlerAdapter adapter = super.requestMappingHandlerAdapter(contentNegotiationManager, conversionService, validator);
  adapter.setIgnoreDefaultModelOnRedirect(this.mvcProperties == null || this.mvcProperties.isIgnoreDefaultModelOnRedirect());
  return adapter;
}
视图解析器:
@Bean
@ConditionalOnMissingBean
public InternalResourceViewResolver defaultViewResolver() {
  InternalResourceViewResolver resolver = new InternalResourceViewResolver();
  resolver.setPrefix(this.mvcProperties.getView().getPrefix());
  resolver.setSuffix(this.mvcProperties.getView().getSuffix());
  return resolver;
}
一上类使用@Bean注解,将各个类添加到spring的Ioc容器中
|—EnableWebMvcConfiguration 开启mvc的配置文件 静态内部类
|—WebMvcProperties::日期格式化 xxxProperties这个类是为了封装配置文件的内容
|-- WebProPerties: xxxProperties这个类是为了封装配置文件的内容
|–Resources
public static class Resources {
  private static final String[] CLASSPATH_RESOURCE_LOCATIONS =
    new String[]{"classpath:/META-INF/resources/", "classpath:/resources/","classpath:/static/", 						"classpath:/public/"};
创建SpringBoot的Web项目
一、创建工程是需要选中的依赖
1.devTools开发工具
2.congfiguration-process
3.springWeb
4.Thymeleaf
二、导入静态资源
css,js,jquert内容存放在static文件夹下,html页面放在template
@Configuration(
    proxyBeanMethods = false
)
@EnableConfigurationProperties({ThymeleafProperties.class})
@ConditionalOnClass({TemplateMode.class, SpringTemplateEngine.class})
@AutoConfigureAfter({WebMvcAutoConfiguration.class, WebFluxAutoConfiguration.class})
public class ThymeleafAutoConfiguration {
    public ThymeleafAutoConfiguration() {
    }
}
@ConfigurationProperties(
    prefix = "spring.thymeleaf"
)
public class ThymeleafProperties {
    private static final Charset DEFAULT_ENCODING;
    public static final String DEFAULT_PREFIX = "classpath:/templates/";
    public static final String DEFAULT_SUFFIX = ".html";
    private boolean checkTemplate = true;
    private boolean checkTemplateLocation = true;
    private String prefix = "classpath:/templates/";
    private String suffix = ".html";
}
SpringBoot多静态资源的映射规则
1.默认情况下加载本地文件,就是static文件夹下的
2.SpringBoot支持webjars映射,这是WebMvcAutoConfiguration类
public void addResourceHandlers(ResourceHandlerRegistry registry) {
            if (!this.resourceProperties.isAddMappings()) {
                logger.debug("Default resource handling disabled");
            } else {
                this.addResourceHandler(registry, "/webjars/**", "classpath:/META-INF/resources/webjars/");
                this.addResourceHandler(registry, this.mvcProperties.getStaticPathPattern(), (registration) -> {
                 registration.addResourceLocations(this.resourceProperties.getStaticLocations());
                    if (this.servletContext != null) {
                        ServletContextResource resource = new ServletContextResource(this.servletContext, "/");
                        registration.addResourceLocations(new Resource[]{resource});
                    }

                });
            }
 }
<dependency>
  <groupId>org.webjarsgroupId>
  <artifactId>jqueryartifactId>
  <version>3.4.1version>
dependency>
index.html
<head>
		<meta http-equiv="Content-Type" content="text/html; charset=UTF-8">
		<meta name="viewport" content="width=device-width, initial-scale=1, shrink-to-fit=no">
		<meta name="description" content="">
		<meta name="author" content="">
		<title>Signin Template for Bootstraptitle>

		<link href="@{asserts/css/bootstrap.min.css}" rel="stylesheet">

		<link href="@{webjars\jquery\3.4.1\jquery.js}" rel="stylesheet">
head>
Thymeleaf模板引擎
jsp(java Server Pag)Java服务页面,属于动态页面,通过EL表达式,JSTL标签库从后台获取数据值,但是SpringBoot不推荐使用jsp,因为性能不是很好,加载速度慢,每次加载页面都需要重新渲染,但是模板引擎不用。
模板引擎种类:
JSP,Velocity(Apache研发),Freemarker(个人研发),Thymeleaf(SpringBoot推荐)
1.引入Thymeleaf依赖
<dependency>
  <groupId>org.springframework.bootgroupId>
  <artifactId>spring-boot-starter-thymeleafartifactId>
dependency>
2.在HTML页面中引入头信息
<html lang="en" xmlns:th="http://www.thymeleaf.org">
  	......
html>
3.Thymeleaf语法:表达式写法
@{  }	超链接,或者跳转路径
${   } 获取变量的,无论是文本变量还是对象变量${user.nalme}
*{   } 当前对象,变量属性 可以省略对象*{uname
#{   } 国际话内容
~{   }片段引入,页面布局
UserController
@Controller
public class UserController {

    @RequestMapping("/index")
    public String index(){
        return "index";
    }

    @RequestMapping("/login")
    public String login(Model model){

        User user = new User();
        user.setUid(1);
        user.setUname("Tom");
        user.setPassword("123");
        user.setAge(23);
        user.setAddress("哈尔滨");
        user.setGender(0);

        model.addAttribute("user",user);
        model.addAttribute("uname","admin");

        List<User> list = new ArrayList<User>();

        list.add(new User(1,"张三","123"));
        list.add(new User(2,"李四","123"));
        list.add(new User(3,"王五","123"));
        list.add(new User(4,"赵六","123"));
        list.add(new User(5,"王二麻子","123"));
        list.add(new User(6,"刘备","123"));

        model.addAttribute("users",list);

        return "test";
    }
}
test.html:
DOCTYPE html>
<html lang="en" xmlns:th="http://www.thymeleaf.org">
<head>
    <meta charset="UTF-8">
    <title>Titletitle>
head>
<body>

     获取文本:  <div th:text="${uname}">div>
     <br/>
     获取对象:  <div th:object="${user}">
                   用户编号:
                     <div>[[${user.uid}]]div>
                   地址:
                     <div th:text="*{address}">div>
                     姓名:
                     <div>[[${user.uname}]]div>
                     年龄:
                     <div th:text="${user.age}">div>
                     性别: <div th:if="${user.gender} == 1">男div>
                           <div th:if="${user.gender} == 0">女div>
                div>
     <br/>
     <a th:href="@{/index}">跳转登录页面a>
     <br/>
         遍历的集合List:
        <table>
            <tr>
                <th>用户idth>
                <th>用户姓名th>
                <th>用户密码th>
            tr>
            <tr th:each="user : ${users}">
                <td th:text="${user.uid}">td>
                <td th:text="${user.uname}">td>
                <td th:text="${user.password}">td>
            tr>
        table>
body>
html>
登录案例
DOCTYPE html>
<html lang="en" xmlns:th="http://www.thymeleaf.org">
	<head>
		<meta http-equiv="Content-Type" content="text/html; charset=UTF-8">
		<meta name="viewport" content="width=device-width, initial-scale=1, shrink-to-fit=no">
		<meta name="description" content="">
		<meta name="author" content="">
		<title>Signin Template for Bootstraptitle>

		<link href="asserts/css/bootstrap.min.css" th:href="@{asserts/css/bootstrap.min.css}" rel="stylesheet">

		<link href="asserts/css/signin.css" th:href="@{asserts/css/signin.css}" rel="stylesheet">
	head>

	<body class="text-center">
		<form class="form-signin" action="dashboard.html" th:action="@{/login}">
			<img class="mb-4" th:src="@{asserts/img/bootstrap-solid.svg}" src="asserts/img/bootstrap-solid.svg" alt="" width="72" height="72">
			<h1 class="h3 mb-3 font-weight-normal">Please sign inh1>
			<label class="sr-only">Usernamelabel>
			<input type="text" class="form-control" name="uname" placeholder="Username" required="" autofocus="">
			<label class="sr-only">Passwordlabel>
			<input type="password" class="form-control" name="password" placeholder="Password" required="">
			<div class="checkbox mb-3">
				<label>
          <input type="checkbox" value="remember-me"> Remember me
        label>
			div>
			<button class="btn btn-lg btn-primary btn-block" type="submit">Sign inbutton>
			<p class="mt-5 mb-3 text-muted">© 2017-2018p>
			<a class="btn btn-sm">中文a>
			<a class="btn btn-sm">Englisha>
		form>
	body>
html>
UserController:
package com.oracle.controller;

import com.oracle.pojo.User;
import org.springframework.stereotype.Controller;
import org.springframework.ui.Model;
import org.springframework.web.bind.annotation.RequestMapping;
import org.springframework.web.bind.annotation.RequestParam;
import java.util.ArrayList;
import java.util.List;

@Controller
public class UserController {

    @RequestMapping("/")
    public String index(){
        return "index";
    }

    @RequestMapping("/login")
    public String login(@RequestParam("uname") String uname,
                        @RequestParam("password") String password,
                        Model model){

        User user = new User();

        user.setUname(uname);
        user.setPassword(password);
        System.out.println(user);
        model.addAttribute("user",user);

        return "dashboard";
    }
}
dashboard.html:
<a class="navbar-brand col-sm-3 col-md-2 mr-0" href="http://getbootstrap.com/docs/4.0/examples/dashboard/#">欢迎 [[${user.uname}]] 登录a>
页面抽取
th:insert:代表插入
~{全路径::fragment名字}
th:include:代表包含,值包含内容
~{全路径::fragment名字}
th:replace:代表替代
~{全路径::fragment名字}
<footer th:fragment="copy"> © 2011 The Good Thymes Virtual Groceryfooter>

<body> ...
  <div th:insert="footer :: copy">div>
  <div th:replace="footer :: copy">div>
  <div th:include="footer :: copy">div>
body>

<body> ...

  <div>
    <footer> © 2011 The Good Thymes Virtual Grocery footer>
  div>

  <footer> © 2011 The Good Thymes Virtual Grocery footer>

  <div> © 2011 The Good Thymes Virtual Grocery div>
body>
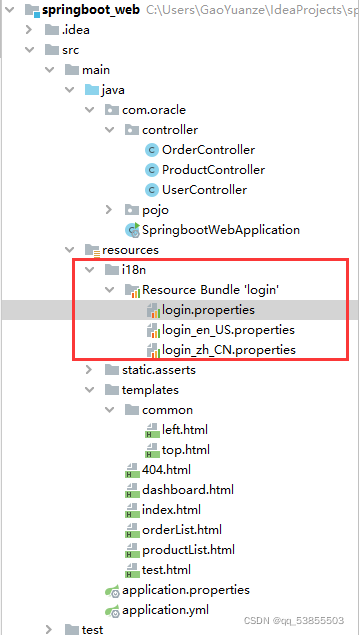
SpringBoot国际化
- 什么是国际化
国际化(Internationalztion)简称i18n,其中i和n分别为首字符和尾字符,18是一共字符数,是软件开发时具备多种语言的支持,也可以理解为中英文切换。
通常以下有3步:
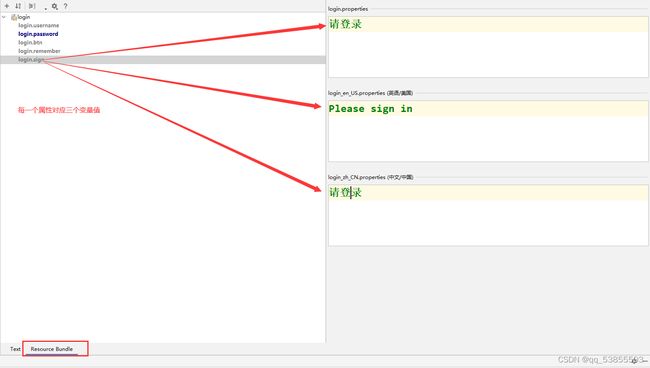
1.编写国际化配置文件,在项目中的resources中
2.SpringBoot使用MessageSourceAutoConfiguration类对ResourceBundleMessageSource类管理国际化资源文件提供了默认配置
@AutoConfigureOrder(-2147483648)
@Conditional({MessageSourceAutoConfiguration.ResourceBundleCondition.class})
@EnableConfigurationProperties
public class MessageSourceAutoConfiguration {
    private static final Resource[] NO_RESOURCES = new Resource[0];

    public MessageSourceAutoConfiguration() {
    }

    @Bean
    @ConfigurationProperties(
        prefix = "spring.messages"
    )
    public MessageSourceProperties messageSourceProperties() {
        return new MessageSourceProperties();
    }
=====================================================================
public class MessageSourceProperties {
    private String basename = "messages";
    private Charset encoding;
因此我们必须在配置文件中配置:
spring:
  thymeleaf:
    cache: false
  #国际化配置
  messages:
    basename: i18n.login  #在配置文件中 必须设置i18n的 基础名
    encoding: UTF-8
3.在页面获取国际化的数据
在页面上点超链接来手动切换语言
配置页面
<a class="btn btn-sm" th:href="@{/index(a='zh_CN')}">中文a>
<a class="btn btn-sm" th:href="@{/index(a='en_US')}">Englisha>
拓展springMvc的功能:添加一个自定义区域信息解析器
  public Locale resolveLocale(HttpServletRequest request) {
        //zh_CN
        String a = request.getParameter("a");

        //设置默认的区域信息解析器
        Locale locale = Locale.getDefault();

        //不等于 空
        if(!StringUtils.isEmpty(a)){
            //把字符串 zh_CN 截取
            String[] s = a.split("_");
            //zh language 语言,  CN country 国家
            locale = new Locale(s[0], s[1]);
        }
        return locale;
    }
把加载到组件中:定义一个配置类,Myconfig
/**
 * 设置MyConfig 是一个配置类
 */
@Configuration
public class MyConfig  {

    //添加一个组件给Ioc容器  ,这个方法名是容器中的 id 属性 localeResolver
    @Bean
    public LocaleResolver localeResolver(){
        return new MyLocaleResolver();
    }
}
== 需要用rhymeleaf模板引擎的#{}来完成国际化的取值操作==
DOCTYPE html>
<html lang="en" xmlns:th="http://www.thymeleaf.org">
	<head>
		<meta http-equiv="Content-Type" content="text/html; charset=UTF-8">
		<meta name="viewport" content="width=device-width, initial-scale=1, shrink-to-fit=no">
		<meta name="description" content="">
		<meta name="author" content="">
		<title>Signin Template for Bootstraptitle>

		<link href="asserts/css/bootstrap.min.css" th:href="@{asserts/css/bootstrap.min.css}" rel="stylesheet">

		<link href="asserts/css/signin.css" th:href="@{asserts/css/signin.css}" rel="stylesheet">
	head>

	<body class="text-center">
		<form class="form-signin" action="dashboard.html" th:action="@{/login}">
			<img class="mb-4" th:src="@{asserts/img/bootstrap-solid.svg}" src="asserts/img/bootstrap-solid.svg" alt="" width="72" height="72">
			<h1 class="h3 mb-3 font-weight-normal">[[#{login.sign}]]h1>
			<label class="sr-only" th:text="#{login.username}">Usernamelabel>
			<input type="text" class="form-control" name="uname" placeholder="Username" th:placeholder="#{login.username}" required="" autofocus="">
			<label class="sr-only" th:text="#{login.password}">Passwordlabel>
			<input type="password" class="form-control" name="password" placeholder="Password" th:placeholder="#{login.password}" required="">
			<div class="checkbox mb-3">
				<label>
          <input type="checkbox" value="remember-me"> [[#{login.remember}]]
        label>
			div>
			<button class="btn btn-lg btn-primary btn-block" type="submit" th:text="#{login.btn}">Sign inbutton>
			<p class="mt-5 mb-3 text-muted">© 2021-2022p>

			<a class="btn btn-sm" th:href="@{/index(a='zh_CN')}">中文a>
			<a class="btn btn-sm" th:href="@{/index(a='en_US')}">Englisha>
		form>
	body>
html>
SpringBoot定制SpringMvc(拓展)
SpringBoot抛弃了原始的SpringMvc的xml配置文件,通过配置类的形式添加额外功能;SpringBoot对SpringMvc的自动配置可以满足我们绝大多数的需求,但是我们也可以在SpringBoot的基础上,自定义配置类的形式,来添加额外的共能,例如@Configuration修饰类,并实现一个WebMvcConfigurer,例如;拦截器,视图控制器…
拓展SpringMvc
/**
 * 设置MyConfig 是一个配置类
 */
@Configuration
public class MyConfig implements WebMvcConfigurer {

    //向现有的视图控制器 添加额外的 映射 ,我们可以通过这个三个路径,访问同一个页面
    @Override
    public void addViewControllers(ViewControllerRegistry registry) {
        registry.addViewController("/").setViewName("index");
        registry.addViewController("/index").setViewName("index");
        registry.addViewController("/index.html").setViewName("index");
    }

    //添加一个组件给Ioc容器  ,这个方法名是容器中的 id 属性 localeResolver
    @Bean
    public LocaleResolver localeResolver(){
        return new MyLocaleResolver();
    }
}
全面接管:取消SpringBoot对SpringMvc的全部自动配置,有程序员自己完全接管SpringMvc
@Configuration
@EnableWebMvc //完全结管SpringMvc, 取消了SpringBoot的默认配置
public class MyConfig implements WebMvcConfigurer {
}
总结:如果使用了EnableWebMvc注解,那就是取消了SpringBoot的自动配置,由程序员完全接管了Springmvc,这样所有的SpringBoot默认都将失效,例如:SpringBoot对静态资源的映射。
SpringBoot拦截器
SpringBoot使用拦截器步骤
1.定义拦截器
/**
 * HandlerInterceptor 这个类 在SpringMvc 拦截器的时候用过
 */
public class LoginInterceptor implements HandlerInterceptor {

    //内容需要自己手写 ,就是设置拦截规则
    @Override
    public boolean preHandle(HttpServletRequest request, HttpServletResponse response, Object handler) throws Exception {
        //获取session
        HttpSession session = request.getSession();
        //判断user是否为null
        User user = (User) session.getAttribute("user");
        //如果 user 是null 说明 没登录过
        if(user == null){
            session.setAttribute("msg","您没有权限,请先登录!");
            request.getRequestDispatcher("/index").forward(request,response);
            //跳转到 登录页面后 就拦截了
            return false;
        }
        //如果 user 不是 null 那么就直接放行
        return true;    //return false 拦截    ,return true 是放行
    }

}
2.注册拦截器:注册拦截器相当于给SpringBoot添加一个组件
3.设置拦截规则:拦截时,静态资源可能也会被拦截,要注意静态资源放行
/**
 * 设置MyConfig 是一个配置类
 */
@Configuration
//@EnableWebMvc //完全结管SpringMvc, 取消了SpringBoot的默认配置
public class MyConfig implements WebMvcConfigurer {

    //向现有的视图控制器 添加额外的 映射
    @Override
    public void addViewControllers(ViewControllerRegistry registry) {
        registry.addViewController("/").setViewName("index");
        registry.addViewController("/index").setViewName("index");
        registry.addViewController("/index.html").setViewName("index");
    }

    /**
     * 拓展功能
     * 添加一个拦截器
     * @param registry
     */
    @Override
    public void addInterceptors(InterceptorRegistry registry) {
        // 我们注册完了 拦截器后,需要拦截哪些 路径 /** 拦截所有请求,默认包含静态资源的
        registry.addInterceptor(new LoginInterceptor()).addPathPatterns("/**") //拦截所有请求,默认包含静态资源的
                .excludePathPatterns("/","/index","/index.html","/login",
                        "/asserts/css/**","/asserts/js/**","/asserts/img/**");
            //第一次请求时,放行登录请求,和静态资源
    }
      //添加一个组件给Ioc容器  ,这个方法名是容器中的 id 属性 localeResolver
    @Bean
    public LocaleResolver localeResolver(){
        return new MyLocaleResolver();
    }
}
index.html:
<h1 class="h3 mb-3 font-weight-normal">[[#{login.sign}]]h1>

<p style="color:red" th:text="${session.msg}" th:if="${not #strings.isEmpty(session.msg)}">p>
SpringBoot持久层框架整合
SpringBoot和Mybatis整合
1.创建工程
2.配置maven
3.给idea添加lombok插件
package com.oracle.pojo;
import lombok.*;
//@Getter
//@Setter
//@ToString
//@EqualsAndHashCode
@Data
public class User {
    private Integer uid;
    private String uname;
    private String password;
}
4.引入依赖
mysql驱动包,druid数据源,mybatis-spring依赖,PageHelper分页插件的依赖
        <dependency>
            <groupId>org.webjarsgroupId>
            <artifactId>jqueryartifactId>
            <version>3.4.1version>
        dependency>


        <dependency>
            <groupId>mysqlgroupId>
            <artifactId>mysql-connector-javaartifactId>
            <version>5.1.46version>
        dependency>


        <dependency>
            <groupId>org.mybatis.spring.bootgroupId>
            <artifactId>mybatis-spring-boot-starterartifactId>
            <version>2.1.3version>
        dependency>


        <dependency>
            <groupId>com.alibabagroupId>
            <artifactId>druid-spring-boot-starterartifactId>
            <version>1.2.6version>
        dependency>


        <dependency>
            <groupId>com.github.pagehelpergroupId>
            <artifactId>pagehelper-spring-boot-starterartifactId>
            <version>1.4.1version>
        dependency>
5.mapper接口
@Mapper
public interface ProductMapper {
    //查询
    public List<Product> getProductList();
    //删除
    public int deleteProductByPid(Integer pid);
    //修改
    public int updateProductByPid(Product product);
    //添加
    public int insertProduct(Product product);
    //根据 id 查询product实体
    public Product getProductByPid(Integer pid);
}
6.mapper.xml:
<mapper namespace="com.oracle.mapper.ProductMapper">

    <select id="getProductList" resultType="product">
        select * from product
    select>

    <insert id="insertProduct">
        insert into product(pid,pname,price,remark,img)
            values (null,#{pname},#{price},#{remark},#{img})
    insert>

    <update id="updateProductByPid">
        update product set pname = #{pname} , price = #{price},
            remark = #{remark} ,img = #{img} where pid = #{pid}
    update>

    <delete id="deleteProductByPid">
        delete from product where pid = #{pid}
    delete>

    <select id="getProductByPid" resultType="product">
        select * from product where pid =#{pid}
    select>
mapper>
7.serviceImpl:
@Service
public class ProductServiceImpl implements ProductService {

    @Autowired
    private ProductMapper productMapper;

    @Override
    public PageInfo getProductWithPage() {
        PageHelper.startPage(1,5);
        List<Product> products = productMapper.getProductList();
        //将数据存储到PageInfo对象中
        PageInfo pageInfo = new PageInfo(products);
        return pageInfo;
    }
    @Override
    public int deleteProductByPid(Integer pid) {
        return productMapper.deleteProductByPid(pid);
    }
    @Override
    public int updateProductByPid(Product product) {
        return productMapper.updateProductByPid(product);
    }

    @Override
    public int insertProduct(Product product) {
        return productMapper.insertProduct(product);
    }

    @Override
    public Product getProductByPid(Integer pid) {
        return productMapper.getProductByPid(pid);
    }
}
8.controller
@Controller
public class ProductController {

    @Autowired
    private ProductService productService;

    @RequestMapping("/productList")
    public String productList(Model model){
        System.out.println("商品列表");
        PageInfo page = productService.getProductWithPage();
        model.addAttribute("page",page);
        return "productList";
    }

    @RequestMapping("/deleteProduct/{pid}")
    public String deleteProduct(@PathVariable("pid") String pid){
        System.out.println(pid);
        productService.deleteProductByPid(Integer.parseInt(pid));

        //删除后 重定向到上面 查询列表
        return "redirect:/productList";
    }

    @RequestMapping("/getProductByPid")
    public String getProductByPid(@RequestParam("pid") String pid,
                                  Model model){

        Product product = productService.getProductByPid(Integer.parseInt(pid));

        model.addAttribute("product",product);

        return "updateProduct";
    }

    @RequestMapping("/updateProduct")
    public String updateProduct(Product product){
        productService.updateProductByPid(product);
        return "redirect:/productList";
    }

    @RequestMapping("/toAddPage")
    public String toAddPage(){
        return "addProduct";
    }

    @RequestMapping("/addProduct")
    public  String addProduct(Product product){
        productService.insertProduct(product);

        //重定向到添加页面
        return "redirect:/productList";
    }
}
SpringBoot和SpringDataJPA整合(了解)
SpringBoot JDBC —>Jdbc Template
SpringBoot JPA —>Hibernate框架
实际上就是对目前淘汰掉的Hibernate进行了二次封装,变成了SpringDataJPA的框架,SpringBoot对持久层操作做了很多支持
<dependency>
      <groupId>org.springframework.bootgroupId>
      <artifactId>spring-boot-starter-data-jpaartifactId>
dependency>
 springboot data jpa 启动器 里面集成了 hibernate框架的依赖
<dependency>
      <groupId>org.hibernategroupId>
      <artifactId>hibernate-coreartifactId>
      <version>5.6.1.Finalversion>
dependency>
1.引入依赖
 <dependency>
            <groupId>org.springframework.bootgroupId>
            <artifactId>spring-boot-starter-data-jdbcartifactId>
        dependency>
        <dependency>
            <groupId>org.springframework.bootgroupId>
            <artifactId>spring-boot-starter-data-jpaartifactId>
        dependency>

        <dependency>
            <groupId>org.springframework.bootgroupId>
            <artifactId>spring-boot-devtoolsartifactId>
            <scope>runtimescope>
            <optional>trueoptional>
        dependency>
        <dependency>
            <groupId>org.springframework.bootgroupId>
            <artifactId>spring-boot-configuration-processorartifactId>
            <optional>trueoptional>
        dependency>
        <dependency>
            <groupId>org.projectlombokgroupId>
            <artifactId>lombokartifactId>
            <optional>trueoptional>
        dependency>
        <dependency>
            <groupId>org.springframework.bootgroupId>
            <artifactId>spring-boot-starter-testartifactId>
            <scope>testscope>
        dependency>

        <dependency>
            <groupId>mysqlgroupId>
            <artifactId>mysql-connector-javaartifactId>
            <version>5.1.47version>
        dependency>


        <dependency>
            <groupId>com.alibabagroupId>
            <artifactId>druid-spring-boot-starterartifactId>
            <version>1.2.6version>
        dependency>
2.编写yaml配置文件
#配置Spring的数据源
spring:
   datasource:
      driver-class-name: com.mysql.jdbc.Driver
      url: jdbc:mysql://localhost:3306/test
      username: root
      password: root
      type: com.alibaba.druid.pool.DruidDataSource

      #配置spring Data JPA的参数
   jpa:
      hibernate:
         ddl-auto: update
      show-sql: true    #显示sql语句
3.编写代码
实体类:User
package com.oracle.pojo;
import lombok.*;
import javax.persistence.*;
@Entity
@Table(name = "t_user")
@Getter
@Setter
@ToString
public class User {

    @Id  //代表主键
    @GeneratedValue(strategy = GenerationType.IDENTITY) //主键生成测率,主键自增
    @Column(name="uid") //与哪个表进行映射
    private Integer uid;

    @Column(name = "username")
    private String username;

    @Column(name = "password")
    private String password;

}
Dao接口:
/**
 * JpaRepository
 *        参数一 : T 泛型的第一个参数是需要映射的实体
 *        参数二 : ID 泛型的第二个参数是实体中主键的uid类型
 */
public interface UserDao extends JpaRepository<User,Integer> {
    /**
     * 自己拓展 他没有的功能 (不好使)
     *
     * 这个语句 是 hql 语句 不是 sql语句
     *  update 实体名
     */
//    @Query("update User set username=? where uid=?")
//    @Modifying
//    public int updateUserByUid(String username,Integer uid);
}
测试
@SpringBootTest
class SpringbootDataJpaApplicationTests {
    @Autowired
    private UserDao userDao;

    @Test
    public void delete(){
        userDao.deleteById(5);
    }
    @Test
    public void update(){
        User user = new User();
        user.setUid(3);
        user.setUsername("貂蝉");
        user.setPassword("0987");

        userDao.saveAndFlush(user);
        //userDao.updateUserByUid("刘备",5);

    }
    @Test
    void contextLoads() {
        List<User> all = userDao.findAll();
        for (User user : all) {
            System.out.println(user);
        }
    }
    @Test
    void add(){
        User user =new User();
        user.setUsername("张三");
        user.setPassword("123");
        userDao.save(user);

        System.out.println("添加成功");
    }
}
SpringBoot和RedisTemplate整合
Spring使用jedis连接redis服务器,但是SpringBoot整合,redis内置的客户端时lettuce。
jedis:采用的是直连,在多线程操作的话,是不安全的
lettuce:lettuce中又实用了netty框架,netty用以快速开发高性能、高可靠性的网络服务器和客户端程序。也就是说,netty是一个基于NIO的客户、服务器端的编程框架,lettuce解决在多个线程共享,不存在线程安全问题,所以lettuce比jedis性能好,高效而安全。
依赖配置:
 <dependency>
    <groupId>org.springframework.bootgroupId>
    <artifactId>spring-boot-starter-data-redisartifactId>
dependency>
 引入了lettuce 作为客户端
 <dependency>
   <groupId>io.lettucegroupId>
   <artifactId>lettuce-coreartifactId>
   <version>6.1.5.RELEASEversion>
   <scope>compilescope>
dependency>
源码分析
|-- RedisAutoConfiguration
    |--RedisProperties
    	  内酯类很多redis的基本参数
          @ConfigurationProperties(
            prefix = "spring.redis"
           )
          public class RedisProperties {
              private int database = 0;
              private String url;
              private String host = "localhost";
              private String username;
              private String password;
              private int port = 6379;
           }
配置文件
#springboot 整合 reids
spring:
  redis:
    host: 192.168.200.128  # 默认是localhost 但是我链接的是 Linux的
    port: 6379   #默认端口号
    database: 3 #选择第三个数据库
#    lettuce:
#      pool:
#        max-active: 8
#        max-idle: 3
#    jedis:  不要用这个
#      pool:
#        max-active:
单元测试
@SpringBootTest
class SpringbootRedisApplicationTests {

    @Autowired
    private RedisTemplate redisTemplate;

    @Test
    void contextLoads() {
//        RedisConnectionFactory redis = redisTemplate.getConnectionFactory();
//        RedisConnection connection = redis.getConnection();
//        System.out.println(connection);

        //redisTemplate调用方法

        ValueOperations ops = redisTemplate.opsForValue();//就是操作字符串

        ops.set("uname","admin");

        Object uname = ops.get("uname");

        System.out.println(uname);

        // redisTemplate.opsForList(); //操作列表的

       //  redisTemplate.opsForHash(); //操作hash

       // redisTemplate.opsForSet(); //操作set

       // redisTemplate.opsForZSet(); //操作zset
    }
}
自定义RedisTemplate
首先我们先看一下,SpringBoot对RedisTemplate默认的序列化的方式有几种:我们并不像用它默认的序列化方式,所以我们自定义一个RedisTemplae的序列化方式,这时它就不会使用SpringBoot默认的RedisTemplate了;
RedisConfig
package com.oracle.config;

import com.fasterxml.jackson.annotation.JsonAutoDetect;
import com.fasterxml.jackson.annotation.PropertyAccessor;
import com.fasterxml.jackson.databind.ObjectMapper;
import com.fasterxml.jackson.databind.jsontype.impl.LaissezFaireSubTypeValidator;
import org.springframework.context.annotation.Bean;
import org.springframework.context.annotation.Configuration;
import org.springframework.data.redis.connection.RedisConnectionFactory;
import org.springframework.data.redis.core.RedisTemplate;
import org.springframework.data.redis.serializer.Jackson2JsonRedisSerializer;
import org.springframework.data.redis.serializer.StringRedisSerializer;

@Configuration
public class RedisConfig {
    /**
     * 修改了SpringBoot默认的redisTemplate序列化,自定义了一个序列化方式
     * @param redisConnectionFactory
     * @return redisTemplate
     */
    @Bean
    public RedisTemplate<String, Object> redisTemplate(RedisConnectionFactory redisConnectionFactory){

        RedisTemplate<String, Object> template = new RedisTemplate<>();
        template.setConnectionFactory(redisConnectionFactory);

        //采用json序列化并对其做出配置
        Jackson2JsonRedisSerializer jackson2JsonRedisSerializer = new Jackson2JsonRedisSerializer(Object.class);
        ObjectMapper om = new ObjectMapper();
        om.setVisibility(PropertyAccessor.ALL, JsonAutoDetect.Visibility.ANY);
        //Jackson ObjectMapper 中的 enableDefaultTyping 方法由于安全原因,从 2.10.0 开始标记为过期,建议用 activateDefaultTyping 方法代替
        //om.enableDefaultTyping(ObjectMapper.DefaultTyping.NON_FINAL);
        om.activateDefaultTyping(LaissezFaireSubTypeValidator.instance, ObjectMapper.DefaultTyping.NON_FINAL);
        jackson2JsonRedisSerializer.setObjectMapper(om);

        //创建一个String类型的序列化对象
        StringRedisSerializer stringRedisSerializer = new StringRedisSerializer();
        //key 采用的String 的序列化方式
        template.setKeySerializer(stringRedisSerializer);
        //hashde key 也采用String的序列化方式
        template.setHashKeySerializer(stringRedisSerializer);
        //value 序列化方式采用jackson
        template.setValueSerializer(jackson2JsonRedisSerializer);
        //hash 的 value序列化方式采用jackson
        template.setHashKeySerializer(jackson2JsonRedisSerializer);
        template.afterPropertiesSet();
        return template;
    }
}
RedisUtil二次封装:
package com.oracle.util;

import org.springframework.beans.factory.annotation.Autowired;
import org.springframework.data.redis.core.RedisTemplate;
import org.springframework.stereotype.Component;

/**
 * 把这个工具类放到容器中
 * redisTemplate的方法 ,都在这里进行二次封装
 */
@Component
public class RedisUtil {

    @Autowired
    private RedisTemplate<String,Object> redisTemplate;

    /**
     * 向redis中设置缓存
     * @param key
     * @param value
     * @return
     */
    public boolean set(String key, Object value){
        try{
            redisTemplate.opsForValue().set(key,value);
            return true;
        }catch (Exception e){
            e.printStackTrace();
            return false;
        }
    }

    /**
     * 获取redis中的缓存
     * @param key
     * @return
     */
    public Object get(String key){
        return key == null ? null : redisTemplate.opsForValue().get(key);
    }

    public long incr(String key,long value){
        if(value < 0){
            throw new RuntimeException();
        }
        return  redisTemplate.opsForValue().increment(key, value);
    }
}
ServiceImpl:
package com.oracle.serviceImpl;

@Service
public class UserServiceImpl implements UserService {

    //@Autowired
    //private UserMapper userMapper;

    @Autowired
    private RedisUtil redisUtil;

    @Override
    public User login(String uname, String password) {

        //这行代码是从数据库查询出来的 , 查询以后应该加入缓存
        //userMapper.getUserByUnameAndPassword(uname, password);
        User user =  new User();
        user.setUid(3);
        user.setUname("张三");
        user.setPassword("123");
        //user 支持不支持 序列化啊
        Gson gson = new Gson();
        String s = gson.toJson(user);
        //如何加到redis中啊
        redisUtil.set("user",s);
        return null;
    }
}
单元测试:
@SpringBootTest
class SpringbootRedisApplicationTests {

    @Autowired
    private RedisTemplate redisTemplate;

    @Autowired
    private UserService userService;

    @Autowired
    private RedisUtil redisUtil;

    @Test
    void testRedis(){
        userService.login("","");
    }

    @Test
    void getUser(){
       String str = (String) redisUtil.get("user");
        //{"uid":3,"uname":"张三","password":"123"}
        System.out.println(str);
    }
}