Vue的完整学习及NodeJS等插件安装
Vue
回顾前端:
- 逻辑
- 判断
- 循环
- 事件
- 浏览器事件:window document
- dom事件:增 删 遍历 修改节点元素
- jQuery
- 视图
- html
- css
- 通信
- ajax
- axios
IDEA安装Vue.js插件:
打开IDEA,依次展开File > Settings > Plugins
搜索vue.js,在Marketplace中,点击Install,重启IDEA
idea 安装 Vue 插件没有Vue component选项
解决方法:
依次展开File > Settings > Editor > File and Code Templates
选中Vue Single File Component,点击最上方的Copy Template
把复制下来的Name值改为Vue Component,Extension:vue,代码不用动
1、概述
vue是一套用于构建用户界面的渐进式框架,其核心库只关注视图层!
-
#其实是css中的选择器,id选择器
-
$是jQuery 元素选择器
jQuery 使用 CSS 选择器来选取 HTML 元素。
$("p") 选取 <p> 元素。
$("p.intro") 选取所有 class="intro" 的 <p> 元素。
$("p#demo") 选取所有 id="demo" 的 <p> 元素。

jQuery CSS 选择器可用于改变 HTML 元素的 CSS 属性
*$("p").css("background-color","red");*
Vue:一款逐步实现新特性的JavaScript框架,实现模块化开发、路由、状态管理等新特性
Axios:前端通信框架,页可以使用jQuery提供的AJAX通信框架。
UI框架
- Ant-Design:基于React的UI框架
- ElementUI、ice:基于Vue的UI框架
- Bootstrap:用于前端开发的开源工具包
- AmazeUI:HTML5跨屏前端框架
JavaScript构建工具
- Babel:js编译工具
- webPack:模块化打包器,打包、压缩、合并及按序加载
微信小程序
- UI框架:WeUI
后端技术
- 方便后端人员开发的NodeJS
- Express:NodeJS框架
- NPM:项目综合管理工具,类似于Maven
- YARN:NPM的替代方案
前端为主的MV*时代
- MVC(同步通信为主):Model、View、Controller
- MVP(异步通信时代):Model、View、Presenter
- MVVM(异步通信为主):Model、View、ViewModel
2、第一个Vue程序
cdn引入:
-
<script src="https://cdn.jsdelivr.net/npm/[email protected]/dist/vue.min.js">script> -
<script src="https://cdn.jsdelivr.net/npm/[email protected]/dist/vue.min.js">script>
DOCTYPE html>
<html lang="en">
<head>
    <meta charset="UTF-8">
    <title>Titletitle>

head>
<body>


<div id="app">
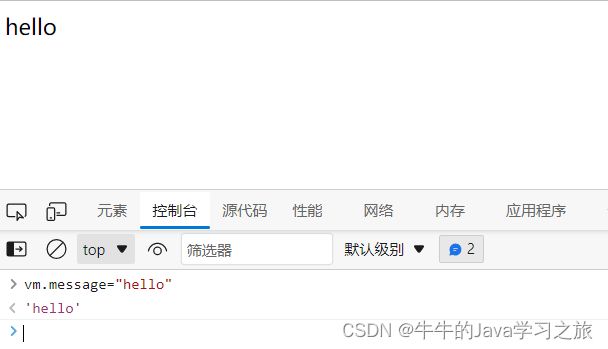
    {{message}}
div>


<script src="https://cdn.jsdelivr.net/npm/[email protected]/dist/vue.min.js">script>
<script>
    var vm = new Vue({
        //Model:数据
        el: "#app",
        data:{
            message: "hello,vue!"
        }
    });
script>

body>
html>
- 双向绑定:前端数据改变,data中的数据改变,这个过程不需要刷新
为什么要使用MVVM
低耦合:视图独立于Model变化和修改,一个ViewModel开源绑定到不同的View上,当View变化的时候Model开源不变,当Model变化的是很好View开源不变
可复用:很多View可以重复视图逻辑
独立开发:专注业务逻辑和数据的开发
3、基本语法
v-bind
导入命名空间:
<html lang="en" xmlns:v-bind="http://www.w3.org/1999/xhtml">
显示悬浮功能:
<div id="app">
    <span v-bind:title="message">
        查看提示信息!
    span>
div>
- 指令带有v-前缀表示他们是vue提供的特殊特性,会在渲染的DOM上应用特殊的响应式行为,指令的意思是:将这个元素节点的title特性和vue实例的message属性保持一致
v-if,v-else
DOCTYPE html>
<html lang="en" xmlns:v-bind="http://www.w3.org/1999/xhtml">
<head>
    <meta charset="UTF-8">
    <title>Titletitle>

head>
<body>


<div id="app">
    <h1 v-if="type==='A'">Ah1>
    <h1 v-else-if="type==='B'">Bh1>
    <h1 v-else-if="type==='C'">Ch1>
    <h1 v-else>Dh1>
div>


<script src="https://cdn.jsdelivr.net/npm/[email protected]/dist/vue.min.js">script>
<script>
    var vm = new Vue({
        //Model:数据
        el: "#app",
       data: {
            type: 'A'
       }
    });
script>

body>
html>
- js是弱类型语言,===表示全等于,值和数据类型都必须相等,==表示两者是否相等,忽略数据类型
v-for
DOCTYPE html>
<html lang="en" xmlns:v-bind="http://www.w3.org/1999/xhtml">
<head>
    <meta charset="UTF-8">
    <title>Titletitle>

head>
<body>


<div id="app">
    <li v-for="items in items">
        {{items.message}}
    li>
div>


<script src="https://cdn.jsdelivr.net/npm/[email protected]/dist/vue.min.js">script>
<script>
    var vm = new Vue({
        //Model:数据
        el: "#app",
       data: {
            items: [
                {message: '刘想1'},
                {message: '刘想2'},
            ]
       }
    });
script>

body>
html>
- 数组用[],对象用{}
4、绑定事件
DOCTYPE html>
<html lang="en" xmlns:v-bind="http://www.w3.org/1999/xhtml" xmlns:v-on="http://www.w3.org/1999/xhtml">
<head>
    <meta charset="UTF-8">
    <title>Titletitle>

head>
<body>


<div id="app">

    <button v-on:click="a">click mebutton>

div>


<script src="https://cdn.jsdelivr.net/npm/[email protected]/dist/vue.min.js">script>
<script>
    var vm = new Vue({
        //Model:数据
        el: "#app",
       data: {
            message: "溜溜梅"
       },
        methods: {//方法必须定义在vue的methods对象中(一堆方法)
            a: function (){
                alert(this.message);
            }
        }
    });
script>

body>
html>
双向绑定
Vue.js是一个MVVM框架,即数据双向绑定,当数据发生变化的时候,视图也发生变化,当视图发生变化的时候,数据也发生变化
在表单中使用双向数据绑定
使用v-model指令在表单,textarea及select元素上创建双向数据绑定。
DOCTYPE html>
<html lang="en" xmlns:v-bind="http://www.w3.org/1999/xhtml" xmlns:v-on="http://www.w3.org/1999/xhtml">
<head>
    <meta charset="UTF-8">
    <title>Titletitle>

head>
<body>


<div id="app">


    下拉框:
    <select v-model="message">
        <option value="" disabled>-请选择-option>
        <option>Aoption>
        <option>Boption>
        <option>Coption>
    select>

    <span>value:{{message}}span>
div>


<script src="https://cdn.jsdelivr.net/npm/[email protected]/dist/vue.min.js">script>
<script>
    var vm = new Vue({
        //Model:数据
        el: "#app",
       data: {
            message: ''
       }
    });
script>

body>
html>
- v-model会忽略所有表单元素的value,checked,selected特性的初始值而总数将vue实例的数据作为数据来源
5、vue组件
-
组件是可复用的vue实例,是一组可以重复使用的模板,跟JSTL的自定义标签、thymeleaf的
th:fragment一样。 -
Vue.component注册组件,组件有两个参数props:接收参数template:模板
-
数据进行遍历,遍历出来item对象,组件和对象是同级的,需要通过接收参数
DOCTYPE html>
<html lang="en" xmlns:v-bind="http://www.w3.org/1999/xhtml" xmlns:v-on="http://www.w3.org/1999/xhtml">
<head>
<meta charset="UTF-8">
<title>Titletitle>
head>
<body>
<div id="app">
<liuxiang v-for="item in items" v-bind:item="item">liuxiang>
div>
<script src="https://cdn.jsdelivr.net/npm/[email protected]/dist/vue.min.js">script>
<script>
//定义一个vue的component
Vue.component("liuxiang",{
props:['item'], //接收参数
template: '{{item}} '
});
var vm = new Vue({
//Model:数据
el: "#app",
data: {
items:["java","llx","linux"]
}
});
script>
body>
html>
6、Axios异步通信
- 主要作用是实现AJAX
- 少用jQuery,因为操作DOM太频繁!
第一个Axios应用程序
vue实例的生命周期:从开始创建、初始化数据、编译模板、挂载DOM、渲染-更新-渲染,卸载等一系列过程。
json文件:
{
  "name":"狂神说java",
  "url": "http://baidu.com",
  "page": "1",
  "isNonProfit":"true",
  "address": {
    "street": "含光门",
    "city":"陕西西安",
    "country": "中国"
  },
  "links": [
    {
      "name": "B站",
      "url": "https://www.bilibili.com/"
    },
    {
      "name": "4399",
      "url": "https://www.4399.com/"
    },
    {
      "name": "百度",
      "url": "https://www.baidu.com/"
    }
  ]
}
DOCTYPE html>
<html lang="en">
<head>
    <meta charset="UTF-8">
    <title>Titletitle>


    <style>
        [v-cloak]{
            display: none;
        }
    style>

head>
<body>

<div id="vue" v-cloak>
    <div>{{info.name}}div>
    <div>{{info.address}}div>

    <a v-bind:href="info.url">跳转链接a>
div>

<script src="https://cdn.jsdelivr.net/npm/[email protected]/dist/vue.min.js">script>
<script src="https://unpkg.com/axios/dist/axios.min.js">script>
<script tpye="text/javascript">
    var vm = new Vue({
        el: '#vue',
        data(){
            return {
                // 请求的返回参数必须和json字符串一样
                info: {
                    name: null,
                    address: {
                        country: null,
                        city: null,
                        street: null
                    },
                    url:null
                }
            }
        },
        mounted(){ //钩子函数 ES6新特性
            axios
                .get('../data.json')
                .then(response => (this.info = response.data));
        }
    });
script>

body>
html>
7、计算属性
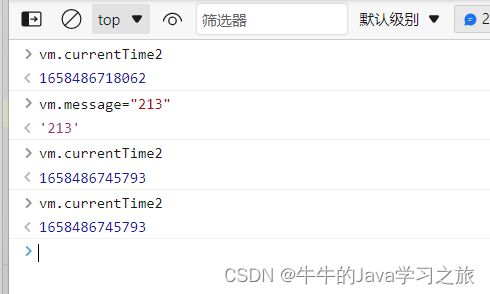
虚拟DOM:可以理解为缓存!
属性变了,从新计算!
计算属性就是将不经常变化的结果进行缓存,以节省系统开销!
DOCTYPE html>
<html lang="en">
<head>
  <meta charset="UTF-8">
  <title>Titletitle>
head>
<body>

<div id="app">
  <p> currentTime1: {{currentTime1()}}p>
  <p> currentTime2: {{currentTime2}}p>
div>

<script src="https://cdn.jsdelivr.net/npm/[email protected]/dist/vue.min.js">script>
<script src="https://unpkg.com/axios/dist/axios.min.js">script>
<script tpye="text/javascript">
  var vm = new Vue({
    el: '#app',
    data: {
      message: "hello"
    },
    methods: { //调用方法需要()
      currentTime1: function () {
        return Date.now();
      }
    },
    computed: { //计算属性 methods computed方法名不能重名
      currentTime2: function () {
        this.message;
        return Date.now();
      }
    }
  });
script>

body>
html>
8、插槽slot
DOCTYPE html>
<html lang="en">
<head>
<meta charset="UTF-8">
<title>Titletitle>
head>
<body>
<div id="app">
<liuxiang>
<liuxiang-title slot="liuxiang-title" v-bind:title="title">liuxiang-title>
<liuxiang-items slot="liuxiang-items" v-for="item in liuxiangItems" v-bind:item="liuxiangItems">liuxiang-items>
liuxiang>
div>
<script src="https://cdn.jsdelivr.net/npm/[email protected]/dist/vue.min.js">script>
<script src="https://unpkg.com/axios/dist/axios.min.js">script>
<script tpye="text/javascript">
Vue.component("liuxiang",{
template: '\
\
\
'
});
Vue.component("liuxiang-title",{
props: ['title'],
template: '{{title}}'
});
Vue.component("liuxiang-items",{
props: ['item'],
template: '{{item}} '
});
var vm = new Vue({
el: '#app',
data: {
title: '列表',
liuxiangItems: ['java','python','linux']
}
});
script>
body>
html>
前端就是视图层:
- 通过插槽slot与组件进行绑定
- 通过id绑定Vue实例对象,可以操作Vue的方法
- 组件和Vue进行交互需要自定义分发事件
v-on:remove="removeItems(index)"
DOCTYPE html>
<html lang="en">
<head>
<meta charset="UTF-8">
<title>Titletitle>
head>
<body>
<div id="app">
<liuxiang>
<liuxiang-title slot="liuxiang-title" v-bind:title="title">liuxiang-title>
<liuxiang-items slot="liuxiang-items" v-for="(item,index) in liuxiangItems"
v-bind:item="liuxiangItems" v-bind:index="index"
v-on:remove="removeItems(index)" v-bind:key="index">liuxiang-items>
liuxiang>
div>
<script src="https://cdn.jsdelivr.net/npm/[email protected]/dist/vue.min.js">script>
<script src="https://unpkg.com/axios/dist/axios.min.js">script>
<script tpye="text/javascript">
Vue.component("liuxiang",{
template: '\
\
\
'
});
Vue.component("liuxiang-title",{
props: ['title'],
template: '{{title}}'
});
Vue.component("liuxiang-items",{
props: ['item','index'],
template: '{{item}} ',
methods: {
remove: function (index) {
//自定义事件分发
this.$emit('remove',index);
}
}
});
var vm = new Vue({
el: '#app',
data: {
title: '列表',
liuxiangItems: ['java','python','linux']
},
methods: {
removeItems: function (index) {
console.log("删除了"+this.liuxiangItems[index]+"ok");
this.liuxiangItems.splice(index,1); //从index开始的第一个元素删除
}
}
});
script>
body>
html>
总结:
-
自此,后端人员再也不用关注视图层了,只用关注数据的传输,通过axios异步通信,data数据return即可!
-
v-on绑定事件 简写为@
-
v-model 数据双向绑定
-
v-bind 给组件绑定参数,简写为:
-
组件化:
- 组合组件slot插槽
- 组件内部绑定事件需要使用到
this.$emit('事件名',参数) - 计算属性缓存计算属性
9、第一个vue-cli项目
vue-cli是官方提供的一个脚手架,用于快速生成一个vue的项目模板
安装Nodejs网站:下载 | Node.js 中文网 (nodejs.cn)
无脑安装下一步即可!
确认nodejs安装成功:
-
cmd下输入
node -v,查看是否正确打印出版本号 -
cmd下输入
npm -v,查看是否正确打印出版本号 -
无需配置环境变量,自动配置好了
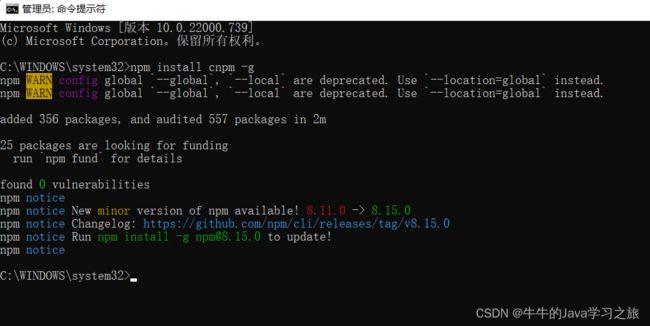
安装Node.js淘宝镜像加速器(cnpm)
# -g 就是全局安装
npm install cnpm -g

#或者以下语句解决npm速度慢的问题
npm install -- registry=https://registry.npm.taobao.org
安装成功!
安装的位置:C:\Users\liuxiang\AppData\Roaming\npm

安装vue-cli
cnpm install vue-cli -g

#测试是否安装成功
vue list
执行vue项目打包
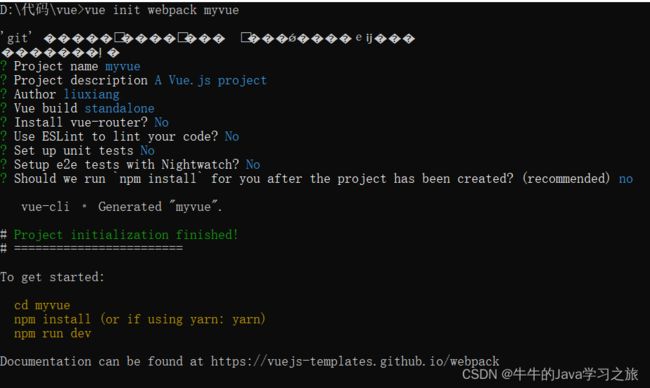
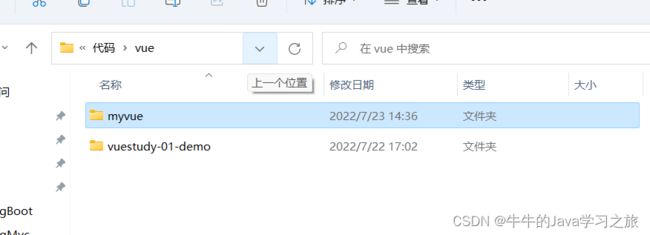
vue init webpack myvue
在项目文件夹下会生成一个myvue的文件
初始化并运行
cd myvue
#安装所有项目依赖环境
cnpm install
#运行
cnpm run dev
10、webpack学习使用
CommonJS
服务端的nodejs遵循commonsjs规范,该规范核心思想是允许模块通过require方法来同步加载所需依赖的其他模块,然后通过exports或module.exports来导出需要暴露的接口
require("module")
require("../moudule.js");
export.doStuff = function(){};
moudule.exports = someValue;
优点:
- 服务端模块便于重用
- NPM中已经有超过45万个可以使用的模块包
- 简单易用
缺点:
- 同步的模块加载方式不适合在浏览器环境下,同步意味着阻塞加载,浏览器是异步加载的
- 不能非阻塞的并行加载多个模块
实现:
- 服务端的NodeJS
- Browserify
- moudules-webmake
AMD
实现异步加载
缺点:提高了开发成本
实现:requireJS、curl
CMD
define(function(require,exports,module){
    var $ = require("jquery");
    var spinning = require("./spinning");
    export.doSomething = ...;
    module.export = ...;
});
优点:依赖就近
缺点:依赖spm打包
实现:sea.js
ES6模块
思想:尽量模块化,使编译就能缺点模块的依赖的关系,以及输入和输出的变量。
import "jquery";
export function doStuff(){}
module "localModule"{}
安装Webpack
- 一款模块加载器打包工具,能把各种资源JS、jsx、es6、sass、图片等都作为模块来才处理和使用
安装:
npm install webpack -g
npm install webpack-cli -g
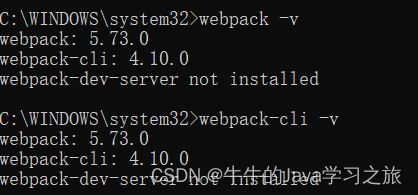
测试:
webpack -v
webpack-cli -v
配置:
- entry:入口文件,指定webpack用哪个文件作为项目的入口
- output:输出,指定webpack把处理完成的文件放置到指定路径
- module:模块,处理各种类型的文件
- plugins:插件:热更新,代码重用
- resolve:设置路径指向
- watch:监听,用于设置文件改动后直接打包
使用webpack
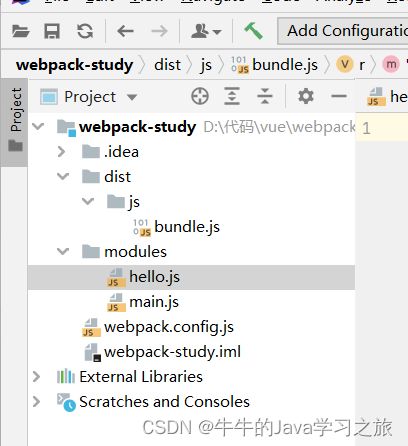
1.创建项目
2.创建一个moudules的目录,存放js文件!
3.在modules下创建模块文件,
//暴露一个方法
exports.sayHi = function () {
document.write("牛牛的博客
")
}
var hello = require("./hello");
hello.sayHi();
打包的配置文件
module.exports = {
    entry: './modules/main.js',
    output: {
        filename: "./js/bundle.js"
    }
};
在当前项目下的terminal输出语句:webpack即可打包!webpack --watch是监听功能!
输出打包后的文件:
(()=>{var r={645:(r,t)=>{t.sayHi=function(){document.write("牛牛的博客
")}}},t={};(function e(o){var i=t[o];if(void 0!==i)return i.exports;var n=t[o]={exports:{}};return r[o](n,n.exports,e),n.exports})(645).sayHi()})();
在index页面下引入打包后的文件即可!
<script src ="dist/js/bundle.js">script>
11、vue-router路由
功能:
- 嵌套的路由/视图表
- 模块化的、基于组件的路由配置
- 路由参数、查询、通配符
- 导航控制
1.安装:
在当前项目下:
cnpm install [email protected] --save-dev
2.如果在一个模块化工程中使用,必须要通过Vue.use()明确的安装路由功能:
import Vue form 'vue'
import VueRouter from 'vue-router'

//显示的声明引用
Vue.use(VueRouter);
3.定义一个Content.vue组件
内容页
定义一个首页组件
首页
4.安装路由,在src目录下,新建一个文件夹:router,专门存放路由
import Vue from "vue";
//导入路由插件
import VueRouter from "vue-router";

import Content from "../components/Content";
import Main from "../components/Main";

//安装路由
Vue.use(VueRouter);
Vue.use(Main);

//配置导出路由
export default new VueRouter({
  routes: [
    {
      //路由路径 @RequestMapping
      path: '/content',
      name: 'content',
      //要跳转的组件
      component: Content
    },
    {
      //路由路径
      path: '/main',
      name: 'content',
      //要跳转的组件
      component: Main
    }
  ]
})
5.在main.js中配置路由
import Vue from 'vue'
import App from './App'
import router from './router' //自动扫描里面的路由配置
Vue.config.productionTip = false
new Vue({
el: '#app',
//配置路由
router,
components: { App },
template: '6.在App.vue中使用
Vue-Router
跳到首页
内容页
使用axios
1.安装commonJS
cnpm install --save axios vue-axios
2.main.js引用axios
import Vue from 'vue'
import axios from 'axios'
import VueAxios from 'vue-axios'

//显示的声明引用axios
Vue.use(VueAxios,axios)
12、vue+elementUI
-
创建一个hello-vue的工程
vue init webpack hello-vue管理员cmd命令下 -
安装依赖,需要依次安装vue-router、element-UI、sass-loader和node-sass四个插件
#创建hello-vue工程
vue init webpack hello-vue
#进入工程目录
cd hello-vue
#安装 vue-router
cnpm install vue-router --save-dev
#安装 element-UI
cnpm i element-ui -S
#安装依赖
cnpm install
#安装sass加载器 css预处理器
cnpm install sass-loader node-sass --save-dev
#启动测试
cnpm run dev
- Login.vue组件,是独立的,需要关联到路由js
欢迎 登录
登录
请输入账号和密码
Main.vue
首页
4.路由router组件 index.js
import Vue from "vue";
import VueRouter from 'vue-router'
import Main from "../views/Main";
import Login from "../views/Login";

Vue.use(VueRouter);

export default new VueRouter({
  routers:[
    {
      path: '/login',
      component: Login
    },
    {
      path: '/main',
      component: Main
    }
  ]
})
5.main.js
// The Vue build version to load with the `import` command
// (runtime-only or standalone) has been set in webpack.base.conf with an alias.
import Vue from 'vue'
import App from './App'
import router from './router'
import elementUI from 'element-ui'
import 'element-ui/lib/theme-chalk/index.css'

Vue.use(router);
Vue.use(elementUI);
/* eslint-disable no-new */
new Vue({
  el: '#app',
  router,
  render: h => h(App) //element
})
6.App.vue
报错:Module build failed: TypeError: this.getOptions is not a function
解决:在packjson文件里将sass的版本降低到7.3.1,再重新cnpm install导入依赖
"node-sass": "^4.0.0","sass-loader": "^7.3.1"
sass-loader 4.1.1,node-sass 4.3.0
sass-loader 7.0.3,node-sass 4.7.2
sass-loader 7.3.1,node-sass 4.7.2
sass-loader 7.3.1,node-sass 4.14.1
sass-loader 10.0.1,node-sass 6.0.1
- 路由跳转
children
传参及内嵌组件
用户管理
个人信息
用户列表
内容管理
分类管理
内容列表
Profile.vue
个人信息
{{$route.params.id }}
index.js
import Vue from "vue";
import VueRouter from 'vue-router'
import Main from "../views/Main";
import Login from "../views/Login";
import UserList from '../views/user/List'
import UserProfile from "../views/user/Profile";
Vue.use(VueRouter);
export default new VueRouter({
routers:[
{
path: '/login',
component: Login
},
{
path: '/main',
component: Main
children: [
{path: '/user/profile/:id',component:UserProfile},
{path: '/user/List',component:UserList},
]
}
]
})
重定向:
{
path: '/goHome',
redirect: '/main'
}
接收路由:
回到首页
url解决带#问题:
- hash模式:带#,默认情况
- history模式:不带#
路由钩子:在组件的script代码块写
- to:路由将要跳转的路径信息
- from:路径跳转前的路径信息
- next:路由的控制参数
- next()跳入下一个页面
- next(‘path’)改变路由的跳转方向,使其跳到另一个路由
- next(false)返回原来的页面
- next((vm)=> {})仅在beforeRouteEnter中可使用,vm是组件实例
个人信息
{{$route.params.id }}
component: Login
},
{
path: '/main',
component: Main
children: [
{path: '/user/profile/:id',component:UserProfile},
{path: '/user/List',component:UserList},
]
}
]
})
重定向:
```js
{
path: '/goHome',
redirect: '/main'
}
接收路由:
回到首页
url解决带#问题:
- hash模式:带#,默认情况
- history模式:不带#
路由钩子:在组件的script代码块写
- to:路由将要跳转的路径信息
- from:路径跳转前的路径信息
- next:路由的控制参数
- next()跳入下一个页面
- next(‘path’)改变路由的跳转方向,使其跳到另一个路由
- next(false)返回原来的页面
- next((vm)=> {})仅在beforeRouteEnter中可使用,vm是组件实例
个人信息
{{$route.params.id }}
