OpenCV计算机视觉实战 - Task6 - 答题卡识别判卷【项目实战】
项目要求
提供一张答题卡图像,通过图像处理识别出答题卡上每个题的选项,与正确答案对比,得出分数并写在答题卡上。
主要步骤:先进行仿射变换去除背景(只留试卷部分),二值化,圆形轮廓检测,遍历每一行选项,统计非零像素,记录填充选项(即非零像素最多的轮廓区域),与正确答案进行比对,正确则correct数+1,得到总成绩
1、预处理
1、灰度图
2、滤波去噪
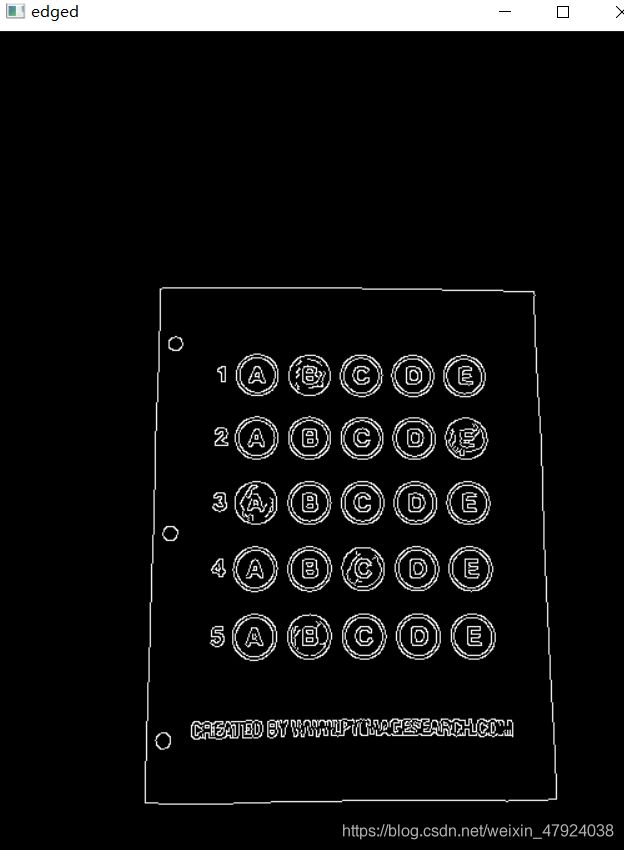
3、边缘检测Canny
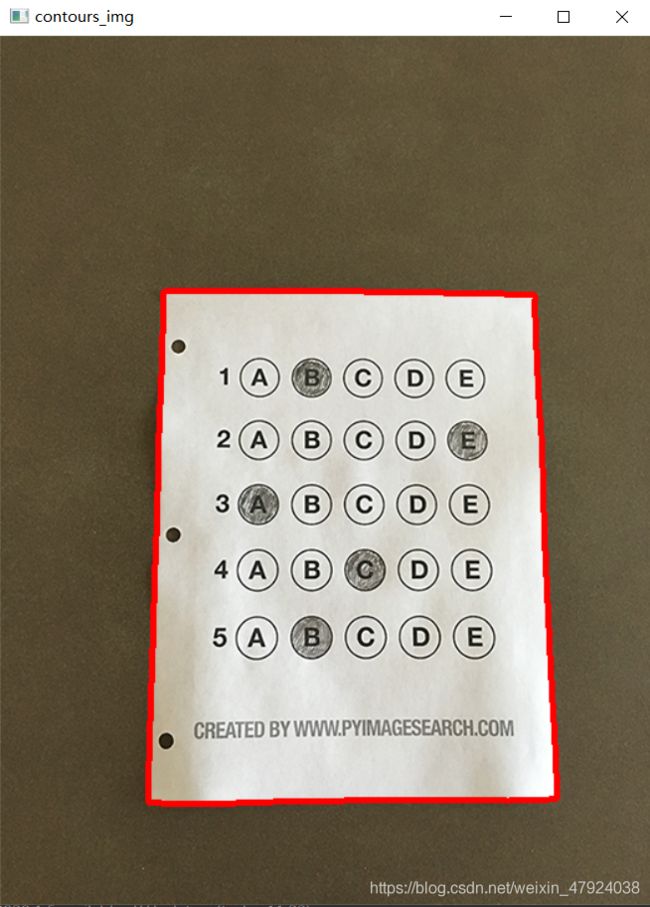
4、轮廓检测
# 预处理
image = cv2.imread("./images/test_01.png")
contours_img = image.copy()
gray = cv2.cvtColor(image, cv2.COLOR_BGR2GRAY)
blurred = cv2.GaussianBlur(gray, (5, 5), 0)#高斯滤波
cv_show('blurred',blurred)
edged = cv2.Canny(blurred, 75, 200)#边缘检测
cv_show('edged',edged)

# 轮廓检测:cnt保存的就是轮廓的坐标
cnts = cv2.findContours(edged.copy(), cv2.RETR_EXTERNAL,cv2.CHAIN_APPROX_SIMPLE)[0]
cv2.drawContours(contours_img,cnts,-1,(0,0,255),3)
cv_show('contours_img',contours_img)
灰度图

边缘检测
轮廓检测
2、透视变换
透视变换的原理参考OCR文本扫描 轮廓检测 透视变换-唐宇迪笔记
# 确保检测到了
if len(cnts) > 0:
	# 根据轮廓面积大小进行排序
	cnts = sorted(cnts, key=cv2.contourArea, reverse=True)

	# 遍历每一个轮廓
	for c in cnts:
		# 近似
		peri = cv2.arcLength(c, True)
		approx = cv2.approxPolyDP(c, 0.02 * peri, True)

		# 准备做透视变换:如果顶点有4个,那么就是这个轮廓
		if len(approx) == 4:#通过四个点来做变换
			docCnt = approx
			break

# 执行透视变换

warped = four_point_transform(gray, docCnt.reshape(4, 2))
cv_show('warped',warped)
def order_points(pts):
	'''# 一共4个坐标点,其实这个函数就是将四个点按照左上,右上,右下,左下的位置排列'''
	rect = np.zeros((4, 2), dtype = "float32")

	# 按顺序找到对应坐标0123分别是 左上,右上,右下,左下
	# 计算左上,右下
	s = pts.sum(axis = 1)#所谓的pts.sum(axis=1)就是将pts这个4 * 2的矩阵的每行相加,得到四个值
	rect[0] = pts[np.argmin(s)]#给出水平方向最小值的下标,rect[0]实际上就是pts的第一个点=(131,206)
	rect[2] = pts[np.argmax(s)]#给出水平方向最大值的下标rect[2]=(448,614)

	# 计算右上和左下
	diff = np.diff(pts, axis = 1)#其实s和diff没有什么意义。就是为了下面的函数形使用
	rect[1] = pts[np.argmin(diff)]
	rect[3] = pts[np.argmax(diff)]

	return rect

def four_point_transform(image, pts):
	# 获取输入坐标点
	rect = order_points(pts)#现在rect将4个点都按照左上,右上,右下,左下的位置排列
	(tl, tr, br, bl) = rect
	'''
	根据几个关系利用公式 s = ((x2-x1)^2 + (y2-y1))2)1/2
	因为四个点确定的近似轮廓不一定是矩形,所以分别取长和宽最大长度,
	'''
	#根据几个关系利用公式 s = ((x2-x1)^2 + (y2-y1))2)1/2
	# 因为四个点确定的近似轮廓不一定是矩形,所以分别取长和宽最大长度,
	# 计算输入的w和h值,其实就是计算4个边的长和宽的最大值
	widthA = np.sqrt(((br[0] - bl[0]) ** 2) + ((br[1] - bl[1]) ** 2))
	widthB = np.sqrt(((tr[0] - tl[0]) ** 2) + ((tr[1] - tl[1]) ** 2))
	maxWidth = max(int(widthA), int(widthB))

	heightA = np.sqrt(((tr[0] - br[0]) ** 2) + ((tr[1] - br[1]) ** 2))
	heightB = np.sqrt(((tl[0] - bl[0]) ** 2) + ((tl[1] - bl[1]) ** 2))
	maxHeight = max(int(heightA), int(heightB))

	# 变换后对应坐标位置:就是确定好变换后的坐标是一个矩形,下面只需要计算矩阵M即可
	dst = np.array([
		[0, 0],
		[maxWidth - 1, 0],
		[maxWidth - 1, maxHeight - 1],
		[0, maxHeight - 1]], dtype = "float32")

	# 计算变换矩阵
	M = cv2.getPerspectiveTransform(rect, dst)
	warped = cv2.warpPerspective(image, M, (maxWidth, maxHeight))

	# 返回变换后结果
	return warped
透视变换主要步骤:
- 根据轮廓大小排序,遍历每一个轮廓,找到有四个顶点的轮廓。
- 然后在order_points(pts)函数中,将四个顶点按照左上,右上,右下,左下的顺序排序。
- 在four_point_transform(image, pts)函数中,根据四个坐标点计算出最大的长和宽,确定坐标变换之后的位置。
- 根据四个坐标位置和变换之后的位置通过cv2.getPerspectiveTransform函数计算出变换矩阵M,最后通过cv2.warpPerspective得到了变换后的结果

3、阈值处理+轮廓检测
-
阈值处理
THRESH_OTSU会自动寻找合适的阈值,适合双峰,需把阈值参数设置为0
在信用卡数字识别案例中出现也有应用(第三、五部分) -
然后怎么区分涂和没涂的圆?
这里不用霍夫变换,因为有些涂完后 会突出边界,如下

# 又进行了阈值处理:这里写0是因为cv2.THRESH_OTSU自适应选择阈值
thresh = cv2.threshold(warped, 0, 255,cv2.THRESH_BINARY_INV | cv2.THRESH_OTSU)[1]
cv_show('thresh',thresh)
thresh_Contours = thresh.copy()
# 找到每一个圆圈轮廓
cnts = cv2.findContours(thresh.copy(), cv2.RETR_EXTERNAL,cv2.CHAIN_APPROX_SIMPLE)[0]
cv2.drawContours(thresh_Contours,cnts,-1,(0,0,255),3)
cv_show('thresh_Contours',thresh_Contours)
questionCnts = []

4、筛选答题圈
- 遍历所有圆圈轮廓(包括干扰项) 筛选出答题区域的圆,其轮廓存于questionCnts
无论是圆形还是矩形的答题卡,都是规则的形状,比例相同.
所以这里要人工设定圆圈外接矩形的长宽比例 - 然后按照从上到下(从左到右)进行排序
# 遍历
for c in cnts:
	'''主要是为了排除非选项的背景干扰'''
	# 计算比例和大小
	(x, y, w, h) = cv2.boundingRect(c)#对每个圆做外接矩形,然后将矩形的四个顶点坐标取出来
	ar = w / float(h)#计算长和宽的比值,以此来判断是否是想要的轮廓

	# 根据实际情况指定标准:满足则认为是其中的选项,
	if w >= 20 and h >= 20 and ar >= 0.9 and ar <= 1.1:
		questionCnts.append(c)

# 按照从上到下进行排序:按照第一题有5个圆,这五个圆的x是不同的,但是y是相同的,所以可以根据这个进行排序
questionCnts = sort_contours(questionCnts,method="top-to-bottom")[0]
correct = 0
def sort_contours(cnts, method="left-to-right"):
    reverse = False
    i = 0
    if method == "right-to-left" or method == "bottom-to-top":
        reverse = True
    if method == "top-to-bottom" or method == "bottom-to-top":
        i = 1

    boundingBoxes = [cv2.boundingRect(c) for c in cnts]
	#cv2.boundingRect(cnt)这个函数这个函数很简单,cnt是一个轮廓点集合,也就是它的参数,返回四个值,分别是x,y,w,h;
    (cnts, boundingBoxes) = zip(*sorted(zip(cnts, boundingBoxes),key=lambda b: b[1][i], reverse=reverse))
	#i=1意思就是第一题的五个
    return cnts, boundingBoxes
5、每行的5个选项 分别比对正确答案
- 第一个循环
答题圈的轮廓questionCnts长度应为25(25个轮廓), 间隔5, 可以遍历5次, 则q 取0 1 2 3 4,共5行;
i 表示从第几个轮廓开始:0,5,10,15,20. 即每行的第一个轮廓 - 第二个循环中
1、 j 取每个选项0 1 2 3 4
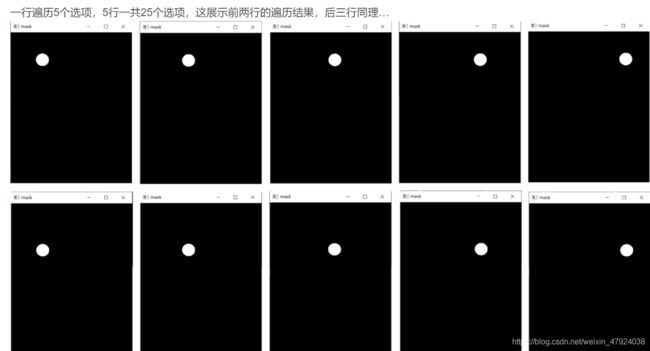
2、使用mask来判断结果:#mask就是和投射变换之后图像同样大小的纯黑的掩码,初始化一个 跟透视变换后的图 一样大小的mask(全黑)。然后在mask上, 画出当前遍历的这个(圆圈)轮廓c, 画成白色
3、与操作:用原图的copy 跟得到的黑白图片进行与操作,将轮廓保留了下来
cv2.bitwise_and(src1, src2, dst=None, mask=None)
对图像(灰度图像或彩色图像均可)每个像素值进行二进制“与”操作,
1&1=1,1&0=0,0&1=0,0&0=0
4、通过计算非零点数量(cv2.countNonZero)来算是否选择这个答案:因为真正的答案被涂黑了
5、依次判断5个选项的哪个非零值最大(即哪个被填充上了), total > bubbled[0] 比它大的才保留到bubbled
bubbled 保留最大的选项( 即填充上的选项 ) j
# 每排有5个选项
for (q, i) in enumerate(np.arange(0, len(questionCnts), 5)):
	# 排序
	cnts = sort_contours(questionCnts[i:i + 5])[0]
	bubbled = None

	# 遍历每一个结果
	for (j, c) in enumerate(cnts):#j表示的就是,某题的第j+1个选项
		# 使用mask来判断结果
		mask = np.zeros(thresh.shape, dtype="uint8")
		#mask就是和投射变换之后图像同样大小的纯黑的掩码
		# c表示第一题的第一个轮廓,此时mask就是第一题的A选项为纯白
		cv2.drawContours(mask, [c], -1, 255, -1) #-1表示填充
		cv_show('mask',mask)

		# 通过计算非零点数量来算是否选择这个答案:因为真正的答案被涂黑了
		mask = cv2.bitwise_and(thresh, thresh, mask=mask)
		total = cv2.countNonZero(mask)

		# 通过阈值判断
		if bubbled is None or total > bubbled[0]:
			bubbled = (total, j)

	# 对比正确答案
	color = (0, 0, 255)
	k = ANSWER_KEY[q]#q表示第几题,在第一层for循环中

	# 判断正确:说明找到了答案
	if k == bubbled[1]:
		color = (0, 255, 0)
		correct += 1

	# 绘图
	cv2.drawContours(warped, [cnts[k]], -1, color, 3)
6、正确答案的判断
k = ANSWER_KEY[q] 是第几题(行)的正确答案
若k = bubbled[1],判断正确,correct+=1
7、打印正确率
# 10.打印正确率
score = (correct / 5.0) * 100
print("[INFO] score: {:.2f}%".format(score))
cv2.putText(warped, "{:.2f}%".format(score), (10, 30),
	cv2.FONT_HERSHEY_SIMPLEX, 0.9, (0, 255, 0), 2)
cv2.imshow("Original", image)
cv2.imshow("Exam", warped)
cv2.waitKey(0)

结束语:这个项目不是很难,其实就是将过去学的知识综合起来
完整代码
#导入工具包
import numpy as np
import argparse
import imutils
import cv2


# 正确答案
ANSWER_KEY = {0: 1, 1: 4, 2: 0, 3: 3, 4: 1}

def order_points(pts):
	'''# 一共4个坐标点,其实这个函数就是将四个点按照左上,右上,右下,左下的位置排列'''
	rect = np.zeros((4, 2), dtype = "float32")

	# 按顺序找到对应坐标0123分别是 左上,右上,右下,左下
	# 计算左上,右下
	s = pts.sum(axis = 1)#所谓的pts.sum(axis=1)就是将pts这个4 * 2的矩阵的每行相加,得到四个值
	rect[0] = pts[np.argmin(s)]#给出水平方向最小值的下标,rect[0]实际上就是pts的第一个点=(131,206)
	rect[2] = pts[np.argmax(s)]#给出水平方向最大值的下标rect[2]=(448,614)

	# 计算右上和左下
	diff = np.diff(pts, axis = 1)#其实s和diff没有什么意义。就是为了下面的函数形使用
	rect[1] = pts[np.argmin(diff)]
	rect[3] = pts[np.argmax(diff)]

	return rect

def four_point_transform(image, pts):
	# 获取输入坐标点
	rect = order_points(pts)#现在rect将4个点都按照左上,右上,右下,左下的位置排列
	(tl, tr, br, bl) = rect
	'''
	根据几个关系利用公式 s = ((x2-x1)^2 + (y2-y1))2)1/2
	因为四个点确定的近似轮廓不一定是矩形,所以分别取长和宽最大长度,
	'''
	#根据几个关系利用公式 s = ((x2-x1)^2 + (y2-y1))2)1/2
	# 因为四个点确定的近似轮廓不一定是矩形,所以分别取长和宽最大长度,
	# 计算输入的w和h值,其实就是计算4个边的长和宽的最大值
	widthA = np.sqrt(((br[0] - bl[0]) ** 2) + ((br[1] - bl[1]) ** 2))
	widthB = np.sqrt(((tr[0] - tl[0]) ** 2) + ((tr[1] - tl[1]) ** 2))
	maxWidth = max(int(widthA), int(widthB))

	heightA = np.sqrt(((tr[0] - br[0]) ** 2) + ((tr[1] - br[1]) ** 2))
	heightB = np.sqrt(((tl[0] - bl[0]) ** 2) + ((tl[1] - bl[1]) ** 2))
	maxHeight = max(int(heightA), int(heightB))

	# 变换后对应坐标位置:就是确定好变换后的坐标是一个矩形,下面只需要计算矩阵M即可
	dst = np.array([
		[0, 0],
		[maxWidth - 1, 0],
		[maxWidth - 1, maxHeight - 1],
		[0, maxHeight - 1]], dtype = "float32")

	# 计算变换矩阵
	M = cv2.getPerspectiveTransform(rect, dst)
	warped = cv2.warpPerspective(image, M, (maxWidth, maxHeight))

	# 返回变换后结果
	return warped
def sort_contours(cnts, method="left-to-right"):
    reverse = False
    i = 0
    if method == "right-to-left" or method == "bottom-to-top":
        reverse = True
    if method == "top-to-bottom" or method == "bottom-to-top":
        i = 1

    boundingBoxes = [cv2.boundingRect(c) for c in cnts]
	#cv2.boundingRect(cnt)这个函数这个函数很简单,cnt是一个轮廓点集合,也就是它的参数,返回四个值,分别是x,y,w,h;
    (cnts, boundingBoxes) = zip(*sorted(zip(cnts, boundingBoxes),key=lambda b: b[1][i], reverse=reverse))
	#i=1意思就是第一题的五个
    return cnts, boundingBoxes
def cv_show(name,img):
        cv2.imshow(name, img)
        cv2.waitKey(0)
        cv2.destroyAllWindows()

# 预处理
image = cv2.imread("./images/test_01.png")
contours_img = image.copy()
gray = cv2.cvtColor(image, cv2.COLOR_BGR2GRAY)
blurred = cv2.GaussianBlur(gray, (5, 5), 0)#高斯滤波
cv_show('blurred',blurred)
edged = cv2.Canny(blurred, 75, 200)#边缘检测
cv_show('edged',edged)

# 轮廓检测:cnt保存的就是轮廓的坐标
cnts = cv2.findContours(edged.copy(), cv2.RETR_EXTERNAL,cv2.CHAIN_APPROX_SIMPLE)[0]
cv2.drawContours(contours_img,cnts,-1,(0,0,255),3)
cv_show('contours_img',contours_img)
docCnt = None

# 确保检测到了
if len(cnts) > 0:
	# 根据轮廓面积大小进行排序
	cnts = sorted(cnts, key=cv2.contourArea, reverse=True)

	# 遍历每一个轮廓
	for c in cnts:
		# 近似
		peri = cv2.arcLength(c, True)
		approx = cv2.approxPolyDP(c, 0.02 * peri, True)

		# 准备做透视变换:如果顶点有4个,那么就是这个轮廓
		if len(approx) == 4:#通过四个点来做变换
			docCnt = approx
			break

# 执行透视变换

warped = four_point_transform(gray, docCnt.reshape(4, 2))
cv_show('warped',warped)
# 又进行了阈值处理:这里写0是因为cv2.THRESH_OTSU自适应选择阈值
thresh = cv2.threshold(warped, 0, 255,cv2.THRESH_BINARY_INV | cv2.THRESH_OTSU)[1]
cv_show('thresh',thresh)
thresh_Contours = thresh.copy()
# 找到每一个圆圈轮廓
cnts = cv2.findContours(thresh.copy(), cv2.RETR_EXTERNAL,cv2.CHAIN_APPROX_SIMPLE)[0]
cv2.drawContours(thresh_Contours,cnts,-1,(0,0,255),3)
cv_show('thresh_Contours',thresh_Contours)
questionCnts = []

# 遍历
for c in cnts:
	'''主要是为了排除非选项的背景干扰'''
	# 计算比例和大小
	(x, y, w, h) = cv2.boundingRect(c)#对每个圆做外接矩形,然后将矩形的四个顶点坐标取出来
	ar = w / float(h)#计算长和宽的比值

	# 根据实际情况指定标准:满足则认为是其中的选项,
	if w >= 20 and h >= 20 and ar >= 0.9 and ar <= 1.1:
		questionCnts.append(c)

# 按照从上到下进行排序:按照第一题有5个圆,这五个圆的x是不同的,但是y是相同的,所以可以根据这个进行排序
questionCnts = sort_contours(questionCnts,method="top-to-bottom")[0]
correct = 0

# 每排有5个选项
for (q, i) in enumerate(np.arange(0, len(questionCnts), 5)):
	# 排序
	cnts = sort_contours(questionCnts[i:i + 5])[0]
	bubbled = None

	# 遍历每一个结果
	for (j, c) in enumerate(cnts):#j表示的就是,某题的第j+1个选项
		# 使用mask来判断结果
		mask = np.zeros(thresh.shape, dtype="uint8")
		#mask就是和投射变换之后图像同样大小的纯黑的掩码
		# c表示第一题的第一个轮廓,此时mask就是第一题的A选项为纯白
		cv2.drawContours(mask, [c], -1, 255, -1) #-1表示填充
		cv_show('mask',mask)

		# 通过计算非零点数量来算是否选择这个答案:因为真正的答案被涂黑了
		mask = cv2.bitwise_and(thresh, thresh, mask=mask)
		total = cv2.countNonZero(mask)

		# 通过阈值判断
		if bubbled is None or total > bubbled[0]:
			bubbled = (total, j)

	# 对比正确答案
	color = (0, 0, 255)
	k = ANSWER_KEY[q]#q表示第几题,在第一层for循环中

	# 判断正确:说明找到了答案
	if k == bubbled[1]:
		color = (0, 255, 0)
		correct += 1

	# 绘图
	cv2.drawContours(warped, [cnts[k]], -1, color, 3)


score = (correct / 5.0) * 100
print("[INFO] score: {:.2f}%".format(score))
cv2.putText(warped, "{:.2f}%".format(score), (10, 30),
	cv2.FONT_HERSHEY_SIMPLEX, 0.9, (0, 0, 255), 2)
cv2.imshow("Original", image)
cv2.imshow("Exam", warped)
cv2.waitKey(0)