Linux学习——进程间通信
目录
一、概念:
二、常用通信方式
三、无名管道
无名管道注意事项:
无名管道的读写特性:
四、有名管道(命名管道)
创建管道
特点:
注意事项:
五、内存映射
概念:
mmap()的优点:
函数定义:
注意事项:
mmap()映射的种类:
六、System V共享内存
两种共享内存的比较:
System-V详细介绍:
共享内存
system V 共享内存使用步骤:
七、信号机制
概念:
信号的产生:(软中断)
信号处理方式:
常用信号:
信号命令:
信号的函数:
定时器函数
定时器的实现
信号集、信号屏蔽和阻塞
信号的状态:
信号集操作函数
八、消息队列
概念:
消息队列的使用:
消息格式:
消息的接收:
九、信号灯/信号量(semaphore)
概念:
三种信号灯:
Posix 有名信号灯和无名信号灯使用:
进程间通信(IPC,InterProcess Communication)
一、概念:
就是进程和进程之间交换信息。
二、常用通信方式
无名管道(pipe)
有名管道 (fifo)
信号(signal) //重点
共享内存(mmap)
套接字(socket) //目前主流方式,还可用于主机通信
过时的IPC通信方式
System V IPC
共享内存(share memory)
消息队列(message queue)
信号灯集(semaphore set)
三、无名管道

int pipe(int pfd[2]); 成功:0;失败:-1,设置errno
pfd[0] 为读描述符
pfd[1] 为写描述符

无名管道注意事项:
- 只能用于亲缘关系的进程间通信(父子进程,兄弟进程)
- 管道通信是单工的,一端读,一端写(程序实现设计好)。
- 数据自己读不能自己写
- 管道可以用于大于2个进程共享
简单的程序:
#include
#include
#include
int main(){
    int pfd[2];
    int re;
    char buf[20]={0};
    pid_t pid;
    re = pipe(pfd);
    if(re<0){
        perror("pipe");
        return 0;
    }
    //printf("%d,%d\n",pfd[0],pfd[1]);
    pid = fork();
    if(pid<0){
        perror("fork");
        return 0;
    }else if(pid == 0){
        //close(pfd[0]);
        while(1){
            strcpy(buf,"hhahahahah");
            write(pfd[1],buf,strlen(buf));

            sleep(1);
        }

    }else{
       // close(pfd[1]);
       while(1){
            re=read(pfd[0],buf,20);
            if(re>0){
                printf("read pipe=%s\n",buf);
            }
        }
    }


}
结果: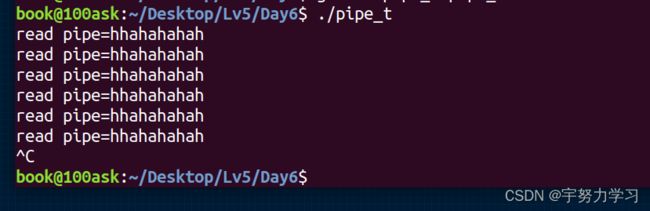
现在让父进程来写:
#include
#include
#include
int main(){
    int pfd[2];
    int re;
    char buf[20]={0};
    pid_t pid;
    re = pipe(pfd);
    if(re<0){
        perror("pipe");
        return 0;
    }
    printf("%d,%d\n",pfd[0],pfd[1]);
    pid = fork();
    if(pid<0){
        perror("fork");
        return 0;
    }else if(pid > 0){
        close(pfd[0]);
        while(1){
            strcpy(buf,"hhahahahah");
            write(pfd[1],buf,strlen(buf));

            sleep(1);
        }

    }else{
       close(pfd[1]);
       while(1){
            re=read(pfd[0],buf,20);
            if(re>0){
                printf("read pipe=%s\n",buf);
            }
        }
    }


}
结果:
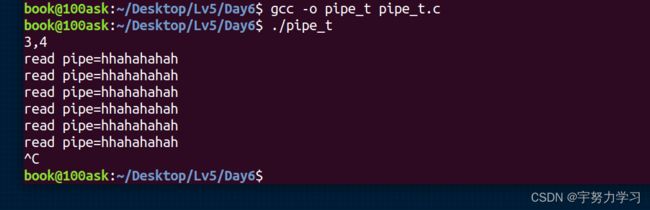
无名管道的读写特性:
- 读管道:
1. 管道中有数据,read返回实际读到的字节数。
2. 管道中无数据:
(1) 管道写端被全部关闭,read返回0 (相当于读到文件结尾)
(2) 写端没有全部被关闭,read阻塞等待(不久的将来可能有数据递达,此时会让出cpu)
- 写管道:
1. 管道读端全部被关闭, 进程异常终止(也可使用捕捉SIGPIPE信号,使进程不终止)
2. 管道读端没有全部关闭:
(1) 管道已满,write阻塞。(管道大小64K)
(2)管道未满,write将数据写入,并返回实际写入的字节数。
#include
#include
#include
int main(){
    int pfd[2];
    int i;
    int re;
    char buf[40]={0};
    pid_t pid;
    re = pipe(pfd);
    if(re<0){
        perror("pipe");
        return 0;
    }
    printf("%d,%d\n",pfd[0],pfd[1]);

    for(i=0;i<2;i++){
        pid = fork();
        if(pid<0){
            perror("fork");
            return 0;
        }else if(pid>0){

        }else{
            break;

        }
    }
    if(i==2){
        close(pfd[1]);
        while(1){
            memset(buf,0,40);
            re=read(pfd[0],buf,40);
            if(re>0){
                printf("%s\n",buf);
            }
        }
        return 0;
    }

    if(i==1){
        close(pfd[0]);
        while(1){
            strcpy(buf,"this is 2 process");
            write(pfd[1],buf,strlen(buf));
            usleep(930000);
        }
        return 0;
    }
    if(i==0){
        close(pfd[0]);
        while(1){
            strcpy(buf,"this is 1 process");
            write(pfd[1],buf,strlen(buf));
            sleep(1);
        }

        return 0;
    }


} 
#include
#include
#include
#include
int main(){
    int pfd[2];
    int re;
    char buf[20]={0};
    pid_t pid;
    re = pipe(pfd);
    if(re<0){
        perror("pipe");
        return 0;
    }
    printf("%d,%d\n",pfd[0],pfd[1]);
    pid = fork();
    if(pid<0){
        perror("fork");
        return 0;
    }else if(pid>0){
        close(pfd[0]);
//        close(pfd[1]);
        int j=0;
        while(1){
            j++;
            strcpy(buf,"hhahahahah");
            for(int i=0;i<1000;i++){
                write(pfd[1],buf,strlen(buf));
            }
            printf("write %d times\n",j);
            sleep(1);
        }

    }else{
        close(pfd[1]);
       // close(pfd[0]);
        sleep(30000);
        exit(0);
       while(1){
            re=read(pfd[0],buf,20);
            if(re>0){
                printf("read pipe=%s\n",buf);
            }else if(re==0){
                printf("re=0\n");
            }
        }
    }


} 
四、有名管道(命名管道)
就像一个队列
创建管道
#include
#include
int mkfifo(const char *filename, mode_t mode);
open(const char *path, O_RDONLY);//1
open(const char *path, O_RDONLY | O_NONBLOCK);//2
open(const char *path, O_WRONLY);//3
open(const char *path, O_WRONLY | O_NONBLOCK);//4
特点:
1有名管道可以使非亲缘的两个进程互相通信
2通过路径名来操作,在文件系统中可见,但内容存放在内存中
3 文件IO来操作有名管道
4 遵循先进先出规则
5 不支持leek操作
6 单工读写
注意事项:
1 就是程序不能以O_RDWR(读写)模式打开FIFO文件进行读写操作,而其行为也未明确定义,因为如一个管道以读/写方式打开,进程可以读回自己的输出,同时我们通常使用FIFO只是为了单向的数据传递
2 第二个参数中的选项O_NONBLOCK,选项O_NONBLOCK表示非阻塞,加上这个选项后,表示open调用是非阻塞的,如果没有这个选项,则表示open调用是阻塞的
3 对于以只读方式(O_RDONLY)打开的FIFO文件,如果open调用是阻塞的(即第二个参数为O_RDONLY),除非有一个进程以写方式打开同一个FIFO,否则它不会返回;如果open调用是非阻塞的的(即第二个参数为O_RDONLY | O_NONBLOCK),则即使没有其他进程以写方式打开同一个FIFO文件,open调用将成功并立即返回。
对于以只写方式(O_WRONLY)打开的FIFO文件,如果open调用是阻塞的(即第二个参数为O_WRONLY),open调用将被阻塞,直到有一个进程以只读方式打开同一个FIFO文件为止;如果open调用是非阻塞的(即第二个参数为O_WRONLY | O_NONBLOCK),open总会立即返回,但如果没有其他进程以只读方式打开同一个FIFO文件,open调用将返回-1,并且FIFO也不会被打开。
4.数据完整性,如果有多个进程写同一个管道,使用O_WRONLY方式打开管道,如果写入的数据长度小于等于PIPE_BUF(4K),那么或者写入全部字节,或者一个字节都不写入,系统就可以确保数据决不会交错在一起。
使用非阻塞方式打开:
#include
#include
#include
#include
#include
#include
#include


int main(){
    int re;
    int fd;
    char buf[32];
    //re = mkfifo("/home/book/Desktop/Lv5/Day6/myfifo",0666);
	re = mkfifo("./myfifo",0666);
    if(re<0){
        perror("mkfifo");
        //return 0;
    }
    fd = open("./myfifo",O_WRONLY|O_NONBLOCK);
    if(fd<0){
        perror("open");
        return 0;
    }
    printf("after open\n");
    while(1){
        fgets(buf,32,stdin);
        write(fd,buf,strlen(buf));

    }
}
#include
#include
#include
#include
#include
#include
#include
int main(){
int re;
int fd;
char buf[32];
/*
re = mkfifo("/myfifo",0666);
if(re<0){
perror("mkfifo");
return 0;
}
*/
fd = open("./myfifo",O_RDONLY);
if(fd<0){
perror("open");
return 0;
}
printf("after open\n");
while(1){
re=read(fd,buf,32);
if(re>0){
printf("read fifo=%s\n",buf);
}else if(re==0){
exit(0);
}
}
} 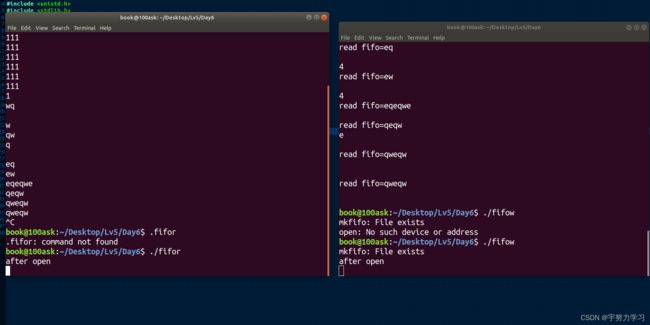
非阻塞状态打开一定要先打开读在打开写不然会打不开(所以最好加上阻塞)

现在通过有名管道进行通信。
五、内存映射
概念:
使一个磁盘文件与内存中的一个缓冲区相映射,进程可以像访问普通内存一样对文件进行访问,不必再调用read,write。
mmap()的优点:
实现了用户空间和内核空间的高效交互方式


函数定义:
void *mmap(void *addr, size_t length, int prot, int flags, int fd, off_t offset);
功能:创建共享内存映射
函数返回值:成功返回创建的映射区首地址,失败返回MAP_FAILED( ((void *) -1) ),设置errno值
参数说明:
addr:指定要映射的内存地址,一般设置为 NULL 让操作系统自动选择合适的内存地址。
length:必须>0。映射地址空间的字节数,它从被映射文件开头 offset 个字节开始算起。
prot:指定共享内存的访问权限。可取如下几个值的可选:PROT_READ(可读), PROT_WRITE(可写), PROT_EXEC(可执行), PROT_NONE(不可访问)。
flags:由以下几个常值指定:MAP_SHARED(共享的) MAP_PRIVATE(私有的), MAP_FIXED(表示必须使用 start 参数作为开始地址,如果失败不进行修正),其中,MAP_SHARED , MAP_PRIVATE必选其一,而 MAP_FIXED 则不推荐使用。MAP_ANONYMOUS(匿名映射,用于血缘关系进程间通信)
fd:表示要映射的文件句柄。如果匿名映射写-1。(就是文件描述符)
offset:表示映射文件的偏移量,一般设置为 0 表示从文件头部开始映射。
注意事项:
(1) 创建映射区的过程中,隐含着一次对映射文件的读操作,将文件内容读取到映射区。
(2) 当MAP_SHARED时,要求:映射区的权限应 <=文件打开的权限(出于对映射区的保护),如果不满足报非法参数(Invalid argument)错误。
当MAP_PRIVATE时候,mmap中的权限是对内存的限制,只需要文件有读权限即可,操作只在内存有效,不会写到物理磁盘,且不能在进程间共享。
(3) 映射区的释放与文件关闭无关,只要映射建立成功,文件可以立即关闭。(没映射成功前不能关闭)
(4) 用于映射的文件大小必须>0,当映射文件大小为0时,指定非0大小创建映射区,访问映射地址会报总线错误,指定0大小创建映射区,报非法参数错误(Invalid argument)
(5) 文件偏移量必须为0或者4K的整数倍(不是会报非法参数Invalid argument错误).
(操作系统的内存是一页一页分配的一页就是4k)
操作系统——内存分配与管理_王王仙贝~的博客-CSDN博客_操作系统内存分配
(6)映射大小可以大于文件大小,但只能访问文件page的内存地址,否则报总线错误(下图中剩余部分) ,超出映射的内存大小报段错误


(7)mmap创建映射区出错概率非常高,一定要检查返回值,确保映射区建立成功再进行后续操作。
mmap()映射的种类:
1基于文件的映射
2 匿名映射
适用于具有亲缘关系的进程之间,
释放内存映射
munmap函数
int munmap(void *addr, size_t length);
返回值:成功返回0,失败返回-1,并设置errno值。
函数参数:
addr:调用mmap函数成功返回的映射区首地址
length:映射区大小(即:mmap函数的第二个参数)
实验一:
#include
#include
#include
#include
#include
#include
#include
#include
int main(){
void *addr;
int fd;
fd =open("test",O_RDWR);
if(fd<0){
perror("open");
return 0;
}
// int len = lseek(fd,0,SEEK_END);
addr = mmap(NULL,2048, PROT_READ|PROT_WRITE, MAP_SHARED, fd, 0);
if(addr == MAP_FAILED){
perror("mmap");
return 0;
}
// close(fd);
//int i=0;
//while(i<2048){
// memcpy((addr+i),"a",1);
// i++;
// sleep(1);
// }
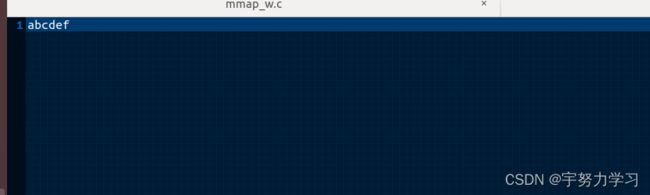
memcpy(addr,"abcdefg",7);
// printf("read=%s\n",(char*)(addr));
} 文件需要提前创建,文件要有内存,不然会总线错误

创建的时候加几个空格

但是不全因为文件大小在那里加几个回车就全了
接下来把文件改一下加上读语句
printf("read=%s\n",(char*)(addr));

实验二:
#include
#include
#include
#include
#include

#include
#include
#include


int main(){

    void *addr;
    int fd;
    fd =open("test",O_RDWR);
    if(fd<0){
        perror("open");
        return 0;
    }
   // int len = lseek(fd,0,SEEK_END);
    addr = mmap(NULL,2048, PROT_READ|PROT_WRITE, MAP_SHARED, fd, 0);
    if(addr == MAP_FAILED){
        perror("mmap");
        return 0;
    }
    close(fd);
	memcpy(addr,"aaaaaaaaaaaaaaa",15);
    //int i=0;
    //while(i<2048){
       // memcpy((addr+i),"a",1);
       // i++;
       // sleep(1);
   // }
	//memcpy(addr,"abcdefg",7);
	printf("read=%s\n",(char*)(addr));


}

读程序:
#if 1


#include
#include
#include
#include
#include

#include
#include
#include


int main(){

    void *addr;
    int fd;
    fd =open("test",O_RDWR);
    if(fd<0){
        perror("open");
        return 0;
    }
    int len = lseek(fd,0,SEEK_END);
    addr = mmap(NULL,2048, PROT_READ|PROT_WRITE, MAP_SHARED, fd, 0);
    if(addr == MAP_FAILED){
        perror("mmap");
        return 0;
    }
    close(fd);
//    memcpy((addr),"99999999999999",15);
    while(1){
        printf("read=%s\n",(char*)(addr));
        sleep(1);
    }


}
#endif
写程序:
#include
#include
#include
#include
#include

#include
#include
#include


int main(){

    void *addr;
    int fd;
    fd =open("test",O_RDWR);
    if(fd<0){
        perror("open");
        return 0;
    }
    int len = lseek(fd,0,SEEK_END);
    addr = mmap(NULL,2048, PROT_READ|PROT_WRITE, MAP_SHARED, fd, 0);
    if(addr == MAP_FAILED){
        perror("mmap");
        return 0;
    }
    close(fd);
	memcpy(addr,"aaaaaaaaaaaaaaa",15);
    int i=0;
    while(i<2048){
       memcpy((addr+i),"a",1);
       i++;
       sleep(1);
   }
	//memcpy(addr,"abcdefg",7);


	//printf("read=%s\n",(char*)(addr));


}
结果是这样的

试了好几次都是前面没变化后面开始加,把插入的字符换个1试试:
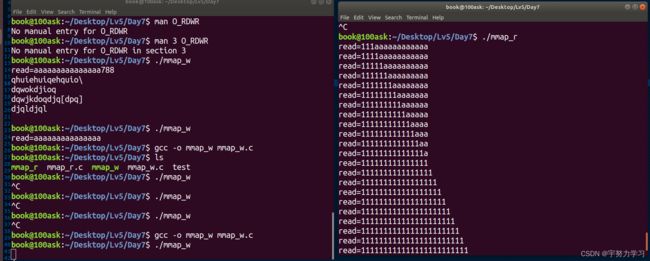 先开启写后开启读,为什么会是从前面开始加的呢。
改成16试试:
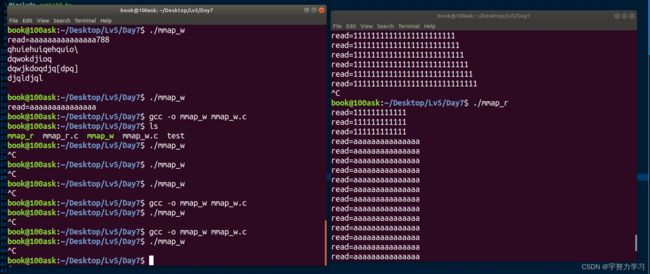
这次我是先开始读的读到几个111111后面全是a了,这是什么情况。
在改成纯i试试,之接报错了,addr是一个指针i只是他的偏移量。改成3试试
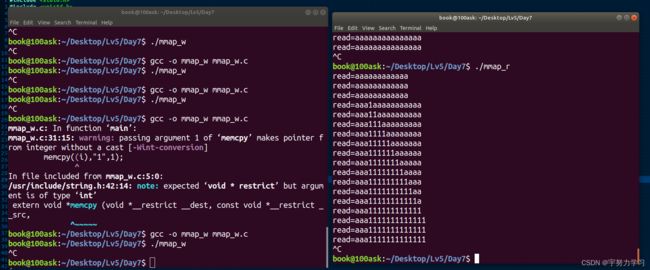
在第三个位置开始加了,但是不够直观改进代码让他每次插入的数据都不一样:
我开始想的是数组加strcpy后来这个转换老报错运行还段错误,所以还是用sprintf把他变成字符串把
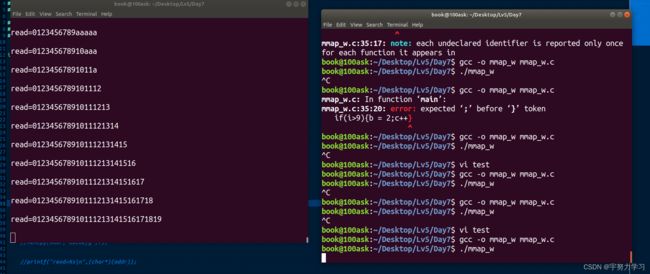
终于是我想要的了,还有个问题test第一行的空格数量决定他能跑到多少,超过文件大小就写不进去了。具体原因以后再来看现在直接深挖要学很多东西。

代码如下:
#include
#include
#include
#include
#include

#include
#include
#include


int main(){

    void *addr;
    int fd;
    fd =open("test",O_RDWR);
    if(fd<0){
        perror("open");
        return 0;
    }
    int len = lseek(fd,0,SEEK_END);
    addr = mmap(NULL,2048, PROT_READ|PROT_WRITE, MAP_SHARED, fd, 0);
    if(addr == MAP_FAILED){
        perror("mmap");
        return 0;
    }
    close(fd);
	memcpy(addr,"aaaaaaaaaaaaaaa",15);
    int i=0,b=1,c=0;
	char a[4];
	//sprintf(a,)
	//a[0] = 0;
    while(i<2048){
		sprintf(a,"%d",i);
		if(i>9){b = 2;}
		if(i>10){c++;}
        memcpy((addr+i+c),a,b);
        i++;
		sleep(1);
   }
	//memcpy(addr,"abcdefg",7);


	//printf("read=%s\n",(char*)(addr));


}
父子进间进行匿名通信:
#include
#include
#include
#include
#include

#include
#include
#include
#include

int main(){

    void *addr;

    addr = mmap(NULL,2048, PROT_READ|PROT_WRITE, MAP_SHARED|MAP_ANONYMOUS, -1, 0);
    if(addr == MAP_FAILED){
        perror("mmap");
        return 0;
    }
    pid_t pid;
    pid = fork();

    if(pid<0){
        perror("fork");
        return 0;
    }
    else if(pid>0){
        memcpy(addr,"1234567890",10);

        wait(NULL);
    }else {
        sleep(1);
        printf("read father val=%s\n",(char *)addr);


    }

    munmap(addr,2048);

}
结果:

六、System V共享内存
两种共享内存的比较:
linux 内存文件共享,两种Linux共享内存的比较_weixin_39544333的博客-CSDN博客
System-V详细介绍:
Linux-C 进程通信之system-V IPC_Genven_Liang的博客-CSDN博客
共享内存
IPC 的key

ftok函数
key_t ftok(const char *path, int id);
其中参数path是指定的文件名,这个文件必须是存在的而且可以访问的。id是子序号,它是一个8bit的整数。即范围是0~255。当函数执行成功,则会返回key_t键值,否则返回-1。在一般的UNIX中,通常是将文件的索引节点取出,然后在前面加上子序号就得到key_t的值
程序:
#include
#include
#include
#include
#include

int main(){
    key_t key;
    int shmid;
    char *buf;
    key = ftok("keytest",100);
    if(key<0){
        perror("ftok");
        return 0;
    }
    printf("key=%x\n",key);

    shmid = shmget(key,512,IPC_CREAT|0666);

    if(shmid<0){
        perror("shmget");
        return 0;
    }

    printf("shmid=%d\n",shmid);

    buf = shmat(shmid,NULL,0);
    if(buf<0){
        perror("shmat");
        return 0;
    }
    strcpy(buf,"hello world");

}
结果:

system V 共享内存使用步骤:
1创建/打开共享内存
2映射共享内存,即把指定的共享内存映射到进程的地址空间用于访问
3 读写共享内存
4 撤销共享内存映射
5 删除共享内存对象
查看共享内存命令ipcs
共享内存创建 – shmget
int shmget(key_t key, int size, int shmflg);
共享内存映射
void *shmat(int shmid, const void *shmaddr, int shmflg);
第二个参数一般写NULL,表示自动映射
第三参数一般写0 ,表示可读写
共享内存撤销
int shmdt(void *shmaddr);
撤销后,内存地址不可再访问。(只是不能用了他还在)
共享内存控制
int shmctl(int shmid, int cmd, struct shmid_ds *buf);
shmctl(shmid, IPC_RMID, NULL);删除共享内存
写程序:
#include
#include
#include
#include
#include

int main(){
    key_t key;
    int shmid;
    char *buf;
    key = ftok("keytest",100);
    if(key<0){
        perror("ftok");
        return 0;
    }
    printf("key=%x\n",key);

    shmid = shmget(key,512,IPC_CREAT|0666);

    if(shmid<0){
        perror("shmget");
        return 0;
    }

    printf("shmid=%d\n",shmid);

    buf = shmat(shmid,NULL,0);
    if(buf<0){
        perror("shmat");
        return 0;
    }
    strcpy(buf,"hello world");

}
读程序:
#include
#include
#include
#include
#include
#include

int main(){
    key_t key;
    int shmid;
    char *buf;
    key = ftok("keytest",100);
    if(key<0){
        perror("ftok");
        return 0;
    }
    printf("key=%x\n",key);

    shmid = shmget(key,512,0666);

    if(shmid<0){
        perror("shmget");
        return 0;
    }
    printf("shmid=%d\n",shmid);

    buf = shmat(shmid,NULL,0);
    if(buf<0){
        perror("shmat");
        return 0;
    }
//    strcpy(buf,"hello world");
    printf("share mem=%s\n",buf);
    while(1){
        sleep(1);
    }
    shmdt(buf);
    shmctl(shmid, IPC_RMID, NULL);

//    printf("detach mem=%s\n",buf);

}
运行结果:

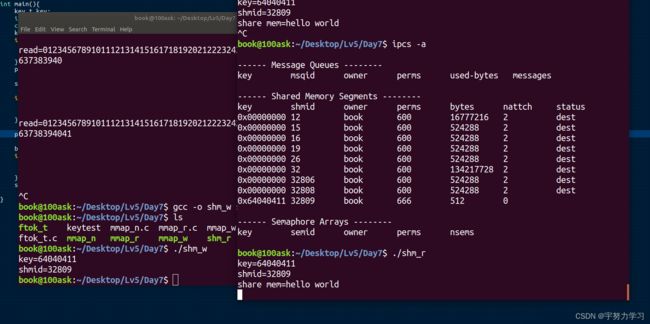
 没人用了,把while注释掉让他可以执行删除语句,现在查看就没有共享内存了。

七、信号机制
概念:
信号是在软件层次上对中断机制的一种模拟,是一种异步通信方式
所有信号的产生及处理全部都是由内核完成的
信号的产生:(软中断)
1 按键产生
2 系统调用函数产生(比如raise, kill)
3 硬件异常
4 命令行产生 (kill)
5 软件条件(比如被0除,访问非法内存等)
信号处理方式:
1 缺省方式
2 忽略信号
3 捕捉信号
常用信号:
| 信号名 |
含义 |
默认操作 |
| SIGHUP |
该信号在用户终端关闭时产生,通常是发给和该 终端关联的会话内的所有进程 |
终止 |
| SIGINT |
该信号在用户键入INTR字符(Ctrl-C)时产生,内 核发送此信号送到当前终端的所有前台进程 |
终止 |
| SIGQUIT |
该信号和SIGINT类似,但由QUIT字符(通常是 Ctrl-\)来产生 |
终止 |
| SIGILL |
该信号在一个进程企图执行一条非法指令时产生 |
终止 |
| SIGSEV |
该信号在非法访问内存时产生,如野指针、缓 冲区溢出 |
终止 |
| SIGPIPE |
当进程往一个没有读端的管道中写入时产生,代 表“管道断裂” |
终止 |
| 信号名 |
含义 |
默认操作 |
| SIGKILL |
该信号用来结束进程,并且不能被捕捉和忽略 |
终止 |
| SIGSTOP |
该信号用于暂停进程,并且不能被捕捉和忽略 |
暂停进程 |
| SIGTSTP |
该信号用于暂停进程,用户可键入SUSP字符( 通常是Ctrl-Z)发出这个信号 |
暂停进程 |
| SIGCONT |
该信号让进程进入运行态 |
继续运行 |
| SIGALRM |
该信号用于通知进程定时器时间已到 |
终止 |
| SIGUSR1/2 |
该信号保留给用户程序使用 |
终止 |
| SIGCHLD |
是子进程状态改变发给父进程的。 |
忽略 |
信号命令:
kill [-signal] pid

killall [-u user | prog]
prog指定进程名

17)子进程改变时发给父进程的信号
9)一定能杀死
15)直接kill的默认值不一定能杀死
信号的函数:
int kill(pid_t pid, int signum)
功能:发送信号
参数:
pid: > 0:发送信号给指定进程
= 0:发送信号给跟调用kill函数的那个进程处于同一进程组的进程。
< -1: 取绝对值,发送信号给该绝对值所对应的进程组的所有组员。
= -1:发送信号给,有权限发送的所有进程。
signum:待发送的信号
int raise(int sig);
给自己发信号,等价于kill(getpid(), signo);
定时器函数
unsigned int alarm(unsigned int seconds);
功能:定时发送SIGALRM给当前进程
参数: seconds:定时秒数
返回值:上次定时剩余时间。
ualarm (循环发送)
#include
#include
#include
int main(){

//    kill(24149,11);
//   raise(11);
   alarm(3);
   pause();
//   while(1){
//   }
} 
useconds_t ualarm(useconds_t usecs, useconds_t interval);
以useconds为单位,第一个参数为第一次产生时间,第二个参数为间隔产生
int setitimer(int which, const struct itimerval *new_value, struct itimerval *old_value);
功能:定时的发送alarm信号
参数:
which:
ITIMER_REAL:以逝去时间递减。发送SIGALRM信号(常用)
ITIMER_VIRTUAL: 计算进程(用户模式)执行的时间。 发送SIGVTALRM信号
ITIMER_PROF: 进程在用户模式(即程序执行时)和核心模式(即进程调度用时)均计算时间。 发送SIGPROF信号
new_value: 负责设定 timout 时间
old_value: 存放旧的timeout值,一般指定为NULL
struct itimerval {
struct timeval it_interval; // 闹钟触发周期
struct timeval it_value; // 闹钟触发时间
};
struct timeval {
time_t tv_sec; /* seconds */
suseconds_t tv_usec; /* microseconds */
};
信号的捕捉
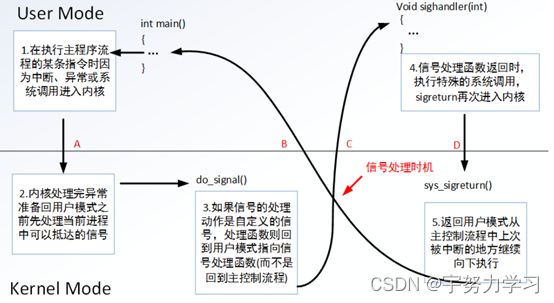
信号捕捉过程:
- 定义新的信号的执行函数handle。
- 使用signal/sigaction 函数,把自定义的handle和指定的信号相关联。
signal函数:
typedef void (*sighandler_t)(int);
sighandler_t signal(int signum, sighandler_t handler);//这是一个函数指针
功能:捕捉信号执行自定义函数
返回值:成功时返回原先的信号处理函数,失败时返回SIG_ERR
参数:
signo 要设置的信号类型
handler 指定的信号处理函数: SIG_DFL代表缺省方式; SIG_IGN 代表忽略信号;
系统建议使用sigaction函数,因为signal在不同类unix系统的行为不完全一样。
程序:
#include
#include
#include
#include
#include
#include

typedef void (*sighandler_t)(int);

sighandler_t oldact;

void handle(int sig){
    printf("I cath the SIGINT \n");
//    signal(SIGINT,oldact);
}

int main(){

    oldact = signal(SIGINT,handle);

    while(1){

        sleep(1);
    }


}
结果:
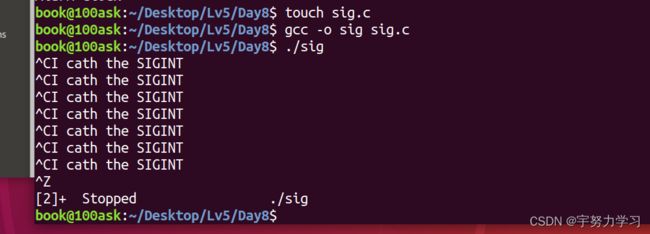
如果取消注释,第一次ctrl+c后再次ctrl+c就会退出。
sigaction函数:
int sigaction(int signum, const struct sigaction *act,struct sigaction *oldact);
struct sigaction {
void (*sa_handler)(int);
void (*sa_sigaction)(int, siginfo_t *, void *);
sigset_t sa_mask;
int sa_flags;
void (*sa_restorer)(void);
}
参数:
signum:处理的信号
act,oldact: 处理信号的新行为和旧的行为,是一个sigaction结构体。
sigaction结构体成员定义如下:
sa_handler: 是一个函数指针,其含义与 signal 函数中的信号处理函数类似
sa_sigaction: 另一个信号处理函数,它有三个参数,可以获得关于信号的更详细的信息。
sa_flags参考值如下:
SA_SIGINFO:使用 sa_sigaction 成员而不是 sa_handler 作为信号处理函数
SA_RESTART:使被信号打断的系统调用自动重新发起。
SA_RESETHAND:信号处理之后重新设置为默认的处理方式。
SA_NODEFER:使对信号的屏蔽无效,即在信号处理函数执行期间仍能发出这个信号。
re_restorer:是一个已经废弃的数据域
程序:
#include
#include
#include
#include
#include
#include
typedef void (*sighandler_t)(int);
sighandler_t oldact;
void handle(int sig){
if(sig == SIGINT){
printf("I cath the SIGINT \n");
}else if (sig==SIGALRM){
printf("second timer \n");
alarm(1);
}
// signal(SIGINT,oldact);
}
void mytimer(int sig){
}
int main(){
struct sigaction act;
act.sa_handler = handle;
act.sa_flags = 0;
sigemptyset(&act.sa_mask);
sigaction(SIGINT,&act,NULL);
alarm(1);
sigaction(SIGALRM,&act,NULL);
// oldact = signal(SIGINT,handle);
while(1){
sleep(1);
}
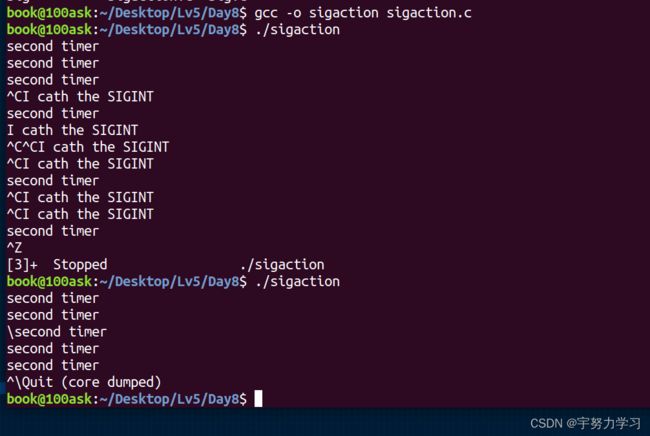
} 结果:
定时器的实现
程序:
#include
#include
#include
#include
#include
#include
#include


typedef void (*sighandler_t)(int);

sighandler_t oldact;

void handle(int sig){
   if(sig == SIGINT){
        printf("I cath the SIGINT \n");
   }else if (sig==SIGALRM){
       printf("second timer \n");
//       alarm(1);
   }
    //    signal(SIGINT,oldact);
}


int main(){
    struct sigaction act;
    act.sa_handler = handle;
    act.sa_flags = 0;
    sigemptyset(&act.sa_mask);
//    sigaction(SIGINT,&act,NULL);
//    alarm(1);
    struct itimerval timevalue;
    timevalue.it_interval.tv_sec = 1;
    timevalue.it_interval.tv_usec = 0;
    timevalue.it_value.tv_sec = 5;
    timevalue.it_value.tv_usec = 0;

    setitimer(ITIMER_REAL,&timevalue, NULL);
    sigaction(SIGALRM,&act,NULL);
//    oldact = signal(SIGINT,handle);

    while(1){
  //      sleep(1);
    }

}
结果:

五秒钟后启动定时器每秒输出一次。
使用SIGCHLD信号实现回收子进程
SIGCHLD的产生条件
1子进程终止时
2子进程接收到SIGSTOP信号停止时
3子进程处在停止态,接受到SIGCONT后唤醒时
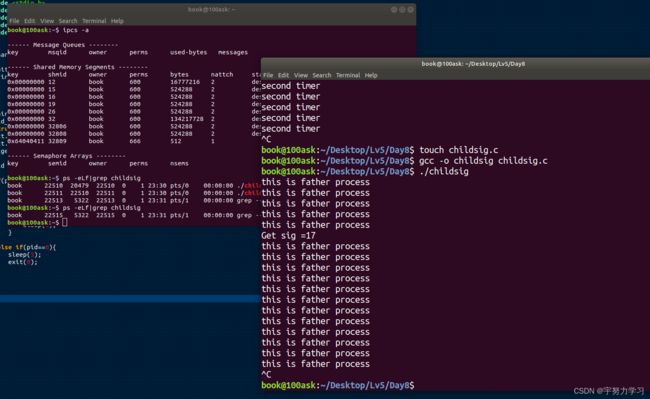
程序:(通过信号回收子进程,这样父进程不需要阻塞)
#include
#include
#include
#include
#include


void handle(int sig){

    wait(NULL);
    printf("Get sig =%d\n",sig);

}


int main(){
    pid_t pid;
    struct sigaction act;
    act.sa_handler = handle;
    act.sa_flags = 0;
    sigemptyset(&act.sa_mask);

    pid = fork();

    if(pid>0){
        //wait(NULL);

        sigaction(SIGCHLD,&act,NULL);
        while(1){
            printf("this is father process\n");
            sleep(1);
        }

    }else if(pid==0){
        sleep(5);
        exit(0);
    }


}
结果:
信号集、信号屏蔽和阻塞
(信号的三种方式其实都是一种软中断,打断了之前的程序运行,即便是忽略也进行了打断只不过什么都没做)
有时候不希望在接到信号时就立即停止当前执行,去处理信号,同时也不希望忽略该信号,而是延时一段时间去调用信号处理函数。这种情况可以通过阻塞信号实现。
信号的阻塞概念:信号的”阻塞“是一个开关动作,指的是阻止信号被处理,但不是阻止信号产生。

信号的状态:
信号递达(Delivery ):实际信号执行的处理过程(3种状态:忽略,执行默认动作,捕获)
信号未决(Pending):从产生到递达之间的状态(挂起)
信号集操作函数
sigset_t set; 自定义信号集。 是一个32bit 64bit 128bit的数组。
sigemptyset(sigset_t *set); 清空信号集
sigfillset(sigset_t *set); 全部置1
sigaddset(sigset_t *set, int signum); 将一个信号添加到集合中
sigdelset(sigset_t *set, int signum); 将一个信号从集合中移除
sigismember(const sigset_t *set,int signum); 判断一个信号是否在集合中。
设定对信号集内的信号的处理方式(阻塞或不阻塞)
#include
int sigprocmask( int how, const sigset_t *restrict set, sigset_t *restrict oset );
返回值:若成功则返回0,若出错则返回-1
首先,若oset是非空指针,那么进程的当前信号屏蔽字通过oset返回。
其次,若set是一个非空指针,则参数how指示如何修改当前信号屏蔽字。
how可选用的值:(注意,不能阻塞SIGKILL和SIGSTOP信号)
SIG_BLOCK : 把参数set中的信号添加到信号屏蔽字中
SIG_UNBLOCK: 从信号屏蔽字中删除参数set中的信号
SIG_SETMASK: 把信号屏蔽字设置为参数set中的信号
程序:
#include
#include
#include
#include


void handle(int sig){

    printf("I get sig=%d\n",sig);

}

int main(){

    struct sigaction act;
    act.sa_handler = handle;
    sigemptyset(&act.sa_mask);
    act.sa_flags = 0;
    sigaction(SIGINT,&act,NULL);
    sigset_t set;
    sigemptyset(&set);
    sigaddset(&set,SIGINT);

    sigprocmask(SIG_BLOCK,&set,NULL);
    sleep(5);
    sigprocmask(SIG_UNBLOCK,&set,NULL);

    while(1){
        sleep(1);
    }

}
结果:

按下ctrl+c等待五秒钟处理
int pause(void);
进程一直阻塞,直到被信号中断,返回值:-1 并设置errno为EINTR
函数行为:
1如果信号的默认处理动作是终止进程,则进程终止,pause函数么有机会返回。
2如果信号的默认处理动作是忽略,进程继续处于挂起状态,pause函数不返回
3 如果信号的处理动作是捕捉,则调用完信号处理函数之后,pause返回-1。
4 pause收到的信号如果被屏蔽,那么pause就不能被唤醒
int sigsuspend(const sigset_t *sigmask);
功能:将进程的屏蔽字替换为由参数sigmask给出的信号集,然后挂起进程的执行
参数:
sigmask:希望屏蔽的信号
程序:
#include
#include
#include
#include


void handle(int sig){

    printf("I get sig=%d\n",sig);

}

void mytask(){
    printf("My task start\n");
    sleep(3);
    printf("My task end\n");


}


int main(){
    struct sigaction act;
    act.sa_handler = handle;
    act.sa_flags = 0;
    sigemptyset(&act.sa_mask);
    sigaction(SIGINT,&act,NULL);
    sigaction(SIGHUP,&act,NULL);
    sigset_t set,set2;
    sigemptyset(&set2);
    sigaddset(&set,SIGHUP);
    sigaddset(&set,SIGINT);
    pause();
    while(1){
        sigprocmask(SIG_BLOCK,&set,NULL);
        mytask();
        //      sigprocmask(SIG_UNBLOCK,&set,NULL);
        //      pause();
        sigsuspend(&set2);
    }
    printf("After pause\n");
    while(1){
        sleep(1);
    }


}
如果不用sigsuspend函数使用被注释掉的两个语句,ctrl+c信号不会被pause接收到,因为被处理了。
结果:

八、消息队列
概念:
消息队列是System V IPC对象的一种(System 5)

通过内核中的链表实现

消息队列的使用:
发送端:
1 申请Key
2打开/创建消息队列 msgget
3向消息队列发送消息 msgsnd
接收端:
1打开/创建消息队列 msgget
2从消息队列接收消息 msgrcv
3 控制(删除)消息队列 msgctl
打开/创建消息队列
#include
#include
int msgget(key_t key, int msgflg);
成功时返回消息队列的id,失败时返回EOF
key 和消息队列关联的key IPC_PRIVATE 或 ftok
msgflg 标志位 IPC_CREAT|0666 IPC_CREAT:没有创建,有则打开。
发送消息
#include
#include
int msgsnd(int msgid, const void *msgp, size_t size,
int msgflg);
成功时返回0,失败时返回-1
msgid 消息队列id
msgp 消息缓冲区地址
size 消息正文长度
msgflg 标志位 0 或 IPC_NOWAIT
msgflg:
0:当消息队列满时,msgsnd将会阻塞,直到消息能写进消息队列
IPC_NOWAIT:当消息队列已满的时候,msgsnd函数不等待立即返回
消息格式:
typedef struct{
long msg_type;//第一个必须是long型代表消息的格式。
char buf[128];//后面接着写随便定义
}msgT;
注意:
1 消息结构必须有long类型的msg_type字段,表示消息的类型。
2消息长度不包括首类型 long
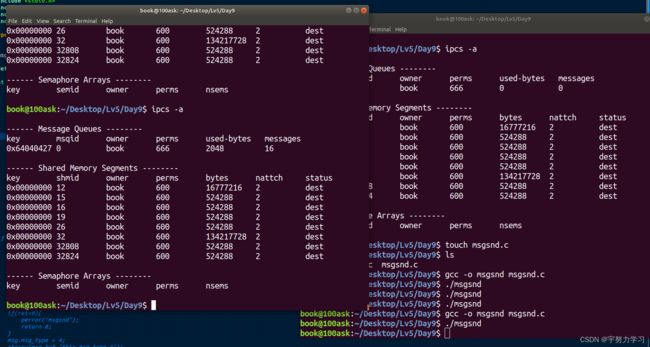
程序:
#include
#include
#include
#include

typedef struct{
    long msg_type;
    char buf[128];
}msgT;

#define MSGLEN  (sizeof(msgT)-sizeof(long))

int main(){
    key_t key;
    int msgid;
    int ret;
    msgT msg;
    key = ftok(".",100);
    if(key<0){
        perror("ftok");
        return 0;
    }
    msgid = msgget(key,IPC_CREAT|0666);
    if(msgid<0){
        perror("msgget");
        return 0;
    }

    msg.msg_type = 1;
    strcpy(msg.buf,"this msg type 1");
    ret = msgsnd(msgid,&msg,MSGLEN,0);
    if(ret<0){
        perror("msgsnd");
        return 0;
    }
#if 0
    msg.msg_type = 2;
    strcpy(msg.buf,"this msg type 2");
    ret = msgsnd(msgid,&msg,MSGLEN,0);
    if(ret<0){
        perror("msgsnd");
        return 0;
    }
    msg.msg_type = 3;
    strcpy(msg.buf,"this msg type 3");
    ret = msgsnd(msgid,&msg,MSGLEN,0);
    if(ret<0){
        perror("msgsnd");
        return 0;
    }
    msg.msg_type = 4;
    strcpy(msg.buf,"this msg type 4");
    ret = msgsnd(msgid,&msg,MSGLEN,0);
    if(ret<0){
        perror("msgsnd");
        return 0;
    }
    msg.msg_type = 5;
    strcpy(msg.buf,"this msg type 5");
    ret = msgsnd(msgid,&msg,MSGLEN,0);
    if(ret<0){
        perror("msgsnd");
        return 0;
    }
#endif


}
结果:
消息的接收:
#include
#include
int msgrcv(int msgid, void *msgp, size_t size, long msgtype,
int msgflg);
成功时返回收到的消息长度,失败时返回-1
msgid 消息队列id
msgp 消息缓冲区地址
size 指定接收的消息长度
msgtype 指定接收的消息类型
msgflg 标志位
msgtype://发送类型没有等于零的都是大于零的
msgtype=0:收到的第一条消息,任意类型。
msgtype>0:收到的第一条 msg_type类型的消息。
msgtype<0:接收类型等于或者小于msgtype绝对值的第一个消息。
例子:如果msgtype=-4,只接受类型是1、2、3、4的消息
msgflg:
0:阻塞式接收消息
IPC_NOWAIT:如果没有返回条件的消息调用立即返回,此时错误码为ENOMSG
MSG_EXCEPT:与msgtype配合使用返回队列中第一个类型不为msgtype的消息
程序:
#include
#include
#include
#include

typedef struct{
    long msg_type;
    char buf[128];
}msgT;

#define MSGLEN  (sizeof(msgT)-sizeof(long))
int main(){

    int msgid;
    key_t key;
    msgT msg;
    int ret;
    key = ftok(".",100);
    if(key<0){
        perror("ftok");
        return 0;
    }
    msgid = msgget(key,IPC_CREAT|0666);
    if(msgid<0){
        perror("msgget");
        return 0;
    }
    int count=0;
    while(1){
        ret = msgrcv(msgid,&msg,MSGLEN,0,0);
        if(ret<0){
            perror("msgrcv");
            return 0;
        }
        count++;
        if(count>3){
            break;
        }
        printf("receiv msg type=%d,buf=%s\n",(int)msg.msg_type,msg.buf);
    }

    ret = msgctl(msgid,IPC_RMID,NULL);
    if(ret<0){
        perror("msgctl");
        return 0;
    }


}
结果:

消息队列的控制
#include
#include
int msgctl(int msgid, int cmd, struct msqid_ds *buf);
成功时返回0,失败时返回-1
msgid 消息队列id
cmd 要执行的操作 IPC_STAT / IPC_SET / IPC_RMID(删除)
buf 存放消息队列属性的地址
九、信号灯/信号量(semaphore)
概念:
是不同进程间或一个给定进程内部不同线程间同步的机制。类似我们的

PV操作概念:
生产者和消费者场景
P(S) 含义如下:
if (信号量的值大于0) {
申请资源的任务继续运行;
信号量的值减一;
} else {
申请资源的任务阻塞;
}
V(S) 含义如下:
信号量的值加一;
if (有任务在等待资源) {
唤醒等待的任务,让其继续运行
}
三种信号灯:
Posix 有名信号灯
Posix 无名信号灯 (linux只支持线程同步)
System V 信号灯
Posix 有名信号灯和无名信号灯使用:
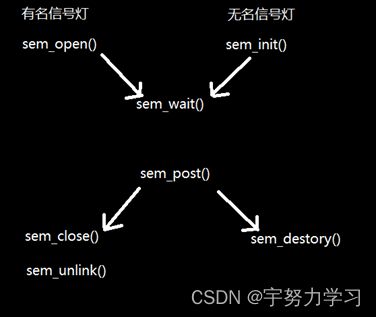
有名信号灯打开:
sem_t *sem_open(const char *name, int oflag);
sem_t *sem_open(const char *name, int oflag,mode_t mode, unsigned int value);
参数:
name:name是给信号灯起的名字
oflag:打开方式,常用O_CREAT
mode:文件权限。常用0666
value:信号量值。二元信号灯值为1,普通表示资源数目
信号灯文件位置:/dev/shm
有名信号灯关闭
int sem_close(sem_t *sem);
有名信号灯的删除
int sem_unlink(const char* name);
读信号量:
#include            /* For O_* constants */
#include         /* For mode constants */
#include
#include
#include
#include
#include
#include

#include


void delsemfile(int sig){
    sem_unlink("mysem_r");
    exit(0);

}


int main(){

   sem_t *sem_r,*sem_w;
   key_t key;
   int shmid;
   char *shmaddr;
   struct sigaction act;
   act.sa_handler = delsemfile;
   act.sa_flags = 0;
   sigemptyset(&act.sa_mask);

   sigaction(SIGINT,&act,NULL);


   key = ftok(".",100);
   if(key<0){
       perror("ftok");
       return 0;
   }

   shmid = shmget(key,500,0666|IPC_CREAT);
   if(shmid<0){
       perror("shmget");
       return 0;
   }

   shmaddr = shmat(shmid,NULL,0);

   sem_r = sem_open("mysem_r",O_CREAT|O_RDWR,0666,0);
   sem_w = sem_open("mysem_w",O_CREAT|O_RDWR,0666,1);

   while(1){
        sem_wait(sem_r);
        printf("%s\n",shmaddr);
        sem_post(sem_w);
   }

}
写信号量:
#include            /* For O_* constants */
#include         /* For mode constants */
#include

#include
#include
#include
#include
#include
#include
void delsemfile(int sig){
    sem_unlink("mysem_w");
    exit(0);

}

int main(){


   sem_t *sem_r,*sem_w;
   key_t key;
   int shmid;
   char *shmaddr;

   struct sigaction act;
   act.sa_handler = delsemfile;
   act.sa_flags = 0;
   sigemptyset(&act.sa_mask);

   sigaction(SIGINT,&act,NULL);

   key = ftok(".",100);
   if(key<0){
       perror("ftok");
       return 0;
   }

   shmid = shmget(key,500,0666|IPC_CREAT);
   if(shmid<0){
       perror("shmget");
       return 0;
   }

   shmaddr = shmat(shmid,NULL,0);

   sem_r = sem_open("mysem_r",O_CREAT|O_RDWR,0666,0);
   sem_w = sem_open("mysem_w",O_CREAT|O_RDWR,0666,1);

   while(1){
        sem_wait(sem_w);
        printf(">");
        fgets(shmaddr,500,stdin);
        sem_post(sem_r);
   }

}
结果:
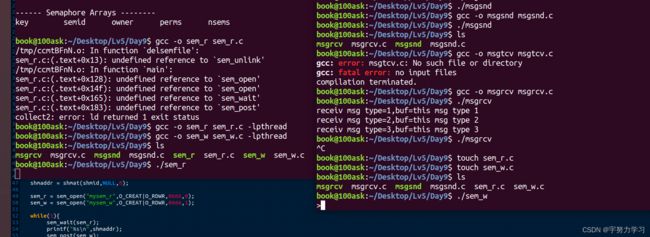

一定要加删除信号量操作,否则再次打开是失效的。只能手动来删除这个文件

无名信号灯在Linux中只能进程间通信不能用于线程间
无名信号灯初始化
int sem_init(sem_t *sem, int shared, unsigned int value);
参数:
sem:需要初始化的信号灯变量
shared: shared指定为0,表示信号量只能由初始化这个信号量的进程使用,不能在进程间使用,linux 不支持进程间同步。
Value:信号量的值
无名信号灯销毁
int sem_destroy(sem_t* sem);
信号灯P操作
int sem_wait(sem_t *sem);
获取资源,如果信号量为0,表示这时没有相应资源空闲,那么调用线程就将挂起,直到有空闲资源可以获取
信号灯V操作
int sem_post(sem_t *sem);
释放资源,如果没有线程阻塞在该sem上,表示没有线程等待该资源,这时该函数就对信号量的值进行增1操作,表示同类资源多增加了一个。如果至少有一个线程阻塞在该sem上,表示有线程等待资源,信号量为0,这时该函数保持信号量为0不变,并使某个阻塞在该sem上的线程从sem_wait函数中返回
注意:编译posix信号灯需要加pthread动态库。
程序:
#include            /* For O_* constants */
#include         /* For mode constants */
#include

#include
#include
#include
#include
#include
#include
#include


sem_t sem_r,sem_w;
char *shmaddr;
void destroysem(int sig){
//    sem_unlink("mysem_w");
   sem_destroy(&sem_r);
   sem_destroy(&sem_w);
   exit(0);

}

void *readmem(void *arg){
    while(1){
        sem_wait(&sem_r);
        printf("%s\n",shmaddr);
        sem_post(&sem_w);

    }

}


int main(){


   key_t key;
   int shmid;

   struct sigaction act;
   act.sa_handler = destroysem;
   act.sa_flags = 0;
   sigemptyset(&act.sa_mask);

   sigaction(SIGINT,&act,NULL);

   key = ftok(".",100);
   if(key<0){
       perror("ftok");
       return 0;
   }

   shmid = shmget(key,500,0666|IPC_CREAT);
   if(shmid<0){
       perror("shmget");
       return 0;
   }

   shmaddr = shmat(shmid,NULL,0);

//   sem_r = sem_open("mysem_r",O_CREAT|O_RDWR,0666,0);
//   sem_w = sem_open("mysem_w",O_CREAT|O_RDWR,0666,1);
   sem_init(&sem_r,0,0);
   sem_init(&sem_w,0,1);

   pthread_t tid;
   pthread_create(&tid,NULL,readmem,NULL);

   while(1){
        sem_wait(&sem_w);
        printf(">");
        fgets(shmaddr,500,stdin);
        sem_post(&sem_r);
   }

}
结果:

System V 信号灯使用:
int semget(key_t key, int nsems, int semflg);
功能:创建/打开信号灯
参数:key:ftok产生的key值(和信号灯关联的key值)
nsems:信号灯集中包含的信号灯数目
semflg:信号灯集的访问权限,通常为IPC_CREAT |0666
返回值:成功:信号灯集ID ; 失败:-1
int semop ( int semid, struct sembuf *opsptr, size_t nops);
功能:对信号灯集合中的信号量进行P - V操作
参数:semid:信号灯集ID
struct sembuf {
short sem_num; // 要操作的信号灯的编号
short sem_op; // 1 : 释放资源,V操作
// -1 : 分配资源,P操作
short sem_flg; // 0(阻塞),IPC_NOWAIT, SEM_UNDO
};//对某一个信号灯的操作,如果同时对多个操作,则需要定义这种结构体数组
nops: 要操作的信号灯的个数 ,1个
返回值:成功 :0 ; 失败:-1
int semctl ( int semid, int semnum, int cmd…/*union semun arg*/);
功能:信号灯集合的控制(初始化/删除)
参数:semid:信号灯集ID
semnum: 要操作的集合中的信号灯编号
cmd:
GETVAL:获取信号灯的值,返回值是获得值
SETVAL:设置信号灯的值,需要用到第四个参数:共用体
IPC_RMID:从系统中删除信号灯集合
返回值:成功 0 ; 失败 -1
程序:
#include
#include
#include
#include
#include

#include
#include
#include
#include


#define SEM_READ   0
#define SEM_WRITE  1

union semun {
   int val;
};

void Poperation(int semid,int semindex){
   struct sembuf sbuf;
   sbuf.sem_num =  semindex;
   sbuf.sem_op = -1;
   sbuf.sem_flg = 0;

   semop(semid,&sbuf,1);


}
void Voperation(int semid,int semindex){
   struct sembuf sbuf;
   sbuf.sem_num =  semindex;
   sbuf.sem_op = 1;
   sbuf.sem_flg = 0;

   semop(semid,&sbuf,1);


}


int main(){

    key_t key;
    char *shmaddr;
    int semid,shmid;
    key = ftok(".",100);
    if(key<0){
        perror("ftok");
        return 0;
    }

    semid = semget(key,2,IPC_CREAT |0666);
    if(semid<0){
        perror("semget");
        return 0;
    }
    shmid = shmget(key,500,IPC_CREAT |0666);
    shmaddr = shmat(shmid,NULL,0);
    union semun mysem;
    mysem.val = 0;
    semctl(semid,SEM_READ,SETVAL,mysem);
    mysem.val = 1;
    semctl(semid,SEM_WRITE,SETVAL,mysem);

    pid_t pid;
    pid = fork();
    if(pid<0){
        perror("fork");
        shmctl(shmid,IPC_RMID,NULL);
        semctl(semid,0,IPC_RMID);
        exit(-1);
    }else if(pid == 0){
        while(1){
            Poperation(semid,SEM_READ);
            printf("%s\n",shmaddr);

            Voperation(semid,SEM_WRITE);

        }


    }else{
        while(1){
            Poperation(semid,SEM_WRITE);
            printf(">");
            fgets(shmaddr,32,stdin);

            Voperation(semid,SEM_READ);

        }


    }

}
结果:
