- Hadoop 集群规划与部署最佳实践
AI天才研究院
Python实战DeepSeekR1&大数据AI人工智能大模型自然语言处理人工智能语言模型编程实践开发语言架构设计
作者:禅与计算机程序设计艺术1.简介2009年2月2日,ApacheHadoop项目诞生。它是一个开源的分布式系统基础架构,用于存储、处理和分析海量的数据。Hadoop具有高容错性、可靠性、可扩展性、适应性等特征,因而广泛应用于数据仓库、日志分析、网络流量监测、推荐引擎、搜索引擎等领域。由于Hadoop采用“分而治之”的架构设计理念,因此可以轻松应对数据量、计算能力和存储成本的增长。2013年底,
- JAVA代码实现ElasticSearch搜索(入门-进阶)(一):搜索方法、多字段查询、高亮展示
majunssz
elasticsearchelasticsearch
一、搜索方法对比首先存入一条数据count="ilikeeatingandkuing"默认分词器应该将内容分为“i”“like”“eating”“and”“kuing”1.QueryBuilders.matchQuery("count",count);会将搜索词分词,再与目标查询字段进行匹配,若分词中的任意一个词与目标字段匹配上,则可查询到。count="i"可查出count="ili"可查出co
- 轻松入门Apache SeaTunnel:数据集成利器
窝窝和牛牛
SeaTunnelETL数据集成
文章目录轻松入门ApacheSeaTunnel:数据集成利器什么是SeaTunnel基本原理运行流程SeaTunnelvsDataX:两大数据集成工具对比实战场景:MySQL数据同步至ElasticsearchSeaTunnel实现方案DataX实现方案实现原理对比底层依赖环境方案优缺点分析快速上手环境准备简单示例总结轻松入门ApacheSeaTunnel:数据集成利器什么是SeaTunnelAp
- java毕业设计,网上商城系统
爱编程的小哥
java毕设java课程设计springbootvue
️OnlineMall商城系统全解析|Vue3+SpringBoot全栈实战(附高并发与数据安全方案)一、系统架构全景基于七张效果图分析,该系统是企业级电商综合管理平台,采用SpringBoot3+Vue3+ElementPlus+MyBatisPlus技术栈,覆盖商品管理、订单处理、会员运营等核心场景。通过RBAC权限控制+Elasticsearch搜索+分布式事务三大技术亮点,支持10万级商品
- 微服务架构中的服务发现与负载均衡
egzosn
架构微服务服务发现负载均衡云原生
1.引言在微服务架构中,服务发现(ServiceDiscovery)和负载均衡(LoadBalancing)是两个核心组件,它们确保了服务之间的高效通信和资源的合理分配。本文将深入探讨服务发现和负载均衡的基本概念、实现方式以及在实际应用中的最佳实践。2.服务发现2.1什么是服务发现?服务发现是微服务架构中的一个关键机制,它允许服务动态地找到并与其他服务通信。由于微服务通常运行在动态环境中,服务的实
- 【 现代后端架构演进:微服务设计与云原生】
蝉叫醒了夏天
架构云原生微服务
现代后端架构演进:微服务设计与云原生一、架构演进历程1.单体架构到分布式系统单体架构瓶颈典型问题:代码耦合(代码行超百万级)、扩展困难(垂直扩容成本>105>10^5>105美元/节点)、技术栈固化故障扩散:数据库连接池耗尽导致全站瘫痪SOA(面向服务架构)引入ESB(企业服务总线),服务间通信延迟增加30-50ms典型案例:电信计费系统(服务拆分粒度以模块为单位)2.微服务革命(2014-)核心
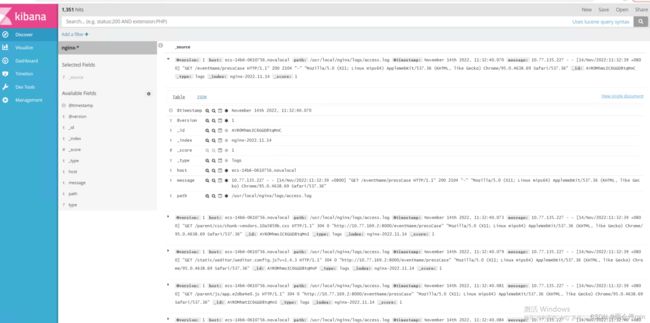
- 通过 Kibana 操作 Elasticsearch:从入门到实践
格子先生Lab
elasticsearch大数据搜索引擎
引言Kibana是Elasticsearch的可视化工具,提供了一个用户友好的界面来管理和操作Elasticsearch中的数据。通过Kibana,你可以轻松地执行数据搜索、创建可视化图表、构建仪表盘等操作。本文将带你从零开始学习如何通过Kibana操作Elasticsearch,掌握其基本功能和进阶操作。1.Kibana简介1.1什么是Kibana?Kibana是一个开源的数据可视化工具,专为E
- 同步MySQL数据至Elasticsearch:go-mysql-elasticsearch实战指南
吴镇业
同步MySQL数据至Elasticsearch:go-mysql-elasticsearch实战指南go-mysql-elasticsearchSyncMySQLdataintoelasticsearch项目地址:https://gitcode.com/gh_mirrors/go/go-mysql-elasticsearch项目介绍go-mysql-elasticsearch是一个服务,能够自动将
- ElasticSearch~查询操作~(简单查询、批量查询、匹配查询、模糊查询、精确查询、范围查询、通配符查询、must查询、should查询、过滤查询)
飞Link
Elasticelasticsearchlucene全文检索
一、简单查询一、查询所有结果GET/student_info/_search{"query":{"match_all":{}}}二、根据条件查询GET/student_info/_search{"query":{"match":{"name":"张三"}}}三、排序GET/student_info/_search{"query":{"match":{"name":"张三"}},"sort":[{"
- 将MySQL数据同步到Elasticsearch作为全文检索数据的实战指南
格子先生Lab
全文检索mysqlelasticsearch
在现代应用中,全文检索是一个非常重要的功能,尤其是在处理大量数据时。Elasticsearch是一个强大的分布式搜索引擎,能够快速地进行全文检索、分析和可视化。而MySQL作为传统的关系型数据库,虽然能够处理结构化数据,但在全文检索方面的性能不如Elasticsearch。因此,将MySQL中的数据同步到Elasticsearch中,可以充分发挥两者的优势。本文将介绍如何将MySQL中的数据同步到
- Python Web框架 Flask vs Django vs FastAPI
ZengDerby
pythonflaskfastapidjango
如果您需要构建大型的、功能丰富的应用程序,Django可能是一个很好的选择。如果您需要更灵活的框架,可以选择Flask来定制开发。而对于追求极致性能和高并发处理的项目,FastAPI可能是一个更加理想的选择。优缺点Flask在小型项目或微服务理想的选择。Flask灵活且轻量,非常适合快速开发小型应用。Flask是一个非常灵活的框架,它允许您根据项目需求进行定制。您可以根据需要选择合适的插件和扩展。
- Elasticsearch + Docker:实现容器化部署指南
IT成长日记
elasticsearchdocker容器化部署
Elasticsearch是一款强大的分布式搜索和分析引擎,广泛应用于日志分析、全文检索、实时数据分析等场景。而Docker作为一种轻量级的容器化技术,能够帮助开发者快速部署和管理应用。将Elasticsearch与Docker结合,不仅可以简化部署流程,还能提高资源利用率和系统可维护性。1环境准备1.1安装Docker安装操作请参考:Docker入门指南:1分钟搞定安装+常用命令,轻松入门容器化
- 在Spring Boot中集成分布式任务调度
微赚淘客机器人开发者联盟@聚娃科技
springboot分布式后端
在SpringBoot中集成分布式任务调度大家好,我是微赚淘客系统3.0的小编,也是冬天不穿秋裤,天冷也要风度的程序猿!1.引言分布式任务调度是现代企业应用中常见的需求,特别是在微服务架构中,不同服务可能需要定时执行任务、定时触发某些业务逻辑或者周期性地处理数据。SpringBoot提供了多种方式来实现分布式任务调度,包括使用Quartz、Spring自带的任务调度以及集成第三方调度中心等。2.使
- 网络安全-信息收集
One_Blanks
网络安全网络安全
声明学习视频来自B站UP主泷羽sec,如涉及侵权马上删除文章。笔记的只是方便各位师傅学习知识,以下网站只涉及学习内容,其他的都与本人无关,切莫逾越法律红线,否则后果自负。目录X一、Whois信息1.思路2.工具3.社工库二、搜索1.Google、bing、baidu三、Github四、搜索引擎FOFA:[https://fofa.info/](https://fofa.info/)360网络空间测
- Python - 爬虫;爬虫-网页抓取数据-工具curl
MinggeQingchun
Python爬虫curlpython
一、爬虫关于爬虫的合法性通用爬虫限制:Robots协议【约定协议robots.txt】robots协议:协议指明通用爬虫可以爬取网页的权限robots协议是一种约定,一般是大型公司的程序或者搜索引擎等遵守几乎每一个网站都有一个名为robots.txt的文档,当然也有部分网站没有设定robots.txt。对于没有设定robots.txt的网站可以通过网络爬虫获取没有口令加密的数据,也就是该网站所有页
- 【微服务架构】SpringCloud(二):Eureka原理、服务注册、Euraka单独使用
道友老李
架构师进阶-微服务架构#SpringCloud架构微服务springcloud
文章目录SpringCloudEureka原理RegisterRenewFetchRegistryCancelTimeLagCommunicationmechanism服务注册客户端配置选项服务器端配置选项Eureka单独使用Rest服务调用/eureka/status服务状态注册到eureka的服务信息查看注册到eureka的具体的服务查看服务续约更改服务状态删除状态更新删除服务元数据客户端个人
- 服务器监控 Prometheus、AlertManager、Grafana、钉钉机器人通知
懒熊猫
运维
监控系统简介Prometheus是一套开源的系统监控报警框架。需要指出的是,由于数据采集可能会有丢失,所以Prometheus不适用对采集数据要100%准确的情形。但如果用于记录时间序列数据,Prometheus具有很大的查询优势,此外,Prometheus适用于微服务的体系架构。prometheus可以理解为一个数据库+数据抓取工具,工具从各处抓来统一的数据,放入prometheus这一个时间序
- Java直通车系列46【Spring Cloud】(服务监控与追踪Spring Cloud Sleuth 和 Zipkin)
浪九天
Java直通车javaspring开发语言后端springcloud
目录服务监控与追踪(SpringCloudSleuth和Zipkin)一、为什么需要服务监控与追踪?二、核心工具:SpringCloudSleuth+Zipkin三、场景示例:电商下单调用链追踪场景描述:使用Sleuth+Zipkin的追踪流程:四、高级功能与优化五、适用场景六、总结服务监控与追踪(SpringCloudSleuth和Zipkin)一、为什么需要服务监控与追踪?在微服务架构中,一个
- 商品详情中除了价格和库存,还有哪些重要信息?
数据小爬虫@
大数据
在获取商品详情时,除了价格和库存,还有许多其他重要信息可以帮助我们更全面地了解商品。这些信息对于市场调研、数据分析、商品比较以及用户体验优化等都非常有价值。以下是一些常见的商品详情字段及其重要性:1.商品名称(Name)重要性:商品名称是用户识别商品的关键信息,也是搜索引擎优化(SEO)的重要部分。应用场景:用于展示商品、搜索优化、分类整理等。2.商品描述(Description)重要性:详细的商
- 【大模型系列】SFT(Supervised Fine-Tuning,监督微调)
Kwan的解忧杂货铺@新空间代码工作室
s2AIGC大模型
欢迎来到我的博客,很高兴能够在这里和您见面!希望您在这里可以感受到一份轻松愉快的氛围,不仅可以获得有趣的内容和知识,也可以畅所欲言、分享您的想法和见解。推荐:kwan的首页,持续学习,不断总结,共同进步,活到老学到老导航檀越剑指大厂系列:全面总结java核心技术,jvm,并发编程redis,kafka,Spring,微服务等常用开发工具系列:常用的开发工具,IDEA,Mac,Alfred,Git,
- istio 介绍-01-一个用于连接、管理和保护微服务的开放平台 概览
后端java
istioistio一个用于连接、管理和保护微服务的开放平台。介绍Istio是一个开放平台,用于提供统一的方式来集成微服务、管理跨微服务的流量、执行策略和聚合遥测数据。Istio的控制平面在底层集群管理平台(例如Kubernetes)上提供了一个抽象层。Istio由以下组件组成:Envoy-每个微服务的Sidecar代理,用于处理集群中服务之间以及从服务到外部服务的入口/出口流量。这些代理形成了一
- 云原生技术的风口来了!!
Real Man★
云原生
云原生技术(Cloud-NativeTechnologies)是一种基于云计算架构设计和运行应用程序的方法,旨在充分利用云计算的弹性、可扩展性和敏捷性。它的核心思想是通过容器化、微服务、DevOps和持续交付等技术,构建高效、可靠且易于维护的应用系统。未来,云原生技术将继续演进,成为企业数字化转型的核心驱动力。云原生技术的核心组件容器化(Containerization):使用容器(如Docker
- AlphaFolding填补蛋白质动态结构预测空白!复旦大学等提出4D扩散模型,成果入选AAAI 2025
HyperAI超神经
ScienceAI人工智能深度学习机器学习扩散模型蛋白质结构AI4S4D
蛋白质的功能很大程度上取决于其3D结构。19世纪中期,科学界普遍认为蛋白质结构是固定的、刚性的,类似「锁与钥匙」模型(lock-and-keymodel),即蛋白质与配体的结合是由固定的三维结构决定的。然而,当DanielKoshland提出酶与底物结合时会发生构象变化的观点后,传统思维开始受到挑战。1980年代,分子动力学模拟(MolecularDynamics,MD)兴起,首次从计算角度揭示了
- Spring Cloud:微服务架构的利器
Earth explosion
架构springcloud微服务
在当今快速变化的软件开发领域,微服务架构凭借其灵活性、可扩展性和易于维护的特点,成为了众多企业构建大型应用系统的首选方案。而SpringCloud,作为Spring生态系统中的一部分,为开发者提供了一整套用于构建微服务架构的工具集,极大地简化了微服务应用的开发、部署和管理过程。本文将深入介绍SpringCloud的核心概念、关键技术及其在实际项目中的应用。一、SpringCloud简介Spring
- ElasticSearch Java查询实现详解
当牛作馬
ElasticSearch使用elasticsearchjavajenkins
文章目录前言一、环境准备二.连接到ElasticSearch三.实现各种查询1匹配查询(MatchQuery)2术语查询(TermQuery)3范围查询(RangeQuery)4复合查询(BoolQuery)5.术语聚合(TermsAggregation)5.平均值聚合(AvgAggregation)6.最大值聚合(MaxAggregation)与最小值聚合(MinAggregation)7.日期
- 从 0 到 1 构建 Python 分布式爬虫,实现搜索引擎全攻略
七七知享
Pythonpython分布式爬虫搜索引擎算法程序人生网络爬虫
从0到1构建Python分布式爬虫,实现搜索引擎全攻略在大数据与信息爆炸的时代,搜索引擎已然成为人们获取信息的关键入口。你是否好奇,像百度、谷歌这般强大的搜索引擎,背后是如何精准且高效地抓取海量网页数据的?本文将带你一探究竟,以Python为工具,打造属于自己的分布式爬虫,进而搭建一个简易搜索引擎,完整呈现从底层代码编写到系统搭建的全过程。通过本文的实践,我们成功打造了Python分布式爬虫,并以
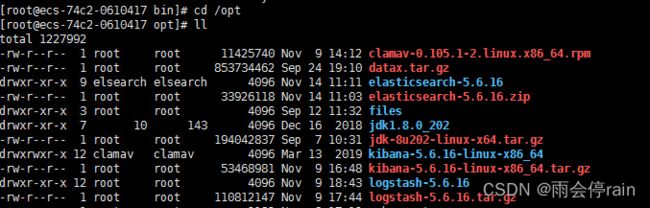
- sc命令在windows上将elasticsearch和kibana自动作为服务开机启动
windowselastic
sc是Windows自带的命令行工具,用于管理服务。1.创建服务:打开命令提示符,运行以下命令:sccreateElasticsearchbinPath="D:\elasticsearch\bin\elasticsearch.bat"start=auto2.启动服务:创建后,启动服务:scstartElasticsearch亲测可用
- 论云原生架构及其应用
桃花键神
云原生架构
摘要:2021年7月,我所在的公司承担了广东省某医院的网上预约挂号项目的开发工作,我有幸作为系统架构师参与整个系统的开发过程,并负责了系统架构设计工作。该系统以预约挂号为主线,其中包括管理平台审核、确认挂号、订单支付、更新预约状态等业务模块。本文以网上预约挂号项目为例,详细论述了云原生架构在该项目中的具体应用。系统以SpringCloud微服务框架开发,分为前端Web服务、平台保障服务、业务服务三
- jieba库词频统计_jieba分词器(应用及字典的补充)及文档高频词提取实战
袁圆园建建
jieba库词频统计
jieba分词器是Python中最好的中文分词组件,本文讲解一下jieba分词器及其应用。1、jieba分词器的分词模式jieba分词器提供了三种常用的分词模式1、精确模式:将句子按照最精确的方法进行切分,适合用于进行文本分析;2、全模式:将句子当中所有可以成词的词语都扫描出来,分词速度很快但容易产生歧义;3、搜索引擎模式:在精确模式分词的基础上,将长的句子再次进行切分,提高召回率,适用于搜索引擎
- Chapter 9: Using Templates in Practice_《C++ Templates》notes
郭涤生
c/c++c++开发语言笔记
UsingTemplatesinPracticeStep1:UnderstandTemplateDefinitionsandtheInclusionModelKeyConceptCodeExampleExplanationStep2:TackleLinkerErrorswithExplicitInstantiationKeyConceptCodeExampleTestCaseStep3:Decod
- Java 并发包之线程池和原子计数
lijingyao8206
Java计数ThreadPool并发包java线程池
对于大数据量关联的业务处理逻辑,比较直接的想法就是用JDK提供的并发包去解决多线程情况下的业务数据处理。线程池可以提供很好的管理线程的方式,并且可以提高线程利用率,并发包中的原子计数在多线程的情况下可以让我们避免去写一些同步代码。
这里就先把jdk并发包中的线程池处理器ThreadPoolExecutor 以原子计数类AomicInteger 和倒数计时锁C
- java编程思想 抽象类和接口
百合不是茶
java抽象类接口
接口c++对接口和内部类只有简介的支持,但在java中有队这些类的直接支持
1 ,抽象类 : 如果一个类包含一个或多个抽象方法,该类必须限定为抽象类(否者编译器报错)
抽象方法 : 在方法中仅有声明而没有方法体
package com.wj.Interface;
- [房地产与大数据]房地产数据挖掘系统
comsci
数据挖掘
随着一个关键核心技术的突破,我们已经是独立自主的开发某些先进模块,但是要完全实现,还需要一定的时间...
所以,除了代码工作以外,我们还需要关心一下非技术领域的事件..比如说房地产
&nb
- 数组队列总结
沐刃青蛟
数组队列
数组队列是一种大小可以改变,类型没有定死的类似数组的工具。不过与数组相比,它更具有灵活性。因为它不但不用担心越界问题,而且因为泛型(类似c++中模板的东西)的存在而支持各种类型。
以下是数组队列的功能实现代码:
import List.Student;
public class
- Oracle存储过程无法编译的解决方法
IT独行者
oracle存储过程
今天同事修改Oracle存储过程又导致2个过程无法被编译,流程规范上的东西,Dave 这里不多说,看看怎么解决问题。
1. 查看无效对象
XEZF@xezf(qs-xezf-db1)> select object_name,object_type,status from all_objects where status='IN
- 重装系统之后oracle恢复
文强chu
oracle
前几天正在使用电脑,没有暂停oracle的各种服务。
突然win8.1系统奔溃,无法修复,开机时系统 提示正在搜集错误信息,然后再开机,再提示的无限循环中。
无耐我拿出系统u盘 准备重装系统,没想到竟然无法从u盘引导成功。
晚上到外面早了一家修电脑店,让人家给装了个系统,并且那哥们在我没反应过来的时候,
直接把我的c盘给格式化了 并且清理了注册表,再装系统。
然后的结果就是我的oracl
- python学习二( 一些基础语法)
小桔子
pthon基础语法
紧接着把!昨天没看继续看django 官方教程,学了下python的基本语法 与c类语言还是有些小差别:
1.ptyhon的源文件以UTF-8编码格式
2.
/ 除 结果浮点型
// 除 结果整形
% 除 取余数
* 乘
** 乘方 eg 5**2 结果是5的2次方25
_&
- svn 常用命令
aichenglong
SVN版本回退
1 svn回退版本
1)在window中选择log,根据想要回退的内容,选择revert this version或revert chanages from this version
两者的区别:
revert this version:表示回退到当前版本(该版本后的版本全部作废)
revert chanages from this versio
- 某小公司面试归来
alafqq
面试
先填单子,还要写笔试题,我以时间为急,拒绝了它。。时间宝贵。
老拿这些对付毕业生的东东来吓唬我。。
面试官很刁难,问了几个问题,记录下;
1,包的范围。。。public,private,protect. --悲剧了
2,hashcode方法和equals方法的区别。谁覆盖谁.结果,他说我说反了。
3,最恶心的一道题,抽象类继承抽象类吗?(察,一般它都是被继承的啊)
4,stru
- 动态数组的存储速度比较 集合框架
百合不是茶
集合框架
集合框架:
自定义数据结构(增删改查等)
package 数组;
/**
* 创建动态数组
* @author 百合
*
*/
public class ArrayDemo{
//定义一个数组来存放数据
String[] src = new String[0];
/**
* 增加元素加入容器
* @param s要加入容器
- 用JS实现一个JS对象,对象里有两个属性一个方法
bijian1013
js对象
<html>
<head>
</head>
<body>
用js代码实现一个js对象,对象里有两个属性,一个方法
</body>
<script>
var obj={a:'1234567',b:'bbbbbbbbbb',c:function(x){
- 探索JUnit4扩展:使用Rule
bijian1013
java单元测试JUnitRule
在上一篇文章中,讨论了使用Runner扩展JUnit4的方式,即直接修改Test Runner的实现(BlockJUnit4ClassRunner)。但这种方法显然不便于灵活地添加或删除扩展功能。下面将使用JUnit4.7才开始引入的扩展方式——Rule来实现相同的扩展功能。
1. Rule
&n
- [Gson一]非泛型POJO对象的反序列化
bit1129
POJO
当要将JSON数据串反序列化自身为非泛型的POJO时,使用Gson.fromJson(String, Class)方法。自身为非泛型的POJO的包括两种:
1. POJO对象不包含任何泛型的字段
2. POJO对象包含泛型字段,例如泛型集合或者泛型类
Data类 a.不是泛型类, b.Data中的集合List和Map都是泛型的 c.Data中不包含其它的POJO
- 【Kakfa五】Kafka Producer和Consumer基本使用
bit1129
kafka
0.Kafka服务器的配置
一个Broker,
一个Topic
Topic中只有一个Partition() 1. Producer:
package kafka.examples.producers;
import kafka.producer.KeyedMessage;
import kafka.javaapi.producer.Producer;
impor
- lsyncd实时同步搭建指南——取代rsync+inotify
ronin47
1. 几大实时同步工具比较 1.1 inotify + rsync
最近一直在寻求生产服务服务器上的同步替代方案,原先使用的是 inotify + rsync,但随着文件数量的增大到100W+,目录下的文件列表就达20M,在网络状况不佳或者限速的情况下,变更的文件可能10来个才几M,却因此要发送的文件列表就达20M,严重减低的带宽的使用效率以及同步效率;更为要紧的是,加入inotify
- java-9. 判断整数序列是不是二元查找树的后序遍历结果
bylijinnan
java
public class IsBinTreePostTraverse{
static boolean isBSTPostOrder(int[] a){
if(a==null){
return false;
}
/*1.只有一个结点时,肯定是查找树
*2.只有两个结点时,肯定是查找树。例如{5,6}对应的BST是 6 {6,5}对应的BST是
- MySQL的sum函数返回的类型
bylijinnan
javaspringsqlmysqljdbc
今天项目切换数据库时,出错
访问数据库的代码大概是这样:
String sql = "select sum(number) as sumNumberOfOneDay from tableName";
List<Map> rows = getJdbcTemplate().queryForList(sql);
for (Map row : rows
- java设计模式之单例模式
chicony
java设计模式
在阎宏博士的《JAVA与模式》一书中开头是这样描述单例模式的:
作为对象的创建模式,单例模式确保某一个类只有一个实例,而且自行实例化并向整个系统提供这个实例。这个类称为单例类。 单例模式的结构
单例模式的特点:
单例类只能有一个实例。
单例类必须自己创建自己的唯一实例。
单例类必须给所有其他对象提供这一实例。
饿汉式单例类
publ
- javascript取当月最后一天
ctrain
JavaScript
<!--javascript取当月最后一天-->
<script language=javascript>
var current = new Date();
var year = current.getYear();
var month = current.getMonth();
showMonthLastDay(year, mont
- linux tune2fs命令详解
daizj
linuxtune2fs查看系统文件块信息
一.简介:
tune2fs是调整和查看ext2/ext3文件系统的文件系统参数,Windows下面如果出现意外断电死机情况,下次开机一般都会出现系统自检。Linux系统下面也有文件系统自检,而且是可以通过tune2fs命令,自行定义自检周期及方式。
二.用法:
Usage: tune2fs [-c max_mounts_count] [-e errors_behavior] [-g grou
- 做有中国特色的程序员
dcj3sjt126com
程序员
从出版业说起 网络作品排到靠前的,都不会太难看,一般人不爱看某部作品也是因为不喜欢这个类型,而此人也不会全不喜欢这些网络作品。究其原因,是因为网络作品都是让人先白看的,看的好了才出了头。而纸质作品就不一定了,排行榜靠前的,有好作品,也有垃圾。 许多大牛都是写了博客,后来出了书。这些书也都不次,可能有人让为不好,是因为技术书不像小说,小说在读故事,技术书是在学知识或温习知识,有
- Android:TextView属性大全
dcj3sjt126com
textview
android:autoLink 设置是否当文本为URL链接/email/电话号码/map时,文本显示为可点击的链接。可选值(none/web/email/phone/map/all) android:autoText 如果设置,将自动执行输入值的拼写纠正。此处无效果,在显示输入法并输
- tomcat虚拟目录安装及其配置
eksliang
tomcat配置说明tomca部署web应用tomcat虚拟目录安装
转载请出自出处:http://eksliang.iteye.com/blog/2097184
1.-------------------------------------------tomcat 目录结构
config:存放tomcat的配置文件
temp :存放tomcat跑起来后存放临时文件用的
work : 当第一次访问应用中的jsp
- 浅谈:APP有哪些常被黑客利用的安全漏洞
gg163
APP
首先,说到APP的安全漏洞,身为程序猿的大家应该不陌生;如果抛开安卓自身开源的问题的话,其主要产生的原因就是开发过程中疏忽或者代码不严谨引起的。但这些责任也不能怪在程序猿头上,有时会因为BOSS时间催得紧等很多可观原因。由国内移动应用安全检测团队爱内测(ineice.com)的CTO给我们浅谈关于Android 系统的开源设计以及生态环境。
1. 应用反编译漏洞:APK 包非常容易被反编译成可读
- C#根据网址生成静态页面
hvt
Web.netC#asp.nethovertree
HoverTree开源项目中HoverTreeWeb.HVTPanel的Index.aspx文件是后台管理的首页。包含生成留言板首页,以及显示用户名,退出等功能。根据网址生成页面的方法:
bool CreateHtmlFile(string url, string path)
{
//http://keleyi.com/a/bjae/3d10wfax.htm
stri
- SVG 教程 (一)
天梯梦
svg
SVG 简介
SVG 是使用 XML 来描述二维图形和绘图程序的语言。 学习之前应具备的基础知识:
继续学习之前,你应该对以下内容有基本的了解:
HTML
XML 基础
如果希望首先学习这些内容,请在本站的首页选择相应的教程。 什么是SVG?
SVG 指可伸缩矢量图形 (Scalable Vector Graphics)
SVG 用来定义用于网络的基于矢量
- 一个简单的java栈
luyulong
java数据结构栈
public class MyStack {
private long[] arr;
private int top;
public MyStack() {
arr = new long[10];
top = -1;
}
public MyStack(int maxsize) {
arr = new long[maxsize];
top
- 基础数据结构和算法八:Binary search
sunwinner
AlgorithmBinary search
Binary search needs an ordered array so that it can use array indexing to dramatically reduce the number of compares required for each search, using the classic and venerable binary search algori
- 12个C语言面试题,涉及指针、进程、运算、结构体、函数、内存,看看你能做出几个!
刘星宇
c面试
12个C语言面试题,涉及指针、进程、运算、结构体、函数、内存,看看你能做出几个!
1.gets()函数
问:请找出下面代码里的问题:
#include<stdio.h>
int main(void)
{
char buff[10];
memset(buff,0,sizeof(buff));
- ITeye 7月技术图书有奖试读获奖名单公布
ITeye管理员
活动ITeye试读
ITeye携手人民邮电出版社图灵教育共同举办的7月技术图书有奖试读活动已圆满结束,非常感谢广大用户对本次活动的关注与参与。
7月试读活动回顾:
http://webmaster.iteye.com/blog/2092746
本次技术图书试读活动的优秀奖获奖名单及相应作品如下(优秀文章有很多,但名额有限,没获奖并不代表不优秀):
《Java性能优化权威指南》