卷积神经网络结构可视化工具PlotNeuralNet
0. 效果展示
这是GitHub项目地址
偷了几张项目中的展示图感受下,要是喜欢这个风格,就继续往下看:
1. 使用
该项目我只在Ubuntu18成功运行过,Windows试过没有成功。
1.1 克隆项目到本地
1.2 安装相关
- ubuntu 16.04
sudo apt-get install texlive-latex-extra - ubuntu 18.04
sudo apt-get install texlive-latex-base
sudo apt-get install texlive-fonts-recommended
sudo apt-get install texlive-fonts-extra
sudo apt-get install texlive-latex-extra
1.3 测试
进入pyexamples文件夹,这里存放了测试程序
然后运行测试程序
cd pyexamples/
bash ../tikzmake.sh test_simple
程序成功运行后,会自动弹出PDF展示,在pyexamples生产一个"test_simple.pdf"文件
1.4 绘制自己的网络结构
- 在PlotNeuralNet-master文件夹(项目根目录)创建my_project文件夹,并进入该文件夹:
mkdir my_project
cd my_project
- 创建并编辑my_arch.py(这一步就是创建文件写入代码,用什么其实无所谓)
vim my_arch.py
- 写入以下代码
import sys
sys.path.append('../')
from pycore.tikzeng import *
# defined your arch
arch = [
to_head( '..' ),
to_cor(),
to_begin(),
# 这里才构建自己的网络结构
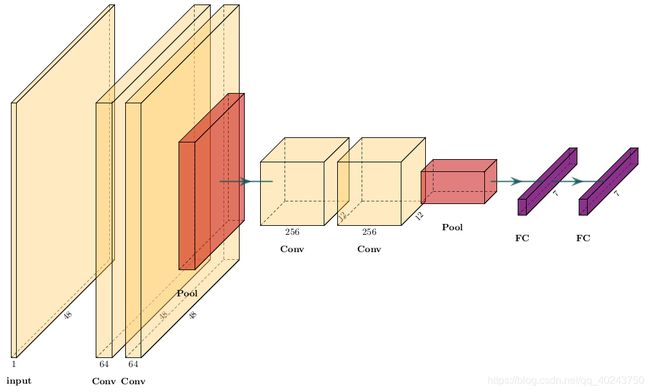
to_Conv("input", 48,1, offset="(0,0,0)", to="(0,0,0)", height=48, depth=48, width=1,caption="input"),
to_Conv("conv1", 48,64, offset="(3,0,0)", to="(input-east)", height=48, depth=48, width=3 ,caption="Conv"),
to_Conv("conv2", 48,64, offset="(0.5,0,0)", to="(conv1-east)", height=48, depth=48, width=3 ,caption="Conv"),
to_Pool("pool3", offset="(0.5,0,0)",height=24, depth=24, width=3 , to="(conv2-east)",caption="Pool"),
to_Conv("conv7", 12,256, offset="(2,0,0)", to="(pool3-east)", height=12, depth=12, width=12 ,caption="Conv"),
to_Conv("conv8", 12,256, offset="(0.5,0,0)", to="(conv7-east)", height=12, depth=12, width=12 ,caption="Conv"),
to_Pool("pool9", offset="(0.5,0,0)",height=6, depth=6, width=12 , to="(conv8-east)",caption="Pool"),
to_SoftMax("soft1", 7 ,"(2,0,0)", "(pool9-east)", caption="FC" ),
to_SoftMax("soft2", 7 ,"(2,0,0)", "(soft1-east)", caption="FC" ),
to_connection( "pool3", "conv7"),
to_connection( "pool9", "soft1"),
to_connection( "soft1", "soft2"),
# 至此结束
to_end()
]
def main():
namefile = str(sys.argv[0]).split('.')[0]
to_generate(arch, namefile + '.tex' )
if __name__ == '__main__':
main()
to_Conv("conv1", 48,64, offset="(3,0,0)", to="(input-east)", height=48, depth=48, width=3 ,caption="Conv"),
- “conv1”:该层的独特名字。每层都有一个不重复的名字,不会显示
- 48:该层要显示出来的特征图尺寸
- 64:该层要显示出来的通道数
- offset="(3,0,0)":相对位置偏移,是相对于to参数指定的层。这里表示相对input层移动3个单位
- to="(input-east)":表示该层是相对于input的东侧位置
- height=48, depth=48, width=3:表示该层在图中的尺寸大小,将影响图的大小
- caption=“Conv”:表示该层展示的名字
to_Pool("pool3", offset="(0.5,0,0)",height=24, depth=24, width=3 , to="(conv2-east)",caption="Pool"),
- Pool层没有特征图尺寸和通道数,其他同上
to_connection( "pool3", "conv7"),
- 该函数将会在指定的两层创建一个指向箭头
绘制的网络结构图:
1.5 运行代码
使用以下命令运行,成功后会产生pdf文件,并自动打开pdf展示;失败则会卡在命令行中,无反应;
bash ../tikzmake.sh my_arch
2. 扩展
更多的层函数封装在pycore/tikzeng.py文件中,examples文件夹中也有网络样例,在github项目中也有更多的信息。