集合
1.ArryList与LinkedList
1.1 ArryList类常用方法
		使用一个类的方法时,一定要去看此类的构造方法(必须的)

  		boolean add(Object o)
  					在列表的末尾顺序添加元素,起始索引位置从0开始
  		void add(int index,Object o)
  					在指定的索引位置添加元素。索引位置必须介于0和列表中元素个数之间
  		int size()
  					返回列表中的元素个数
  		Object get(int index)
  					返回指定索引位置处的元素。取出元素是Object类型,使用前需要进行强制类型转换
  		boolean remove(Object o)
  					从列表中删除元素
  		Object remove(int index)
  					从列表中删除指定位置元素,起始索引位置从0开始
  		boolean contains(Object o)
  					判断列表中是否存在指定元素
1.2 ArryList各种方法用法例子
import java.util.ArrayList;
public class Test {
public static void main(String[] args) {
NewsTitle nt1 = new NewsTitle(1001, "合肥新站区和肥西各新增1例新冠肺炎感染者", "合肥日报");
NewsTitle nt2 = new NewsTitle(1002, "合肥今日有暴雨,局部地区特大暴雨", "张三");
NewsTitle nt3 = new NewsTitle(1003, "震惊,程序员每天竟然喜欢干这件事", "李四");
NewsTitle nt4 = new NewsTitle(1004, "安徽泗县昨日新增新冠肺炎无症状感染者23例", "安徽日报");
ArrayList al = new ArrayList();
al.add(nt1);
al.add(nt3);
al.add(nt2);
int size = al.size();
System.out.println("集合中元素的个数:" + size);
for (int i = 0; i < al.size(); i++) {
Object obj = al.get(i);
NewsTitle newsTile = (NewsTitle) obj;
System.out.println(newsTile.getId()+"--"+newsTile.getName());
}
al.add(0, nt4);
NewsTitle news =(NewsTitle)al.get(0);
System.out.println(news);
boolean result1 =al.contains(nt3);
System.out.println("集合中存在你要找的元素nt3:"+result1);
boolean result2 =al.remove(nt4);
System.out.println("删除元素成功:"+result2);
for (int i = 0; i < al.size(); i++) {
Object obj = al.get(i);
NewsTitle newsTile = (NewsTitle) obj;
System.out.println(newsTile.getId()+"--"+newsTile.getName());
}
System.out.println("---------------");
Object obj =al.remove(0);
NewsTitle newsTile = (NewsTitle) obj;
System.out.println(newsTile);
System.out.println("--------------");
for (int i = 0; i < al.size(); i++) {
Object obje = al.get(i);
NewsTitle newsTilee = (NewsTitle) obje;
System.out.println(newsTilee.getId()+"--"+newsTilee.getName());
}
System.out.println("--------------");
Object[] objs =al.toArray();
for (int i = 0; i < objs.length; i++) {
System.out.println(objs[i]);
}
System.out.println("--------------");
Iterator it =al.iterator();
while(it.hasNext()){
Object object =it.next();
System.out.println(object);
}
System.out.println("--------------------------------------");
for(Object ob:al){
System.out.println(ob);
}
}
}
1.3 LinkedList类常用方法
-
LinkedList类是List接口的一个具体实现类,它是用于创建链表数据结构,当插入或删除元素时,性能会更好

void  addFirst(Object o) 	在列表的首部添加元素
Object getFirst() 			返回列表中的第一个元素
Object  getLast()			返回列表中的最后一个元素
Object  removeFirst()	 	删除并返回删除的这个元素
Object  removeLast()		删除并返回列表中的最后一个元素
-
例子

public class Test {
  	/*
  	 * 新闻管理系统,需求如下 可以添加头条新闻标题 获取头条和最末条新闻标题 可以删除末条新闻标题
  	 */
  	public static void main(String[] args) {
  		// 准备集合中的内容,创建3个NewsTitle类对象
  		NewsTitle nt1 = new NewsTitle(1001, "Java中还有这么神奇的事情", "张三");
  		NewsTitle nt2 = new NewsTitle(1002, "合肥将变成一个没有传销的城市", "李四");
  		NewsTitle nt3 = new NewsTitle(1003, "合肥比亚迪即将建成开厂", "王五");
  		NewsTitle nt4 = new NewsTitle(1004, "大湖名城,创新高低", "赵六");
  		NewsTitle nt5 = new NewsTitle(1005, "大湖名城,创新高低", "孙七");

  		//准备容器,创建LinkedList对象
  		LinkedList list = new LinkedList();
  		list.add(nt1);
  		list.add(nt2);
  		list.add(nt3);
  		list.addLast(nt5);
  		list.addFirst(nt4);


  		for (int i = 0; i < list.size(); i++) {
  			System.out.println(list.get(i));
  		}

  		System.out.println("-------------获取元素-------------");

  		System.out.println(list.getFirst());
  		System.out.println(list.getLast());

  		System.out.println("-------------删除元素--------------");
  		System.out.println(list.removeFirst());
  		System.out.println(list.removeLast());

  		System.out.println("--------------删除元素后进行遍历-------------");
  		for (Object object : list) {
  			System.out.println(object);
  		}

  	}
  }

  输出结果
  			NewsTitle [id=1004, name=大湖名城,创新高低, author=赵六]
  			NewsTitle [id=1001, name=Java中还有这么神奇的事情, author=张三]
  			NewsTitle [id=1002, name=合肥将变成一个没有传销的城市, author=李四]
  			NewsTitle [id=1003, name=合肥比亚迪即将建成开厂, author=王五]
  			NewsTitle [id=1005, name=大湖名城,创新高低, author=孙七]
  			-------------获取元素-------------
  			NewsTitle [id=1004, name=大湖名城,创新高低, author=赵六]
  			NewsTitle [id=1005, name=大湖名城,创新高低, author=孙七]
  			-------------删除元素--------------
  			NewsTitle [id=1004, name=大湖名城,创新高低, author=赵六]
  			NewsTitle [id=1005, name=大湖名城,创新高低, author=孙七]
  			--------------删除元素后进行遍历-------------
  			NewsTitle [id=1001, name=Java中还有这么神奇的事情, author=张三]
  			NewsTitle [id=1002, name=合肥将变成一个没有传销的城市, author=李四]
  			NewsTitle [id=1003, name=合肥比亚迪即将建成开厂, author=王五]
2.HashSet
2.1 HashSet类中的方法
-
boolean add(E e)
int size()
Iterator iterator()   返回此集合中元素的迭代器,元素没有特定的顺序返回。
无get()方法

注:
	Iterator接口中的方法
  			 boolean hasNext()
  			 E next()
    迭代器作用
    		是用来访问容器(用来保存元素的数据结构)中的元素,所以使用迭代器,我们就可以访问容器中里面的元素
-
HashSet是Set接口常用的实现类 ,set集合是无序的,所以不能使用get(下标)获取元素

如何遍历Set集合呢?
方法一:
		通过获取迭代器Iterator实现遍历
		Collection接口的iterator()方法

		Iterator接口的方法
				boolean hasNext()  判断是否存在另一个可访问的元素
				Object next()   返回要访问的下一个元素(因为这不是指向第一个元素,而是先指向的是空元素,所以访问的是下一个元素)
方法二:
		增强for循环
-
例子
  	public class Test {

  		public static void main(String[] args) {
  			//准备数据:创建NewsTitle对象
  			NewsTitle nt1 = new NewsTitle(1001, "Java中还有这么神奇的事情", "张三");
  			NewsTitle nt2 = new NewsTitle(1002, "合肥将变成一个没有传销的城市", "李四");
  			NewsTitle nt3 = new NewsTitle(1003, "合肥比亚迪即将建成开厂", "王五");
  			NewsTitle nt4 = new NewsTitle(1004, "大湖名城,创新高低", "赵六");
  			NewsTitle nt5 = new NewsTitle(1005, "大湖名城,创新高低", "孙七");

  			//准备容器
  			HashSet hs = new HashSet();
  			hs.add(nt1);
  			hs.add(nt2);
  			hs.add(nt3);
  			hs.add(nt4);
  			hs.add(nt5);
  			hs.add(nt1);
  			hs.add(nt1);
  			System.out.println(hs.size());//5  因为他唯一,当重复了就不再往里加了

  			for (Object object : hs) {   //因为set是无序的,所以每一次遍历都会输出的顺序不同(不考虑内存缓存问题)
  				System.out.println(object);
  			}

  			System.out.println("-------------------");

  			//set集合是无序的,所以不能使用get(下标)获取元素
  			//hs.get(0);

  			Iterator it = hs.iterator();
  			while(it.hasNext()){
  				Object obj =it.next();
  				NewsTitle nt = (NewsTitle)obj;
  				System.out.println(nt);
  			}

  		}

  	}
-
特例
  public class Demo {

  		public static void main(String[] args) {
  			Set set = new HashSet();
  			String s1 = new String("java");
  			String s2 = s1;
  			String s3 = new String("JAVA");

  			NewsTitle nt1 = new NewsTitle(1001, "Java中还有这么神奇的事情", "张三");
  			NewsTitle nt2 = new NewsTitle(1001, "Java中还有这么神奇的事情", "张三");

  			set.add(nt1);
  			set.add(nt2);
  			System.out.println(set.size());//2		//new了两个不同的对象,回头搞一下String类和普通类  堆内存和栈内存存放方式


  			set.add(s1);
  			set.add(s2);
  			set.add(s3);
  			System.out.println(set.size());//4


  		}

  	}
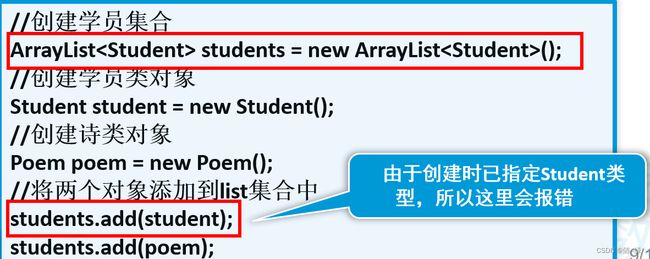
3.HashMap
-
例子
  public class Test {
  		/*
  		 * 需求说明
  		 * 学员应聘至外企工作,每个学员都会有一个英文名称,对应该学员对象。
  		 * 请实现通过英文名称,获得该学员对象的详细信息
  		 * 学员属性包括姓名以及性别

  		 */
  		public static void main(String[] args) {
  			//创建学生对象
  			Student stu1 = new Student("张三", "男");   //已经重写了toString()方法
  			Student stu2 = new Student("李四", "男");
  			Student stu3 = new Student("如花", "女");

  			//创建HashMap集合对象
  			HashMap hm = new HashMap();

  			//将学生对象添加到集合中
  			hm.put("jack", stu1);
  			hm.put("tom", stu2);
  			hm.put("rose", stu3);

  			Object obj = hm.get("jack");
  			Student stu = (Student)obj;
  			System.out.println("Jack对应的学员信息为:姓名:"+stu.getName()+",性别:"+stu.getGender());

  			System.out.println("--------------------------");

  			//使用键值对的方式遍历输出所有学员的姓名和性别
  			Set set =hm.entrySet();
  			for(Object object:set){
  				Map.Entry me = (Map.Entry)object;
  				//获取键值对的键
  				Object obj1 = me.getKey();
  				String key = (String)obj1;
  				//获取键值对的值
  				Object obj2=me.getValue();
  				Student student = (Student)obj2;
  				System.out.println(key+"对应的学员姓名:"+student.getName()+",性别为:"+student.getGender());
  			}
  		}
  	}
-
使用键值对方式遍历输出
  		Set set = (new HashMap).entrySet();
  		for(Object obj : set){
  			Map.Entry me =(Map.Entry)obj;
  			Object obj1 =me.getKey();		//获取键值对的健(重写toString()方法,可以直接输出obj1)
  			Object obj2 =me.getValue();    //获取键值对的值
  		}

例子
public class Test {
  	/*
  	 * 需求说明
  	 * 学员应聘至外企工作,每个学员都会有一个英文名称,对应该学员对象。
  	 * 请实现通过英文名称,获得该学员对象的详细信息
  	 * 学员属性包括姓名以及性别

  	 */
  	public static void main(String[] args) {
  		//创建学生对象
  		Student stu1 = new Student("张三", "男");
  		Student stu2 = new Student("李四", "男");
  		Student stu3 = new Student("如花", "女");

  		//创建HashMap集合对象
  		HashMap hm = new HashMap();

  		//将学生对象添加到集合中
  		hm.put("jack", stu1);
  		hm.put("tom", stu2);
  		hm.put("rose", stu3);

  		Object obj = hm.get("jack");
  		Student stu = (Student)obj;
  		System.out.println("Jack对应的学员信息为:姓名:"+stu.getName()+",性别:"+stu.getGender());

  		System.out.println("--------------------------");

  		//使用键值对的方式遍历输出所有学员的姓名和性别
  		Set set =hm.entrySet();
  		for(Object object:set){
  			Map.Entry me = (Map.Entry)object;
  			//获取键值对的键
  			Object obj1 = me.getKey();
  			String key = (String)obj1;
  			//获取键值对的值
  			Object obj2=me.getValue();
  			Student student = (Student)obj2;
  			System.out.println(key+"对应的学员姓名:"+student.getName()+",性别为:"+student.getGender());
  		}
  	}

  }
3.1 HashMap常用方法(加上泛型)
-
public V put(K key, V value){}
public V remove(Object key) {}
public int size() {}
public boolean containsKey(Object key) {}
	在HashMap集合中,键值对的健若是有,则返回true
public boolean containsValue(Object value) {}
	在HashMap集合中,键值对的值若是有,则返回true
public Collection values() {}
	返回的是获取值的集合

public Set keySet() {}  						返回的是键值对的集合
public Set> entrySet() {}		返回的是将集合中的键值对全部取出来存储到Set集合(我觉得是把引用赋值给Set集合),目的是为了下一步可以调用iterator()方法,因为是在HashMap内部的类实现了iterator方法,HashMap没有办法直接调用这个方法
	返回的是获取的是键值对的健的集合(可以直接进行打印,打印出的是健的集合)
	这里需要注意一点,那么要分别打印呢?(需要进源码看一下....)
  		  	step overF6  不进入内部,只执行自己写的代码
  		  	step overF5  进入内部,执行所有需要执行的代码

  		  	(HashMap类里面有一个内部类KeySet,而KeySet有继承了AbstractSet)
  		    public class HashMap extends AbstractMap implements Map, Cloneable, Serializable
  				{
  					............
  				     private final class KeySet extends AbstractSet {
  					        public Iterator iterator() {
  					            return newKeyIterator();
  					        }
  				        	.........
  				     }
  				}

  			(Abstract类实现了Set接口,所以重写了Set接口中的iterator()方法,但这个抽象类没有重写iterrator()方法,又被HashMap继承了,所以是HashMap类实现了Set接口中的iterator()方法)
  	   		public abstract class AbstractSet extends AbstractCollection implements Set {
  	   		}

  	   		阿西吧..........
  	   		看下面的例子,就是为了看懂下面两行代码
  		   		Set keys2 = hm.keySet();
  				Iterator it = keys2.iterator();   //疑惑就在为什么Set类型的接口可以调用iterator,原因就是HashMap绕了一圈实现了Set接口


例子
  	 public class Test {
  		public static void main(String[] args) {
  			//准备键值对容器用来存储键值对
  			HashMap hm = new HashMap();

  			//向集合中存储数据
  			hm.put("CN", "中华人民共和国");
  			hm.put("RU","俄罗斯联邦");
  			hm.put("US", "美利坚合众国");
  			hm.put("JP", "日本");

  			System.out.println(hm.size());

  			String str1 =hm.get("CN");
  			System.out.println(str1);

  			//Object remove(key):根据键来删除键值对,返回值是键对应的值
  			String str2=hm.remove("JP");
  			System.out.println(str2);
  			System.out.println(hm.size());

  			System.out.println(hm.containsKey("CN"));//true
  			System.out.println(hm.containsKey("JP"));//false

  			System.out.println(hm.containsValue("中华人民共和国"));//true

  			//keySet():返回集合中所有键值对的键的集合
  			Set keys=hm.keySet();
  			for (String object : keys) {
  				String key = object;
  				String obj =hm.get(key);
  				String value = obj;
  				System.out.println(key+"---"+value);
  			}

  			System.out.println("--------------------");

  			//Collection values():获取值得集合
  			Collection coll = hm.values();
  			for (String object : coll) {
  				String value = object;
  				System.out.println(value);
  			}

  			System.out.println("--------------------");

  			//获取键的集合
  			Set keys2 = hm.keySet();

  			Iterator it = keys2.iterator();

  			while(it.hasNext()){
  				String key =it.next();
  				String value =hm.get(key);
  				System.out.println(key+"---"+value);
  			}

  			System.out.println("--------------------");

  			//使用键值对的方式取出集合中的键值对
  			Set> keyValues = hm.entrySet(); //将集合中的键值对全部取出来存储到Set集合
  			Iterator> iterator =keyValues.iterator();//将Set集合中的元素存储到迭代器中
  			while(iterator.hasNext()){
  				Entry me =iterator.next();//使用next()方法获取迭代器中的元素
  				String key = me.getKey();//键值对类型对象调用getKey()方法可以获取键值对的键
  				String value=me.getValue();键值对类型对象调用getValue()方法可以获取键值对的值
  				System.out.println(key+"~~~~~"+value);
  			}

  		}

  	}
3.2 泛型
-
将对象的类型作为参数,指定到其它类或者方法上,从而保证类型转换的安全性和稳定性
-
泛型集合可以约束集合内的元素类型
典型泛型集合ArryList、HashMap  对于和表示该泛型集合中的元素类型,泛型集合中的数据不再转换为Object

例子
  	  public class Test {

  	/*
  	 * 需求说明
  	 * 学员应聘至外企工作,每个学员都会有一个英文名称,对应该学员对象。
  	 * 请实现通过英文名称,获得该学员对象的详细信息
  	 * 学员属性包括姓名以及性别

  	 */
  	public static void main(String[] args) {
  		//创建学生对象
  		Student stu1 = new Student("张三", "男");
  		Student stu2 = new Student("李四", "男");
  		Student stu3 = new Student("如花", "女");

  		//创建HashMap集合对象
  		HashMap hm = new HashMap();

  		//将学生对象添加到集合中
  		hm.put("jack", stu1);
  		hm.put("tom", stu2);
  		hm.put("rose", stu3);

  		Student stu = hm.get("jack");
  		System.out.println("Jack对应的学员信息为:姓名:"+stu.getName()+",性别:"+stu.getGender());

  		System.out.println("--------------------------");

  		Set> set =hm.entrySet();

//使用迭代器遍历输出所有学员的姓名和性别
  		Iterator>  iterator= set.iterator();
  		while(iterator.hasNext()){
  			Entry me = iterator.next();
  			System.out.println(me.getKey()+"-------"+me.getValue().getName()+"----------"+me.getValue().getGender());
  		}

  		System.out.println("---------------------------");

//使用键值对的方式遍历输出所有学员的姓名和性别
  		for(Map.Entry me:set){
  			//获取键值对的键
  			String key = me.getKey();
  			//获取键值对的值
  			Student student=me.getValue();
  			System.out.println(key+"对应的学员姓名:"+student.getName()+",性别为:"+student.getGender());
  		}
  	}
  }
3.3 加强for循环
-
 	public static void main(String[] args) {

//arr
  		 int arr[]={1,2,3,4,5,6};
  		 for(int i : arr){
  		        System.out.println(i);
  		 }

//string
  	     String s [] =  {"hello","world","java"};
  	     for(String i : s){
  		        System.out.println(i);
  		  }

//list
  	     List list = new ArrayList();
  	     list.add("hello");
  		 list.add("world");
  		 list.add("java");
  		 for(String i : list){
  		        System.out.println(i);
  		 }

//使用键值对的方式遍历输出所有学员的姓名和性别
  	 	HashMap hm = new HashMap();
  	 	Student stu1 = new Student("张三", "男");
  	 	hm.put("jack", stu1);
  	 	Set> set =hm.entrySet();
  		for(Map.Entry me:set){
  			//获取键值对的键
  			String key = me.getKey();
  			//获取键值对的值
  			Student student=me.getValue();
  			System.out.println(key+"对应的学员姓名:"+student.getName()+",性别为:"+student.getGender());
  		}
   }

Map.Entry<>  查一下资料,了解一下

这些都是集合或者数组的'引用'进行for循环的
3.4 InstanceOf用法
4.枚举
-
 枚举是指由一组固定的常量组成的类型

  public enum Genders {
  Male,Female
  }

(注意下面gender的类型是枚举类型)
  public class Student{

  	private String name;
  	private Genders gender;
  	public String getName() {
  		return name;
  	}
  	public void setName(String name) {
  		this.name = name;
  	}
  	public Genders getGender() {
  		return gender;
  	}
  	public void setGender(Genders gender) {
  		this.gender = gender;
  	}
 }

  (注意:stu.setGender(Genders.Male);  该方法里只能传在Gender中已经定义好的)
  public class StudentTest {
  	public static void main(String[] args) {

  		Student stu = new Student();
  		stu.setName("张三");
  		stu.setGender(Genders.Male);

  		System.out.println(stu.getName()+"--"+stu.getGender());

  		System.out.println(Math.log10(10));
  	}
  }
5.Java API
5.1 包装类

  包装类的作用
			  提供了一系列使用的方法
			  集合不允许存放基本数据类型数据,存放数字时,要用包装类型


  包装类的构造方法
  			所有包装类都可将与之对应的基本数据类型作为参数来构造它们的实例
  			public Type(type value){    //这是8大类型的构造方法,没有无参构造
					this.value  = value
				}
			例如
  			public Integer(int value) {
				    this.value = value;
		 	    }

  除Character类外,其它包装可将一个字符串作为参数构造它们的实例
  例如
  		Integer i = new Integer("123");
注意:
		Boolean类型构造方法参数为String类型时,若该字符串内容为true(不考虑大小写),则该Boolean对象表示true,否则表示false
		Integer i = new Integer("abc"),这个虽然编译不报错,但是运行时会抛出异常,numberformatexception表示数字格式化异常
		Byte b = new Byte(1); 与 Short s = new Short((short) 1);必须要进行强制类型转换,因为,你传过去的是int类型的数据,构造函数接收的是小于int类型的数据


	包装类型的常用方法
  	XXXValue():包装类型转换成基本类型
  	例子
		  	Integer in = new Integer(25);
		  	int i =	in.intValue();

	toString():以字符串形式返回包装对象表示的基本类型数据(基本类型->字符串)
	例子
			String sex = Character.toString('男');
			String str = Boolean.toString(true);
			Integer inte = new Integer(100);
			String str2 = inte.toString();

	parseXXX():把字符串转换为相应的基本数据类型数据(Character除外,并且字符串里面的内容要能够转换为数字,否则会报异常)(字符串->基本类型)
			byte num2 = Byte.parseByte("123");
			System.out.println(num2);
			boolean result = Boolean.parseBoolean("TruE");
			System.out.println(result);

	valueOf():所有包装类都有如下方法(基本类型->包装类) public static Type valueOf(type value)
			byte byte2 = 10;
			Byte byte3 = Byte.valueOf(byte2);
			Byte byte4 = Byte.valueOf((byte)1);
			Character cha = Character.valueOf('女');
    除Character类外,其他包装类都有如下方法(字符串->包装类)public static Type valueOf(String s)
			Byte byte5 = Byte.valueOf("123");
			// Character.valueOf("a");   报错
5.2 Collections与Collection
-
  Collections是一个工具类。工具类是工具,就像Math,Arrays类一样,他是一种工具,集成了很多特定的功能。
  比如排序,拷贝,替换,反转等等等功能。工具类不能被实例化。 工具类使用方式:类名.方法名()

  总体来说:collection是接口  , collections是工具类

  Collections工具类的方法
  		sort():排序
  		binarySearch():查找
  		max()\min():查找最大\最小值
  		实现一个类的对象之间比较大小,该类要实现Comparable接口,重写compareTo()方法,因为使用sort方法进入内部操作会调用到compartTo方法

  	   ************************
  	   由于例子1中String类已经重写过compartTo方法,而例子2中自己定义的类需要自己实现compareTo方法

例子1(String类已经重写过compartTo方法)
  	public class Demo01 {

  	public static void main(String[] args) {
  			ArrayList al = new ArrayList();

  			al.add("wseurfhu");
  			al.add("dsfsdf");
  			al.add("asdewre");
  			al.add("sdfsf");
  			al.add("afhth");

  			System.out.println("集合排序之前:");
  			for (String string : al) {
  				System.out.println(string);
  			}

  			//Collections.sort():对集合进行排序
  			Collections.sort(al);

  			System.out.println("集合排序后:");
  			for (String string : al) {
  				System.out.println(string);
  			}

  			//int binarySearch(集合名,查找的数据):查找元素,返回查找元素所在的下标,如果查找不到元素,返回一个负值。 注意:使用该方法之前,对先对集合进行升序排序,否则不能保证查询结果的正确性
  			int index = Collections.binarySearch(al, "sdfsfgj");
  			System.out.println(index);

  			//max()/min():求集合中的最大值最小值
  			String max = Collections.max(al);
  			System.out.println(max);
  			String min = Collections.min(al);
  			System.out.println(min);


  			Collections.reverse(al);
  			System.out.println("集合元素反转之后:");
  			Iterator it=al.iterator();
  			while(it.hasNext()){
  				String str = it.next();
  				System.out.println(str);
  			}
  		}
  	}


例子2 (实现Comparable接口)

  		public class Student implements Comparable{
  			private int number=0; 			//学号
  			private String name=""; 		//学生姓名
  			private String gender="";	 	//性别
  			public int getNumber(){
  				return number;
  			}
  			public void setNumber(int number){
  				this.number=number;
  			}
  			public String getName(){
  				return name;
  			}
  			public void setName(String name){
  				this.name=name;
  			}
  			public String getGender(){
  				return gender;
  			}
  			public void setGender(String gender){
  				this.gender=gender;
  			}

  			public int compareTo(Object obj){
  				Student student=(Student)obj;
  				if(this.number==student.number){
  					return 0;			//如果学号相同,那么两者就是相等的
  				}else if(this.number>student.getNumber()){
  					return 1;			//如果这个学生的学号大于传入学生的学号
  				}else{
  					return -1;			//如果这个学生的学号小于传入学生的学号
  				}
  			}
  		}


  	import java.util.ArrayList;
  	import java.util.Collections;
  	import java.util.Iterator;
  	public class Test {
  		public static void main(String[] args) {
  			Student student1=new Student();
  			student1.setNumber(5);
  			Student student2=new Student();
  			student2.setNumber(2);
  			Student student3=new Student();
  			student3.setNumber(1);
  			Student student4=new Student();
  			student4.setNumber(4);
  			ArrayList list=new ArrayList();
  			list.add(student1);
  			list.add(student2);
  			list.add(student3);
  			list.add(student4);
  			System.out.println("-------排序前-------");
  			Iterator iterator=list.iterator();
  			while(iterator.hasNext()){
  				Student stu=iterator.next();
  				System.out.println(stu.getNumber());
  			}
  			//使用Collections的sort方法对list进行排序
  			System.out.println("-------排序后-------");
  			Collections.sort(list);
  			iterator=list.iterator();
  			while(iterator.hasNext()){
  				Student stu=iterator.next();
  				System.out.println(stu.getNumber());
  			}

  		}
  	}
5.3 拆箱和装箱
public class Demo04 {
public static void main(String[] args) {
byte byte1 = 10;
Byte byte2 = new Byte(byte1);
Byte byte3 = Byte.valueOf(byte1);
Byte byte4 = byte1;
System.out.println(byte4);
Integer int1 = new Integer(20);
int int2 = int1.intValue();
int int3 = int1;
System.out.println(int3);
Integer num1 = new Integer(100);
int num2 = 1000;
int sum = num1 + num2;
System.out.println(sum);
Integer sum2 = num1 + num2;
System.out.println(sum2);
}
}
5.4 拆箱和装箱面试题
Integer i1 = 100;
Integer i2 = 100;
Integer i3 = 200;
Integer i4 = 200;
Integer i5 = new Integer(127);
Integer i6 = new Integer(127);
System.out.println(i5 == i6);
System.out.println(i5.equals(i6));
System.out.println(i1==i2);
System.out.println(i3==i4);
Float f1 = 20F;
Float f2 = 20F;
System.out.println(f1 == f2);
Double i1 = 100.0;
Double i2 = 100.0;
Double i3 = 200.0;
Double i4 = 200.0;
System.out.println(i1==i2);
System.out.println(i3==i4);
System.out.println(i3.equals(i4));
Boolean i1 = false;
Boolean i2 = false;
Boolean i3 = true;
Boolean i4 = true;
System.out.println(i1==i2);
System.out.println(i3==i4);
Integer a = 1;
Integer b = 2;
Integer c = 3;
Integer d = 3;
Integer e = 321;
Integer f = 321;
Long g = 3L;
Long h = 2L;
Long p = 128L;
Long p1 =128L;
System.out.println(c==d);
System.out.println(e==f);
System.out.println(c==(a+b));
System.out.println(c.equals(a+b));
System.out.println(g==(a+b));
System.out.println(g.equals(a+b));
System.out.println(g==(a+b));
System.out.println(g.equals(a+h));
System.out.println(p==p1);
Integer a = 444;
int b = 444;
System.out.println(a==b);
System.out.println(a.equals(b));
6.实用类
6.1 Math常用方法
-
括号里的类型指的是传参对面接收的类型
Math.random()       随机获取double类型的[0.0,1.0)之间的数
Math.PI 					返回Π
Math.abs(int/long/float/double类型)   返回取绝对值
Math.ceil(double类型)  		返回一个比a大的离a最近的整数
Math.floor(double类型)      返回一个比a小的并且离a最近的整数
Math.round(float/double类型)		返回根据四舍五入的规则
Math.max(int/long/float/double a,b)		两个数取出最大值
Math.min(int/long/float/double a,b)    	两个数取最小值
Math.pow(double a,b)					返回a的b次方

例子
  	    double num =Math.random();
  		System.out.println(num);			//0.21315734454875046

  		//随机获取一个[num1,num2]之间的整数
  		//int num = (int)(Math.random()*(num2-num1)+num1)

  		System.out.println(Math.PI);  		 //返回Π的值  	3.141592653589793

  		System.out.println(Math.abs(-60));   //取绝对值     	60

  		System.out.println(Math.ceil(3.1)); //ceil(double a) 返回一个比a大的离a最近的整数		4.0

  		System.out.println(Math.floor(3.9)); //Math.floor(double a)  返回一个比a小的并且离a最近的整数		3.0

  		System.out.println(Math.round(3.5));  //Math.round(double a)  根据四舍五入的规则		4

  		System.out.println(Math.max(12, 25));  //两个数取出最大值						25

  		System.out.println(Math.min(2,5));	//两个数取最小值						2

  		System.out.println(Math.pow(2, 5)); //Math.pow(a,b)  返回a的b次方			32.0
6.2 Random常用方法
6.3 String类常用方法
-
先来点开胃小菜
  System.out.println(10+20+"hello");
  System.out.println(10+"hello"+20);
  System.out.println("hello"+10+20);  //hello先和10进行字符串拼接(从左往右运算)
  System.out.println("hello"+(10+20));

答案
  	 30hello
  	 10hello20
  	 hello1020
  	 hello30
------------------------------------------------------

 public int length()
 public int indexOf(int ch)
 public int lastIndexOf(String str)
 public String substring(int beginIndex)
 public String substring(int beginIndex, int endIndex)
 public String trim()
 public String[] split(String regex)
 public char charAt(int index)
 public boolean endsWith(String suffix)
 public byte[] getBytes()
 public String toLowerCase()
 public String toUpperCase()
 public String concat(String str)

 例子1
   	public static void main(String[] args) {

  		//public int indexOf(int ch) 传的是ASCII码值,搜索第一个出现的字符ch(或字符串value),如果没有找到,返回-1
  		//public int indexOf(String value) 搜索第一个出现的字符ch(或字符串value),如果没有找到,返回-1

  		//常用ASCII码值 A:65   a:97    0:48
  		String str = "abcAbabkmn";
  		int num = str.indexOf(65);
  		System.out.println(num);					//3
  		System.out.println(str.indexOf("a"));	    //0


  		//public int lastiIndexOf(int ch) 传的是ASCII码值,搜索最后一个出现的字符ch(或字符串value),如果没有找到,返回-1
  		//public int lastIndexOf(String value) 搜索最后出现的字符ch(或字符串value),如果没有找到,返回-1
  		System.out.println(str.lastIndexOf("a"));	//5


  		//public String substring(int index)提取从位置索引开始的字符串部分
  		String newStr =str.substring(3);
  		System.out.println(str);					//abcAbabkmn
  		System.out.println(newStr);					//Ababkmn

  		// public String substring(int beginindex, int
  		// endindex):提取beginindex和endindex之间的字符串部分,包括开始索引的字符,不包括结束索引的字符
  		String newStr2 = str.substring(2, 4);
  		System.out.println(str);			//abcAbabkmn
  		System.out.println(newStr2);		//cA

  		// public String trim():返回一个前后不含任何空格的调用字符串的副本
  		String str3 = "   abc    qwert    ";
  		String newStr3 = str3.trim();
  		System.out.println(str3); 			//   abc    qwert
  		System.out.println(newStr3); 	//abc    qwert
  		System.out.println("-----------------");

  		// String[] split(String regex) :根据拆分规则对字符串进行拆分
  		String song = "长亭外,古道边,芳草碧连天,晚风拂,柳笛声残,夕阳山外山";
  		String[] strs = song.split(",");
  		for (String string : strs) {
  			System.out.println(string);
  		}

  		// 我爱你你不爱我但是我很爱你可我就是不爱你
  		String love = "我爱你你不爱我但是我很爱你可我就是不爱你";
  		String[] loves = love.split("爱");
  		for (String string : loves) {
  			System.out.println(string);
  		}
  		System.out.println("--------------");

  		char ch = love.charAt(1);
  		System.out.println(ch);					//爱
  		boolean result = love.endsWith("我就是不爱你");   	//根据字符串的结尾语句,判断是否相同
  		System.out.println(result);				//true

  		System.out.println("--------------");


  		String love1 = "ABCDEFGHI"; //考虑到编码问题,所以不使用汉字
  		byte[] bytes = love1.getBytes();  //把字符串变成byte型数组
  		for (int i = 0; i < bytes.length; i++) {
  			System.out.print(bytes[i]+"--"+(char)bytes[i]+"\t");  //65--A	66--B	67--C	68--D	69--E	70--F	71--G	72--H	73--I
  		}

  		//toLowerCase()方法:将大写英文字母转换为小写
  		//toUpperCase()方法:将小写英文字母转换为大写
  		String str3 = "AbcdE";
  		System.out.println(str3.toLowerCase());   //abcde
  		System.out.println(str3.toUpperCase());   //ABCDE

  		//字符串的连接: +  concat()
  		String str5 = "大湖名称";
  		String str6 = "创新高地";
  		System.out.println(str5+str6);					//大湖名称创新高地
  		String result = str5.concat(str6);
  		System.out.println(result);						//大湖名称创新高地
  }


例子2

  //输入一行字符,分别统计出其中英文字母、空格、数字和其它字
  public class Demo01 {
  	public static void main(String[] args) {
  				Scanner sc = new Scanner(System.in);
  				String str = sc.nextLine();
  				int lat=0,spa=0,num=0,oth=0;
  				for(int i=0;i127){             //汉字都是大于127的
  						System.out.println("*");
  					}

  					else if(str.charAt(i)==' ') {
  						spa++;
  					}
  					else if((str.charAt(i)>=65&&str.charAt(i)<=90)||(str.charAt(i)>=97&&str.charAt(i)<=122)) {  //65--90    97--122
  						lat++;
  					}
  					else if(str.charAt(i)>=48&&str.charAt(i)<=57) {		// 数0 到10的ASCII表   48--57
  						num++;
  					}
  				}
  				oth = str.length()-num-spa-lat;
  				System.out.println("字母个数:"+lat+"\n数字个数:"+num+"\n空格个数:"+spa+"\n其他字符个数:"+oth);
  	}

  }
6.4 StringBuffer类常用方法
-
 我们如果对字符串进行拼接操作,每次拼接,都会构建一个新的String对象,既耗时,又浪费空间。而StringBuffer就可以解决这个问题。

  StringBuffer与String都是final,不可被继承。
  StrinBuffer的操作都是在原有的基础上进行操作,不复制另一份

  public StringBuffer append(String str)  //添加字符串str,返回字符缓冲区
  public StringBuffer insert(int offset, String str)  //向任意位置,添加字符串str,返回字符缓冲区
  public synchronized String toString()
  public synchronized StringBuffer replace(int start, int end, String str)

例子
    public static void main(String[] args) {
  		//将一个数字字符串转换成逗号分隔的数字串,即从右边开始每三个数字由逗号分隔


  		//第一步:获取键盘输入的数字
  		Scanner sc = new Scanner(System.in);
  		System.out.println("请输入一个串数字");
  		String num = sc.next();

  		System.out.println("---------------");
  		//第二部:一会要使用StringBuffer里的insert()方法,所以先要转换成StringBuffer
  		StringBuffer sb = new StringBuffer(num);
  		System.out.println(sb);  //12345678
  		//向字符串中插入,从后面开始插入,也就是说要反着来插入
  		for(int i=sb.length()-3;i>0;i-=3){
  			sb.insert(i,",");
  		}

  		System.out.println(sb);  //12,345,678


  		StringBuffer sb1 = new StringBuffer("我喜欢你");
  		StringBuffer sb2 = sb1.append("问世间情为何物,直教人生死相许");
  		System.out.println(sb1);	//我喜欢你问世间情为何物,直教人生死相许
  		System.out.println(sb2);	//我喜欢你问世间情为何物,直教人生死相许

  		StringBuffer sb3 = new StringBuffer("我喜欢你,b,是吧bb3");
  		StringBuffer sb4 = sb3.replace(5,8,"爱"); //会把[5,8)去掉,换成爱  (从0开始数)
  		System.out.println(sb4);		//我喜欢你,爱吧bb3
  	}
7.日期类
7.1 Date类
7.2 SimpleDateFormat类
7.3 Calendar类
输入和输出流
8.1 File类
-
File类常用方法

public boolean exists()    判断文件或目录是否存在
public boolean isFile() 	 判断是否是文件
public boolean isDirectory()	判断是否是目录
public String getPath()		返回此对象表示的文件的相对路径名
public String getAbsolutePath()  返回此对象表示的文件的绝对路径名
public boolean createNewFile() throws IOException  创建名称的空文件,不创建文件夹
public boolean mkdirs()		可以创建多个文件夹
public boolean mkdir()  		只能创建一个文件夹
public String getName()	 获取文件夹的名称或者文件的名称(带后缀)

public boolean delete()   删除此对象指定的文件或目录
public long length()	返回文件的长度,如果文件不存在,则返回0L


例子
public class FileDemo01 {
  	public static void main(String[] args) {

  		//创建File类对象
  		File file = new File("D:\\demo.txt");   //第一个\是转义字符,第二个\则是斜杠
  		File file1 =new File("D:\\demo");


  		//通过file调用方法实现对文件属性的操作

  		//exists():判断文件或目录是否存在
  		boolean result1 = file.exists();  //存在则返回true,不存在则返回false
  		System.out.println("file对象指向的文件存在:"+result1);

  		//boolean isFile()
  		boolean result2= file.isFile();
  		System.out.println("fiel对象指向的是一个文件:"+result2);

  		//boolean isDirectory()
  		boolean result3 = file1.isDirectory();
  		System.out.println("file1对象指向的是一个目录:"+result3);

  		//String getPath()
  		String path =file.getPath();
  		System.out.println("file对象指向的文件路径:"+path);

  		//String getAbsolutePath()
  		String absolutePath = file.getAbsolutePath();
  		System.out.println("file对象指向的文件路径:"+absolutePath);

  		//boolean createNewFile();
  		File file2 =new File("test.txt");
  		boolean result4;
  		try {
  			result4 = file2.createNewFile();	 //只能创建文件,不能创建文件夹
  			System.out.println("file2对象指向的文件创建成功:"+result4);
  		} catch (IOException e) {
  			e.printStackTrace();
  		}
  		String path1 =file2.getPath();  					//相对路径指的是相对于谁的路径(这里相对的是src路径)
  		System.out.println("file对象指向的文件路径:"+path1);
  		String absolutePath1 = file2.getAbsolutePath();
  		System.out.println("file对象指向的文件路径:"+absolutePath1);	//绝对路径是输出磁盘整个目录


  		//boolean mkdir()   //只能创建一个文件夹
  		//boolean mkdirs()  //可以创建多个文件夹
  		File file3 =  new File("D:\\mm\\aa\\bb");
  		boolean result5 = file3.mkdirs();
  		System.out.println("多级文件夹创建成功:"+result5);		//只要保证bb文件夹没有就好,不需要担心是否有mm\\aa文件夹


  		//String getName()  获取文件夹的名称或者文件的名称(带后缀)
  		String result6 = file.getName();
  		System.out.println(result6);


  		// boolean delete()   删除文件或者文件夹
  		System.out.println("file1对象指向的文件删除成功:" + file1.delete());
  		System.out.println("file2对象指向的目录删除成功:" + file2.delete());

  		//long length():获取文件内容的长度
  		File file4 = new File("D:/demo.txt");
  		System.out.println(file4.length());
  	}

  }
8.2 FileInputStream(输入流,从磁盘中读到内存 )类
8.3 FileOutputStream
-
构造方法
  public FileOutputStream(String name) throws FileNotFoundException
  		通过此构造方法创建的对象,使用write()方法写入数据的时候,会将文件中的数据全部进行覆盖
  public FileOutputStream(String name, boolean append)throws FileNotFoundException
   		通过此构造方法创建的对象,将第二个参数设置为true使用write()方法写入数据的时候,会在文件末尾继续写入,不会将文件中的数据全部进行覆盖,
   		若是false则会覆盖,和Demo01一样,因为boolean值默认是false
-
例子1(写入1个字节)

  public class FileOutputStreamDemo01 {

  	public static void main(String[] args) {

  		//创建一个OutputStream类对象指向FileOutputStream类对象
  		OutputStream os = null;
  		try {
  		//FileOutputStream(String path) 通过此构造方法创建的对象,使用write()方法写入数据的时候,会将文件中的数据全部进行覆盖
  		    os = new FileOutputStream("d:\\demo.txt");
  			//将数据写入到自定义的文件中
  			os.write(65);
  			System.out.println("数据写入完毕");
  		} catch (FileNotFoundException e) {
  			// TODO Auto-generated catch block
  			e.printStackTrace();
  		} catch (IOException e) {
  			// TODO Auto-generated catch block
  			e.printStackTrace();
  		}finally{
  			if(os!=null)
  				try {
  					os.close();
  				} catch (IOException e) {
  					// TODO Auto-generated catch block
  					e.printStackTrace();
  				}
  		}
  	}
  }


例子2(解决例子1的缺陷,写入一个字符串)
  	  public class FileOutputStreamDemo03 {
  			public static void main(String[] args) {
  				FileOutputStream fos =null;
  				//创建File类对象
  				File file = new File("d:\\demo.txt");
  				try {
  				    fos = new FileOutputStream(file,true);
  					//将一串字符串写入到文件中去
  					String str = "hello world";

  					//getBytes()将一个字符串转化为一个字节数组byte[]的方法
  					byte[] bytes = str.getBytes();

  					fos.write(bytes);

  				} catch (FileNotFoundException e) {
  					// TODO Auto-generated catch block
  					e.printStackTrace();
  				} catch (IOException e) {
  					// TODO Auto-generated catch block
  					e.printStackTrace();
  				}finally{
  					if(fos!=null)
  						try {
  							fos.close();
  						} catch (IOException e) {
  							// TODO Auto-generated catch block
  							e.printStackTrace();
  						}
  				}
  		  }
  	}

注意
	String类中比较重要的一个方法getBytes(),将一个字符串转化为一个字节数组byte[]的方法,然后再写入磁盘中
8.4 流类的总结
-
Read是从磁盘中读
Write是把内容写道磁盘中
抽象类的第一原则是不能创建对象,但非抽象类的子类可以向上转型
  	 1 Reader类(抽象类)的子类
  		 	1.1 BufferedReader
  		 	 	BufferedReader构造方法参数需要用到Reader类(InputStreamReader),而InputStreamReader类的构造方法需要InputStream类(FileInputStream)
  		 	 		拥有的方法
  		 	 			String readLine()
  		 	 			按行读取,每调用一次切换到下一行,直到下一行没数据,则返回-1

  		 	1.2 InputStreamReader
  		 	 	InputStreamReader类的构造方法需要InputStream类(FileInputStream)并且可以加另外一个String类型的参数charset,也可以不加
  		 	 		拥有的方法
  		 	 			int read()
  		 	 			读一个字符,每调用一次切换到下一个字符,直到没数据,则返回-1。它返回的是这个字符对应的ASCII码对应的数 例如 a对应97
  		 	 	1.3 FileReader类是InputStreamReader类的子类
  		 	 			FileReader构造方法需要用到File类或者直接给一个String类型的磁盘地址
   	 					拥有的方法
  		 	 			int read()
  		 	 			读一个字符,每调用一次切换到下一个字符,直到没数据,则返回-1。它返回的是这个字符对应的ASCII码对应的数 例如 a对应97


   	  2 InputStream类(抽象类)的子类
   	 		2.1 FileInputStream
   	 		    FileInputStream构造方法参数有两种,一种是放File类的对象,另一种是直接放String类型的地址
   	 		 		拥有的方法
   	 		 			int read(byte b[])
   	 		 			返回值则是从文件中读取的内容长度。只需要定义一个byte型数组,规定大小,直接把这个byte型数组对象拿给read中就行,
   	 		 			然后执行完read方法之后,byte型数组就把那些ASCII码数字存储到数组里面了


   	 		 写入对象的类(InputStream类的子类),这个对象类要实现Serializable
   	 		2.2 ObjectInputStream
   	 		 	ObjectInputStream类的构造方法需要InputStream类(FileInputStream)
   	 		 		拥有方法
   	 		 			Object readObject()
   	 		 			把用ObjectOutputStream类存放的数据,用ObjectInputStream读出来
   	 		2.3 ObjectOutputStream
   	 			ObjectOutputStream类的构造方法需要OutputStrem类(FileOutputStream)
   	 				拥有方法
   	 					void writeObject(Object obj)
   	 					把创建好的对象传给这个参数obj(也可以用集合把对象存储起来,然后把集合对象传给obj),然后就可以写入到磁盘中,然后就可以使用ObjectInputStream读出来

   	 	序列化和反序列化
   	 			1、序列化和反序列化的定义:
  					   Java序列化就是指把Java对象转换为字节序列的过程。(将对象存储到文件中)
  					   Java反序列化就是指把字节序列恢复为Java对象的过程。(从文件中读取对象信息)

  				2、序列化最重要的作用:
  					   在传递和保存对象时.保证对象的完整性和可传递性。对象转换为有序字节流,以便在网络上传输或者保存在本地文件中。

 反序列化的最重要的作用:根据字节流中保存的对象状态及描述信息,通过反序列化重建对象。

  			   总结:核心作用就是对象状态的保存和重建。


   	  3 二进制输入输出图片、音频等
   	 	   3.1 DataInputStream类的构造方法需要InputStream类(FileInputStream)
   	 			    拥有方法
   	 				int read()
   	 				读一个字符,每调用一次切换到下一个字符,直到没数据,则返回-1。它返回的是这个字符对应的ASCII码对应的数 例如 a对应97

   	 	   3.2 DataOutputStream类的构造方法需要OutputStream类(FileOutputStream类)
   	 				拥有方法
   	 				public synchronized void write(int b)
   	 				写一个数字,该数字是对应ASCII码表上的

   	   4 同理上方
   	 	   4.1 BufferedWriter(new OutputStreamWriter(new FileOutputStream("d:\\demo.txt",true)));
   	 	 		拥有方法
   	 	 			void newLine()  		   写入换行
   	 	 			void write(String str)    String接收的是写入磁盘中的内容
   	 	 			void flush()			    写完之后需要刷新一下缓冲区才可以

   	 	   4.2 OutputStreamWriter类的两个构造方法,可以加编码格式
   	 	   		OutputStreamWriter(OutputStream os)
   	 	   		OutputStreamWriter(OutputStream os,String charset)
   	 	 			拥有方法
   	 	 			void write(String str)    String接收的是写入磁盘中的内容
   	 	 		4.3 FileWriter类是OutputStreamWriter类的子类
   	 	 			FileWriter(File file)
   	 	 			FileWriter(String path)
   	 	 			FileWriter(File file,boolean bool)
   	 	 			FileWriter(String path,boolean bool)
   	 	 				拥有方法
   	 	 				void write(String str)    String接收的是写入磁盘中的内容

   	 	   4.4 FileOutputStream("d:\\demo.txt",true)

   	 	   		 构造方法
  				 FileOutputStream(File file)
  				 FileOutputStream(String path)
  				 FileOutputStream(File file , boolean bool)
  				 FileOutputStream(String path, boolean bool)
8.5 BufferedReader类
public class BufferedReaderDemo01 {
public static void main(String[] args) {
BufferedReader br = null;
try {
br = new BufferedReader(new InputStreamReader(new FileInputStream("d:\\demo.txt"),"utf-8"));
while(true){
String str1 = br.readLine();
if(str1!=null)
System.out.println(str1);
else
break;
}
} catch (FileNotFoundException e) {
e.printStackTrace();
} catch (UnsupportedEncodingException e) {
e.printStackTrace();
} catch (IOException e) {
e.printStackTrace();
}finally{
try {
br.close();
} catch (IOException e) {
e.printStackTrace();
}
}
}
}
8.6 BufferedWriter类
public class BufferedWriterDemo01 {
public static void main(String[] args) {
BufferedWriter bw =null;
try {
bw = new BufferedWriter(new OutputStreamWriter(new FileOutputStream("d:\\demo.txt",true)));
bw.newLine();
bw.write("随意");
bw.newLine();
bw.write("吃饭 喝酒");
bw.flush();
System.out.println("数据写入成功");
} catch (FileNotFoundException e) {
e.printStackTrace();
} catch (IOException e) {
e.printStackTrace();
}finally{
try {
bw.close();
} catch (IOException e) {
e.printStackTrace();
}
}
}
}
8.7 DataInputStreamAndDataOutputStream类
public class DataInputStreamAndDataOutputStreamDemo01 {
public static void main(String[] args) {
FileInputStream fis = null;
DataInputStream dis = null;
FileOutputStream fos = null;
DataOutputStream dos =null;
try {
fis = new FileInputStream("d:\\beautiful.jpg");
dis = new DataInputStream(fis);
fos = new FileOutputStream("d:\\girl.jpg");
dos = new DataOutputStream(fos);
byte[] bytes = new byte[2000000];
System.out.println();
while(true){
int num = dis.read();
if(num!=-1)
dos.write(num);
else
break;
}
System.out.println("程序执行完毕");
} catch (FileNotFoundException e) {
e.printStackTrace();
} catch (IOException e) {
e.printStackTrace();
}finally{
try {
dos.close();
fos.close();
dis.close();
fis.close();
} catch (IOException e) {
e.printStackTrace();
}
}
}
}
8.8 ObjectOutputStreamAndObjectInputStream类
	public class ObjectOutputStreamDemo02 {
		public static void main(String[] args) {
			try {
				ObjectOutputStream oos = new ObjectOutputStream(new FileOutputStream("D:\\student.txt"));

				Student stu1 = new Student("张三","20");
				Student stu2 = new Student("李四","21");
				Student stu3 = new Student("王五","22");
				Student stu4 = new Student("赵六","23");

				List<Student> list = new ArrayList<Student>();
				list.add(stu1);
				list.add(stu2);
				list.add(stu3);
				list.add(stu4);

				oos.writeObject(list);
				System.out.println("多个对象写入完毕");
			} catch (FileNotFoundException e) {
				e.printStackTrace();
			} catch (IOException e) {
				e.printStackTrace();
			}

		}
}


	public class ObjectInputStreamDemo02 {

		public static void main(String[] args) {
				ObjectInputStream ois;
				try {
					ois = new ObjectInputStream(new FileInputStream("D:\\student.txt"));
					Object object = ois.readObject();
					ArrayList al = (ArrayList)object;
					for (Object object2 : al) {
						System.out.println(object2);
					}
				} catch (FileNotFoundException e) {
					e.printStackTrace();
				} catch (IOException e) {
					e.printStackTrace();
				} catch (ClassNotFoundException e) {
					e.printStackTrace();
				}
		}
	}


	public class Student implements Serializable{
			private String name;
			private String age;

			public Student(String name, String age) {
				super();
				this.name = name;
				this.age = age;
			}
			public String getName() {
				return name;
			}
			public void setName(String name) {
				this.name = name;
			}
			public String getAge() {
				return age;
			}
			public void setAge(String age) {
				this.age = age;
			}
			@Override
			public String toString() {
				return "Student [name=" + name + ", age=" + age + "]";
			}
		}
8.9 FileReader类
public class FileReaderDemo01 {
public static void main(String[] args) throws IOException {
FileReader fr = null;
fr = new FileReader("D:\\demo.txt");
while(true){
int num =fr.read();
if(num!=-1)
System.out.print((char)num);
else
break;
}
fr.close();
}
}
8.10 FileWriter类
public class FileWriterDemo01
public static void main(String[] args) {
FileWriter fw = null;
try {
fw = new FileWriter("D:\\demo.txt");
fw.write("你好,我是FileWriter");
System.out.println("数据写入完毕");
} catch (IOException e) {
e.printStackTrace();
}finally{
try {
fw.close();
} catch (IOException e) {
e.printStackTrace();
}
}
}
}
8.11 InputStreamReader类
public abstract class InputStreamReaderDemo02 {
public static void main(String[] args) {
InputStreamReader ir =null;
try {
ir = new InputStreamReader(new FileInputStream("D:\\demo.txt"),"UTF-8");
char[] chars = new char[1024];
int num =ir.read(chars);
for(int i=0;i<num;i++){
System.out.print(chars[i]);
}
} catch (FileNotFoundException e) {
e.printStackTrace();
} catch (IOException e) {
e.printStackTrace();
}finally{
if(ir!=null)
try {
ir.close();
} catch (IOException e) {
e.printStackTrace();
}
}
}
}
8.12 OutputStreamWriter类
public class OutputStreamWriterDemo01 {
public static void main(String[] args) {
OutputStreamWriter osw =null;
try {
osw = new OutputStreamWriter(new FileOutputStream("d:\\demo.txt",true));
osw.write("hello java");
System.out.println("数据写入完毕");
} catch (FileNotFoundException e) {
e.printStackTrace();
} catch (IOException e) {
e.printStackTrace();
}finally{
try {
osw.close();
} catch (IOException e) {
e.printStackTrace();
}
}
}
}
8.13 图片保存到文本中并且可以复原
public class txtPngDemo{
public static void main(String[] args) throws Exception {
jpgTxt();
txtPng();
}
public static void jpgTxt()throws Exception{
FileOutputStream outputStream = new FileOutputStream("d:/1.txt");
FileInputStream inputStream = new FileInputStream("D:/1.png");
int b = -1;
while((b = inputStream.read()) !=-1){
byte[] bytes =( b+"").getBytes();
outputStream.write(bytes);
outputStream.write(new byte[]{'\r'});
}
System.out.println("图片写到文本成功");
outputStream.close();
inputStream.close();
}
public static void txtPng()throws Exception{
BufferedOutputStream outputStream = new BufferedOutputStream(new FileOutputStream("d:/4.png"));
BufferedReader inputStream = new BufferedReader(new FileReader("d:/1.txt")) ;
String str = null;
while((str=inputStream.readLine()) !=null){
byte a = (byte)Integer.parseInt(str);
outputStream.write(a);
}
System.out.println("文本转换成图片成功");
outputStream.close();
inputStream.close();
}
}
多线程
-
如果再一个进程中同时运行多个线程,用来完成不同的工作,则称之为多线程
多个线程交替占用CPU资源,而非真正的并行执行
-
进程和线程的关系
  	 一个在内存中运行的应用程序。每个进程都有自己独立的一块内存空间,一个进程可以有多个线程,比如在Windows系统中,一个运行的xx.exe就是一个进程。

  	 与进程不同的是同类的多个线程共享进程的堆和方法区资源,但每个线程有自己的程序计数器、虚拟机栈和本地方法栈,
  	 所以系统在产生一个线程,或是在各个线程之间作切换工作时,负担要比进程小得多,也正因为如此,线程也被称为轻量级进程。
9.1 Thread类
-
Java中创建多线程的两种方式
		java.lang包下的Thread类,Thread类支持多线程编程
		java.lang包下的Runnable接口

主线程只有一个main()方法,它必须最后完成执行,因为他执行各种关闭动作

Thread类方法
        currentThread()     //获取当前线程对象
        getName()			//获取当前线程的名称
        getPriority()		//获取当前线程的优先级
        setName()			//设置线程的名称
        setPriority()		//设置线程优先级

Thread类的静态字段
        MAX_PRIORITY   10
        MIN_PRIORITY    1
        NORM_PRIORITY   5

例子
  	 public class ThreadDemo01 {
  		public static void main(String[] args) {
  			//main方法是程序的主入口,是一个线程
  			//currentThread() 获取当前线程对象
  			Thread thread = Thread.currentThread();

  			//getName()  获取当前线程的名称
  			String name = Thread.currentThread().getName();
  			System.out.println(name);					//main

  			//getPriority() 获取当前线程的优先级
  			int priority = thread.getPriority();
  			System.out.println(priority);				//5

  			//setName() 设置线程的名称
  			thread.setName("随意");						//随意
  			System.out.println(thread.getName());

  			//setPriority()  设置线程优先级
  			thread.setPriority(1);
  			System.out.println(thread.getPriority());	//1

  			System.out.println("线程优先级最高值:"+Thread.MAX_PRIORITY);	//10
  			System.out.println("线程优先级最低值:"+Thread.MIN_PRIORITY);	//1
  			System.out.println("线程优先级默认值:"+Thread.NORM_PRIORITY);	//5
  		}
  	}
-
继承Thread类实例

  	public class Test {
  	   public static void main(String[] args) {
  			//创建线程类对象
  			MyThread mt1 = new MyThread("天山童姥");
  			MyThread mt2 = new MyThread("逍遥子");

  			// start()方法是启动线程的方法
  			mt1.start();
  			mt2.start();
  			//当同时启动两个线程以后,会出现两个线程交替占用CPU执行代码的结果
  		}
  	}

  	//一个类要定义成线程类,可以通过继承Thread类来实现,然后重写Thread类的run()方法
  	public class MyThread extends Thread{

  		public MyThread(){
  		}

  		public MyThread(String name){
  			super(name);
  		}
  		@Override
  		public void run(){
  			//在重写的run()方法中编写你要执行的代码,使用循环输出1-20
  			for(int i=1;i<=20;i++){
  				System.out.println(Thread.currentThread().getName()+"-"+i);
  			}
  		}
  	}


实现Runnable接口实例

  	public class Test {
  	   public static void main(String[] args) {
  			//创建线程类对象
  			MyRunnable mt1 = new MyRunnable();
  			Thread thread1 = new Thread(mt1,"千里眼");
  			Thread thread2 = new Thread(mt1);
  			thread1.start();
  			thread2.start();
  			//start()方法是Thread类中的方法,而我们需要通过start()放啊来调用run()方法,不能直接调用run()方法
  			//但是Runnable接口中只有一个抽象方法run()方法,那么实现Runnable接口的子类不能调用start()方法
  			//解决办法
  			//将实现Runnable接口的类对象作为参数传递给Thread构造方法,然后通过Thread类对象调用start()方法
  		}
  	}
9.2 锁机制
public class Account {
private int balance = 500;
public int getBalance(){
return balance;
}
public void withdraw(int amount){
balance = balance-amount;
}
}
public class TestAccount implements Runnable {
private Account acct = new Account();
public void run() {
for (int i = 0; i < 5; i++) {
makeWithDrawal(100);
if (acct.getBalance() < 0) {
System.out.println("账户透支了!");
}
}
}
private void makeWithDrawal(int amt) {
synchronized (acct) {
if (acct.getBalance() >= amt) {
System.out.println(Thread.currentThread().getName() + "准备取款");
try {
Thread.sleep(500);
} catch (InterruptedException e) {
e.printStackTrace();
}
acct.withdraw(amt);
System.out.println(Thread.currentThread().getName() + "完成取款");
} else {
System.out.println("余额不足支付" + Thread.currentThread().getName()
+ "的取款,余额为" + acct.getBalance());
}
}
}
}
public class Test {
public static void main(String[] args) {
TestAccount r = new TestAccount();
Thread one = new Thread(r);
Thread two = new Thread(r);
one.setName("张三");
two.setName("张三老婆");
one.start();
two.start();
}
}
9.3 join方法和yield方法
public class MyThread implements Runnable {
@Override
public void run() {
for(int i =0;i<20;i++){
System.out.println(Thread.currentThread().getName()+"运行第"+(i+1)+"次");
}
}
}
public class Test {
public static void main(String[] args) {
MyThread mt = new MyThread();
Thread t = new Thread(mt,"尼古拉斯");
t.start();
for(int i=0;i<10;i++){
if(i==5){
try{
t.join();
}
catch(InterruptedException e){
e.printStackTrace();
}
}
System.out.println(Thread.currentThread().getName()+"运行第"+(i+1)+"次");
}
}
}
public class MyThread implements Runnable {
@Override
public void run() {
for(int i =0;i<=5;i++){
System.out.println(Thread.currentThread().getName()+"正在运行:"+i);
if(i==3){
System.out.println(Thread.currentThread().getName()+"线程礼让:");
Thread.yield();
}
}
}
public class Test {
public static void main(String[] args) {
MyThread mt =new MyThread();
Thread t1 = new Thread(mt,"A");
Thread t2 = new Thread(mt,"B");
t1.start();
t2.start();
}
}
注意:
从这里我们可以推断出,输出语句是加锁的,否则,我打印一部分,下一部分还没来的及打印
9.4 return break continue
9.5 线程同步的方式
-
同步方法
       使用synchronized修饰的方法,就叫做同步方法,保证一个线程执行该方法的时候,其他线程只能在方法外等着。

例子
  	public class Mythread1 implements Runnable {
  	    private int ticket = 10;
  	    @Override
  	    public void run() {
  	        while (true) {
  	            if (sellTicket() == false) {
  	                break;
  	            }
  	        }
  	    }

  	    public synchronized boolean sellTicket() {
  	        if (ticket <= 0) {
  	            System.out.println(Thread.currentThread().getName() + "票已售罄");
  	            return false;
  	        } else {
  	            ticket--;
  	            System.out.println(Thread.currentThread().getName() + "卖出一张票,还剩" + ticket + "张票");
  	            try {
  	                Thread.currentThread().sleep(500);
  	            } catch (InterruptedException e) {
  	                e.printStackTrace();
  	            }
  	            return true;
  	        }
  	    }
  	}
-
同步代码块

代码格式
		synchronized(同步锁){   //注意:同步锁可以是任意对象
  		    需要同步操作的代码
  		}


例子
  		public class Mythread1 implements Runnable {
  		    private int ticket = 10;
  		    Object object = new Object();
  		    @Override
  		    public void run() {
  		        while (true) {
  		            synchronized (object) {//锁对象可以是任意对象
  		                if (ticket <= 0) {
  		                    System.out.println(Thread.currentThread().getName() + "票已售罄");
  		                    break;
  		                } else {
  		                    ticket--;
  		                    System.out.println(Thread.currentThread().getName() + "卖出一张票,还剩" + ticket + "张票");
  		                    try {
  		                        Thread.currentThread().sleep(500);
  		                    } catch (InterruptedException e) {
  		                        e.printStackTrace();
  		                    }
  		                }
  		            }
  		        }
  		    }
  		}
-
 Lock锁(ReentrantLock类)
  		同步代码块/同步方法具有的功能Lock都有,除此之外更强大,更体现面向对象。

  方法:
  		public void lock() :加同步锁。
  		public void unlock() :释放同步锁。

  例子
  		public class Mythread1 implements Runnable {
  		    private int ticket = 10;
  		    Lock lock = new ReentrantLock();
  		    @Override
  		    public void run() {
  		        while (true) {
  		            lock.lock();
  		            try {
  		             if (ticket <= 0) {
  		                System.out.println(Thread.currentThread().getName() + "票已售罄");
  		                break;
  		            }
  		                ticket--;
  		                System.out.println(Thread.currentThread().getName() + "卖出一张票,还剩" + ticket + "张票");
  		                try {
  		                    Thread.currentThread().sleep(500);
  		                } catch (InterruptedException e) {
  		                    e.printStackTrace();
  		                }
  		            } finally {
  		                lock.unlock();
  		            }
  		        }
  		    }
  		}
并发编程
10.1 并发编程三大特性
-
可见性,有序性,原子性


volatile保证可见性与有序性,但不保证原子性


例子
		public class VolatileVisibilityTest extends Thread{
  		    private static boolean initFlag = false;
  		    public static void main(String[] args) throws InterruptedException {

  		        Thread t = new Thread(new Runnable() {
  		            @Override
  		            public void run() {
  		            	System.out.println("waiting data");
  		                while (!initFlag){}
  		                System.out.println("==========success");
  		            }
  		        });
  		        t.start();
  		        Thread.sleep(2000);//模拟有一堆代码要执行

  		        Thread t1 = new Thread(new Runnable() {
  		            @Override
  		            public void run() {
  			            System.out.println("prepare data........");
             		    initFlag = true;
              			System.out.println("prepare data end......");
  		            }
  		        });
  		        t1.start();
  		    }
  		}

  执行结果如下

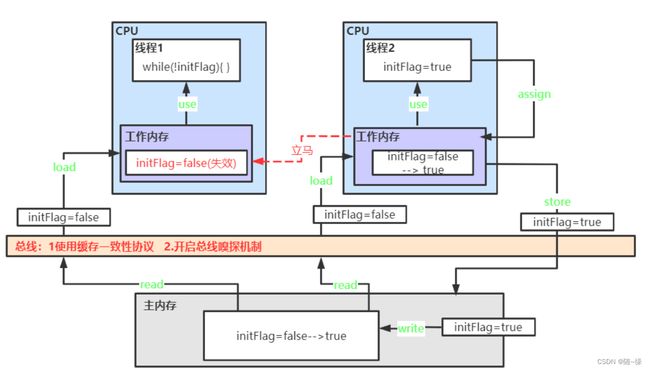
  	   执行上面代码,控制打印内容如下,发现程序并没有停下来,说明第一个线程并不知道共享变量initFlag已经被改为true了,
  	   事实上第二个线程改是自己工作内存里面的变量副本,第一个线程工作内存里面的变量副本还是false。


怎么解决这个问题呢?
		如果想要第一个线程立刻知道共享变量已经修改了,只要给共享变量initFlag加上volatile关键字
		private volatile static boolean initFlag = false;

-
总线使用缓存一致性协议MESI,开启总线嗅探机制。
当线程2修改了共享变量initFLag的值后,立马(线程2不再往下继续执行)线程1使工作内存中的变量initFlag值失效,当线程1再使用时又会从主内存中重新读取。
-
总结
  	多个cpu从主内存中读取同一个数据到各自高速缓存,当其中的某个cpu修改了缓存里的数据,该数据会马上同步回主内存,
  	其他cpu通过总线嗅探机制可以感知到数据的变化从而将自己缓存里的数据失效,再使用时重新从主内存中读取。
  	不同的处理器使用的缓存一致性协议可能不同。
10.2 JMM有序性
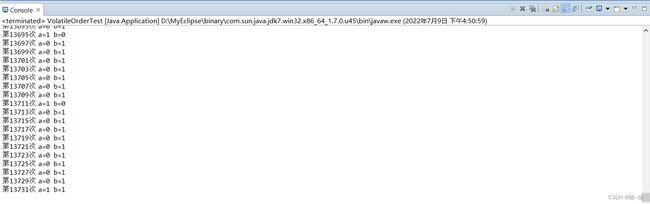
		public class VolatileOrderTest {
		    static int a = 0, b = 0;
		    static int x = 0, y = 0;
		    public static void main(String[] args) throws InterruptedException {
		        for(int i = 0;;i++){
		            i++;
		            x = 0; y = 0;
		            a = 0; b = 0;
		            Thread one = new Thread(new Runnable() {
		            	@Override
		            	public void run(){
		            		 try {
		                         Thread.sleep(1);
		                     } catch (InterruptedException e) {
		                         e.printStackTrace();
		                     }
		                     a = y;
		                     x = 1;
		            	}
		            });

		            Thread two = new Thread(new Runnable() {
		            	@Override
		            	public void run(){
		            		  try {
		                          Thread.sleep(1);
		                      } catch (InterruptedException e) {
		                          e.printStackTrace();
		                      }
		                      b = x;
		                      y = 1;
		            	}
		            });
		            one.start();
		            two.start();
		            one.join();
		            two.join();
		            System.out.println("第" + i + "次 a=" + a + " b=" + b);
		            if (a==1 && b==1) break;
		        }
		    }
		}
-
可以发现循环到1万多次的时候,出现了结果为:a=1,b=1的情况,

这说明:
  线程one中x=1;比a=y;先执行,线程two中y=1;比b=x;先执行,两个线程代码实际的执行顺序都发生了变化,这就是指令重排现象
-
什么是指令重排
  	java语言规范规定JVM线程内部维持顺序话语义。
  	即,只要程序的最终结果与它顺序化执行结果相同,那么指令的执行顺序可以与代码顺序不一致,此过程叫做指令的重排。

  	指令重排序,在不影响单线程程序执行结果的前提下,计算机为了最大限度的发挥机器性能,会对机器指令进行重排序优化。
-
指令重排的前提
  是不是所有的代码都可能发生指令重排呢?当然不是的,只有满足一定的条件,符合一些规则才会发生。

  as-if-serial
  as-if-serial语义的意思是:不管怎么重排序,单线程程序的执行结果不能被改变。编译器、runtime和处理器都必须遵守as-if-serial语义。

  为了遵守as-if-serial语义,编译器和处理器不会对存在数据依赖关系的操作做重排序,因为这种重排序会改变执行结果。但是,如果操作之间不存在数据依赖关系,这些操作就可能被编译器和处理器重排序。


  int i = 0;
  int j = i + 1; //下面这条语句就依赖上面的语句,不会发生指令重排
通信
三次握手四次挥手
-
TCP与UDP都工作在传输层,这两个目标都是在程序之间传输数据,数据可以是文本文件、视频、图片等。
对于TCP协议与UDP协议来说,它们都是一堆二进制数。它们最大的区别是基于连接和基于非连接的
例如(不考虑速度因素)
		打电话 ----电话接通,互相通话,结束挂断						TCP
		写信---对方是否收到,内容是否完整,多封信件顺序是否正确  		UDP


问题一:TCP是如何保证以上过程的呢?
		分别为三次握手,传输确认,四次握手

		三次握手是建立连接的过程,当客户端向服务端发起连接时,会先发一包连接请求数据,过去询问一下,能否与你建立连接,这包数据我们称之为SYN包,
		如果服务端同意连接,则回复一包SYN+ACK包,客户端收到之后回复ACK包。则到这客户端与服务端连接建立
		因为这个过程中互相发送了三包数据,所以称之为三次握手

问题二:TCP三次握手第三次握手时ACK丢失怎么办?
		 第三次的ACK在网络中丢失,那么Server 端该TCP连接的状态为SYN_RECV,并且会根据 TCP的超时重传机制,会等待3秒、6秒、12秒后重新发送SYN+ACK包,以便Client重新发送ACK包。
		 如果重发指定次数之后,仍然未收到 client 的ACK应答,那么一段时间后,Server自动关闭这个连接,并从半连接队列(syns queue)移除

问题三:为什么不是两次握手呢?
			这是为了防止已经失效的请求报文突然有传到服务器引起错误
			现假定一种异常情况,即A发出的SYN报文段并没有丢失,而是在某些网络节点长时间滞留了,以致延误到连接释放后的某个时间才到达B。
			本来这是一个早已失效的报文段。但B收到此失效的连接请求报文段后,却误以为是A又发出一次新的连接请求,于是就向A发出确认报文段,同意建立连接。
  			由于现在A并没有发出建立连接的请求,因此不会理睬B的确认,也不会向B发送数据,但B却以为新的运输连接已经建立了,并一直等待A发来的数据。B的许多资源就这样白白浪费了。
  			*******************************
  			即:当A发送SYN+ACK给B,而客户端由于没有发送请求,不会接收服务端发送来的SYN+ACK请求,而此时服务端建立连接,客户端没有建立连接。(两次握手)
  			若是第三次,由于客户端没有发送ACK给服务端,所以问题二解答
  			*******************************

问题四:一包数据可能被拆成多包发送,如何处理丢包问题?
问题五:这些数据包到达的先后顺序不同,如何处理乱序问题
  		针对以上两个问题tcp协议为每个连接建立了一个发送缓冲区(存放的是需要发送的数据),从建立连接后的第一个字节的序列号为0,后面的每个字节的序列号就会增加1,
  		发送数据时,从发送缓冲区,取一部分数据组成发送报文,在其tcp协议头中会附带序列号和长度,接收端在收到数据后,需要回复确认报文,确认报文中的ACK等于接收序列号加长度,也就是下一包起始序列号。
  		这样一问一答的发送方式,能够使发送端确认发送的数据已经被对方收到。
  		发送端也可以一次发送连续的多包数据,接收端只需要回复一次ACK就可以了,这样发送端可以把待发送的数据分割成一系列的碎片,发送到对端,对端根据序列号和长度,在接收后重构出来完整的数据。
  		假设其中丢失了某些数据包,在接收端可以要求发送端重传,比如丢失了100-199这100个字节,接收端向发送端发送ACK=100的报文,发送端收到后重传这一包数据,接收端进行补齐。
  		以上过程不区分客户端和服务端,tcp连接是全双工的,对于两端来说均采用上述机制

三次握手是为了解决网络信道不可靠的问题,在不可导的信道上建立可靠的链接
-
四次挥手
  	  处于连接状态的客户端和服务端,都可以发起关闭连接请求,此时需要四次挥手来进行关闭连接
  	  假设客户端主动发起连接关闭请求,它需要向服务端发送一个FIN包,表示要关闭连接,自己进入终止等待1状态,这是第一次挥手
  	  服务端收到FIN包,发送一包ACK包,表示自己进入了关闭等待状态,客户端进入终止等待2状态,这是第二次挥手
  	  服务端此时还可以发送未发送的数据,而客户端还可以接受数据,待服务端发送完数据之后,发送一个FIN包,进入最后确认状态,这是第三次挥手
  	  客户端收到之后回复ACK包,进入超时等待状态,经过超时时间后关闭连接,而服务端收到ACK包后,立即关闭连接,这是第四次挥手

问题一:为什么客户端需要等待超时时间?
	  这是为了保证对方已收到ACK包。因为假设客户端发送完最后一包,ACK包后就释放了连接,一旦ACK包在网络中丢失,服务端将一直停留在最后确认状态
	  如果客户端发送完最后一包ACK包后,等待一段时间,这时服务端因为没有收到ACK包将会重发FIN包,客户端会相应这个FIN包,客户端会重发ACK包并刷新超时时间。

UDP
	UDP协议是基于非连接的,发送数据就是简单的把数据包封装一下,然后从网卡发出去就可以了,数据包之间并没有状态上的联系。
	所以UDP性能损耗非常小,对于CPU内存资源的占用也远小于TCP。
	但是对于网络传输过程中产生的丢包UDP协议并不能保证,所以UDP在传输稳定性上要弱于tcp
-
什么是线程通信
		一个线程进行了规定操作后,就进入等待状态, 等待其他线程执行完他们的指定代码过后 再将其唤醒
-
TCP需要建立连接(使用流建立连接)
UDP不需要建立连接
127.0.0.1与localhost是一样的,代表的是当前自己计算机
普通通信TCP
-
Client
  	  创建客户端  new Socket("localhost",端口号)
  	  获取输出流	 new Socket("localhost",端口号).getOutputStream()
  	  输出信息 	 new Socket("localhost",端口号).getOutputStream().write(byte型数组对象)  //str.getBytes()
  	  关闭输出流	 new Socket("localhost",端口号).shoutdownOutput()

  	  获取输入流接收服务器端发送的相应信息
  	  			 new Socket("localhost",端口号).getInputStream()
  	  			 new BufferedReader(new InputStreamReader(new Socket("localhost",端口号).getInputStream()))

  例子	(getBytes()方法重要)
  		public class Client {
  			public static void main(String[] args) {
  				//创建Socket对象
  				Socket socket =null;
  				OutputStream os =null;
  				InputStream is =null;
  				BufferedReader br =null;
  				try {
  					//通信链路的客户端端点创建成功
  					socket = new Socket("localhost", 10088);
  					//获取输出流将登录信息发送给服务器端
  					os =socket.getOutputStream();

  					String str = "用户名:tom,密码:123456";
  					byte[] bytes=str.getBytes();
  					//输出信息
  					os.write(bytes);
  					System.out.println("向服务器发送请求成功!");
  					//关闭输出流
  					socket.shutdownOutput();

  					//获取输入流接收服务器端发送的响应信息
  					is = socket.getInputStream();
  					br = new BufferedReader(new InputStreamReader(is));
  					String str2;
  					while((str2=br.readLine())!=null){
  						System.out.println("这里是客户端,接收到的服务器发送来的响应信息为:"+str2);
  					}

  				} catch (UnknownHostException e) {
  					e.printStackTrace();
  				} catch (IOException e) {
  					e.printStackTrace();
  				}finally{
  					try {
  						br.close();
  						is.close();
  						os.close();
  						socket.close();
  					} catch (IOException e) {
  						// TODO Auto-generated catch block
  						e.printStackTrace();
  					}
  				}
  			}
  		}
-
Server端
	创建ServerSocket	new ServerSocket(端口号)
	侦听客户端的请求		new ServerSocket(端口号).accept()
	获取输入流接受客户端的请求信息
						new ServerSocket(端口号).accept().getInputStream()
						new BufferedReader(new InputStreamReader(new ServerSocket(端口号).accept().getInputStream())

	获取输出流向客户端发送响应消息
    					new ServerSocket(端口号).accept().getOutputStream()
    					new ServerSocket(端口号).accept().getOutputStream().write(byte型数组对象)

例子
    public class Server {

  		public static void main(String[] args) {
  			// 创建ServerSocket
  			ServerSocket ss =null;
  			Socket soc=null;
  			InputStream is=null;
  			BufferedReader br =null;
  			OutputStream os=null;
  			try {
  				ss = new ServerSocket(10088);
  				//侦听客户端的请求
  				soc=ss.accept();
  				//获取输入流接收客户端的请求信息
  				is=soc.getInputStream();
  				br = new BufferedReader(new InputStreamReader(is));

  					String str;
  					while((str=br.readLine())!=null){
  						System.out.println("这里是服务器端,接收到的客户端信息为:"+str);
  					}

  					//获取输出流向客户端发送响应信息
  					os=soc.getOutputStream();
  					String str2 = "用户名和密码正确,登录成功";
  					byte[] bytes = str2.getBytes();
  					os.write(bytes);

  				} catch (IOException e) {
  					e.printStackTrace();
  				}finally{
  					try {
  						os.close();
  						br.close();
  						is.close();
  						soc.close();
  						ss.close();
  					} catch (IOException e) {
  						// TODO Auto-generated catch block
  						e.printStackTrace();
  					}
  				}
  			}
  		}
单个对象通信TCP
-
LoginClient
    	建立客户端连接	new Socket("localhost",端口号)
    	打开输出流 		new Socket("localhost",端口号).getOutputStream()
    	对象序列化		new ObjectOutputStream(new Socket("localhost",端口号).getOutputStream())
    	发送客户端信息,即向输出流中写入信息
    					User user = new User("Tom",123)
    					new ObjectOutputStream(new Socket.getOutputStream()).writeObject(user)
    	关闭输出流	    new Socket("localhost",端口号).shutdownOutput()

    	接受服务端相应,即从输入流中读取信息
    			new Socket("localhost",端口号).getInputStream()
    			new BufferedReader(new InputStreamReader(new Socket("localhost",端口号).getInputStream())


例子
  		public static void main(String[] args) {
  			Socket socket = null;
  			OutputStream os = null;
  			ObjectOutputStream oos = null;
  			InputStream is = null;
  			BufferedReader br = null;
  			try {
  				// 建立客户端Socket连接,指定服务器的位置为本机以及端口为8800
  				socket = new Socket("localhost", 8800);
  				// 打开输出流
  				os = socket.getOutputStream();
  				// 对象序列化
  				oos = new ObjectOutputStream(os);
  				// 发送客户端信息,即向输出流中写入信息
  				User user = new User("Tom", "123456");
  				oos.writeObject(user);
  				socket.shutdownOutput();

  				// 接收服务器端的响应,即从输入流中读取信息
  				is = socket.getInputStream();
  				br = new BufferedReader(new InputStreamReader(is));
  				String reply;
  				while ((reply = br.readLine()) != null) {
  					System.out.println("我是客户端,服务器的响应为:" + reply);
  				}
  			} catch (UnknownHostException e) {
  				e.printStackTrace();
  			} catch (IOException e) {
  				e.printStackTrace();
  			} finally {
  				try {
  					br.close();
  					is.close();
  					oos.close();
  					os.close();
  					socket.close();
  				} catch (IOException e) {
  					e.printStackTrace();
  				}

  			}
  		}
  	}
-
LoginServer
建立服务器 			new ServerSocket(端口号);
等待客户端发起通信	new ServerSocket(端口号).accept()
打开输入流			new ServerSocket(端口号).accept().getInputStream()
反序列化				new ObjectInputStream(new ServerSocket().accept().getInputStream())
从输入流中读取信息
		  new ObjectInputStream(new ServerSocket().accept().getInputStream()).readObject()

给客户端一个相应
  		  new ServerSocket(端口号).accept().getOutputStream()
		  new ServerSocket(端口号).accept().getOutputStream().write(byte型数组对象)

例子
    public class LoginServer {

  		public static void main(String[] args) {
  			ServerSocket serverSocket = null;
  			Socket socket = null;
  				InputStream is = null;
  				ObjectInputStream ois = null;
  				OutputStream os = null;
  				try {
  					// 建立一个服务器Socket(ServerSocket),指定端口8800并开始监听
  					serverSocket = new ServerSocket(8800);
  					// 使用accept()方法等待客户端发起通信
  					socket = serverSocket.accept();
  					// 打开输入流
  					is = socket.getInputStream();
  					// 反序列化
  					ois = new ObjectInputStream(is);
  					// 获取客户端信息,即从输入流读取信息
  					User user = (User) ois.readObject();
  					if (user != null) {
  						System.out.println("我是服务器,客户登录信息为:" + user.getLoginName() + ","
  								+ user.getPwd());
  					}

  					// 给客户端一个响应,即向输出流中写入信息
  					String reply = "欢迎你,登录成功";
  					os = socket.getOutputStream();
  					os.write(reply.getBytes());
  				} catch (IOException e) {
  					e.printStackTrace();
  				} catch (ClassNotFoundException e) {
  					e.printStackTrace();
  				} finally {
  					// 关闭资源
  					try {
  						os.close();
  						ois.close();
  						is.close();
  						socket.close();
  						serverSocket.close();
  					} catch (IOException e) {
  						e.printStackTrace();
  					}
  				}
  			}
  		}
-
User
  	  public class User implements Serializable {

  			private static final long serialVersionUID = 1L;
  			/** 用户名 */
  			private String loginName;
  			/** 用户密码 */
  			private String pwd;

  			public User() {
  				super();
  			}

  			public User(String loginName, String pwd) {
  				super();
  				this.loginName = loginName;
  				this.pwd = pwd;
  			}

  			public String getLoginName() {
  				return loginName;
  			}

  			public void setLoginName(String loginName) {
  				this.loginName = loginName;
  			}

  			public String getPwd() {
  				return pwd;
  			}

  			public void setPwd(String pwd) {
  				this.pwd = pwd;
  			}
  		}
多个对象通信TCP
-
LoginServer
建立服务器	new ServerSocket(端口号)
while死循环进行监听
			new ServerSocket(端口号).accept()  --返回的是Socket类型对象
			把此对象传给loginThread类处理

例子
  		  public class LoginServer {

  				public static void main(String[] args) {

  					ServerSocket serverSocket = null;
  					try {
  						// 建立一个服务器Socket(ServerSocket)指定端口并开始监听
  						serverSocket = new ServerSocket(8800);

  						// 监听一直进行中
  						while (true) {
  							// 使用accept()方法等待客户发起通信
  							Socket socket = serverSocket.accept();
  							LoginThread loginThread = new LoginThread(socket);
  							loginThread.start();
  						}
  					} catch (IOException e) {
  						e.printStackTrace();
  					}
  				}
  			}
-
LoginThread(使用多线程处理每监听一个生成一个socket对象)

Socket对象实例化之后可以使用socket
调用打开输入流getInputStream()   ---返回的是InputStream类型的对象

反序列化
	new ObjectInputStream(socket.getInputSteam())

获取客户端信息
  	new ObjectInputStream(socket.getInputSteam()).readObject()


例子
		public class LoginThread extends Thread {
  			/*
  			 * 示例03:升级示例02,实现多客户端的响应处理。
  			 *
  			 * 分析如下:
  			 * 	(1)创建服务器端线程类,run()方法中实现对一个请求的响应处理。
  			 * 	(2)修改服务器端代码,让服务器端Socket一直处于监听状态。
  			 * 	(3)服务器端每监听到一个请求,创建一个线程对象并启动
  			 */

  			Socket socket = null;
  			//每启动一个线程,连接对应的Socket

  			public LoginThread(Socket socket) {
  				this.socket = socket;
  			}

  			//启动线程,即响应客户请求
  			public void run() {
  				InputStream is = null;
  				ObjectInputStream ois = null;
  				OutputStream os = null;
  				try {
  					//打开输入流
  					is = socket.getInputStream();
  					//反序列化
  					ois = new ObjectInputStream(is);
  					//获取客户端信息,即从输入流读取信息
  					User user = (User)ois.readObject();
  					if(user!=null){
  						System.out.println("我是服务器,客户登录信息为:"+user.getLoginName()+","+user.getPwd());
  					}

  					//给客户端一个响应,即向输出流中写入信息
  					os = socket.getOutputStream();
  					String reply = "欢迎你,登录成功";
  					os.write(reply.getBytes());
  				} catch (IOException e) {
  					e.printStackTrace();
  				} catch (ClassNotFoundException e) {
  					e.printStackTrace();
  				}finally{
  					try {
  						os.close();
  						ois.close();
  						is.close();
  						socket.close();
  					} catch (IOException e) {
  						e.printStackTrace();
  					}
  				}
  			}
  		}
-
LoginClient
     只要改变	User user = new User("Tom", "123456");就可以模仿多个客户端

  	  public class LoginClient01 {

  			/*
  			 * 示例03:升级演示示例02,实现多客户端的响应处理
  			 */
  			public static void main(String[] args) {


  				Socket socket = null;
  				OutputStream os = null;
  				ObjectOutputStream oos = null;
  				InputStream is = null;
  				BufferedReader br = null;
  				try {
  					// 建立客户端Socket连接,指定服务器的位置为本机以及端口为8800
  					socket = new Socket("localhost", 88100);
  					// 打开输出流
  					os = socket.getOutputStream();
  					// 对象序列化
  					oos = new ObjectOutputStream(os);
  					// 发送客户端信息,即向输出流中写入信息
  					User user = new User("Tom", "123456");
  					oos.writeObject(user);
  					socket.shutdownOutput();

  					// 接收服务器端的响应,即从输入流中读取信息
  					is = socket.getInputStream();
  					br = new BufferedReader(new InputStreamReader(is));
  					String reply;
  					while ((reply = br.readLine()) != null) {
  						System.out.println("我是客户端,服务器的响应为:" + reply);
  					}
  				} catch (UnknownHostException e) {
  					e.printStackTrace();
  				} catch (IOException e) {
  					e.printStackTrace();
  				} finally {
  					try {
  						br.close();
  						is.close();
  						oos.close();
  						os.close();
  						socket.close();
  					} catch (IOException e) {
  						e.printStackTrace();
  					}

  				}
  			}

  		}
单向通信UDP
-
创建DatagramPacket对象,准备接收封装的数据。
  			DatagramPacket  dp = new DatagramPacket(new byte[1024], 1024);
创建DatagramSocket对象,接收数据保存于DatagramPacket对象中
		    DatagramSocket ds = new DatagramSocket(8800)
		    ds.receive(dp)
利用DatagramPacket对象处理数据
		  String mess = new String(dp.getData(), 0, dp.getLength())


    模拟客户咨询问题,实现发送方发送咨询问题,接收方接收并显示发送来的咨询问题。
    public class Receive {

  	public static void main(String[] args) {
  		/*
  		 * 示例05:模拟客户咨询问题,实现发送方发送咨询问题,接收方接收并显示发送来的咨询问题。
  		 *
  		 * 接收方实现步骤如下:
  		 * 	(1)创建DatagramPacket对象,准备接收封装的数据。
  		 * 	(2)创建DatagramSocket对象,接收数据保存于DatagramPacket对象中。
  		 * 	(3)利用DatagramPacket对象处理数据。
  		 */

  		DatagramSocket ds = null;
  		//创建DatagramPacket对象,用来准备接收数据
  		byte[] buf = new byte[1024];
  		DatagramPacket  dp = new DatagramPacket(buf, 1024);
  		try {
  			//创建DatagramSocket对象,接收数据
  			ds = new DatagramSocket(8800);
  			ds.receive(dp);
  			//显示接收到的信息
  			String mess = new String(dp.getData(), 0, dp.getLength());
  			System.out.println(dp.getAddress().getHostAddress()+"说:"+mess);

  		} catch (SocketException e) {
  			e.printStackTrace();
  		} catch (IOException e) {
  			e.printStackTrace();
  		}finally{
  			ds.close();
  		}
  	}
  }
-
Send

  		 获取本地主机的InetAddress对象。
  		 		InetAddress  ia = InetAddress.getByName("localhost");
  		 创建DatagramPacket对象,封装要发送的信息。
  		 		DatagramPacket dp = new DatagramPacket(mess.getBytes(), mess.getBytes().length, ia, 8800);
  		 利用DatagramSocket对象将DatagramPacket对象数据发送出去。
  		 		DatagramSocket ds = new DatagramSocket();
  				ds.send(dp);

例子
  	public class Send {
  		public static void main(String[] args) {
  			DatagramSocket ds = null;
  			InetAddress ia = null;
  			String mess = "你好,我想咨询一个问题。";
  			try {
  				//获取本地主机地址
  				ia = InetAddress.getByName("localhost");
  				//创建DatagramPacket对象,封装数据
  				DatagramPacket dp = new DatagramPacket(mess.getBytes(), mess.getBytes().length, ia, 8800);
  				//创建DatagramSocket对象,向服务器发送数据
  				ds = new DatagramSocket();
  				ds.send(dp);

  			} catch (UnknownHostException e) {
  				e.printStackTrace();
  			} catch (SocketException e) {
  				e.printStackTrace();
  			} catch (IOException e) {
  				e.printStackTrace();
  			}finally{
  				ds.close();
  			}
  		}
  	}
双向通信UDP
-
Receive


  	 public class Receive {

  		public static void main(String[] args) {
  			/*
  			 * 示例06:升级示例05,发送方发送咨询问题,接收方回应咨询。
  			 *
  			 * 接收方实现步骤如下:
  			 * (1)创建DatagramPacket对象,准备接收封装的数据。
  			 * (2)创建DatagramSocket对象,接收数据保存于DatagramPacket对象中。
  			 * (3)利用DatagramPacket对象处理数据。
  			 */

  			DatagramSocket ds = null;
  			DatagramPacket dp = null;
  			DatagramPacket dpto = null;
  			// 创建DatagramPacket对象,用来准备接收数据
  			byte[] buf = new byte[1024];
  			dp = new DatagramPacket(buf, 1024);
  			try {
  				// 创建DatagramSocket对象,接收数据
  				ds = new DatagramSocket(8800);
  				ds.receive(dp);
  				// 显示接收到的信息
  				String mess = new String(dp.getData(), 0, dp.getLength());
  				System.out.println(dp.getAddress().getHostAddress() + "说:" + mess);

  //向客户端发送响应信息
  				String reply = "你好,我在,请咨询!";
  				// 显示与本地对话框
  				System.out.println("我  说:" + reply);
  				// 创建DatagramPacket对象,封装数据
  				SocketAddress sa = dp.getSocketAddress();
  				dpto = new DatagramPacket(reply.getBytes(),
  						reply.getBytes().length, sa);
  				ds.send(dpto);

  			} catch (SocketException e) {
  				e.printStackTrace();
  			} catch (IOException e) {
  				e.printStackTrace();
  			} finally {
  				ds.close();
  			}
  		}
  	}
-
Send
  		public class Send {
  			/*
  			 * 示例06:升级示例05,发送方发送咨询问题,接收方回应咨询。
  			 *
  			 * 发送方实现步骤如下:
  			 * (1)获取本地主机的InetAddress对象。
  			 * (2)创建DatagramPacket对象,封装要发送的信息。
  			 * (3)利用DatagramSocket对象将DatagramPacket对象数据发送出去。
  			 */

  			public static void main(String[] args) {
  				DatagramSocket ds = null;
  				InetAddress ia = null;
  				String mess = "你好,我想咨询一个问题。";
  				System.out.println("我说:" + mess);
  				try {
  					// 获取本地主机地址
  					ia = InetAddress.getByName("localhost");
  					// 创建DatagramPacket对象,封装数据
  					DatagramPacket dp = new DatagramPacket(mess.getBytes(),
  							mess.getBytes().length, ia, 8800);
  					// 创建DatagramSocket对象,向服务器发送数据
  					ds = new DatagramSocket();
  					ds.send(dp);

  //接受服务端发送的信息
  					byte[] buf = new byte[1024];
  					DatagramPacket dpre = new DatagramPacket(buf, buf.length);
  					ds.receive(dpre);
  					// 显示接收到的信息
  					String reply = new String(dpre.getData(), 0, dpre.getLength());
  					System.out.println(dpre.getAddress().getHostAddress() + "说:"
  							+ reply);

  				} catch (UnknownHostException e) {
  					e.printStackTrace();
  				} catch (SocketException e) {
  					e.printStackTrace();
  				} catch (IOException e) {
  					e.printStackTrace();
  				} finally {
  					ds.close();
  				}
  			}
  		}
XML
-
什么是XML?
  	它是一个可扩展标记语言
作用
  	数据交互、配置应用程序和网站、Ajax基石
特点
  	XML与操作系统、编程语言的开发平台无关
  	实现不同系统之间的数据交互
-
XML常用的两种解析技术
  DOM
  	DOM是基于XML的树结构来完成解析的,DOM解析XML文档时,会根据读取的文档,构建一个驻留在内存的树结构,然后就可以使用DOMAPI来操作这个结构。
  	因为整个文档的树结构是驻留在内存中的,所以非常方便于各种操作,支持删除、修改、重新排列等多种功能。
  	DOM解析XML的方式非常适用于多次访问XML的程序,但是DOM解析比较消耗资源。

  DOM4J
  	DOM4J是一个非常优秀的Java XML API,具有性能优异、功能强大和易用的特点,同时它也是一个开源库。
  	DOM4J用于在Java平台上使用Java集合框架处理XML、XPath和XSLT,并与DOM、SAX和JAXP完成集合。
  	DOM4J大量使用接口,面向接口编程是它比JDOM更加灵活。如今越来越多的Java软件都使用DOM4J来读写XML,特别值的一提的是Sum的JAXM也在使用DOM4J。
DOM解析技术
-
  前沿知识
  		获得集合、节点数组、数组、字符串长度
  			集合 		-----size()
  			节点数组		-----getLength()
  			数组		-----length
  			字符串		-----length()

  		获得集合、节点数组中的元素(下标从0开始)
  			集合
  				ArrayList	-----get(i)
  				LinkedList 	-----get(i)、getFirst()、getLast()
  				HashMap		-----get("key")
  				HashSet		-----无get()方法
  			节点数组(NodeList)		-----item(i)


  要想将XML文件转换成Document对象,需要使用到解析器对象
  要想使用解析器对象将xml文件转换成Document对象,首先需要使用解析器工厂对象
  1.获取解析器对象
  		DocumentBuilderFactory dbf = DocumentBuilderFactory.newInstance();
  2.使用解析器工厂对象获得解析器对象
  		DocumentBuilder db =dbf.newDocumentBuilder();
  3.使用解析器对象将xml文件转换成Document对象
  		Document document = db.parse("src/com/bdqn/demo02/demo.xml");
  4.获取xml中你需要获取标签的名字(student标签有可能不止一对,所以返回的是节点数组),返回值是NodeList
  		NodeList nl = document.getElementsByTagName("student");
  ---------------------------------------------------------------------------------
  5.Element接口中的方法
  		getAttribute("属性名")		通过元素节点的属性名称获取属性的值
  		getChildNodes()				获取该节点的子节点,返回的是一个子节点数组
  		setAttribute("属性名称", "属性的值");  设置元素节点的属性名称和设置该属性的值
  6.Document接口中的方法
  		getElementsByTagName("属性名称")		通过标签名获取该属性名称的节点数组
  		createElement("属性名称")			创建新的节点
  7.为什么需要保存XML文件保存XML文件?
  		因为所有的操作都是在内存中操作的,在内存中操作完成之后需要把内存中的数据写入到外存中,一定要把数据保存起来

查看
  public class Demo01 {
  		public static void main(String[] args) throws ParserConfigurationException, SAXException, IOException {


  			DocumentBuilderFactory dbf = DocumentBuilderFactory.newInstance();
  			DocumentBuilder db =dbf.newDocumentBuilder();
  			Document document = db.parse("src/com/bdqn/demo02/demo.xml");
  			NodeList nl = document.getElementsByTagName("student");

  			for (int i = 0; i < nl.getLength(); i++) {
  				//将节点集合中的元素取出来
  				Node node = nl.item(i);
  				Element student = (Element)node;
  				String s = student.getAttribute("studId");   //getAttribute()方法通过元素节点的属性名称获取属性的值
  				System.out.println(s);

  				//获取studId中的子节点
  				//NodeList是节点的列表
  				NodeList typeNodes = student.getChildNodes();  //一个类实现了一个接口,这个接口的实例化(得到的实例化,自身不能实例化)调用这个方法
  				for(int j=0;j


  		张三
  		19
  		男


  		李四
  		19
  		男


注意
  	  使用getChildNodes()会将空白符也作为子元素添加进去,所以getChildNodes().item(i)的时候,有些子节点是空白符
  	  这时候要加if判断一下,过滤掉空白符,有两种写法
  		   Node childNode=getChildNodes().item(i);
  		   第一种
  			  if(childNode instanceof Element){
  			        //具体执行代码
  			    }

  		   第二种
  		 	 if(childNode.getNodeType()==Node.ELEMENT_NODE){
  		        //具体执行代码
  		    }


  	    空白字符,也可简称“空白符”,通俗理解,就是不会显示出来的字符,类似空格符、回车换行符、制表符之类的字符,从视觉效果上来看,只是一个空白区域而已。
  	    可以把demo01.xml写成一行,不要留有空格,可以不写if判断语句

  		当既不写if又不把xml写成一行会报异常
  		    Exception in thread "main" java.lang.ClassCastException: com.sun.org.apache.xerces.internal.dom.DeferredTextImpl cannot be cast to org.w3c.dom.Element
  	  	 	Element type =(Element)typeNode;  空白字节点不能强转成Element,因为它们不是父子类,所以就会显示类型转换异常


  	  	解释typeNode.getNodeType()==Node.ELEMENT_NODE
  			typeNode是节点的意思,那么它可能是文字内容、CDATA段、元素、属性等等,具体是什么,就要靠NodeType来判断节点的类型。
  			ELEMENT_NODE是一个枚举值,代表元素节点类型。
  			所以if(node.getNodeType()==Node.ELEMENT_NODE)的意思就是:如果当前节点是元素节点的话。

增加
  public class ParseXMLDemo {

  	//在XML文档中添加品牌为“MOTO”,型号为“A1680”的手机收藏信息
  	public static void main(String[] args) throws SAXException, IOException, ParserConfigurationException, TransformerException {

  		DocumentBuilderFactory dbf = DocumentBuilderFactory.newInstance();
  		DocumentBuilder db = dbf.newDocumentBuilder();
  		Document document = db.parse("src/com/bdqn/demo03/收藏信息2.xml");

  		//创建Brand节点
  		Element brandElement =document.createElement("Brand");
  		brandElement.setAttribute("name", "MOTO");  //setAttribute()方法设置元素节点的属性名称和设置该属性的值
  		//创建Brand节点的子节点Type节点
  		Element typeElement =document.createElement("Type");
  		typeElement.setAttribute("name", "A1680");
  		//添加这两个节点的父子关系,以及父节点和它的父节点,直到到最后层祖节点为止
  		brandElement.appendChild(typeElement);
  		Element phoneElement =(Element) document.getElementsByTagName("PhoneInfo").item(0);
  		phoneElement.appendChild(brandElement);

  		//保存XML文件,因为上面的操作都是在内存中操作的,在内存中操作完成之后一定要把数据保存起来
  		TransformerFactory transformerFactory = TransformerFactory.newInstance();
  		Transformer transformer = transformerFactory.newTransformer();
  		//设置编码格式
  		transformer.setOutputProperty(OutputKeys.ENCODING,"utf-8");
  		//Source(接口)和Result(接口),使用它们的实现类
  		DOMSource domSource = new DOMSource(document);
  		StreamResult result = new StreamResult(new FileOutputStream("收藏信息2.xml"));
  		//把DOM转换成XML文件
  		transformer.transform(domSource,result);
  		System.out.println("数据添加成功");
  	}
  }


删除
  public class ParseXMLDemo {
  	//从保存手机收藏信息的XML文档中,删除手机品牌信息“摩托罗拉”
  	public static void main(String[] args) throws ParserConfigurationException, SAXException, IOException, TransformerException {

  			DocumentBuilderFactory dbf = DocumentBuilderFactory.newInstance();
  			DocumentBuilder db = dbf.newDocumentBuilder();
  			Document document = db.parse("src/com/bdqn/demo05/收藏信息4.xml");


  			//找到删除的节点
  			NodeList list = document.getElementsByTagName("Brand");   //通过标签名获取元素的节点,在通过item(下标)方法找到具体的节点(这里需要把Node强转成Element,Element是继承Node),强转原因是要使用getAttribute()方法
  			for (int i = 0; i < list.getLength(); i++) {
  				Element brandElement = (Element)list.item(i);
  				String brandName = brandElement.getAttribute("name");
  				if (brandName.equals("摩托罗拉")) {
  					brandElement.getParentNode().removeChild(brandElement);  //强转后的子节点找父节点移除子节点
  				}
  			}
  			//保存XML文件
  			TransformerFactory transformerFactory = TransformerFactory.newInstance();
  			Transformer transformer = transformerFactory.newTransformer();
  			DOMSource domSource = new DOMSource(document);
  			//设置编码类型
  			transformer.setOutputProperty(OutputKeys.ENCODING, "UTF-8");
  			StreamResult result = new StreamResult(new FileOutputStream("收藏信息4.xml"));
  			//把DOM转换为XML文件
  			transformer.transform(domSource, result);
  			System.out.println("删除元素完毕");
  	}

  }


修改
  public class ParseXMLDemo {
  	//将保存手机收藏信息的XML文档中的手机品牌信息MOTO修改为“摩托罗拉”。
  	public static void main(String[] args) throws ParserConfigurationException, SAXException, IOException, TransformerException {

  		DocumentBuilderFactory dbf =DocumentBuilderFactory.newInstance();
  		DocumentBuilder db = dbf.newDocumentBuilder();
  		Document document = db.parse("src/com/bdqn/demo04/收藏信息3.xml");

  		//找到修改的节点
  		NodeList list = document.getElementsByTagName("Brand");
  		for(int i=0;i
DOM4J
-
  public class Dom4j {

  		public static Document document;

  		public static void main(String[] args) {
  			loadDocument();
  	//		showPhoneInfo();
  			addNewPhoneInfo();
  	//		saveXML("新收藏.xml");
  	//		updatePhoneInfo();
  	//		deleteItem();
  			showPhoneInfo();
  		}

  (获取操作对象document)
  		public static void loadDocument(){
  			try{
  				SAXReader saxReader = new SAXReader();
  				document = saxReader.read(new File("收藏信息.xml"));
  			}catch (Exception e) {
  				// TODO: handle exception
  				e.printStackTrace();
  			}
  		}
  (更新操作)
  		public static void updatePhoneInfo(){
  			// 获取XML的根节点
  			Element root = document.getRootElement();
  			int id = 0;
  			for (Iterator itBrand = root.elementIterator(); itBrand.hasNext();) {
  				Element brand = (Element) itBrand.next();
  				id++;
  				brand.addAttribute("id", id + "");
  				brand.addAttribute("name","大家都是华为,666");
  			}
  			saveXML("收藏信息.xml");
  		}
  (删除操作)
  		public static void deleteItem(){
  			// 获取XML的根节点
  			Element root = document.getRootElement();
  			int id = 0;
  			for (Iterator itBrand = root.elementIterator(); itBrand.hasNext();) {
  				Element brand = (Element) itBrand.next();
  				if (brand.attributeValue("name").equals("华为")) {
  					brand.getParent().remove(brand);
  				}
  			}
  			saveXML("收藏信息.xml");
  		}
  (输出操作)
  		public static void showPhoneInfo() {
  			// 获取XML的根节点
  			Element root = document.getRootElement();
  			// 遍历所有的Brand标签
  			for (Iterator itBrand = root.elementIterator(); itBrand.hasNext();) {
  				Element brand = (Element) itBrand.next();
  				// 输出标签的name属性
  				System.out.print("品牌:" + brand.attributeValue("name"));
  				// 遍历Type标签
  				for (Iterator itType = brand.elementIterator(); itType.hasNext();) {
  					Element type = (Element) itType.next();
  					// 输出标签的name属性
  					System.out.println("\t型号:" + type.attributeValue("name"));
  				}
  			}
  		}
  (保存操作)
  		public static void saveXML(String path){
  			try {
  				OutputFormat format = OutputFormat.createPrettyPrint();
  				format.setEncoding("GBK"); // 指定XML编码
  				XMLWriter writer;
  				writer = new XMLWriter(new FileWriter(path), format);
  				writer.write(document);
  				writer.close();
  			} catch (IOException e) {
  				// TODO Auto-generated catch block
  				e.printStackTrace();
  			}
  		}
  (增加操作)
  		public static void addNewPhoneInfo(){
  			// 获取XML的根节点
  			Element root = document.getRootElement();		//根节点
  			// 创建Brand标签
  			Element el = root.addElement("Brand");			//父节点
  			// 给Brand标签设置属性
  			el.addAttribute("name", "三");
  			// 创建Type标签
  			Element typeEl = el.addElement("Type");			//子节点
  			// 给Type标签设置属性
  			typeEl.addAttribute("name", "Note4");
  			saveXML("收藏信息.xml");
  		}
  	}