YOLOX安装部署使用训练教程以及报错
YOLOX安装使用教程
- 简介
- 安装
-
- step1
- step2
- step3
- 验证
-
- 图片
- 视频
- 训练
-
- 准备数据集
- 转化为coco数据集
- 配置文件
- 开始训练
- 批量测试并保存
- 训练结果对比
- 计算每一类的map
-
- 整体的map
- 每一类的map
- lr设置
-
- yoloxwarmcos
- yolox_semi_warm_cos_lr
- multistep_lr
- 训练过程可视化
- 报错
-
- 报错1
- 报错2
简介
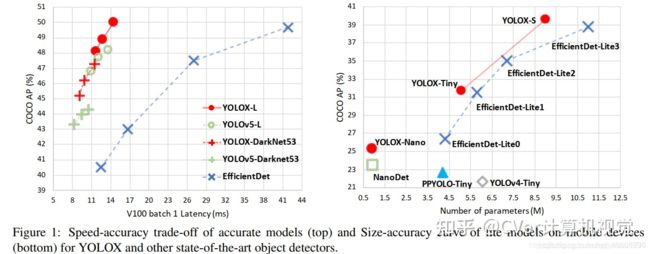
超越一切YOLO!旷视提出YOLOX:新一代实时目标检测网络

其中YOLOX-L版本以 68.9 FPS 的速度在 COCO 上实现了 50.0% AP,比 YOLOv5-L 高出 1.8% AP!还提供了支持 ONNX、TensorRT、NCNN 和 Openvino 的部署版本。代码刚刚开源!
YOLOX: Exceeding YOLO Series in 2021
- 作者单位:旷视科技
- 代码:https://github.com/Megvii-BaseDetection/YOLOX
- 论文:https://arxiv.org/abs/2107.08430
- 论文解读推荐视频:https://www.bilibili.com/video/BV1zh411z7BF?from=search&seid=12121065029191319637
- 作者解读:如何评价旷视开源的YOLOX,效果超过YOLOv5? - 旷视科技的回答 - 知乎
安装
安装过程基本上可以参考:https://github.com/Megvii-BaseDetection/YOLOX
但是在安装apex的时候可能会有问题,可以参看我的解决办法。
step1
Install YOLOX.
git clone [email protected]:Megvii-BaseDetection/YOLOX.git
cd YOLOX
pip3 install -U pip && pip3 install -r requirements.txt
pip3 install -v -e .  # or  python3 setup.py develop
step2
Install apex.
# skip this step if you don't want to train model.
git clone https://github.com/NVIDIA/apex
cd apex
pip3 install -v --disable-pip-version-check --no-cache-dir --global-option="--cpp_ext" --global-option="--cuda_ext" ./
在这里可能会遇到,cuda和torch版本不一致的问题:
我的GPU是3090,cuda是11.2,pytorch还没有11.2的版本,所以用的11.1的,所以会有这样的报错,若你的cuda版本不是很高,则可以进行pytorch版本的改变;若是感觉麻烦,可以直接忽略版本检查。
torch.__version__ = 1.9.0+cu111
/tmp/pip-req-build-6xbwecb4/setup.py:67: UserWarning: Option --pyprof not specified. Not installing PyProf dependencies!
warnings.warn("Option --pyprof not specified. Not installing PyProf dependencies!")
Compiling cuda extensions with
nvcc: NVIDIA (R) Cuda compiler driver
Copyright (c) 2005-2021 NVIDIA Corporation
Built on Sun_Feb_14_21:12:58_PST_2021
Cuda compilation tools, release 11.2, V11.2.152
Build cuda_11.2.r11.2/compiler.29618528_0
from /usr/local/cuda/bin
Traceback (most recent call last):
File "" , line 1, in <module>
File "/tmp/pip-req-build-6xbwecb4/setup.py", line 171, in <module>
check_cuda_torch_binary_vs_bare_metal(torch.utils.cpp_extension.CUDA_HOME)
File "/tmp/pip-req-build-6xbwecb4/setup.py", line 102, in check_cuda_torch_binary_vs_bare_metal
raise RuntimeError("Cuda extensions are being compiled with a version of Cuda that does " +
RuntimeError: Cuda extensions are being compiled with a version of Cuda that does not match the version used to compile Pytorch binaries. Pytorch binaries were compiled with Cuda 11.1.
In some cases, a minor-version mismatch will not cause later errors: https://github.com/NVIDIA/apex/pull/323#discussion_r287021798. You can try commenting out this check (at your own risk).
Running setup.py install for apex ... error
ERROR: Command errored out with exit status 1: /home/liuyuan/anaconda3/envs/yolox/bin/python3.8 -u -c 'import io, os, sys, setuptools, tokenize; sys.argv[0] = '"'"'/tmp/pip-req-build-6xbwecb4/setup.py'"'"'; __file__='"'"'/tmp/pip-req-build-6xbwecb4/setup.py'"'"';f = getattr(tokenize, '"'"'open'"'"', open)(__file__) if os.path.exists(__file__) else io.StringIO('"'"'from setuptools import setup; setup()'"'"');code = f.read().replace('"'"'\r\n'"'"', '"'"'\n'"'"');f.close();exec(compile(code, __file__, '"'"'exec'"'"'))' --cpp_ext --cuda_ext install --record /tmp/pip-record-l1tq4rlf/install-record.txt --single-version-externally-managed --compile --install-headers /home/liuyuan/anaconda3/envs/yolox/include/python3.8/apex Check the logs for full command output.
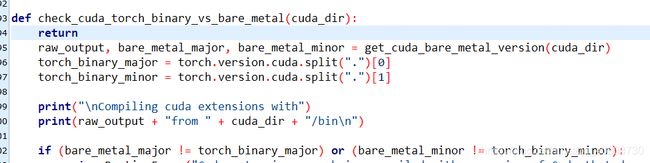
解决办法:

也就是将setup.py里面的 check_cuda_torch_binary_vs_bare_metal函数进行更改,直接return
def check_cuda_torch_binary_vs_bare_metal(cuda_dir):
    return
    raw_output, bare_metal_major, bare_metal_minor = get_cuda_bare_metal_version(cuda_dir)
    torch_binary_major = torch.version.cuda.split(".")[0]
    torch_binary_minor = torch.version.cuda.split(".")[1]

    print("\nCompiling cuda extensions with")
    print(raw_output + "from " + cuda_dir + "/bin\n")

    if (bare_metal_major != torch_binary_major) or (bare_metal_minor != torch_binary_minor):
        raise RuntimeError("Cuda extensions are being compiled with a version of Cuda that does " +
                           "not match the version used to compile Pytorch binaries.  " +
                           "Pytorch binaries were compiled with Cuda {}.\n".format(torch.version.cuda) +
                           "In some cases, a minor-version mismatch will not cause later errors:  " +
                           "https://github.com/NVIDIA/apex/pull/323#discussion_r287021798.  "
                           "You can try commenting out this check (at your own risk).")
然后在进行安装:
pip install -v --no-cache-dir --global-option="--cpp_ext" --global-option="--cuda_ext" ./
顺利的话就是:

step3
Step3. Install pycocotools.
pip3 install cython; pip3 install 'git+https://github.com/cocodataset/cocoapi.git#subdirectory=PythonAPI'
验证
我自己是新建的文件夹
 mkdir checkpoints
 cd checkpoints/
下载预训练模型,放在checkpoints文件夹下:
图片
然后执行:
python tools/demo.py image -n yolox-s -c checkpoints/yolox_s.pth.tar --path assets/dog.jpg --conf 0.25 --nms 0.45 --tsize 640 --save_result --device gpu
其中各参数含义为:
- -n 后为模型名称:yolox-s。
- -c后为权重文件路径:/root/YOLOX/yolos_m.pth.tar。
- –path后为images or video的路径
- –save_result:来保存图片/视频的推断结果
- –conf CONF: test conf
- –nms NMS: test nms threshold
- –tsize TSIZE: test img size
输出:
2021-07-28 09:45:14.310 | INFO     | __main__:main:228 - Model Summary: Params: 8.97M, Gflops: 26.81
2021-07-28 09:45:18.170 | INFO     | __main__:main:239 - loading checkpoint
2021-07-28 09:45:18.255 | INFO     | __main__:main:243 - loaded checkpoint done.
2021-07-28 09:45:18.351 | INFO     | __main__:inference:131 - Infer time: 0.0484s
2021-07-28 09:45:18.353 | INFO     | __main__:image_demo:168 - Saving detection result in ./YOLOX_outputs/yolox_s/vis_res/2021_07_28_09_45_18/dog.jpg
以及得到的结果图:
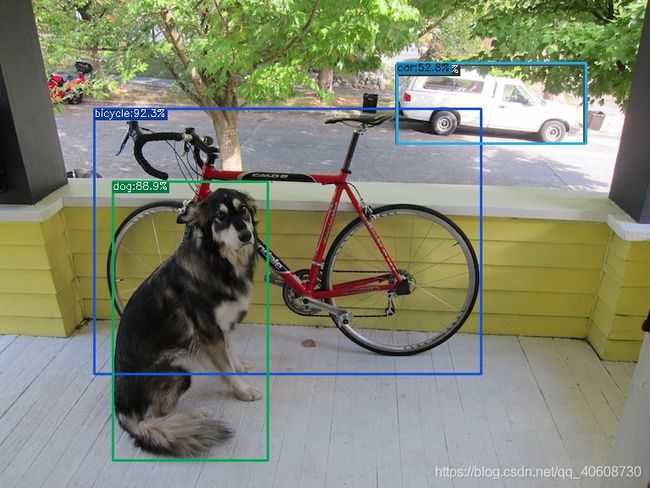
即安装完成!
不过检测效果只能说一般,左上角的自行车没有检测出来,右上角的车,明显检测到两个。
视频
python tools/demo.py video -n yolox-m -c checkpionts/yolox_m.pth.tar --path assets/Street2.mp4 --conf 0.3 --nms 0.5 --tsize 640 --save_result --device gpu
得到视频结果如下:
YOLOX测试视频
去下面的B站视频链接看,更清晰:
https://www.bilibili.com/video/BV1P44y117Ft/
另:
mmdetection可以方便实现数十种检测网络,也是一个不错的工具箱,使用可以参看:
mmdetection使用教程
训练
准备数据集
支持主流的COCO数据集和VOC数据集,官方建议将数据集放在==datasets/==目录下,可以创建软连接类似于:
ln -s /path/to/your/VOCdevkit ./datasets/VOCdevkit
在这里我将用COCO数据集进行演示,由labelimg标注得到xml文件,再用以下代码进行转换:
转化为coco数据集
以下内容从我的另一篇博客复制而来:mmdetection使用教程及报错里面还包括了VOC等转换。
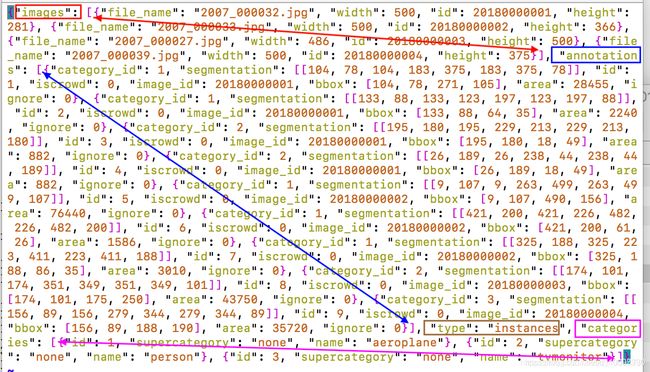
参考:把voc格式的标注文件.xml转为coco格式的.json文件,在此基础上进行修改,使满足格式要求。
如下图所示为instances.json文件内容。从下图可以看到,coco的json标注格式实际上是一个大字典{},里面包括了“images”,“annotations”,“type”,"categories"等信息(为了便于观察,图中画出的双箭头表示该属性从开始到结束的范围)。"images"存放每个图像的名字宽高及图像id,"annotations"存放对应相同图像id的图像box的四个坐标位置及该框的类别id,"categories"则表示每个类别id到该类真实名字的对应关系。
一般只需要更改CLASSES和xml_dir即可。
#coding:utf-8

# pip install lxml

import os
import glob
import json
import shutil
import numpy as np
import xml.etree.ElementTree as ET


path2 = "./coco/" # 输出文件夹
classes = ['plane', 'baseball-diamond', 'bridge', 'ground-track-field',
'small-vehicle', 'large-vehicle', 'ship',
'tennis-court', 'basketball-court',
'storage-tank', 'soccer-ball-field',
'roundabout', 'harbor',
'swimming-pool', 'helicopter','container-crane',]  # 类别
xml_dir = "./caijian_xml/" # xml文件
img_dir = "qiege/" # 图片
train_ratio = 0.85 # 训练集的比例

START_BOUNDING_BOX_ID = 1


def get(root, name):
    return root.findall(name)


def get_and_check(root, name, length):
    vars = root.findall(name)
    if len(vars) == 0:
        raise NotImplementedError('Can not find %s in %s.'%(name, root.tag))
    if length > 0 and len(vars) != length:
        raise NotImplementedError('The size of %s is supposed to be %d, but is %d.'%(name, length, len(vars)))
    if length == 1:
        vars = vars[0]
    return vars


def convert(xml_list, json_file):
    json_dict = {"images": [], "type": "instances", "annotations": [], "categories": []}
    categories = pre_define_categories.copy()
    bnd_id = START_BOUNDING_BOX_ID
    all_categories = {}
    for index, line in enumerate(xml_list):
        # print("Processing %s"%(line))
        xml_f = line
        tree = ET.parse(xml_f)
        root = tree.getroot()

        filename = os.path.basename(xml_f)[:-4] + ".jpg"
        image_id = 20190000001 + index
        size = get_and_check(root, 'size', 1)
        width = int(get_and_check(size, 'width', 1).text)
        height = int(get_and_check(size, 'height', 1).text)
        image = {'file_name': filename, 'height': height, 'width': width, 'id':image_id}
        json_dict['images'].append(image)
        ## Cruuently we do not support segmentation
        #  segmented = get_and_check(root, 'segmented', 1).text
        #  assert segmented == '0'
        for obj in get(root, 'object'):
            category = get_and_check(obj, 'name', 1).text
            if category in all_categories:
                all_categories[category] += 1
            else:
                all_categories[category] = 1
            if category not in categories:
                if only_care_pre_define_categories:
                    continue
                new_id = len(categories) + 1
                print("[warning] category '{}' not in 'pre_define_categories'({}), create new id: {} automatically".format(category, pre_define_categories, new_id))
                categories[category] = new_id
            category_id = categories[category]
            bndbox = get_and_check(obj, 'bndbox', 1)
            xmin = int(float(get_and_check(bndbox, 'xmin', 1).text))
            ymin = int(float(get_and_check(bndbox, 'ymin', 1).text))
            xmax = int(float(get_and_check(bndbox, 'xmax', 1).text))
            ymax = int(float(get_and_check(bndbox, 'ymax', 1).text))
            assert(xmax > xmin), "xmax <= xmin, {}".format(line)
            assert(ymax > ymin), "ymax <= ymin, {}".format(line)
            o_width = abs(xmax - xmin)
            o_height = abs(ymax - ymin)
            ann = {'area': o_width*o_height, 'iscrowd': 0, 'image_id':
                   image_id, 'bbox':[xmin, ymin, o_width, o_height],
                   'category_id': category_id, 'id': bnd_id, 'ignore': 0,
                   'segmentation': []}
            json_dict['annotations'].append(ann)
            bnd_id = bnd_id + 1

    for cate, cid in categories.items():
        cat = {'supercategory': 'none', 'id': cid, 'name': cate}
        json_dict['categories'].append(cat)
    json_fp = open(json_file, 'w')
    json_str = json.dumps(json_dict)
    json_fp.write(json_str)
    json_fp.close()
    print("------------create {} done--------------".format(json_file))
    print("find {} categories: {} -->>> your pre_define_categories {}: {}".format(len(all_categories), all_categories.keys(), len(pre_define_categories), pre_define_categories.keys()))
    print("category: id --> {}".format(categories))
    print(categories.keys())
    print(categories.values())

if __name__ == '__main__':

    pre_define_categories = {}
    for i, cls in enumerate(classes):
        pre_define_categories[cls] = i + 1
    # pre_define_categories = {'a1': 1, 'a3': 2, 'a6': 3, 'a9': 4, "a10": 5}
    only_care_pre_define_categories = True
    # only_care_pre_define_categories = False

    if os.path.exists(path2 + "/annotations"):
        shutil.rmtree(path2 + "/annotations")
    os.makedirs(path2 + "/annotations")
    if os.path.exists(path2 + "/train2017"):
        shutil.rmtree(path2 + "/train2017")
    os.makedirs(path2 + "/train2017")
    if os.path.exists(path2 + "/val2017"):
        shutil.rmtree(path2 +"/val2017")
    os.makedirs(path2 + "/val2017")


    save_json_train = path2 + 'annotations/instances_train2017.json'
    save_json_val = path2 + 'annotations/instances_val2017.json'


    xml_list = glob.glob(xml_dir + "/*.xml")
    xml_list = np.sort(xml_list)
    np.random.seed(100)
    np.random.shuffle(xml_list)

    train_num = int(len(xml_list)*train_ratio)
    xml_list_train = xml_list[:train_num]
    xml_list_val = xml_list[train_num:]

    convert(xml_list_train, save_json_train)
    convert(xml_list_val, save_json_val)


    f1 = open(path2 + "train.txt", "w")
    for xml in xml_list_train:
        img = img_dir + xml.split("\\")[-1][:-4] + ".jpg"
        f1.write(os.path.basename(xml)[:-4] + "\n")
        shutil.copyfile(img, path2 + "/train2017/" + os.path.basename(img))

    f2 = open(path2 + "test.txt", "w")
    for xml in xml_list_val:
        img = img_dir + xml.split("\\")[-1][:-4] + ".jpg"
        f2.write(os.path.basename(xml)[:-4] + "\n")
        shutil.copyfile(img, path2 + "/val2017/" + os.path.basename(img))
    f1.close()
    f2.close()
    print("-------------------------------")
    print("train number:", len(xml_list_train))
    print("val number:", len(xml_list_val))
得到的文件结构如下图所示:

此时还需要修改yolox/data/datasets/coco_classes.py里面的类别名称,换成自己的,注意每一个结尾都要跟一个“,”。

配置文件
再修改yolox/exp/yolox_base.py,这是整个网络的配置文件,首先将分类的个数修改为自己的类别数。
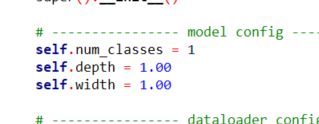
然后就是数据集的地址,一共修改两处,验证集的也要修改:
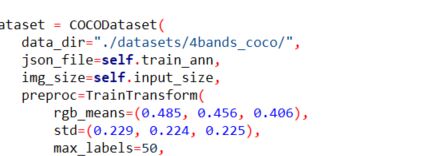
其中的rgb_means和std可以根据自己的数据集进行计算:
参考:统计数据集通道的像素均值和方差
要转化成yolox的格式归一化,还要除以255。
开始训练
使用以下代码进行训练
python tools/train.py -f exps/default/yolox_s.py -d 4 -b 64 -o
- -d: number of gpu devices
- -b: total batch size, the recommended number for -b is num-gpu * 8
其余含义可以参看train.py。
此时应该就开始训练了,相关的模型文件保存在YOLOX_outputs文件夹下。
保存有训练日志和最后一次的模型,以及最佳模型,默认每10个epoch测试一次。

如果提示显存不够的话,可以把** -o**去掉试试,并调整batch_size的大小:
python tools/train.py -f exps/default/yolox_s.py -d 4 -b 64
目前我还在训练,感觉训练过程很快,GPU和CPU的使用率很高,比mmdetection要快,训练结束后再对比。
批量测试并保存
python tools/demo.py image -n yolox-m -c /best_ckpt.pth.tar --path datasets --conf 0.3 --fp16 --fuse --save_result --device gpu
训练结果对比
使用yolox_l和mmdetection的yolo进行对比,两者模型大小基本一致,共同训练500个epoch,batch_size都为32,输入图片大小864x864**,训练集和验证集相同:
yolox-l的结果如下:
Average forward time: 10.84 ms, Average NMS time: 1.00 ms, Average inference time: 11.84 ms
 Average Precision  (AP) @[ IoU=0.50:0.95 | area=   all | maxDets=100 ] = 0.531
 Average Precision  (AP) @[ IoU=0.50      | area=   all | maxDets=100 ] = 0.895
 Average Precision  (AP) @[ IoU=0.75      | area=   all | maxDets=100 ] = 0.593
 Average Precision  (AP) @[ IoU=0.50:0.95 | area= small | maxDets=100 ] = 0.030
 Average Precision  (AP) @[ IoU=0.50:0.95 | area=medium | maxDets=100 ] = 0.539
 Average Precision  (AP) @[ IoU=0.50:0.95 | area= large | maxDets=100 ] = 0.639
 Average Recall     (AR) @[ IoU=0.50:0.95 | area=   all | maxDets=  1 ] = 0.057
 Average Recall     (AR) @[ IoU=0.50:0.95 | area=   all | maxDets= 10 ] = 0.432
 Average Recall     (AR) @[ IoU=0.50:0.95 | area=   all | maxDets=100 ] = 0.596
 Average Recall     (AR) @[ IoU=0.50:0.95 | area= small | maxDets=100 ] = 0.222
 Average Recall     (AR) @[ IoU=0.50:0.95 | area=medium | maxDets=100 ] = 0.600
 Average Recall     (AR) @[ IoU=0.50:0.95 | area= large | maxDets=100 ] = 0.668
mmdetection的yolo结果如下:
2021-07-27 16:18:55,063 - mmdet - INFO - Epoch(val) [400][25]
bbox_mAP: 0.4960,
bbox_mAP_50: 0.8930,
bbox_mAP_75: 0.5210,
bbox_mAP_s: 0.0590,
bbox_mAP_m: 0.5010,
bbox_mAP_l: 0.6250,
bbox_mAP_copypaste: 0.496 0.893 0.521 0.059 0.501 0.625
对应来看,两者结果相近,yolox-l略胜一筹,而且yolox-l的训练速度特别快,大概是yolo的三倍。
yolox-l行!
另:mmdetection可以方便实现数十种检测网络,也是一个不错的工具箱,使用可以参看:
mmdetection使用教程
计算每一类的map
参考:https://github.com/Megvii-BaseDetection/YOLOX/pull/397/files
在实际计算的时候,还是有很多问题的,慢慢解决。。。
目前好像是只支持单卡的训练。
最终实现的效果如下:
整体的map
Average forward time: 7.14 ms, Average NMS time: 0.93 ms, Average inference time: 8.07 ms
 Average Precision  (AP) @[ IoU=0.50:0.95 | area=   all | maxDets=100 ] = 0.471
 Average Precision  (AP) @[ IoU=0.50      | area=   all | maxDets=100 ] = 0.704
 Average Precision  (AP) @[ IoU=0.75      | area=   all | maxDets=100 ] = 0.537
 Average Precision  (AP) @[ IoU=0.50:0.95 | area= small | maxDets=100 ] = 0.332
 Average Precision  (AP) @[ IoU=0.50:0.95 | area=medium | maxDets=100 ] = 0.527
 Average Precision  (AP) @[ IoU=0.50:0.95 | area= large | maxDets=100 ] = 0.589
 Average Recall     (AR) @[ IoU=0.50:0.95 | area=   all | maxDets=  1 ] = 0.184
 Average Recall     (AR) @[ IoU=0.50:0.95 | area=   all | maxDets= 10 ] = 0.448
 Average Recall     (AR) @[ IoU=0.50:0.95 | area=   all | maxDets=100 ] = 0.571
 Average Recall     (AR) @[ IoU=0.50:0.95 | area= small | maxDets=100 ] = 0.387
 Average Recall     (AR) @[ IoU=0.50:0.95 | area=medium | maxDets=100 ] = 0.601
 Average Recall     (AR) @[ IoU=0.50:0.95 | area= large | maxDets=100 ] = 0.689
每一类的map
用的是部分DOTA数据集,由于我的测试集中有些种类没有包含,所以会出现0和nan。
1:      AP:68.88, Recall:77.54, AP_50:95.66, Recall_50:100.00.
2:      AP:54.11, Recall:65.56, AP_50:87.68, Recall_50:100.00.
3:      AP:  nan, Recall:  nan, AP_50:  nan, Recall_50:  nan.
4:      AP:49.12, Recall:63.33, AP_50:65.97, Recall_50:83.33.
5:      AP:45.31, Recall:56.76, AP_50:69.08, Recall_50:79.40.
6:      AP:65.13, Recall:71.72, AP_50:84.84, Recall_50:90.83.
7:      AP:42.57, Recall:46.76, AP_50:59.35, Recall_50:61.44.
8:      AP:85.93, Recall:90.85, AP_50:97.59, Recall_50:99.44.
9:      AP:51.47, Recall:69.17, AP_50:80.46, Recall_50:100.00.
10:     AP:20.98, Recall:38.57, AP_50:33.21, Recall_50:57.14.
11:     AP:37.71, Recall:45.24, AP_50:74.72, Recall_50:85.71.
12:     AP:34.22, Recall:48.00, AP_50:59.82, Recall_50:80.00.
13:     AP:51.70, Recall:63.00, AP_50:85.46, Recall_50:95.95.
14:     AP:52.61, Recall:62.26, AP_50:92.05, Recall_50:97.74.
15:     AP: 0.00, Recall: 0.00, AP_50: 0.00, Recall_50: 0.00.
16:     AP:  nan, Recall:  nan, AP_50:  nan, Recall_50:  nan.
lr设置
在yolox/utils/lr_scheduler.py中,我们可以看到,一共包括5种lr方式:
- cos
- warmcos
- yoloxwarmcos
- yoloxsemiwarmcos
- multistep
以后三种举例,我们可以通过可视化的凡是观察le的变化:
yoloxwarmcos
from yolox.utils.lr_scheduler import *
import matplotlib.pyplot as plt

# 假设300个epoch,每个epoch有15个iters

ys = []
epoch = 300
iter = 15
for i in range(epoch*iter):
    v = yolox_warm_cos_lr(
        lr=0.01,
        min_lr_ratio=0.05,
        total_iters=epoch*iter,
        warmup_total_iters=10*2,
        warmup_lr_start=0,
        no_aug_iter=10*3,
        iters=i,
    )
    ys.append(v)
plt.plot(ys)
plt.show()

经过前100个iter,lr从0增加到0.01,然后lr以cos的方式进行下降到0.0005。
yolox_semi_warm_cos_lr
from yolox.utils.lr_scheduler import *
import matplotlib.pyplot as plt

# 假设300个epoch,每个epoch有15个iters

ys = []
epoch = 300
iter = 15
for i in range(epoch*iter):
    v = yolox_semi_warm_cos_lr(
            lr=0.04,
            min_lr_ratio=0.1,
            warmup_lr_start=0,
            total_iters = epoch*iter,
            normal_iters=2000,
            no_aug_iters=1000,
            warmup_total_iters=300,
            semi_iters=0,
            iters_per_epoch=iter,
            iters_per_epoch_semi=10,
            iters=i,
    )
    ys.append(v)
plt.plot(ys)
plt.show()

相当于在2000个iter直接截断到最小lr。
multistep_lr
from yolox.utils.lr_scheduler import *
import matplotlib.pyplot as plt

# 假设10个epoch,每个epoch有10个iters,
# warmup_epochs=2, no_aug_epochs=3,
# warmup_lr_start=0, min_lr_ratio=0.05

ys = []
epoch = 300
iter = 15

for i in range(epoch*iter):
    v = multistep_lr(
        lr = 0.04,
        milestones=[1000, 2000, 3000],
        gamma = 0.5,
        iters=i,
    )
    ys.append(v)

plt.plot(ys)
plt.show()
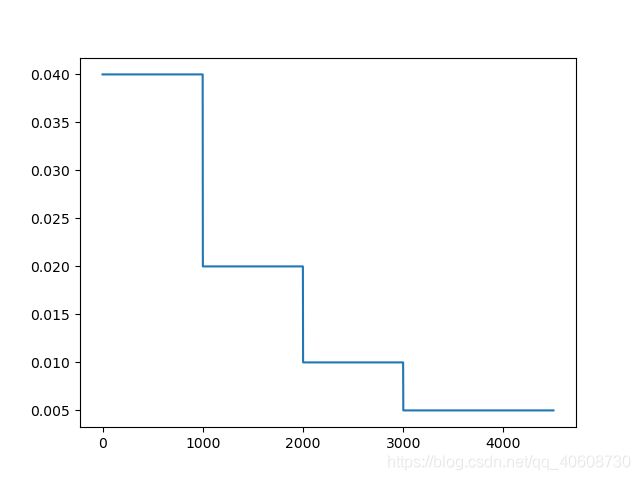
每经过一个milestones,lr变成原来的gamma 倍,没有warmup_lr。
训练过程可视化
在源代码中,包含着COCOAP50和COCOAP50_95随着epoch的变化,最终的结果存储在保存的模型文件夹下,名字以==events.out.tfevents.==开头,可以使用tensorboard查看,命令如下:
tensorboard --logdir = path
- path为events文件所在文件夹
一般会弹出以下命令:
 I tensorflow/stream_executor/platform/default/dso_loader.cc:44] Successfully opened dynamic library cudart64_101.dll
 Serving TensorBoard on localhost; to expose to the network, use a proxy or pass --bind_all
 TensorBoard 2.4.0a20201102 at http://localhost:6006/ (Press CTRL+C to quit)
在浏览器中输入http://localhost:6006/即可查看。
得到结果图如下:
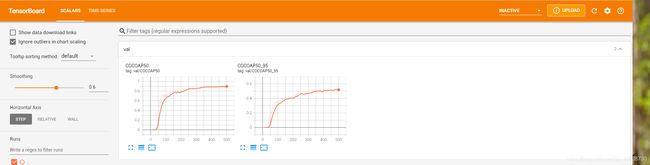
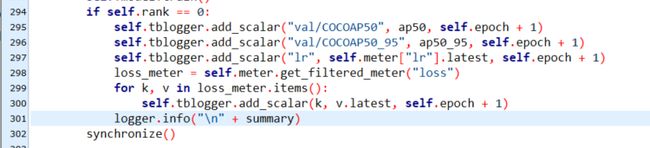
随之而来的问题是,官方默认保存的可视化变量较少,我们可以在yolox/core/trainer.py的L290行左右,加入我们想要保存的变量,比如下面的图片中就加入了lr和loss。
报错
以下是我在使用的时候的报错,不知道的代码的问题,还是数据集格式或者版本的问你,若你也遇到了。可以参考,希望能帮助到你。
报错1
AssertionError: Caught AssertionError in DataLoader worker process 0.
 File "/home/YOLOX/yolox/data/datasets/coco.py", line 99, in pull_item
    assert img is not None
AssertionError
此时如果在这里报错coco.py, img 为空,应该是路径问题:
        img = cv2.imread(img_file)
        # print(img_file)
        assert img is not None
建议修改coco.py,将其中的img_file修改为如下图所示。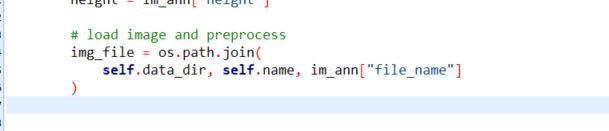
报错2
若是报错:
AttributeError: module ‘torch’ has no attribute ‘tensor_as’
则根据报错信息打开该文件,将torch.tensor_as修改为torch.as_tensor,后面这个函数才是正确的。

查询官方文档,不存在torch.tensor_as。
