mmlab花朵分类结果展示(2)
花朵分类结果展示
- Grad-Cam可视化方法
- 模型分析
-
- 折线图和平均耗时展示
- 计算量展示
这一节我们继续上一节讲解训练结果测试与验证。
Grad-Cam可视化方法
上一节我们讲述了数据增强的可视化方法,因为数据增强是训练模型前的步骤,所以即使我们没有训练结果也可以可视化该过程。但是我们这里介绍的是可视化模型效果,也就是必须要有训练好的模型才可以。
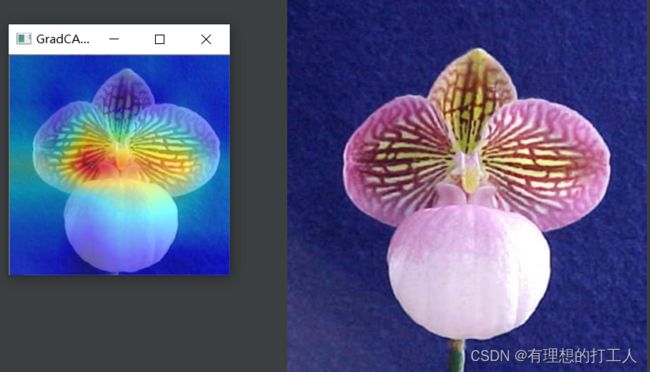
grad-cam可以理解成一种注意力机制,该可视化过程是向我们展示计算机是依据哪些像素点特征将图像分类为最终结果的。其具体的作用原理可以简单理解为我们根据卷积网络的输出(假如是512个特征图)得到每张特征图对最终分类结果的贡献值,然后依据每个特征图的权重将计算机的注意力机制反映到我们的输入图像上,颜色越深(越红)代表对分类结果的贡献值越大:

通过分析注意力的集中位置,可以大致判断模型训练的好坏,因此可视化也可以帮助我们调整训练的策略。我们这里的注意力集中的地方就可以说明我们模型的训练结果还是较让人满意。
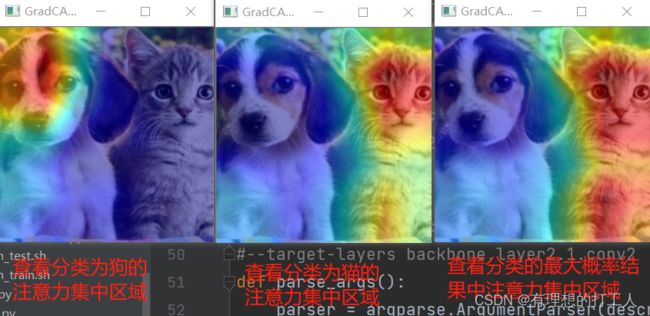
此外,有些分类任务中,一张图片可能出现多个特征部分,比如:

这张图片中既有猫又有狗。那么我们就可以让分类模型告诉我们属于猫或狗的分类依据在于哪里:

不难发现,最终计算机把这张图片分类为了猫。
当然,我们可视化的都是针对最后一层的卷积,针对其它层的操作方法后面也会在注释中介绍。
可视化模型效果所依据的分类模型分别为我们自己训练好的102分类模型以及下载的预训练模型,大家还可以自行尝试一下修改不同的参数,这里还是把代码附加注释提供给大家:
# Copyright (c) OpenMMLab. All rights reserved.
import argparse
import copy
import math
import pkg_resources
import re
from pathlib import Path
import mmcv
import numpy as np
from mmcv import Config, DictAction
from mmcv.utils import to_2tuple
from torch.nn import BatchNorm1d, BatchNorm2d, GroupNorm, LayerNorm
from mmcls import digit_version
from mmcls.apis import init_model
from mmcls.datasets.pipelines import Compose
try:
from pytorch_grad_cam import (EigenCAM, EigenGradCAM, GradCAM,
GradCAMPlusPlus, LayerCAM, XGradCAM)
from pytorch_grad_cam.activations_and_gradients import \
ActivationsAndGradients
from pytorch_grad_cam.utils.image import show_cam_on_image
except ImportError:
raise ImportError('Please run `pip install "grad-cam>=1.3.6"` to install '
'3rd party package pytorch_grad_cam.')
# set of transforms, which just change data format, not change the pictures
FORMAT_TRANSFORMS_SET = {'ToTensor', 'Normalize', 'ImageToTensor', 'Collect'}
# Supported grad-cam type map
METHOD_MAP = {
'gradcam': GradCAM,
'gradcam++': GradCAMPlusPlus,
'xgradcam': XGradCAM,
'eigencam': EigenCAM,
'eigengradcam': EigenGradCAM,
'layercam': LayerCAM,
}
# 安装对应的包
# pip install "grad-cam==1.3.6"
# 修改以下参数
#image_05094.jpg ../../configs/resnet/today_resnet18_8xb32_in1k.py ../work_dirs/resnet18_8xb32_in1k/epoch_100.pth
#--target-category
#cat-dog.png ../../configs/resnet/resnet18_8xb32_in1k.py E:\\唐宇迪\\第四章MMLAB实战系列\\第一模块:mmcls图像分类\\mmclassification-master\\mmcls\\data\\resnet18_8xb32_in1k_20210831-fbbb1da6.pth
#--target-category 238 --target-category 281
# 238的注意力是狗 281的注意力是猫 这两种赋值只需要保留一个
# 指定不同的卷积层查看注意力集中位置
#backbone.layer1.1.conv1 backbone.layer2.1.conv1 backbone.layer1.1.conv1 backbone.layer4.1.conv2
#--target-layers backbone.layer2.1.conv2
def parse_args():
parser = argparse.ArgumentParser(description='Visualize CAM')
# 我们需要依次传入三个参数即img,config和checkpoint
parser.add_argument('img', help='Image file')
parser.add_argument('config', help='Config file')
parser.add_argument('checkpoint', help='Checkpoint file')
parser.add_argument(
'--target-layers', # 指定查看哪一种分类的注意力
default=[],
nargs='+',
type=str,
help='The target layers to get CAM, if not set, the tool will '
'specify the norm layer in the last block. Backbones '
'implemented by users are recommended to manually specify'
' target layers in commmad statement.')
parser.add_argument(
# 可打印网络结构,参数只加--preview-model即可。如果想查看不同卷积层的注意力效果需要先查看网络结构
'--preview-model',
default=False,
action='store_true',
help='To preview all the model layers')
parser.add_argument(
'--method',
default='GradCAM',
help='Type of method to use, supports '
f'{", ".join(list(METHOD_MAP.keys()))}.')
parser.add_argument(
# 指定需要可视化的类别,如没有指定则可视化得分最高的类别
'--target-category',
default=[],
nargs='+',
type=int,
help='The target category to get CAM, default to use result '
'get from given model.')
parser.add_argument(
'--eigen-smooth',
default=False,
action='store_true',
help='Reduce noise by taking the first principle componenet of '
'``cam_weights*activations``')
parser.add_argument(
'--aug-smooth',
default=False,
action='store_true',
help='Wether to use test time augmentation, default not to use')
parser.add_argument(
'--save-path', # 指定保存路径
type=Path,
help='The path to save visualize cam image, default not to save.')
parser.add_argument('--device', default='cpu', help='Device to use cpu')
parser.add_argument(
'--vit-like',
action='store_true',
help='Whether the network is a ViT-like network.')
parser.add_argument(
'--num-extra-tokens',
type=int,
help='The number of extra tokens in ViT-like backbones. Defaults to'
' use num_extra_tokens of the backbone.')
parser.add_argument(
'--cfg-options',
nargs='+',
action=DictAction,
help='override some settings in the used config, the key-value pair '
'in xxx=yyy format will be merged into config file. If the value to '
'be overwritten is a list, it should be like key="[a,b]" or key=a,b '
'It also allows nested list/tuple values, e.g. key="[(a,b),(c,d)]" '
'Note that the quotation marks are necessary and that no white space '
'is allowed.')
args = parser.parse_args()
if args.method.lower() not in METHOD_MAP.keys():
raise ValueError(f'invalid CAM type {args.method},'
f' supports {", ".join(list(METHOD_MAP.keys()))}.')
return args
def build_reshape_transform(model, args):
"""Build reshape_transform for `cam.activations_and_grads`, which is
necessary for ViT-like networks."""
# ViT_based_Transformers have an additional clstoken in features
if not args.vit_like:
def check_shape(tensor):
assert len(tensor.size()) != 3, \
(f"The input feature's shape is {tensor.size()}, and it seems "
'to have been flattened or from a vit-like network. '
"Please use `--vit-like` if it's from a vit-like network.")
return tensor
return check_shape
if args.num_extra_tokens is not None:
num_extra_tokens = args.num_extra_tokens
elif hasattr(model.backbone, 'num_extra_tokens'):
num_extra_tokens = model.backbone.num_extra_tokens
else:
num_extra_tokens = 1
def _reshape_transform(tensor):
"""reshape_transform helper."""
assert len(tensor.size()) == 3, \
(f"The input feature's shape is {tensor.size()}, "
'and the feature seems not from a vit-like network?')
tensor = tensor[:, num_extra_tokens:, :]
# get heat_map_height and heat_map_width, preset input is a square
heat_map_area = tensor.size()[1]
height, width = to_2tuple(int(math.sqrt(heat_map_area)))
assert height * height == heat_map_area, \
(f"The input feature's length ({heat_map_area+num_extra_tokens}) "
f'minus num-extra-tokens ({num_extra_tokens}) is {heat_map_area},'
' which is not a perfect square number. Please check if you used '
'a wrong num-extra-tokens.')
result = tensor.reshape(tensor.size(0), height, width, tensor.size(2))
# Bring the channels to the first dimension, like in CNNs.
result = result.transpose(2, 3).transpose(1, 2)
return result
return _reshape_transform
def apply_transforms(img_path, pipeline_cfg):
"""Apply transforms pipeline and get both formatted data and the image
without formatting."""
data = dict(img_info=dict(filename=img_path), img_prefix=None)
def split_pipeline_cfg(pipeline_cfg):
"""to split the transfoms into image_transforms and
format_transforms."""
image_transforms_cfg, format_transforms_cfg = [], []
if pipeline_cfg[0]['type'] != 'LoadImageFromFile':
pipeline_cfg.insert(0, dict(type='LoadImageFromFile'))
for transform in pipeline_cfg:
if transform['type'] in FORMAT_TRANSFORMS_SET:
format_transforms_cfg.append(transform)
else:
image_transforms_cfg.append(transform)
return image_transforms_cfg, format_transforms_cfg
image_transforms, format_transforms = split_pipeline_cfg(pipeline_cfg)
image_transforms = Compose(image_transforms)
format_transforms = Compose(format_transforms)
intermediate_data = image_transforms(data)
inference_img = copy.deepcopy(intermediate_data['img'])
format_data = format_transforms(intermediate_data)
return format_data, inference_img
class MMActivationsAndGradients(ActivationsAndGradients):
"""Activations and gradients manager for mmcls models."""
def __call__(self, x):
self.gradients = []
self.activations = []
return self.model(
x, return_loss=False, softmax=False, post_process=False)
def init_cam(method, model, target_layers, use_cuda, reshape_transform):
"""Construct the CAM object once, In order to be compatible with mmcls,
here we modify the ActivationsAndGradients object."""
GradCAM_Class = METHOD_MAP[method.lower()]
cam = GradCAM_Class(
model=model, target_layers=target_layers, use_cuda=use_cuda)
# Release the original hooks in ActivationsAndGradients to use
# MMActivationsAndGradients.
cam.activations_and_grads.release()
cam.activations_and_grads = MMActivationsAndGradients(
cam.model, cam.target_layers, reshape_transform)
return cam
def get_layer(layer_str, model):
"""get model layer from given str."""
cur_layer = model
layer_names = layer_str.strip().split('.')
def get_children_by_name(model, name):
try:
return getattr(model, name)
except AttributeError as e:
raise AttributeError(
e.args[0] +
'. Please use `--preview-model` to check keys at first.')
def get_children_by_eval(model, name):
try:
return eval(f'model{name}', {}, {'model': model})
except (AttributeError, IndexError) as e:
raise AttributeError(
e.args[0] +
'. Please use `--preview-model` to check keys at first.')
for layer_name in layer_names:
match_res = re.match('(?P.+?)(?P(\\[.+\\])+)' ,
layer_name)
if match_res:
layer_name = match_res.groupdict()['name']
indices = match_res.groupdict()['indices']
cur_layer = get_children_by_name(cur_layer, layer_name)
cur_layer = get_children_by_eval(cur_layer, indices)
else:
cur_layer = get_children_by_name(cur_layer, layer_name)
return cur_layer
def show_cam_grad(grayscale_cam, src_img, title, out_path=None):
"""fuse src_img and grayscale_cam and show or save."""
grayscale_cam = grayscale_cam[0, :]
src_img = np.float32(src_img) / 255
visualization_img = show_cam_on_image(
src_img, grayscale_cam, use_rgb=False)
if out_path:
mmcv.imwrite(visualization_img, str(out_path))
else:
mmcv.imshow(visualization_img, win_name=title, wait_time=10000) # 延时10s
def get_default_traget_layers(model, args):
"""get default target layers from given model, here choose nrom type layer
as default target layer."""
norm_layers = []
for m in model.backbone.modules():
if isinstance(m, (BatchNorm2d, LayerNorm, GroupNorm, BatchNorm1d)):
norm_layers.append(m)
if len(norm_layers) == 0:
raise ValueError(
'`--target-layers` is empty. Please use `--preview-model`'
' to check keys at first and then specify `target-layers`.')
# if the model is CNN model or Swin model, just use the last norm
# layer as the target-layer, if the model is ViT model, the final
# classification is done on the class token computed in the last
# attention block, the output will not be affected by the 14x14
# channels in the last layer. The gradient of the output with
# respect to them, will be 0! here use the last 3rd norm layer.
# means the first norm of the last decoder block.
if args.vit_like:
if args.num_extra_tokens:
num_extra_tokens = args.num_extra_tokens
elif hasattr(model.backbone, 'num_extra_tokens'):
num_extra_tokens = model.backbone.num_extra_tokens
else:
raise AttributeError('Please set num_extra_tokens in backbone'
" or using 'num-extra-tokens'")
# if a vit-like backbone's num_extra_tokens bigger than 0, view it
# as a VisionTransformer backbone, eg. DeiT, T2T-ViT.
if num_extra_tokens >= 1:
print('Automatically choose the last norm layer before the '
'final attention block as target_layer..')
return [norm_layers[-3]]
print('Automatically choose the last norm layer as target_layer.')
target_layers = [norm_layers[-1]]
return target_layers
def main():
args = parse_args()
cfg = Config.fromfile(args.config)
if args.cfg_options is not None:
cfg.merge_from_dict(args.cfg_options)
# build the model from a config file and a checkpoint file
model = init_model(cfg, args.checkpoint, device=args.device)
if args.preview_model:
print(model)
print('\n Please remove `--preview-model` to get the CAM.')
return
# apply transform and perpare data
data, src_img = apply_transforms(args.img, cfg.data.test.pipeline)
# build target layers
if args.target_layers:
target_layers = [
get_layer(layer, model) for layer in args.target_layers
]
else:
target_layers = get_default_traget_layers(model, args)
# init a cam grad calculator
use_cuda = ('cuda' in args.device)
reshape_transform = build_reshape_transform(model, args)
cam = init_cam(args.method, model, target_layers, use_cuda,
reshape_transform)
# warp the target_category with ClassifierOutputTarget in grad_cam>=1.3.7,
# to fix the bug in #654.
targets = None
if args.target_category:
grad_cam_v = pkg_resources.get_distribution('grad_cam').version
if digit_version(grad_cam_v) >= digit_version('1.3.7'):
from pytorch_grad_cam.utils.model_targets import \
ClassifierOutputTarget
targets = [ClassifierOutputTarget(c) for c in args.target_category]
else:
targets = args.target_category
# calculate cam grads and show|save the visualization image
grayscale_cam = cam(
data['img'].unsqueeze(0),
targets,
eigen_smooth=args.eigen_smooth,
aug_smooth=args.aug_smooth)
show_cam_grad(
grayscale_cam, src_img, title=args.method, out_path=args.save_path)
if __name__ == '__main__':
main()
如果我们想查看浅层网络的注意力机制,就需要先打印网络的结构:

假如我们想要打印layer2中conv2的注意力机制,就需要在参数中添加以下内容:–target-layers backbone.layer2.0.conv2

然后就可以运行查看结果了:

可以看到,浅层网络的注意力机制就很缺乏说服力了,也正是如此,浅层网络的分类效果一定会比深层网络差。
模型分析
任务当中还有两个比较方便的工具,一个是评估结果的可视化,一个用于输出所需参数量以及计算量:

analyze_logs.py可以依据我们的日志文件绘制部分参数的值绘制成折线图,get_flops.py可以帮我们依据输入参数量计算整体的计算量,甚至包括每一层的参数量和计算量。下面我们逐个演示:
折线图和平均耗时展示
首先我们需要传入保存的训练模型,这个模型保存在work_dirs文件夹中,我们先来看看这个flower-100epoch.json文件的内容:

不难发现,这和我们训练过程中终端显示的内容是一样的,我们可以绘制这里面保存的损失数据,也可以绘制准确率数据:

准确率数据,参数传入为:plot_curve …/work_dirs/resnet18_8xb32_in1k/flower-100epoch.json --keys accuracy_top-1

损失数据,参数传入为:plot_curve …/work_dirs/resnet18_8xb32_in1k/flower-100epoch.json --keys loss
当然,我们可以在一张图上显示多个数据,操作方法为keys对应多个参数,参数间以空格隔开:

当然,由于坐标的差距有时会很大,所以并不建议把这样的两种参数变化展示在一张图上。
此外,如果我们把参数调整成cal_train_time …/work_dirs/resnet18_8xb32_in1k/flower-100epoch.json
就可以在终端查看平均耗时情况了:

计算量展示
我们打开get_flops.py文件,将参数改为…/…/configs/resnet/today_resnet18_8xb32_in1k.py --shape 224 224运行,就可以看到每一层网络的运算量以及总的运算量:

我们可以在最后找到计算量和参数量,前面也会输出每一层的数量和占比,是比较好用的分析工具。
这里介绍的两种分析工具使用比较简单,这里就不给大家放原码和注释了,也希望大家在操作的过程中归纳总结修改参数的依据是什么。其实我们传入的参数有些由函数名和函数接受的参数组成的,有些是根据代码的提示直接传入的路径和文件。那么,今天的内容就介绍到这了~