数字图像处理课程作业二-车牌识别
写在最前
这是我大学课程的数字图像处理的实验报告,代码大部分是从网上直接复制使用,小部分是我自己改写的(例如matplotlib的使用),可以直接运行。内容比较详细,但是希望大家能够先理解一下思路再使用,学习图像处理的思路最重要。
1.实验目的:
巩固和综合应用数字图像相关知识,实现车牌识别,提高分析问题和解决问题的能力
2.实验要求
实现车牌定位、车牌字符分割和光学字符识别等,最终组成牌照号码输出
3.实验分析和流程:
- 需要对原始车牌图像进行预处理:灰度化,开运算消除毛刺噪声
- 对处理后的车牌图像进行二值化操作,而后利用canny边缘检测消除小的区域保留大的区域,而后颜色识别判断定位车牌位置
- 利用掩膜处理对定位车牌后的图像进行分割,直接分割出车牌
- 分割出车牌对车牌进行二值化处理,并且分割字符
- 对分割字符进行神经网络模型匹配,输出车牌字符串
流程图如下

4.核心处理图像函数分析
4.1 二值化处理
def threshold(src, thresh, maxval, type, dst=None):
参数说明:
- src: InputArray类型的src,输入数组,填单通道 , 8或32位浮点类型的Mat即可
- thresh:double类型的thresh,阈值的具体值
- maxval:double类型的maxval,当第五个参数阈值类型type取 THRESH_BINARY 或THRESH_BINARY_INV阈值类型时的最大值
- type: int类型的type,阈值类型
作用:为轮廓检测做铺垫
def morphologyEx(src, op, kernel, dst=None, anchor=None, iterations=None, borderType=None, borderValue=None):
参数说明:
- src传入的图片
- op进行变化的方式
- kernel表示方框的大小
作用:去除背景噪声毛刺
4.2 轮廓检测
def findContours(image, mode, method, contours=None, hierarchy=None, offset=None):
参数说明:
-
image:单通道图像矩阵,可以是灰度图,但更常用的是二值图像,一般是经过Canny、拉普拉斯等边 缘检测算子处理过的二值图像
-
mode:定义轮廓的检索模式,
-
method:定义轮廓的近似方法
作用: 检测出车牌的轮廓
4.3 车牌定位和框出
def inRange(src, lowerb, upperb, dst=None):
参数说明:
- src: InputArray类型的src,输入数组,填单通道 , 8或32位浮点类型的Mat即可
- lowerb: 最低阈值
- upperb: 最高阈值
作用:可实现二值化功能(这点类似threshold()函数),更关键的是可以同时针对多通道进行操作,使用起来非常方便,实现车牌定位
def rectangle(img, pt1, pt2, color, thickness=None, lineType=None, shift=None):
参数说明:
-
img:要做处理的图片
-
pt1:左上矩形的角坐标
-
pt2:右下矩形的角坐标
-
color:矩形的颜色
作用:框出车牌
5.实际图像处理代码
5.1 车牌预处理
def find_license(self,img):
    '''
        预处理函数
        '''
    m = 400 * img.shape[0] / img.shape[1]

    # 压缩图像
    img = cv2.resize(img, (400, int(m)), interpolation=cv2.INTER_CUBIC)

    # BGR转换为灰度图像
    gray_img = cv2.cvtColor(img, cv2.COLOR_BGR2GRAY)

    # 灰度拉伸
    stretchedimg = self.stretch(gray_img)

    '''进行开运算,用来去除噪声'''
    r = 16
    h = w = r * 2 + 1
    kernel = np.zeros((h, w), np.uint8)
    cv2.circle(kernel, (r, r), r, 1, -1)
    # 开运算
    openingimg = cv2.morphologyEx(stretchedimg, cv2.MORPH_OPEN, kernel)
    # 获取差分图,两幅图像做差  cv2.absdiff('图像1','图像2')
    strtimg = cv2.absdiff(stretchedimg, openingimg)

    # 图像二值化
    binaryimg = self.dobinaryzation(strtimg)

    # canny边缘检测
    canny = cv2.Canny(binaryimg, binaryimg.shape[0], binaryimg.shape[1])

    '''消除小的区域,保留大块的区域,从而定位车牌'''
    # 进行闭运算
    kernel = np.ones((5, 19), np.uint8)
    closingimg = cv2.morphologyEx(canny, cv2.MORPH_CLOSE, kernel)

    # 进行开运算
    openingimg = cv2.morphologyEx(closingimg, cv2.MORPH_OPEN, kernel)

    # 再次进行开运算
    kernel = np.ones((11, 5), np.uint8)
    openingimg = cv2.morphologyEx(openingimg, cv2.MORPH_OPEN, kernel)

    # 消除小区域,定位车牌位置
    rect = self.locate_license(openingimg, img)

    return rect, img
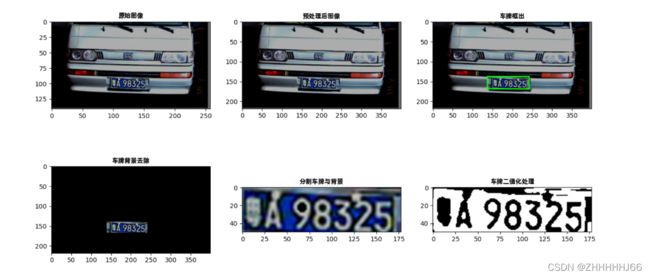
分析:这一步主要是为了对原始车牌图像进行预处理:灰度化,开运算消除毛刺噪声
下图为预处理后的图像:

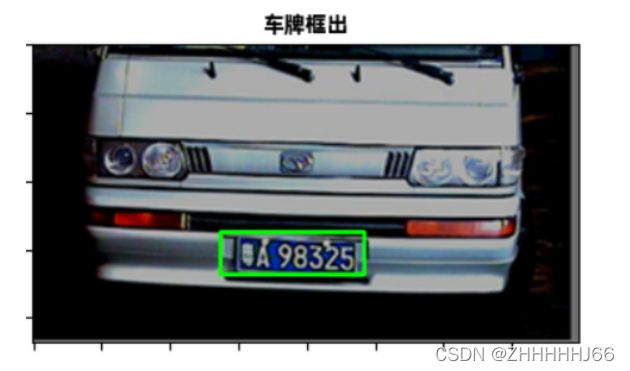
5.2 车牌框出
cv2.rectangle(afterimg, (rect[0], rect[1]), (rect[2], rect[3]), (0, 255, 0),2)
找到车牌轮廓的左上和右下坐标后就可以用矩形圈出
下图为车牌框出的图像:
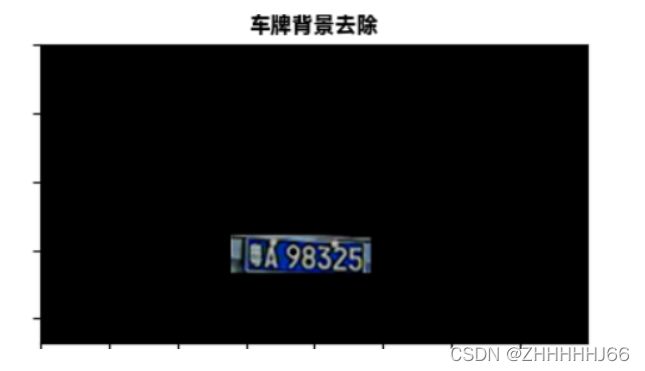
5.3 车牌分割背景
def cut_license(self,afterimg, rect):
    '''
        图像分割函数
        '''
    # 转换为宽度和高度
    rect[2] = rect[2] - rect[0]
    rect[3] = rect[3] - rect[1]
    rect_copy = tuple(rect.copy())
    # 创建掩膜
    mask = np.zeros(afterimg.shape[:2], np.uint8)
    # 创建背景模型  大小只能为13*5,行数只能为1,单通道浮点型
    bgdModel = np.zeros((1, 65), np.float64)
    # 创建前景模型
    fgdModel = np.zeros((1, 65), np.float64)
    # 分割图像
    cv2.grabCut(afterimg, mask, rect_copy, bgdModel, fgdModel, 5, cv2.GC_INIT_WITH_RECT)
    mask2 = np.where((mask == 2) | (mask == 0), 0, 1).astype('uint8')
    img_show = afterimg* mask2[:, :, np.newaxis]
    # cv2.imshow('111',img_show)
    return img_show
把车牌和背景分离开,即将车牌外的背景都变为黑色
下图为车牌和背景分离开的图片:
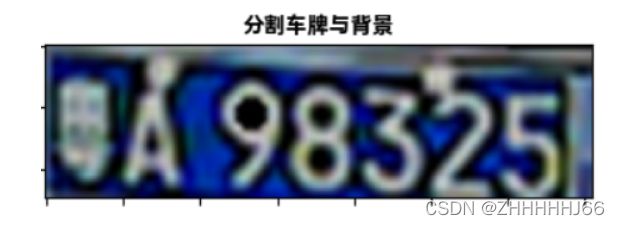
5.4 车牌分割
cutimg = cutimg[140:165, 151:240]
height, width = cutimg.shape[:2]
cutimg = cv2.resize(cutimg, (2 * width, 2 * height), interpolation=cv2.INTER_CUBIC)
plt.subplot(2, 3, 5)
虽然背景已经用黑色代替,但是车牌在图像占的比例太小,因此我们还需要对其进行提取处理,但缺点就行提取出的图像比较模糊,车牌的粤字已经模糊不清
效果如下:
5.5 分割后的车牌二值化
cv2.threshold(img_gray, 100, 255, cv2.THRESH_BINARY_INV, self.img_thre)
进行这步操作后我们就可以对车牌进行字符分割了
效果如下:

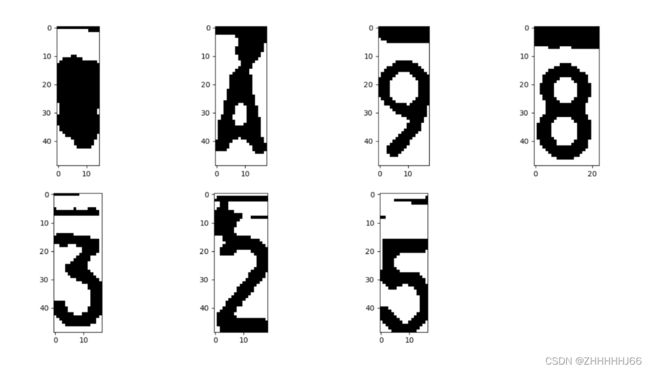
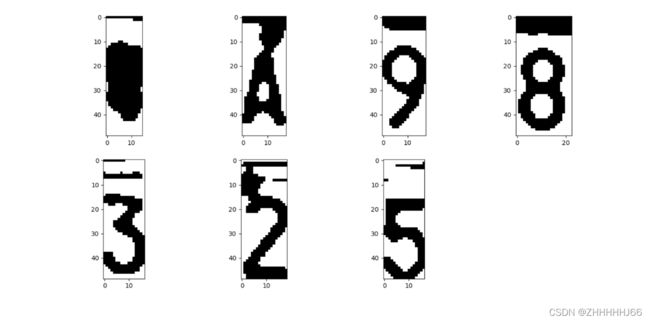
5.6 字符分割
img_list = []
n = 1
plt.figure()
img_num = 0
while n < self.width - 2:
    n += 1
    if (self.white[n] if self.arg else self.black[n]) > (0.15 * self.white_max if self.arg else 0.15 * self.black_max):
        start = n
        end = self.find_end(start)
        n = end

        if end - start > 5:
            cj = self.img_thre[1:self.height, start:end]
            img_num+=1
            cj = cv2.cvtColor(cj, cv2.COLOR_RGB2BGR)
            plt.subplot(2, 4, img_num)
            plt.imshow(cj)
通过二值化的字和背景的对比,我们可以分割出黑色的和白色的背景,从而分割出车牌的多个字
效果图如下:
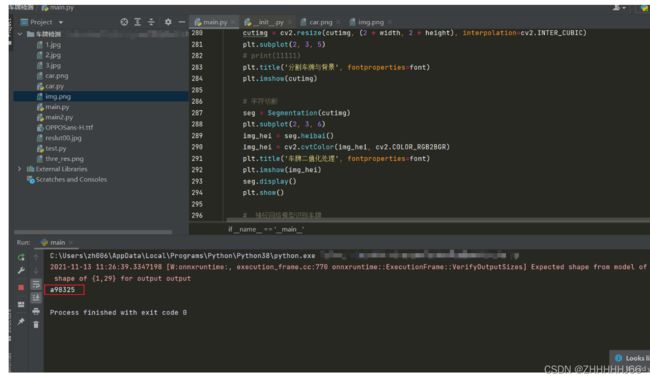
5.7 模版匹配
ocr = ddddocr.DdddOcr()
with open('thre_res.png', 'rb') as f:
	image = f.read()
	res = ocr.classification(image)
	print(res)
分割出字符后,我们对每个字符进行神经网络模版匹配,这里我采用的是github上已经训练好的神经网络模型,直接调用它的api进行识别,但由于粤字实在模糊不清,没能输出粤的字符
效果如下:
6.整体图像呈现和思考
整体图像如下:
- 处理图像:
- 分割字符
7.感想和思考
在做实验过程中我也遇到了许多问题,在轮廓提取时,当车牌与车身背景对比不明显时,这个方案是适用的,可能还需要形状的识别,并且在提取和分割过程后,车牌的粤字已经模糊不清,很难再用模版进行识别。这些缺陷和问题都是我接下来学习更多知识后要解决的。
写在最后
如果觉得写的不错的小伙伴记得给个赞哦!欢迎评论与我交流!
2022.4.23更新
应评论要求现把完整代码写在如下:
import cv2
import numpy as np
import matplotlib.pyplot as plt
from matplotlib import font_manager
import ddddocr

font = font_manager.FontProperties(fname=r".\OPPOSans-H.ttf")


class Get_license():
    def stretch(self, img):
        '''
        图像拉伸函数
        '''
        maxi = float(img.max())
        mini = float(img.min())

        for i in range(img.shape[0]):
            for j in range(img.shape[1]):
                img[i, j] = (255 / (maxi - mini) * img[i, j] - (255 * mini) / (maxi - mini))

        return img

    def dobinaryzation(self, img):
        '''
        二值化处理函数
        '''
        maxi = float(img.max())
        mini = float(img.min())

        x = maxi - ((maxi - mini) / 2)
        # 二值化,返回阈值ret  和  二值化操作后的图像thresh
        ret, thresh = cv2.threshold(img, x, 255, cv2.THRESH_BINARY)
        # 返回二值化后的黑白图像
        return thresh

    def find_rectangle(self, contour):
        '''
        寻找矩形轮廓
        '''
        y, x = [], []

        for p in contour:
            y.append(p[0][0])
            x.append(p[0][1])

        return [min(y), min(x), max(y), max(x)]

    def locate_license(self, img, afterimg):
        '''
        定位车牌号
        '''
        contours, hierarchy = cv2.findContours(img, cv2.RETR_EXTERNAL, cv2.CHAIN_APPROX_SIMPLE)

        # 找出最大的三个区域
        block = []
        for c in contours:
            # 找出轮廓的左上点和右下点,由此计算它的面积和长度比
            r = self.find_rectangle(c)
            a = (r[2] - r[0]) * (r[3] - r[1])  # 面积
            s = (r[2] - r[0]) * (r[3] - r[1])  # 长度比

            block.append([r, a, s])
        # 选出面积最大的3个区域
        block = sorted(block, key=lambda b: b[1])[-3:]

        # 使用颜色识别判断找出最像车牌的区域
        maxweight, maxindex = 0, -1
        for i in range(len(block)):
            b = afterimg[block[i][0][1]:block[i][0][3], block[i][0][0]:block[i][0][2]]
            # BGR转HSV
            hsv = cv2.cvtColor(b, cv2.COLOR_BGR2HSV)
            # 蓝色车牌的范围
            lower = np.array([100, 50, 50])
            upper = np.array([140, 255, 255])
            # 根据阈值构建掩膜
            mask = cv2.inRange(hsv, lower, upper)
            # 统计权值
            w1 = 0
            for m in mask:
                w1 += m / 255

            w2 = 0
            for n in w1:
                w2 += n

            # 选出最大权值的区域
            if w2 > maxweight:
                maxindex = i
                maxweight = w2

        return block[maxindex][0]

    def find_license(self, img):
        '''
        预处理函数
        '''
        m = 400 * img.shape[0] / img.shape[1]

        # 压缩图像
        img = cv2.resize(img, (400, int(m)), interpolation=cv2.INTER_CUBIC)

        # BGR转换为灰度图像
        gray_img = cv2.cvtColor(img, cv2.COLOR_BGR2GRAY)

        # 灰度拉伸
        stretchedimg = self.stretch(gray_img)

        '''进行开运算,用来去除噪声'''
        r = 16
        h = w = r * 2 + 1
        kernel = np.zeros((h, w), np.uint8)
        cv2.circle(kernel, (r, r), r, 1, -1)
        # 开运算
        openingimg = cv2.morphologyEx(stretchedimg, cv2.MORPH_OPEN, kernel)
        # 获取差分图,两幅图像做差  cv2.absdiff('图像1','图像2')
        strtimg = cv2.absdiff(stretchedimg, openingimg)

        # 图像二值化
        binaryimg = self.dobinaryzation(strtimg)

        # canny边缘检测
        canny = cv2.Canny(binaryimg, binaryimg.shape[0], binaryimg.shape[1])

        '''消除小的区域,保留大块的区域,从而定位车牌'''
        # 进行闭运算
        kernel = np.ones((5, 19), np.uint8)
        closingimg = cv2.morphologyEx(canny, cv2.MORPH_CLOSE, kernel)

        # 进行开运算
        openingimg = cv2.morphologyEx(closingimg, cv2.MORPH_OPEN, kernel)

        # 再次进行开运算
        kernel = np.ones((11, 5), np.uint8)
        openingimg = cv2.morphologyEx(openingimg, cv2.MORPH_OPEN, kernel)

        # 消除小区域,定位车牌位置
        rect = self.locate_license(openingimg, img)

        return rect, img

    def cut_license(self, afterimg, rect):
        '''
        图像分割函数
        '''
        # 转换为宽度和高度
        rect[2] = rect[2] - rect[0]
        rect[3] = rect[3] - rect[1]
        rect_copy = tuple(rect.copy())
        # 创建掩膜
        mask = np.zeros(afterimg.shape[:2], np.uint8)
        # 创建背景模型  大小只能为13*5,行数只能为1,单通道浮点型
        bgdModel = np.zeros((1, 65), np.float64)
        # 创建前景模型
        fgdModel = np.zeros((1, 65), np.float64)
        # 分割图像
        cv2.grabCut(afterimg, mask, rect_copy, bgdModel, fgdModel, 5, cv2.GC_INIT_WITH_RECT)
        mask2 = np.where((mask == 2) | (mask == 0), 0, 1).astype('uint8')
        img_show = afterimg * mask2[:, :, np.newaxis]
        # cv2.imshow('111',img_show)
        return img_show


class Segmentation():
    def __init__(self, cutimg):

        # 1、读取图像,并把图像转换为灰度图像并显示
        # cutimg = cv2.imread("3.jpg")  # 读取图片
        img_gray = cv2.cvtColor(cutimg, cv2.COLOR_BGR2GRAY)  # 转换了灰度化
        # cv2.imshow('gray', img_gray)  # 显示图片
        cv2.waitKey(0)

        # 2、将灰度图像二值化,设定阈值是100
        self.img_thre = img_gray
        cv2.threshold(img_gray, 100, 255, cv2.THRESH_BINARY_INV, self.img_thre)

        cv2.waitKey(0)

        # 3、保存黑白图片
        # cv2.imwrite('thre_res.png', self.img_thre)

        # 4、分割字符
        self.white = []  # 记录每一列的白色像素总和
        self.black = []  # ..........黑色.......
        self.height = self.img_thre.shape[0]
        self.width = self.img_thre.shape[1]
        self.white_max = 0
        self.black_max = 0
        # 计算每一列的黑白色像素总和
        for i in range(self.width):
            s = 0  # 这一列白色总数
            t = 0  # 这一列黑色总数
            for j in range(self.height):
                if self.img_thre[j][i] == 255:
                    s += 1
                if self.img_thre[j][i] == 0:
                    t += 1
            self.white_max = max(self.white_max, s)
            self.black_max = max(self.black_max, t)
            self.white.append(s)
            self.black.append(t)

        self.arg = False  # False表示白底黑字;True表示黑底白字
        if self.black_max > self.white_max:
            self.arg = True

    def heibai(self):
        return self.img_thre

        # 分割图像

    def find_end(self, start_):
        end_ = start_ + 1
        for m in range(start_ + 1, self.width - 1):
            if (self.black[m] if self.arg else self.white[m]) > (
            0.85 * self.black_max if self.arg else 0.85 * self.white_max):  # 0.95这个参数请多调整,对应下面的0.05
                end_ = m
                break
        return end_

    def display(self):
        img_list = []
        n = 1
        plt.figure()
        img_num = 0
        while n < self.width - 2:
            n += 1
            if (self.white[n] if self.arg else self.black[n]) > (
            0.15 * self.white_max if self.arg else 0.15 * self.black_max):
                # 上面这些判断用来辨别是白底黑字还是黑底白字
                # 0.05这个参数请多调整,对应上面的0.95
                start = n
                end = self.find_end(start)
                n = end

                if end - start > 5:
                    cj = self.img_thre[1:self.height, start:end]
                    img_num += 1
                    cj = cv2.cvtColor(cj, cv2.COLOR_RGB2BGR)
                    plt.subplot(2, 4, img_num)
                    plt.imshow(cj)
        plt.show()
        return self.img_thre


if __name__ == '__main__':
    # 原始图像读入
    img = cv2.imread('img.png')
    img1 = cv2.cvtColor(img, cv2.COLOR_RGB2BGR)
    plt.figure()
    plt.subplot(2, 3, 1)
    # print(11111)
    plt.title('原始图像', fontproperties=font)
    plt.imshow(img1)

    license = Get_license()
    # # 预处理图像
    rect, afterimg = license.find_license(img)

    afterimg = cv2.cvtColor(afterimg, cv2.COLOR_RGB2BGR)
    plt.subplot(2, 3, 2)
    plt.title('预处理后图像', fontproperties=font)
    plt.imshow(afterimg)
    # # 框出车牌号
    cv2.rectangle(afterimg, (rect[0], rect[1]), (rect[2], rect[3]), (0, 255, 0), 2)
    x1, y1, x2, y2 = int(rect[0]), int(rect[1]), int(rect[2]), int(rect[3])
    print(x1, x2, y1, y2)
    plt.subplot(2, 3, 3)
    plt.title('车牌框出', fontproperties=font)
    plt.imshow(afterimg)

    # 分割车牌与背景
    cutimg = license.cut_license(afterimg, rect)
    plt.subplot(2, 3, 4)
    plt.title('车牌背景去除', fontproperties=font)
    plt.imshow(cutimg)
    # print(int(_rect[0]), int(_rect[3]), int(_rect[2]), int(_rect[1]))
    print(x1, y1, x2, y2)
    # cutimg = cutimg[140:165, 151:240]
    cutimg = cutimg[y1 + 3:y2 - 3, x1 + 12:x2 - 3]
    # cutimg = cutimg[int(_rect[0]):int(_rect[3]),int(_rect[2]):int(_rect[1])]
    # print(cutimg)
    height, width = cutimg.shape[:2]
    cutimg1 = cv2.resize(cutimg, (2 * width, 2 * height), interpolation=cv2.INTER_CUBIC)
    plt.subplot(2, 3, 5)
    # print(11111)
    plt.title('分割车牌与背景', fontproperties=font)
    plt.imshow(cutimg)

    # 字符切割
    seg = Segmentation(cutimg)
    plt.subplot(2, 3, 6)
    img_hei = seg.heibai()
    img_hei = cv2.cvtColor(img_hei, cv2.COLOR_RGB2BGR)
    plt.title('车牌二值化处理', fontproperties=font)
    plt.imshow(img_hei)
    seg.display()
    plt.show()

    #  神经网络模型识别车牌
    ocr = ddddocr.DdddOcr()
    with open('thre_res.png', 'rb') as f:
        image = f.read()
    res = ocr.classification(image)
    print(res)
但是好像不能完美的匹配所有车牌图片,只能说具体图片得自己去优化