yolov5 loss计算之lbox计算:网络预测框与anchor分配策略解析
很多地方都参考了各个公开资源,很感谢大家的分享。
总结写下自己的理解,方便之后复习。
train.py中涉及到loss的代码有:
compute_loss = ComputeLoss(model)
pred = model(imgs) # forward
loss, loss_items = compute_loss(pred, targets.to(device)) # pred是网络输出,targets是标注的gt
如何处理pred
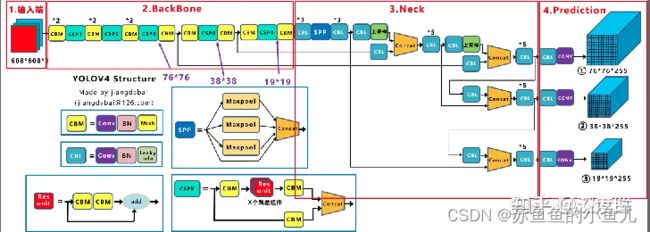
YOLOV5网络结构:

输出的预测为:

【图像与文字参考了:https://zhuanlan.zhihu.com/p/183838757】
每个维度意义有:
16是batchsize
3是每个特征图上由几个不同大小的anchor进行预测
80*80是其中一个特征图大小
85是数据集的80个类(根据任务定)+xywh+前景、背景=80+4+1=85

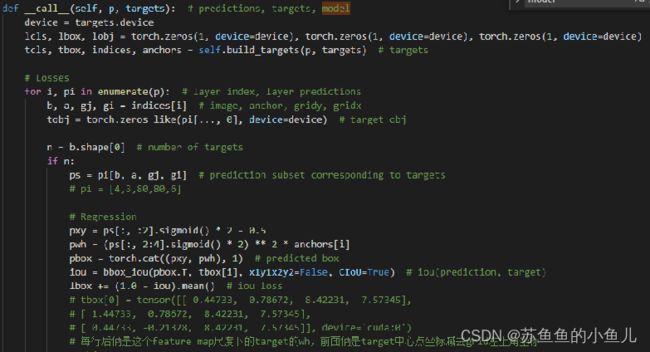
重点代码是这几行:
ps = pi[b, a, gj, gi]  # prediction subset corresponding to targets
# 假设图像0上只有1个target,解析如下
# b是图像id,表示第b张图像,例子中为0;a是build_targets 计算出来的用来回归target的anchor,这个由tensor维度标明对应关系,具体细节见build_targets函数解析;gj,gi是target中心点所在网格与相邻2网格的左上角3个x坐标,3个y坐标
# Regression
pxy = ps[:, :2].sigmoid() * 2 - 0.5
# 规范xy值在-0.5到+1.5内
pwh = (ps[:, 2:4].sigmoid() * 2) ** 2 * anchors[i]
# 规范wh值在anchor的4倍之内
pbox = torch.cat((pxy, pwh), 1)  # predicted box
iou = bbox_iou(pbox.T, tbox[i], x1y1x2y2=False, CIoU=True)  # iou(prediction, target)
                lbox += (1.0 - iou).mean()  # iou loss
如何处理targets
大致来说,就是假设处理的是8080的特征图,这个特征图上有3种大小的anchor去预测target,图像上的target按照比例映射到这个8080的特征图上,然后把这些target与anchor作比较,筛选出符合条件(就是宽高比例是否在1/4-4之内)的target与anchor(也即,如果target与这仨anchor比起来比例超出范围,那么这个target就不放在这个特征图上去预测,视为背景;如果有超过一个anchor可以满足条件,就用tensor保留这个图像id,anchor id等做映射)
然后对于一个保留下来的target,已知其中心点坐标在某个grid内,再看下这个中心点距离哪个相邻的grid比较近,也作为考虑grid。

【图像来源:https://zhuanlan.zhihu.com/p/415071583】
可以看这个作者画的图,target 坐标减去三个黄色的grid的左上角坐标,就是需要填写入代码中tbox中的偏移量,上文中提到的gj,gi就是这里的51 52 51与44 44 45
def build_targets(self, p, targets):
        # Build targets for compute_loss(), input targets(image,class,x,y,w,h)
        # na = 3 nt = 一个batch中的所有gt eg.nt=8
        na, nt = self.na, targets.shape[0]  # number of anchors, targets
        tcls, tbox, indices, anch = [], [], [], []
        gain = torch.ones(7, device=targets.device)  # normalized to gridspace gain
        # ai=target class
        ai = torch.arange(na, device=targets.device).float().view(na, 1).repeat(1, nt)  # same as .repeat_interleave(nt)
        # targets = [3,8,7]
        targets = torch.cat((targets.repeat(na, 1, 1), ai[:, :, None]), 2)  # append anchor indices

        g = 0.5  # bias
        off = torch.tensor([[0, 0],
                            [1, 0], [0, 1], [-1, 0], [0, -1],  # j,k,l,m
                            # [1, 1], [1, -1], [-1, 1], [-1, -1],  # jk,jm,lk,lm
                            ], device=targets.device).float() * g  # offsets

        for i in range(self.nl):
            anchors = self.anchors[i]
            # 1 1 特征图大小 特征图大小 特征图大小 特征图大小 1
            # 1 1 80 80 80 80 1
            gain[2:6] = torch.tensor(p[i].shape)[[3, 2, 3, 2]]  # xyxy gain

            # Match targets to anchors
            t = targets * gain   # 将target映射回特征图大小,在特征图上画出target
            if nt:
                # Matches
                r = t[:, :, 4:6] / anchors[:, None]  # wh ratio
                j = torch.max(r, 1 / r).max(2)[0] < self.hyp['anchor_t']  # compare
                # j = wh_iou(anchors, t[:, 4:6]) > model.hyp['iou_t']
                # iou(3,n)=wh_iou(anchors(3,2), gwh(n,2))
                t = t[j]  # filter
                # tensor([[ 0.00000,  0.00000, 40.44733,  3.78672,  8.42231,  7.57345,  2.00000]], device='cuda:0')
                # 所有的8个target里面,看与这层3个anchor长宽比值是否小于4,如果满足,就留下这个target,这时target里面有anchor_id
                # 如示例所示,留下的target为图像0中的cls为0的target,使用id为2的anchor去匹配这个anchor;
                # anchor去对应这个target分两步走,首先,定义好哪个长宽的anchor,然后,学习这个anchor的偏移量。现在第一步已经完成了,下面是第二步。

                # Offsets
                gxy = t[:, 2:4]  # grid xy
                gxi = gain[[2, 3]] - gxy  # inverse
                j, k = ((gxy % 1 < g) & (gxy > 1)).T
                l, m = ((gxi % 1 < g) & (gxi > 1)).T
                j = torch.stack((torch.ones_like(j), j, k, l, m))
                t = t.repeat((5, 1, 1))[j]
                offsets = (torch.zeros_like(gxy)[None] + off[:, None])[j]
            else:
                t = targets[0]
                offsets = 0

            # Define
            b, c = t[:, :2].long().T  # image, class
            gxy = t[:, 2:4]  # grid xy
            gwh = t[:, 4:6]  # grid wh
            gij = (gxy - offsets).long()
            gi, gj = gij.T  # grid xy indices 选中第几个grid,gi是40,39,40,gj是3,3,4

            # Append
            a = t[:, 6].long()  # anchor indices [2,2,2]
            indices.append((b, a, gj.clamp_(0, gain[3] - 1), gi.clamp_(0, gain[2] - 1)))  # image, anchor, grid indices
            tbox.append(torch.cat((gxy - gij, gwh), 1))  # box  # target的中心点xy相对于每个筛选出的(共三个)grid左上角坐标的偏移
            anch.append(anchors[a])  # anchors
            tcls.append(c)  # class
            # tbox = tensor([[ 0.44733,  0.78672,  8.42231,  7.57345],
            #        [ 1.44733,  0.78672,  8.42231,  7.57345],
            #        [ 0.44733, -0.21328,  8.42231,  7.57345]], device='cuda:0')
            # 每行后俩是这个feature map尺度下的target的wh,前面俩是target中心点坐标减去grid左上角坐标

        return tcls, tbox, indices, anch
到这里,lbox就计算出来了