TensorFlow模型保存和载入方法汇总
目录
一、TensorFlow常规模型加载方法
保存模型
加载模型
1.不加载图结构,只加载参数
2.加载图结构和参数
3.简化版本
二、TensorFlow二进制模型加载方法
三、二进制模型制作
四、从图上读取张量
从二进制模型加载张量
从当前图中获取对应张量
从图中获取节点信息
一、TensorFlow常规模型加载方法
保存模型
tf.train.Saver()类,.save(sess, ckpt文件目录)方法
| 参数名称 | 功能说明 | 默认值 |
| var_list | Saver中存储变量集合 | 全局变量集合 |
| reshape | 加载时是否恢复变量形状 | True |
| sharded | 是否将变量轮循放在所有设备上 | True |
| max_to_keep | 保留最近检查点个数 | 5 |
| restore_sequentially | 是否按顺序恢复变量,模型较大时顺序恢复内存消耗小 | True |
var_list是字典形式{变量名字符串: 变量符号},相对应的restore也根据同样形式的字典将ckpt中的字符串对应的变量加载给程序中的符号。
如果Saver给定了字典作为加载方式,则按照字典来,如:saver = tf.train.Saver({"v/ExponentialMovingAverage":v}),否则每个变量寻找自己的name属性在ckpt中的对应值进行加载。
加载模型
当我们基于checkpoint文件(ckpt)加载参数时,实际上我们使用Saver.restore取代了initializer的初始化
checkpoint文件会记录保存信息,通过它可以定位最新保存的模型:
| 1 2 |
|
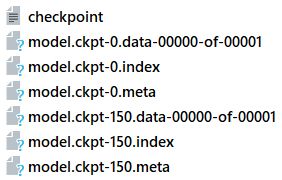
.meta文件保存了当前图结构
.data文件保存了当前参数名和值
.index文件保存了辅助索引信息
.data文件可以查询到参数名和参数值,使用下面的命令可以查询保存在文件中的全部变量{名:值}对,
| 1 2 |
|
tf.train.import_meta_graph函数给出model.ckpt-n.meta的路径后会加载图结构,并返回saver对象
| 1 |
|
tf.train.Saver函数会返回加载默认图的saver对象,saver对象初始化时可以指定变量映射方式,根据名字映射变量
| 1 |
|
saver.restore函数给出model.ckpt-n的路径后会自动寻找参数名-值文件进行加载
| 1 2 |
|
1.不加载图结构,只加载参数
由于实际上我们参数保存的都是Variable变量的值,所以其他的参数值(例如batch_size)等,我们在restore时可能希望修改,但是图结构在train时一般就已经确定了,所以我们可以使用tf.Graph().as_default()新建一个默认图(建议使用上下文环境),利用这个新图修改和变量无关的参值大小,从而达到目的。
| 1 2 3 4 5 6 7 8 9 10 11 12 13 14 15 16 17 18 19 20 21 22 23 24 25 26 27 28 29 30 31 32 |
|
2.加载图结构和参数
| 1 2 3 4 5 6 7 8 9 10 11 12 13 14 15 16 17 18 19 20 21 22 23 24 25 26 27 28 29 30 31 32 33 34 35 36 |
|
注意,在所有两种方式中都可以通过调用节点名称使用节点输出张量,节点.name属性返回节点名称。
3.简化版本
| 1 2 3 4 5 6 7 8 9 10 11 12 |
|
二、TensorFlow二进制模型加载方法
这种加载方法一般是对应网上各大公司已经训练好的网络模型进行修改的工作
| 1 2 3 4 5 6 7 8 9 10 11 12 13 14 15 16 17 |
|
上面两篇都使用了二进制加载模型的方式
三、二进制模型制作
这节是关于tensorflow的Freezing,字面意思是冷冻,可理解为整合合并;整合什么呢,就是将模型文件和权重文件整合合并为一个文件,主要用途是便于发布。
tensorflow在训练过程中,通常不会将权重数据保存的格式文件里(这里我理解是模型文件),反而是分开保存在一个叫checkpoint的检查点文件里,当初始化时,再通过模型文件里的变量Op节点来从checkoupoint文件读取数据并初始化变量。这种模型和权重数据分开保存的情况,使得发布产品时不是那么方便,我们可以将tf的图和参数文件整合进一个后缀为pb的二进制文件中,由于整合过程回将变量转化为常量,所以我们在日后读取模型文件时不能够进行训练,仅能向前传播,而且我们在保存时需要指定节点名称。
将图变量转换为常量的API:tf.graph_util.convert_variables_to_constants
转换后的graph_def对象转换为二进制数据(graph_def.SerializeToString())后,写入pb即可。
| 1 2 3 4 5 6 7 8 9 10 11 12 13 |
|
我们可以直接查看gd:
node {
name: "v1"
op: "Const"
attr {
key: "dtype"
value {
type: DT_FLOAT
}
}
attr {
key: "value"
value {
tensor {
dtype: DT_FLOAT
tensor_shape {
dim {
size: 1
}
}
float_val: 1.0
}
}
}
}
……
node {
name: "add"
op: "Add"
input: "v1/read"
input: "v2/read"
attr {
key: "T"
value {
type: DT_FLOAT
}
}
}
library {
四、从图上读取张量
上面的代码实际上已经包含了本小节的内容,但是由于从图上读取特定的张量是如此的重要,所以我仍然单独的补充上这部分的内容。
无论如何,想要获取特定的张量我们必须要有张量的名称和图的句柄,比如 'import/pool_3/_reshape:0' 这种,有了张量名和图,索引就很简单了。
从二进制模型加载张量
第二小节的代码很好的展示了这种情况
| 1 2 3 4 5 6 7 8 9 10 11 12 13 14 15 |
|
从当前图中获取对应张量
这个就是很普通的情况,从我们当前操作的图中获取某个张量,用于feed啦或者用于输出等操作,API也很简单,用法如下:
g.get_tensor_by_name('import/pool_3/_reshape:0')
g表示当前图句柄,可以简单的使用 g = tf.get_default_graph() 获取。
从图中获取节点信息
有的时候我们对于模型中的节点并不够了解,此时我们可以通过图句柄来查询图的构造:
| 1 2 |
|
这个操作将返回图的构造结构。从这里,对比前面的代码,我们也可以了解到:graph_def 实际就是图的结构信息存储形式,我们可以将之还原为图(二进制模型加载代码中展示了),也可以从图中将之提取出来(本部分代码)。[Ref]
查看TensorFlow中checkpoint内变量的几种方法
查看ckpt中变量的方法有三种:
- 在有model的情况下,使用tf.train.Saver进行restore
- 使用tf.train.NewCheckpointReader直接读取ckpt文件,这种方法不需要model。
- 使用tools里的freeze_graph来读取ckpt
注意:
- 如果模型保存为.ckpt的文件,则使用该文件就可以查看.ckpt文件里的变量。ckpt路径为 model.ckpt
- 如果模型保存为.ckpt-xxx-data (图结构)、.ckpt-xxx.index (参数名)、.ckpt-xxx-meta (参数值)文件,则需要同时拥有这三个文件才行。并且ckpt的路径为 model.ckpt-xxx
1. 基于model来读取ckpt文件里的变量
1.首先建立model
2.从ckpt中恢复变量
| 1 2 3 4 5 6 7 8 9 10 |
|
注意:基于model来读取ckpt中变量时,model和ckpt必须匹配。
2. 使用tf.train.NewCheckpointReader直接读取ckpt文件里的变量,使用tools.inspect_checkpoint里的print_tensors_in_checkpoint_file函数打印ckpt里的东西
| 1 2 3 4 5 6 7 8 |
|
| 1 2 3 4 5 6 7 8 |
|
3.使用tools里的freeze_graph来读取ckpt
| 1 2 3 4 5 6 7 8 9 10 11 12 13 14 15 16 17 18 19 |
|
使用freeze_graph可以将图和ckpt进行合并。[Ref]
一般情况下,我们得到一个模型后都想知道模型里面的张量,下面分别从ckpt模型和pb模型中读取里面的张量名字。
1.读取ckpt模型里面的张量
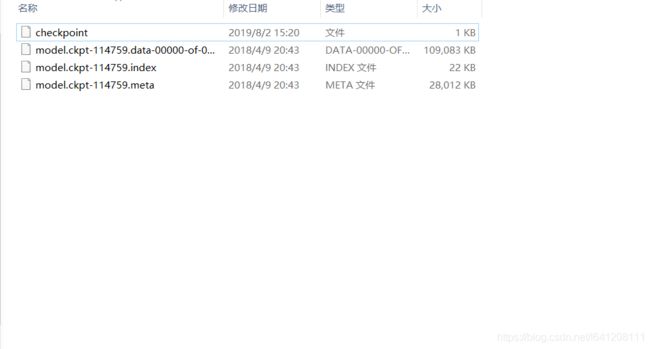
首先,ckpt模型需包含以下文件,一个都不能少
然后编写代码,将所有张量的名字都保存到tensor_name_list_ckpt.txt文件中
import tensorflow as tf

#直接读取图的结构,不需要手动重新定义
meta_graph = tf.train.import_meta_graph("model.ckpt.meta")

with tf.Session()as sess:
	meta_graph.restore(sess,"D:/Face_recognition_github/20180402-114759/model.ckpt")

	tensor_name_list = [tensor.name for tensor in tf.get_default_graph().as_graph_def().node]
	with open("tensor_name_list_ckpt.txt",'a+')as f:
		for tensor_name in tensor_name_list:
			f.write(tensor_name+"\n")
			# print(tensor_name,'\n')
		f.close()
运行结果截图(部分)
2.读取pb模型里面的张量
需要一个pb文件![]()
编写代码
import tensorflow as tf

model_path = "D:/Face_recognition_github/20180402-114759/20180402-114759.pb"

with tf.gfile.FastGFile(model_path,'rb')as f:
    graph_def = tf.GraphDef()
    graph_def.ParseFromString(f.read())
    tf.import_graph_def(graph_def,name='')

    tensor_name_list = [tensor.name for tensor in tf.get_default_graph().as_graph_def().node]
    with open('tensor_name_list_pb.txt','a')as t:
        for tensor_name in tensor_name_list:
            t.write(tensor_name+'\n')
            print(tensor_name,'\n')
        t.close()
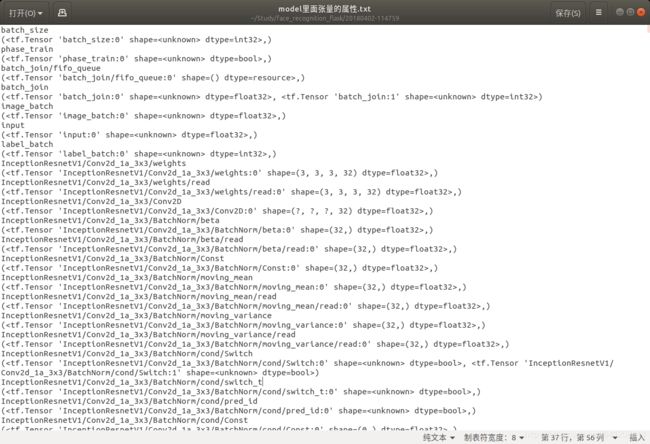
顺便再查看pb模型里面的张量的属性(ckpt模型的操作类似),保存到txt文件中[Ref]
import tensorflow as tf

model_path = "/home/boss/Study/face_recognition_flask/20180402-114759/model.pb"

with tf.gfile.FastGFile(model_path,'rb')as f:
    graph_def = tf.GraphDef()
    graph_def.ParseFromString(f.read())
    tf.import_graph_def(graph_def,name='')

    # tensor_name_list = [tensor.name for tensor in tf.get_default_graph().as_graph_def().node]
    # with open('tensor_name_list_pb.txt','a')as t:
    #     for tensor_name in tensor_name_list:
    #         t.write(tensor_name+'\n')
    #         print(tensor_name,'\n')
    #     t.close()
    with tf.Session()as sess:
        op_list = sess.graph.get_operations()
        with open("model里面张量的属性.txt",'a+')as f:
            for index,op in enumerate(op_list):
                f.write(str(op.name)+"\n")                   #张量的名称
f.write(str(op.values())+"\n") #张量的属性用于获得一个pb文件的所有节点名称
# -*- coding: utf-8 -*-
"""
Created on Tue Dec 18 18:31:13 2018
1、model_dir为模型路径文件夹,model_name为模型名称(自定义非如alexnet等训练实际名称)
2、写入到模型路径下的result.txt文件内
@author: Mr_dogyang
"""

import tensorflow as tf
import os

model_dir = 'D:\\TensorFlow\\MyTensorFlow\\MyTensorFlow\\slim\\satellite'
model_name = 'inception_v3_frozen_graph.pb'

# 读取并创建一个图graph来存放Google训练好的Inception_v3模型(函数)
def create_graph():
    with tf.gfile.FastGFile(os.path.join(
            model_dir, model_name), 'rb') as f:
        # 使用tf.GraphDef()定义一个空的Graph
        graph_def = tf.GraphDef()
        graph_def.ParseFromString(f.read())
        # Imports the graph from graph_def into the current default Graph.
        tf.import_graph_def(graph_def, name='')

# 创建graph
create_graph()

tensor_name_list = [tensor.name for tensor in tf.get_default_graph().as_graph_def().node]
result_file = os.path.join(model_dir, 'result.txt')
with open(result_file, 'w+') as f:
    for tensor_name in tensor_name_list:
        f.write(tensor_name+'\n')
Tensorflow学习教程------下载图像识别模型inceptionV3
# coding: utf-8

import tensorflow as tf
import os
import tarfile
import requests


#inception模型下载地址
inception_pretrain_model_url = 'http://download.tensorflow.org/models/image/imagenet/inception-2015-12-05.tgz'

#模型存放地址
inception_pretrain_model_dir = "inception_model"
if not os.path.exists(inception_pretrain_model_dir):
    os.makedirs(inception_pretrain_model_dir)

#获取文件名,以及文件路径
filename = inception_pretrain_model_url.split('/')[-1]
filepath = os.path.join(inception_pretrain_model_dir, filename)

#下载模型
if not os.path.exists(filepath):
    print("download: ", filename)
    r = requests.get(inception_pretrain_model_url, stream=True)
    with open(filepath, 'wb') as f:
        for chunk in r.iter_content(chunk_size=1024):
            if chunk:
                f.write(chunk)
print("finish: ", filename)
#解压文件
tarfile.open(filepath, 'r:gz').extractall(inception_pretrain_model_dir)

#模型结构存放文件
log_dir = 'inception_log'
if not os.path.exists(log_dir):
    os.makedirs(log_dir)

#classify_image_graph_def.pb为google训练好的模型
inception_graph_def_file = os.path.join(inception_pretrain_model_dir, 'classify_image_graph_def.pb')
with tf.Session() as sess:
    #创建一个图来存放google训练好的模型
    with tf.gfile.FastGFile(inception_graph_def_file, 'rb') as f:
        graph_def = tf.GraphDef()
        graph_def.ParseFromString(f.read())
        tf.import_graph_def(graph_def, name='')
    #保存图的结构
    writer = tf.summary.FileWriter(log_dir, sess.graph)
    writer.close()
[Ref]
用tensorflow神经网络实现一个简易的图片分类器
这篇文章我们将用 CIFAR-10数据集做一个很简易的图片分类器。 在 CIFAR-10数据集包含了60,000张图片。在此数据集中,有10个不同的类别,每个类别中有6,000个图像。每幅图像的大小为32 x 32像素。虽然这么小的尺寸通常给人类识别正确的类别带来了困难,但它实际上是对计算机模型的简化并且减少了分析图像所需的计算。
CIFAR-10数据集
我们可以通过输入模型的大量数字序列将这些图像输入到我们的模型中。每个像素由三个浮点数标识,这三个浮点数表示该像素的红色,绿色和蓝色值(RGB值)。所以每个图像有32 x 32 x 3 = 3,072 个值0.
使用非常大的卷积神经网络可以实现高质量的结果,你可以在这个连接中学习Rodrigo Benenson’s page
下载CIFAR-10数据集,网址:Python version of the dataset, 并把他安装在我们分类器代码所在的文件夹下
先上源代码
模型的源代码:
![]()
import numpy as np
import tensorflow as tf
import time
import data_helpers
beginTime = time.time()


batch_size = 100
learning_rate = 0.005
max_steps = 1000

data_sets = data_helpers.load_data()


# Define input placeholders
images_placeholder = tf.placeholder(tf.float32, shape=[None, 3072])
labels_placeholder = tf.placeholder(tf.int64, shape=[None])

# Define variables (these are the values we want to optimize)
weights = tf.Variable(tf.zeros([3072, 10]))
biases = tf.Variable(tf.zeros([10]))

# Define the classifier's result
logits = tf.matmul(images_placeholder, weights) + biases

# Define the loss function
loss = tf.reduce_mean(tf.nn.sparse_softmax_cross_entropy_with_logits(logits=logits,
                                                                     labels=labels_placeholder))

# Define the training operation
train_step = tf.train.GradientDescentOptimizer(learning_rate).minimize(loss)

# Operation comparing prediction with true label
correct_prediction = tf.equal(tf.argmax(logits, 1), labels_placeholder)

# Operation calculating the accuracy of our predictions
accuracy = tf.reduce_mean(tf.cast(correct_prediction, tf.float32))


with tf.Session() as sess:
    # Initialize variables
    sess.run(tf.global_variables_initializer())

    # Repeat max_steps times
    for i in range(max_steps):

        # Generate input data batch
        indices = np.random.choice(data_sets['images_train'].shape[0], batch_size)
        images_batch = data_sets['images_train'][indices]
        labels_batch = data_sets['labels_train'][indices]

        # Periodically print out the model's current accuracy
        if i % 100 == 0:
            train_accuracy = sess.run(accuracy, feed_dict={
                images_placeholder: images_batch, labels_placeholder: labels_batch})
            print('Step {:5d}: training accuracy {:g}'.format(i, train_accuracy))

        # Perform a single training step
        sess.run(train_step, feed_dict={images_placeholder: images_batch,
                                        labels_placeholder: labels_batch})

    # After finishing the training, evaluate on the test set
    test_accuracy = sess.run(accuracy, feed_dict={
        images_placeholder: data_sets['images_test'],
        labels_placeholder: data_sets['labels_test']})
    print('Test accuracy {:g}'.format(test_accuracy))

endTime = time.time()
print('Total time: {:5.2f}s'.format(endTime - beginTime))![]()
处理数据集的代码
![]()
import numpy as np
import pickle
import sys


def load_CIFAR10_batch(filename):
    '''load data from single CIFAR-10 file'''

    with open(filename, 'rb') as f:
        if sys.version_info[0] < 3:
            dict = pickle.load(f)
        else:
            dict = pickle.load(f, encoding='latin1')
        x = dict['data']
        y = dict['labels']
        x = x.astype(float)
        y = np.array(y)
    return x, y


def load_data():
    '''load all CIFAR-10 data and merge training batches'''

    xs = []
    ys = []
    for i in range(1, 6):
        filename = 'cifar-10-batches-py/data_batch_' + str(i)
        X, Y = load_CIFAR10_batch(filename)
        xs.append(X)
        ys.append(Y)

    x_train = np.concatenate(xs)
    y_train = np.concatenate(ys)
    del xs, ys

    x_test, y_test = load_CIFAR10_batch('cifar-10-batches-py/test_batch')

    classes = ['plane', 'car', 'bird', 'cat', 'deer', 'dog', 'frog', 'horse',
               'ship', 'truck']

    # Normalize Data
    mean_image = np.mean(x_train, axis=0)
    x_train -= mean_image
    x_test -= mean_image

    data_dict = {
        'images_train': x_train,
        'labels_train': y_train,
        'images_test': x_test,
        'labels_test': y_test,
        'classes': classes
    }
    return data_dict


def reshape_data(data_dict):
    im_tr = np.array(data_dict['images_train'])
    im_tr = np.reshape(im_tr, (-1, 3, 32, 32))
    im_tr = np.transpose(im_tr, (0, 2, 3, 1))
    data_dict['images_train'] = im_tr
    im_te = np.array(data_dict['images_test'])
    im_te = np.reshape(im_te, (-1, 3, 32, 32))
    im_te = np.transpose(im_te, (0, 2, 3, 1))
    data_dict['images_test'] = im_te
    return data_dict


def gen_batch(data, batch_size, num_iter):
    data = np.array(data)
    index = len(data)
    for i in range(num_iter):
        index += batch_size
        if (index + batch_size > len(data)):
            index = 0
            shuffled_indices = np.random.permutation(np.arange(len(data)))
            data = data[shuffled_indices]
        yield data[index:index + batch_size]


def main():
    data_sets = load_data()
    print(data_sets['images_train'].shape)
    print(data_sets['labels_train'].shape)
    print(data_sets['images_test'].shape)
    print(data_sets['labels_test'].shape)


if __name__ == '__main__':
main()![]()
首先我们导入了tensorflow numpy time 以及自己写的data_help包
time是为了计算整个代码的运行时间。 data_help是将数据集做成我们训练用的数据结构
data_help中的load_data()会把60000张的CIFAR数据集分成两块:500000张的训练集和100000张的测试集,具体来说他会返回这样的一个包含如下内容的字典
images_train: 训练集。一个500000张 包含3072(32x32像素点x3颜色通道)值labels_train: 训练集的50,000个标签(每个标签在0到9之间,代表训练图像所属的10个类别中的哪一个)images_test: 测试集(10,000 by 3,072)labels_test: 测试集的10,000个标签classes: 10个文本标签,用于将数字类值转换为单词(例如0代表'plane',1代表'car')
然后我们就可以开始建立我们的模型了
先顶两个tensroflow的占位符 这些占位符不包含任何数据,但仅指定输入数据的类型和形状:
images_placeholder = tf.placeholder(tf.float32, shape=[None, 3072])
labels_placeholder = tf.placeholder(tf.int64, shape=[None]) #值得注意的是,这边的Dtype是int 还有shape是没有维度的(一维的)
然后我们定义偏置和权重
weights = tf.Variable(tf.zeros([3072, 10]))
biases = tf.Variable(tf.zeros([10]))
我们的输入由3,072个浮点数组成,但我们寻找的输出是10个不同的整数值之一,代表一个类别。我们如何从3,072个值到单个值?
我们采用的简单方法是分别查看每个像素。对于每个像素和每个可能的类别,我们想知道该像素的颜色是增加还是减少属于特定类别的概率。例如,如果第一个像素是红色 - 并且如果汽车的图像通常具有红色的第一个像素,那么我们希望汽车类别的分数增加。我们通过将红色通道值乘以正数并将其添加到汽车类别得分来实现此目的。
同样,如果马图像在位置1很少有红色像素,我们希望该分数降低。这意味着乘以小数或负数并将结果添加到马匹得分中。对于10个类别中的每个类别,我们在每个像素上重复此步骤,然后总结所有3,072个值以获得单个总分。这是我们的3,072像素值的总和,由该类别的3,072参数权重加权。这里的最终结果是我们将得到10个分数 - 每个类别一个。最高分给我们分类。
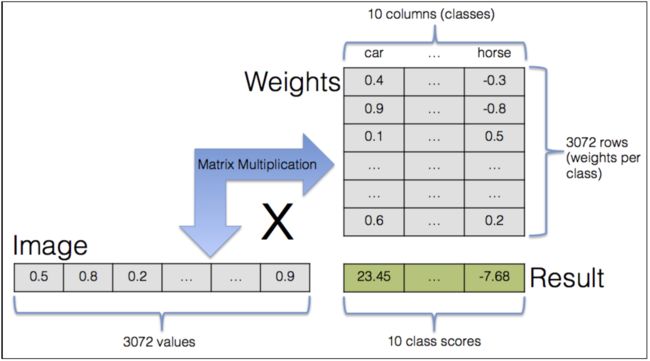
使用矩阵,我们可以大大简化用于将像素值与权重值相乘并总结结果的方案。我们用3,072维向量表示单个图像。如果我们将此向量乘以3,072 x 10权重矩阵,则结果是一个10维矩阵,其中包含我们想要的加权和。
3,072 x 10矩阵中的实际值是模型参数。但是,如果它们是随机的并且毫无意义,那么输出也将是。在这里,我们可以看到训练数据的值,它准备模型以最终自己确定参数值。
在上面的两行代码中,我们通知TensorFlow 3,072 x 10加权参数矩阵 - 所有这些参数在开始时都具有初始值0。我们还定义了第二个参数:包含偏差的10维数组。偏差不直接与图像数据相互作用,而是加到加权和 - 每个分数的起点。想象一个全黑图像:所有像素值都是0,因此它的所有类别得分都是0(与权重矩阵中的值无关)。偏见允许我们从非零类别分数开始。
训练方案的工作原理如下:首先,我们输入训练数据并让模型使用当前参数值进行预测。使用正确的类别对该预测进行比较,并且该比较的数值结果称为损失。损失值越小,类别预测越接近正确的类别 - 反之亦然。目的是尽量减少损失。但在我们看一下损失最小化之前,让我们来看看如何计算损失。
# Define loss function loss=tf.reduce_mean(tf.nn.sparse_softmax_cross_entropy_with_logits(logits,labels_placeholder))
TensorFlow通过提供处理所有这些的功能来处理我们的所有细节。然后,我们可以将logits中包含的模型预测与labels_placeholder(正确的类别标签)进行比较。 sparse_softmax_cross_entropy_with_logits()的输出是每个图像的损失值。最后,我们计算所有输入图像的平均损失值。
tf.nn.sparse_softmax_cross_entropy_with_logits()这个函数的功能就是计算labels和logits之间的交叉熵(cross entropy)。
![]()
import tensorflow as tf

input_data = tf.Variable([[0.2, 0.1, 0.9], [0.3, 0.4, 0.6]], dtype=tf.float32)
output = tf.nn.sparse_softmax_cross_entropy_with_logits(logits=input_data, labels=[0, 2])
with tf.Session() as sess:
    init = tf.global_variables_initializer()
    sess.run(init)
    print(sess.run(output))
# [ 1.36573195 0.93983102]![]()
这边顺便介绍一下tf.nn.softmax_cross_entopy_with_logits()
![]()
tf.nn.softmax_cross_entropy_with_logits(
    _sentinel=None,
    labels=None,
    logits=None,
    dim=-1,
    name=None
)![]()
第一个参数基本不用。此处不说明。
第二个参数label的含义就是一个分类标签,所不同的是,这个label是分类的概率,比如说[0.2,0.3,0.5],labels的每一行必须是一个概率分布。
现在来说明第三个参数logits,logit本身就是是一种函数,它把某个概率p从[0,1]映射到[-inf,+inf](即正负无穷区间)。这个函数的形式化描述为:logit=ln(p/(1-p))。
我们可以把logist理解为原生态的、未经缩放的,可视为一种未归一化的log 概率,如是[4, 1, -2]
于是,Softmax的工作则是,它把一个系列数从[-inf, +inf] 映射到[0,1],除此之外,它还把所有参与映射的值累计之和等于1,变成诸如[0.95, 0.05, 0]的概率向量。这样一来,经过Softmax加工的数据可以当做概率来用。
也就是说,logits是作为softmax的输入。经过softmax的加工,就变成“归一化”的概率(设为q),然后和labels代表的概率分布(设为q),于是,整个函数的功能就是前面的计算labels(概率分布p)和logits(概率分布q)之间的交叉熵
(1)如果labels的每一行是one-hot表示,也就是只有一个地方为1(或者说100%),其他地方为0(或者说0%),还可以使用tf.sparse_softmax_cross_entropy_with_logits()。之所以用100%和0%描述,就是让它看起来像一个概率分布。
(2)tf.nn.softmax_cross_entropy_with_logits()函数已经过时 (deprecated),它在TensorFlow未来的版本中将被去除。取而代之的是
tf.nn.softmax_cross_entropy_with_logits_v2()。
(3)参数labels,logits必须有相同的形状 [batch_size, num_classes] 和相同的类型(float16, float32, float64)中的一种,否则交叉熵无法计算。
(4)tf.nn.softmax_cross_entropy_with_logits 函数内部的 logits 不能进行缩放,因为在这个工作会在改函数内部进行(注意函数名称中的 softmax ,它负责完成原始数据的归一化),如果 logits 进行了缩放,那么反而会影响计算正确性。
-------------------------------------------------------------------------------------------------------------------------------------------
最后,我们计算所有输入图像的平均损失值。
# Define training operation
train_step = tf.train.GradientDescentOptimizer(learning_rate).minimize(loss)
如何改变参数值以减少损失? TensorFlow在这里发光,使用一种称为自动微分的技术,它根据参数值计算损耗的梯度。它计算每个参数对总体损失的影响,以及减少或增加少量用于减少损失的程度。它试图通过递归调整所有参数值来提高准确性。完成此步骤后,将使用下一个图像组重新启动该过程。
TensorFlow包含各种优化技术,用于将梯度信息转换为参数的更新。对于本教程中的目的,我们选择简单的梯度下降选项,该选项仅检查模型的当前状态以确定如何更新参数,而不考虑先前的参数值。
对输入图像进行分类,将预测与正确的类别进行比较,计算损失以及调整参数值的过程重复了很多次。计算持续时间和成本会随着更大,更复杂的模型而迅速升级,但我们这里的简单模型不需要太多耐心或高性能设备就能看到有意义的结果。
我们代码中的下两行(下面)采取精度测量。沿维度1的logg的argmax返回具有最高分数的类别的索引,这是类别标签预测。这些标签通过tf.equal()与正确的类别类别标签进行比较,后者返回一个布尔值向量 - 它被转换为浮点值(0或1),其平均值是正确预测图像的分数。
# Operation comparing prediction with true label
correct_prediction = tf.equal(tf.argmax(logits, 1), labels_placeholder)
# Operation calculating the accuracy of our predictions
accuracy = tf.reduce_mean(tf.cast(correct_prediction, tf.float32))
现在我们已经定义了TensorFlow图,我们可以运行它。该图可在sess变量中访问(见下文)。我们立即初始化之前创建的变量。现在,变量定义初始值已分配给变量。
迭代训练过程开始并重复max_steps次。
# Run the TensorFlow graph
with tf.Session() as sess:

# Initialize variables
sess.run(tf.initialize_all_variables())
# Repeat max_steps times
for i in range(max_steps):
接下来的几行代码随机从训练数据中选择一些图像:
# Generate batch of input data
indices = np.random.choice(data_sets['images_train'].shape[0], batch_size)
images_batch = data_sets['images_train'][indices]
labels_batch = data_sets['labels_train'][indices]
上面的第一行代码选择0和训练集大小之间的batch_size随机索引。然后通过选择这些索引处的图像和类别标签来构建批次。
来自训练数据的结果图像和类别组称为批次。批量大小表示执行参数更新步骤的频率。首先,我们平均特定批次中所有图像的损失,然后通过梯度下降更新参数。
如果不是在批处理后停止并对训练集中的所有图像进行分类,我们将能够计算真正的平均损失和真正的梯度而不是使用批处理时的估计。但是每个参数更新步骤需要更多的计算。在另一个极端,我们可以将批量大小设置为1,并在每个图像后执行参数更新。这将导致更频繁的更新,但更新将更加不稳定,并且往往不会朝着正确的方向前进。通常,在这两个极端之间的某种方法可以最快地改善结果。通常最好选择尽可能大的批量大小,同时仍然能够将所有变量和中间结果放入内存中。
每100次迭代,检查训练数据批次的当前准确度。
# Periodically print out the model's current accuracy
if i % 100 == 0:
train_accuracy = sess.run(accuracy, feed_dict={
images_placeholder: images_batch, labels_placeholder: labels_batch})
print('Step {:5d}: training accuracy {:g}'.format(i, train_accuracy))
这是训练循环中最重要的一行,我们建议模型执行单个训练步骤:
# Perform the training step
sess.run(train_step, feed_dict={images_placeholder: images_batch,
labels_placeholder: labels_batch})
已经在TensorFlow图形定义中提供了所有数据。 TensorFlow知道梯度下降更新取决于损失的值,而损失的值又取决于logits,后者取决于权重,偏差和实际输入批次。
现在只需将批量训练数据输入模型,这是通过提供一个饲料字典来完成的,其中当前的训练数据批次被分配给上面定义的占位符。
培训结束后,我们转而在测试集上运行模型。由于这是模型第一次遇到测试集,因此图像对模型来说是全新的。
记住,目标是评估训练有素的模型处理未知数据的能力
# After finishing the training, evaluate on the test set
test_accuracy = sess.run(accuracy, feed_dict={
images_placeholder: data_sets['images_test'],
labels_placeholder: data_sets['labels_test']})
print('Test accuracy {:g}'.format(test_accuracy))
最后一行打印了培训和运行模型的持续时间。
endTime = time.time()
print('Total time: {:5.2f}s'.format(endTime - beginTime))
[Ref]
Google_BERT
1. 模型文件转换
.indel是对应模型的索引文件,保存.data文件与.meta文件中图的结构关系;
.data-00000-of-00001文件:保存Tensorflow每个变量的取值,存储格式SSTable,(key, value)列表;
.meta文件保存tensorflow计算图的网络结构,MetaGraph元图,以protocal buffer格式保存
将tensorflow的ckpt模型转为pb文件, 需要知道网络的输出节点名称, 如果不指定输出节点名称, 程序就不知道该freeze哪些节点, 就没有办法保存模型.
1.1 获取模型中节点名称
# function: get the node name of ckpt model
from tensorflow.python import pywrap_tensorflow
# checkpoint_path = 'model.ckpt-xxx'
checkpoint_path = './uncased_L-12_H-768_A-12/bert_model.ckpt'
reader = pywrap_tensorflow.NewCheckpointReader(checkpoint_path)
var_to_shape_map = reader.get_variable_to_shape_map()
for key in var_to_shape_map:
print("tensor_name: ", key)
tensorflow获取模型节点名称及将.ckpt转为.pb文件
1.2 将ckpt模型转换为pb模型
import tensorflow as tf
from tensorflow.python.framework import graph_util
from tensorflow.python.platform import gfile
def freeze_graph(ckpt, output_graph):
output_node_names = 'bert/encoder/layer_7/output/dense/kernel'
# saver = tf.train.import_meta_graph(ckpt+'.meta', clear_devices=True)
saver = tf.compat.v1.train.import_meta_graph(ckpt+'.meta', clear_devices=True)
graph = tf.get_default_graph()
input_graph_def = graph.as_graph_def()
with tf.Session() as sess:
saver.restore(sess, ckpt)
output_graph_def = graph_util.convert_variables_to_constants(
sess=sess,
input_graph_def=input_graph_def,
output_node_names=output_node_names.split(',')
)
with tf.gfile.GFile(output_graph, 'wb') as fw:
fw.write(output_graph_def.SerializeToString())
print ('{} ops in the final graph.'.format(len(output_graph_def.node)))
ckpt = '/home/jie/gitdir/ckpt_pb/uncased_L-12_H-768_A-12/bert_model.ckpt'
pb = '/home/jie/gitdir/ckpt_pb/bert_model.pb'
if __name__ == '__main__':
freeze_graph(ckpt, pb)
1.3 查看.ckpt文件保存的tensor信息
import os
from tensorflow.python import pywrap_tensorflow
# code for finall ckpt
checkpoint_path = "./uncased_L-12_H-768_A-12/bert_model.ckpt"
# Read data from checkpoint file
reader = pywrap_tensorflow.NewCheckpointReader(checkpoint_path)
var_to_shape_map = reader.get_variable_to_shape_map()
# Print tensor name and values
for key in var_to_shape_map:
print("tensor_name: ", key)
print(reader.get_tensor(key))
[reference]
1.4 查看.pb文件的所有tensor
# params: pb_file_direction
import argparse
import tensorflow as tf
def print_tensors(pb_file):
print('Model File: {}\n'.format(pb_file))
# read pb into graph_def
with tf.gfile.GFile(pb_file, "rb") as f:
graph_def = tf.GraphDef()
graph_def.ParseFromString(f.read())
# import graph_def
with tf.Graph().as_default() as graph:
tf.import_graph_def(graph_def)
# print operations
for op in graph.get_operations():
print(op.name + '\t' + str(op.values()))
if __name__ == '__main__':
parser = argparse.ArgumentParser()
parser.add_argument("--pb_file", type=str, required=True, help="Pb file")
args = parser.parse_args()
print_tensors(args.pb_file)
2. 模型文件可视化
2.1 ckpt模型可视化
2.2 pb模型可视化
1. 从pb文件中恢复计算图
import tensorflow as tf
# path of pb file
model = './bert_model.pb'
# graph = tf.get_default_graph()
graph = tf.compat.v1.get_default_graph()
graph_def = graph.as_graph_def()
graph_def.ParseFromString(tf.gfile.FastGFile(model, 'rb').read())
tf.import_graph_def(graph_def, name='graph')
# summaryWriter = tf.summary.FileWriter('log/', graph)
summaryWriter = tf.compat.v1.summary.FileWriter('log/', graph)
2. Tensorboard查看计算图
tensorboard --logdir ./log/
Tensorflow之pb文件分析
3. 打印pb模型的tensor info
# coding:utf-8
import tensorflow as tf
from tensorflow.python.platform import gfile
tf.reset_default_graph() # 重置计算图
output_graph_path = '1.pb'
with tf.Session() as sess:
tf.global_variables_initializer().run()
output_graph_def = tf.GraphDef()
# 获得默认的图
graph = tf.get_default_graph()
with gfile.FastGFile(output_graph_path, 'rb') as f:
output_graph_def.ParseFromString(f.read())
_ = tf.import_graph_def(output_graph_def, name="")
# 得到当前图有几个操作节点
print("%d ops in the final graph." % len(output_graph_def.node))
tensor_name = [tensor.name for tensor in output_graph_def.node]
print(tensor_name)
print('---------------------------')
# 在log_graph文件夹下生产日志文件,可以在tensorboard中可视化模型
# summaryWriter = tf.summary.FileWriter('log_graph/', graph)
for op in graph.get_operations():
# print出tensor的name和值
print(op.name, op.values())
查看TensorFlow的pb模型文件并使用TensorBoard可视化
[Ref]
tf.train.get_checkpoint_state函数通过checkpoint文件找到模型文件名。
tf.train.get_checkpoint_state(checkpoint_dir,latest_filename=None)该函数返回的是checkpoint文件CheckpointState proto类型的内容,其中有model_checkpoint_path和all_model_checkpoint_paths两个属性。其中model_checkpoint_path保存了最新的tensorflow模型文件的文件名,all_model_checkpoint_paths则有未被删除的所有tensorflow模型文件的文件名。
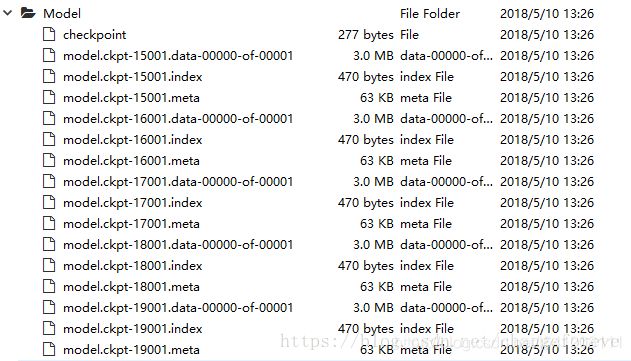
下图是在训练过程中生成的几个模型文件列表:
以下是测试程序里的部分代码:
with tf.Session() as sess:
ckpt=tf.train.get_checkpoint_state('Model/')
print(ckpt)
if ckpt and ckpt.all_model_checkpoint_paths:
#加载模型
#这一部分是有多个模型文件时,对所有模型进行测试验证
for path in ckpt.all_model_checkpoint_paths:
saver.restore(sess,path)
global_step=path.split('/')[-1].split('-')[-1]
accuracy_score=sess.run(accuracy,feed_dict=validate_feed)
print("After %s training step(s),valisation accuracy = %g"%(global_step,accuracy_score))
'''
#对最新的模型进行测试验证
saver.restore(sess,ckpt.model_checkpoint_paths)
global_step=ckpt.model_checkpoint_path.split('/')[-1].split('-')[-1]
accuracy_score=sess.run(accuracy,feed_dict=validate_feed)
print("After %s training step(s),valisation accuracy = %g"%(global_step,accuracy_score))
'''
else:
print('No checkpoint file found')
return
#time.sleep(eval_interval_secs)
return
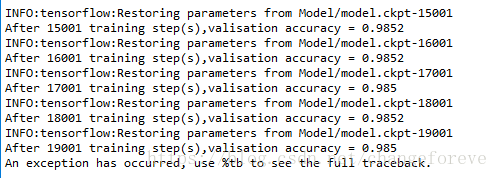
在上面代码中,通过tf.train.get_checkpoint_state函数得到的相关模型文件名如下:
[Ref]
核心代码如下:
[tensor.name for tensor in tf.get_default_graph().as_graph_def().node]
实例代码:(加载了Inceptino_v3的模型,并获取该模型所有节点的名称)
# -*- coding: utf-8 -*-
import tensorflow as tf
import os
model_dir = 'C:/Inception_v3'
model_name = 'output_graph.pb'
# 读取并创建一个图graph来存放训练好的 Inception_v3模型(函数)
def create_graph():
with tf.gfile.FastGFile(os.path.join(
model_dir, model_name), 'rb') as f:
# 使用tf.GraphDef()定义一个空的Graph
graph_def = tf.GraphDef()
graph_def.ParseFromString(f.read())
# Imports the graph from graph_def into the current default Graph.
tf.import_graph_def(graph_def, name='')
# 创建graph
create_graph()
tensor_name_list = [tensor.name for tensor in tf.get_default_graph().as_graph_def().node]
for tensor_name in tensor_name_list:
print(tensor_name,'\n')
输出结果:
mixed_8/tower/conv_1/batchnorm/moving_variance
mixed_8/tower/conv_1/batchnorm
r_1/mixed/conv_1/batchnorm
.
.
.
mixed_10/tower_1/mixed/conv_1/CheckNumerics
mixed_10/tower_1/mixed/conv_1/control_dependency
mixed_10/tower_1/mixed/conv_1
pool_3
pool_3/_reshape/shape
pool_3/_reshape
input/BottleneckInputPlaceholder
.
.
.
.
final_training_ops/weights/final_weights
final_training_ops/weights/final_weights/read
final_training_ops/biases/final_biases
final_training_ops/biases/final_biases/read
final_training_ops/Wx_plus_b/MatMul
final_training_ops/Wx_plus_b/add
final_result
由于结果太长了,就省略了一些。
如果不想这样print输出也可以将其写入txt 查看。
写入txt代码如下:
tensor_name_list = [tensor.name for tensor in tf.get_default_graph().as_graph_def().node]
txt_path = './txt/节点名称'
full_path = txt_path+ '.txt'
for tensor_name in tensor_name_list:
name = tensor_name + '\n'
file = open(full_path,'a+')
file.write(name)
file.close()
参考链接:
TensorFlow学习笔记:获取以来模型全部张量名称
Tensorflow:如何通过名称获得张量?
【Ref】
[Ref]:tensorflow中读取模型中保存的值, tf.train.NewCheckpointReader;
[Ref]https://blog.csdn.net/u014568072/article/details/85281769
