咖啡豆识别-P7
- 本文为365天深度学习训练营 中的学习记录博客
- 参考文章:Pytorch实战 | 第P7周:咖啡豆识别
- 原作者:K同学啊|接辅导、项目定制
要求:
- 自己搭建VGG-16网络框架
- 调用官方的VGG-16网络框架
- 如何查看模型的参数量以及相关指标
拔高(可选):
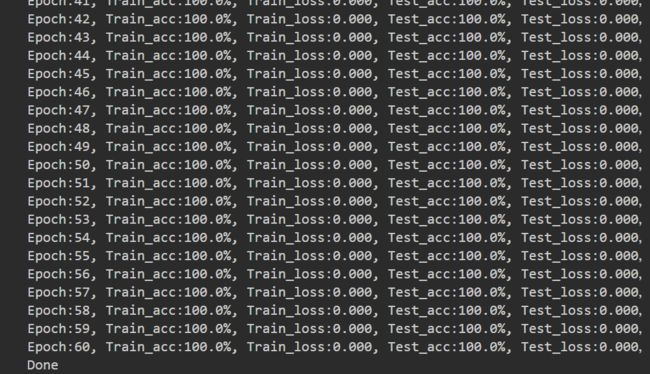
- 验证集准确率达到100%
- 使用PPT画出VGG-16算法框架图(发论文需要这项技能)
探索(难度有点大)
- 在不影响准确率的前提下轻量化模型
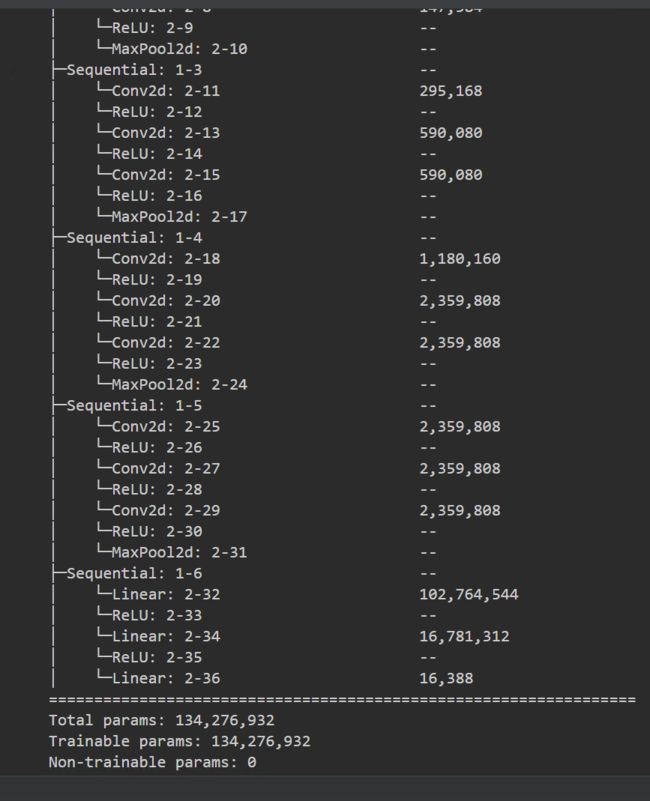
● 目前VGG16的Total params是134,276,932
我的环境:
● 语言环境:Python 3.8
● 编译器:Pycharm
● 深度学习环境:Pytorch
一、 前期准备
1. 设置GPU
如果设备上支持GPU就使用GPU,否则使用CPU
import torch
import torch.nn as nn
import torchvision.transforms as transforms
import torchvision
from torchvision import transforms, datasets
import os,PIL,pathlib,warnings

warnings.filterwarnings("ignore")             #忽略警告信息

device = torch.device("cuda" if torch.cuda.is_available() else "cpu")
2. 导入数据
本地数据集位于./data/7-data/目录下
import os,PIL,random,pathlib

data_dir = './data/7-data/'
data_dir = pathlib.Path(data_dir)

data_paths  = list(data_dir.glob('*'))
classeNames = [str(path).split("\\")[1] for path in data_paths]
train_transforms = transforms.Compose([
    transforms.Resize([224, 224]),  # 将输入图片resize成统一尺寸
    # transforms.RandomHorizontalFlip(), # 随机水平翻转
    transforms.ToTensor(),          # 将PIL Image或numpy.ndarray转换为tensor,并归一化到[0,1]之间
    transforms.Normalize(           # 标准化处理-->转换为标准正太分布(高斯分布),使模型更容易收敛
        mean=[0.485, 0.456, 0.406],
        std=[0.229, 0.224, 0.225])  # 其中 mean=[0.485,0.456,0.406]与std=[0.229,0.224,0.225] 从数据集中随机抽样计算得到的。
])

total_data = datasets.ImageFolder("./data/7-data/",transform=train_transforms)
total_data.class_to_idx
3. 划分数据集
train_size = int(0.8 * len(total_data))
test_size  = len(total_data) - train_size
train_dataset, test_dataset = torch.utils.data.random_split(total_data, [train_size, test_size])
train_dataset, test_dataset
batch_size = 32

train_dl = torch.utils.data.DataLoader(train_dataset,
                                           batch_size=batch_size,
                                           shuffle=True,
                                           num_workers=1)
test_dl = torch.utils.data.DataLoader(test_dataset,
                                          batch_size=batch_size,
                                          shuffle=True,
                                          num_workers=1)
for X, y in test_dl:
    print("Shape of X [N, C, H, W]: ", X.shape)
    print("Shape of y: ", y.shape, y.dtype)
    break
4. 显示图片信息
#%%
import matplotlib.pyplot as plt
 # 指定图片大小,图像大小为20宽、5高的绘图(单位为英寸inch)
plt.figure(figsize=(80, 20))
for i, imgs in enumerate(X[:20]):
    # 维度缩减X
    npimg = imgs.numpy().transpose((1, 2, 0))
    # 将整个figure分成2行10列,绘制第i+1个子图。
    plt.subplot(2, 10, i+1)
    plt.imshow(npimg, cmap=plt.cm.binary)
    plt.axis('off')
二、手动搭建VGG-16模型
1.模型

2.代码
import torch.nn.functional as F

class vgg16(nn.Module):
    def __init__(self):
        super(vgg16, self).__init__()
        # 卷积块1
        self.block1 = nn.Sequential(
            nn.Conv2d(3, 64, kernel_size=(3, 3), stride=(1, 1), padding=(1, 1)),
            nn.ReLU(),
            nn.Conv2d(64, 64, kernel_size=(3, 3), stride=(1, 1), padding=(1, 1)),
            nn.ReLU(),
            nn.MaxPool2d(kernel_size=(2, 2), stride=(2, 2))
        )
        # 卷积块2
        self.block2 = nn.Sequential(
            nn.Conv2d(64, 128, kernel_size=(3, 3), stride=(1, 1), padding=(1, 1)),
            nn.ReLU(),
            nn.Conv2d(128, 128, kernel_size=(3, 3), stride=(1, 1), padding=(1, 1)),
            nn.ReLU(),
            nn.MaxPool2d(kernel_size=(2, 2), stride=(2, 2))
        )
        # 卷积块3
        self.block3 = nn.Sequential(
            nn.Conv2d(128, 256, kernel_size=(3, 3), stride=(1, 1), padding=(1, 1)),
            nn.ReLU(),
            nn.Conv2d(256, 256, kernel_size=(3, 3), stride=(1, 1), padding=(1, 1)),
            nn.ReLU(),
            nn.Conv2d(256, 256, kernel_size=(3, 3), stride=(1, 1), padding=(1, 1)),
            nn.ReLU(),
            nn.MaxPool2d(kernel_size=(2, 2), stride=(2, 2))
        )
        # 卷积块4
        self.block4 = nn.Sequential(
            nn.Conv2d(256, 512, kernel_size=(3, 3), stride=(1, 1), padding=(1, 1)),
            nn.ReLU(),
            nn.Conv2d(512, 512, kernel_size=(3, 3), stride=(1, 1), padding=(1, 1)),
            nn.ReLU(),
            nn.Conv2d(512, 512, kernel_size=(3, 3), stride=(1, 1), padding=(1, 1)),
            nn.ReLU(),
            nn.MaxPool2d(kernel_size=(2, 2), stride=(2, 2))
        )
        # 卷积块5
        self.block5 = nn.Sequential(
            nn.Conv2d(512, 512, kernel_size=(3, 3), stride=(1, 1), padding=(1, 1)),
            nn.ReLU(),
            nn.Conv2d(512, 512, kernel_size=(3, 3), stride=(1, 1), padding=(1, 1)),
            nn.ReLU(),
            nn.Conv2d(512, 512, kernel_size=(3, 3), stride=(1, 1), padding=(1, 1)),
            nn.ReLU(),
            nn.MaxPool2d(kernel_size=(2, 2), stride=(2, 2))
        )

        # 全连接网络层,用于分类
        self.classifier = nn.Sequential(
            nn.Linear(in_features=512*7*7, out_features=4096),
            nn.ReLU(),
            nn.Linear(in_features=4096, out_features=4096),
            nn.ReLU(),
            nn.Linear(in_features=4096, out_features=4)
        )

    def forward(self, x):

        x = self.block1(x)
        x = self.block2(x)
        x = self.block3(x)
        x = self.block4(x)
        x = self.block5(x)
        x = torch.flatten(x, start_dim=1)
        x = self.classifier(x)

        return x

device = "cuda" if torch.cuda.is_available() else "cpu"
print("Using {} device".format(device))

model = vgg16().to(device)
3. 统计模型参数量以及其他指标
import torchsummary as summary
summary.summary(model, (3, 224, 224))
三、训练模型
1. 编写训练和测试函数
见之前文章
2.设置动态学习率
def adjust_learning_rate(optimizer, epoch, start_lr):
    # 每 10 个epoch衰减到原来的 0.98
    lr = start_lr * (0.98** (epoch // 4))
    for param_group in optimizer.param_groups:
        param_group['lr'] = lr

learn_rate = 1e-4 # 初始学习率
optimizer  = torch.optim.Adam(model.parameters(), lr=learn_rate)
3.正式训练

3.指定图片预测

4.模型评估

参考
一文搞清楚分组卷积和深度可分离卷积