【python代码实现】决策树分类算法
目录
- 前置信息
-
- 1、决策树
- 2、样本数据
- 决策树分类算法
-
- 1、构建数据集
- 2、数据集信息熵
- 3、信息增益
- 4、构造决策树
- 5、实例化构造决策树
- 6、测试样本分类
- 后置信息:绘制决策树代码
前置信息
1、决策树
决策树是一种十分常用的分类算法,属于监督学习;也就是给出一批样本,每个样本都有一组属性和一个分类结果。算法通过学习这些样本,得到一个决策树,这个决策树能够对新的数据给出合适的分类
2、样本数据
假设现有用户14名,其个人属性及是否购买某一产品的数据如下:
| 编号 | 年龄 | 收入范围 | 工作性质 | 信用评级 | 购买决策 |
|---|---|---|---|---|---|
| 01 | <30 | 高 | 不稳定 | 较差 | 否 |
| 02 | <30 | 高 | 不稳定 | 好 | 否 |
| 03 | 30-40 | 高 | 不稳定 | 较差 | 是 |
| 04 | >40 | 中等 | 不稳定 | 较差 | 是 |
| 05 | >40 | 低 | 稳定 | 较差 | 是 |
| 06 | >40 | 低 | 稳定 | 好 | 否 |
| 07 | 30-40 | 低 | 稳定 | 好 | 是 |
| 08 | <30 | 中等 | 不稳定 | 较差 | 否 |
| 09 | <30 | 低 | 稳定 | 较差 | 是 |
| 10 | >40 | 中等 | 稳定 | 较差 | 是 |
| 11 | <30 | 中等 | 稳定 | 好 | 是 |
| 12 | 30-40 | 中等 | 不稳定 | 好 | 是 |
| 13 | 30-40 | 高 | 稳定 | 较差 | 是 |
| 14 | >40 | 中等 | 不稳定 | 好 | 否 |
决策树分类算法
1、构建数据集
为了方便处理,对模拟数据按以下规则转换为数值型列表数据:
年龄:<30赋值为0;30-40赋值为1;>40赋值为2
收入:低为0;中为1;高为2
工作性质:不稳定为0;稳定为1
信用评级:差为0;好为1
#创建数据集
def createdataset():
    dataSet=[[0,2,0,0,'N'],
            [0,2,0,1,'N'],
            [1,2,0,0,'Y'],
            [2,1,0,0,'Y'],
            [2,0,1,0,'Y'],
            [2,0,1,1,'N'],
            [1,0,1,1,'Y'],
            [0,1,0,0,'N'],
            [0,0,1,0,'Y'],
            [2,1,1,0,'Y'],
            [0,1,1,1,'Y'],
            [1,1,0,1,'Y'],
            [1,2,1,0,'Y'],
            [2,1,0,1,'N'],]
    labels=['age','income','job','credit']
    return dataSet,labels
调用函数,可获得数据:
ds1,lab = createdataset()
print(ds1)
print(lab)
[[0, 2, 0, 0, ‘N’], [0, 2, 0, 1, ‘N’], [1, 2, 0, 0, ‘Y’], [2, 1, 0, 0, ‘Y’], [2, 0, 1, 0, ‘Y’], [2, 0, 1, 1, ‘N’], [1, 0, 1, 1, ‘Y’], [0, 1, 0, 0, ‘N’], [0, 0, 1, 0, ‘Y’], [2, 1, 1, 0, ‘Y’], [0, 1, 1, 1, ‘Y’], [1, 1, 0, 1, ‘Y’], [1, 2, 1, 0, ‘Y’], [2, 1, 0, 1, ‘N’]]
[‘age’, ‘income’, ‘job’, ‘credit’]
2、数据集信息熵
信息熵也称为香农熵,是随机变量的期望。度量信息的不确定程度。信息的熵越大,信息就越不容易搞清楚。处理信息就是为了把信息搞清楚,就是熵减少的过程。
def calcShannonEnt(dataSet):
    numEntries = len(dataSet)
    labelCounts = {}
    for featVec in dataSet:
        currentLabel = featVec[-1]
        if currentLabel not in labelCounts.keys():
            labelCounts[currentLabel] = 0

        labelCounts[currentLabel] += 1

    shannonEnt = 0.0
    for key in labelCounts:
        prob = float(labelCounts[key])/numEntries
        shannonEnt -= prob*log(prob,2)

    return shannonEnt
样本数据信息熵:
shan = calcShannonEnt(ds1)
print(shan)
0.9402859586706309
3、信息增益
信息增益:用于度量属性A降低样本集合X熵的贡献大小。信息增益越大,越适于对X分类。
def chooseBestFeatureToSplit(dataSet):
    numFeatures = len(dataSet[0])-1
    baseEntropy = calcShannonEnt(dataSet)
    bestInfoGain = 0.0;bestFeature = -1
    for i in range(numFeatures):
        featList = [example[i] for example in dataSet]
        uniqueVals = set(featList)
        newEntroy = 0.0
        for value in uniqueVals:
            subDataSet = splitDataSet(dataSet, i, value)
            prop = len(subDataSet)/float(len(dataSet))
            newEntroy += prop * calcShannonEnt(subDataSet)
        infoGain = baseEntropy - newEntroy
        if(infoGain > bestInfoGain):
            bestInfoGain = infoGain
            bestFeature = i
    return bestFeature
以上代码实现了基于信息熵增益的ID3决策树学习算法。其核心逻辑原理是:依次选取属性集中的每一个属性,将样本集按照此属性的取值分割为若干个子集;对这些子集计算信息熵,其与样本的信息熵的差,即为按照此属性分割的信息熵增益;找出所有增益中最大的那一个对应的属性,就是用于分割样本集的属性。
计算样本最佳的分割样本属性,结果显示为第0列,即age属性:
col = chooseBestFeatureToSplit(ds1)
col
0
4、构造决策树
def majorityCnt(classList):
    classCount = {}
    for vote in classList:
        if vote not in classCount.keys():classCount[vote] = 0
        classCount[vote] += 1
    sortedClassCount = sorted(classList.iteritems(),key=operator.itemgetter(1),reverse=True)#利用operator操作键值排序字典
    return sortedClassCount[0][0]

#创建树的函数
def createTree(dataSet,labels):
    classList = [example[-1] for example in dataSet]
    if classList.count(classList[0]) == len(classList):
        return classList[0]
    if len(dataSet[0]) == 1:
        return majorityCnt(classList)
    bestFeat = chooseBestFeatureToSplit(dataSet)
    bestFeatLabel = labels[bestFeat]
    myTree = {bestFeatLabel:{}}
    del(labels[bestFeat])
    featValues = [example[bestFeat] for example in dataSet]
    uniqueVals = set(featValues)
    for value in uniqueVals:
        subLabels = labels[:]
        myTree[bestFeatLabel][value] = createTree(splitDataSet(dataSet, bestFeat, value), subLabels)

    return myTree
majorityCnt函数用于处理一下情况:最终的理想决策树应该沿着决策分支到达最底端时,所有的样本应该都是相同的分类结果。但是真实样本中难免会出现所有属性一致但分类结果不一样的情况,此时majorityCnt将这类样本的分类标签都调整为出现次数最多的那一个分类结果。
createTree是核心任务函数,它对所有的属性依次调用ID3信息熵增益算法进行计算处理,最终生成决策树。
5、实例化构造决策树
利用样本数据构造决策树:
Tree = createTree(ds1, lab)
print("样本数据决策树:")
print(Tree)
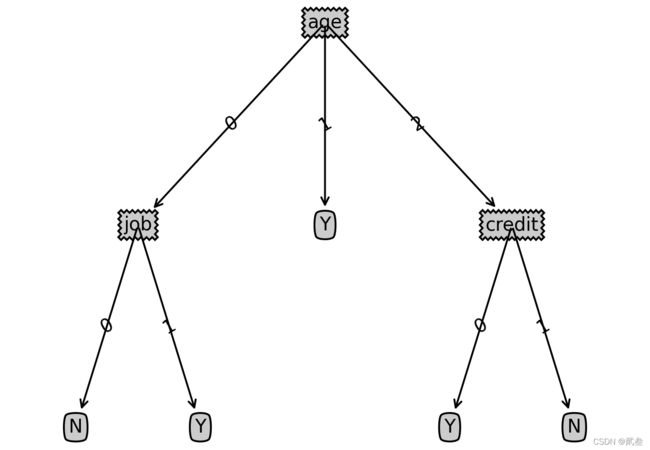
样本数据决策树:
{‘age’: {0: {‘job’: {0: ‘N’, 1: ‘Y’}},
1: ‘Y’,
2: {‘credit’: {0: ‘Y’, 1: ‘N’}}}}
6、测试样本分类
给出一个新的用户信息,判断ta是否购买某一产品:
| 年龄 | 收入范围 | 工作性质 | 信用评级 |
|---|---|---|---|
| <30 | 低 | 稳定 | 好 |
| <30 | 高 | 不稳定 | 好 |
def classify(inputtree,featlabels,testvec):
    firststr = list(inputtree.keys())[0]
    seconddict = inputtree[firststr]
    featindex = featlabels.index(firststr)
    for key in seconddict.keys():
        if testvec[featindex]==key:
            if type(seconddict[key]).__name__=='dict':
                classlabel=classify(seconddict[key],featlabels,testvec)
            else:
                classlabel=seconddict[key]
    return classlabel
labels=['age','income','job','credit']
tsvec=[0,0,1,1]
print('result:',classify(Tree,labels,tsvec))
tsvec1=[0,2,0,1]
print('result1:',classify(Tree,labels,tsvec1))
result: Y
result1: N
后置信息:绘制决策树代码
以下代码用于绘制决策树图形,非决策树算法重点,有兴趣可参考学习
import matplotlib.pyplot as plt

decisionNode = dict(boxstyle="sawtooth", fc="0.8")
leafNode = dict(boxstyle="round4", fc="0.8")
arrow_args = dict(arrowstyle="<-")

#获取叶节点的数目
def getNumLeafs(myTree):
    numLeafs = 0
    firstStr = list(myTree.keys())[0]
    secondDict = myTree[firstStr]
    for key in secondDict.keys():
        if type(secondDict[key]).__name__=='dict':#测试节点的数据是否为字典,以此判断是否为叶节点
            numLeafs += getNumLeafs(secondDict[key])
        else:   numLeafs +=1
    return numLeafs

#获取树的层数
def getTreeDepth(myTree):
    maxDepth = 0
    firstStr = list(myTree.keys())[0]
    secondDict = myTree[firstStr]
    for key in secondDict.keys():
        if type(secondDict[key]).__name__=='dict':#测试节点的数据是否为字典,以此判断是否为叶节点
            thisDepth = 1 + getTreeDepth(secondDict[key])
        else:   thisDepth = 1
        if thisDepth > maxDepth: maxDepth = thisDepth
    return maxDepth

#绘制节点
def plotNode(nodeTxt, centerPt, parentPt, nodeType):
    createPlot.ax1.annotate(nodeTxt, xy=parentPt,  xycoords='axes fraction',
             xytext=centerPt, textcoords='axes fraction',
             va="center", ha="center", bbox=nodeType, arrowprops=arrow_args )

#绘制连接线
def plotMidText(cntrPt, parentPt, txtString):
    xMid = (parentPt[0]-cntrPt[0])/2.0 + cntrPt[0]
    yMid = (parentPt[1]-cntrPt[1])/2.0 + cntrPt[1]
    createPlot.ax1.text(xMid, yMid, txtString, va="center", ha="center", rotation=30)

#绘制树结构
def plotTree(myTree, parentPt, nodeTxt):#if the first key tells you what feat was split on
    numLeafs = getNumLeafs(myTree)  #this determines the x width of this tree
    depth = getTreeDepth(myTree)
    firstStr = list(myTree.keys())[0]     #the text label for this node should be this
    cntrPt = (plotTree.xOff + (1.0 + float(numLeafs))/2.0/plotTree.totalW, plotTree.yOff)
    plotMidText(cntrPt, parentPt, nodeTxt)
    plotNode(firstStr, cntrPt, parentPt, decisionNode)
    secondDict = myTree[firstStr]
    plotTree.yOff = plotTree.yOff - 1.0/plotTree.totalD
    for key in secondDict.keys():
        if type(secondDict[key]).__name__=='dict':#test to see if the nodes are dictonaires, if not they are leaf nodes
            plotTree(secondDict[key],cntrPt,str(key))        #recursion
        else:   #it's a leaf node print the leaf node
            plotTree.xOff = plotTree.xOff + 1.0/plotTree.totalW
            plotNode(secondDict[key], (plotTree.xOff, plotTree.yOff), cntrPt, leafNode)
            plotMidText((plotTree.xOff, plotTree.yOff), cntrPt, str(key))
    plotTree.yOff = plotTree.yOff + 1.0/plotTree.totalD

#创建决策树图形
def createPlot(inTree):
    fig = plt.figure(1, facecolor='white')
    fig.clf()
    axprops = dict(xticks=[], yticks=[])
    createPlot.ax1 = plt.subplot(111, frameon=False, **axprops)    #no ticks
    #createPlot.ax1 = plt.subplot(111, frameon=False) #ticks for demo puropses
    plotTree.totalW = float(getNumLeafs(inTree))
    plotTree.totalD = float(getTreeDepth(inTree))
    plotTree.xOff = -0.5/plotTree.totalW; plotTree.yOff = 1.0;
    plotTree(inTree, (0.5,1.0), '')
    plt.savefig('决策树.png',dpi=300,bbox_inches='tight')
    plt.show()
