model.py篇
model.py篇
目录如下:
- 引言
- 找LeNet5网络结构
- 书写代码
- 测试结果
- 函数解释
引言
卷积主要用于特征的提取,而model.py则是为了从输入信息中筛选出我们需要的信息。
我们在阅读完论文后,对我们需要的模型进行搭建,下以LeNet5的model为例:
找LeNet5网络结构

我们使用微信截图或者command+shift+4截图,使图片悬浮于最上层,观察图片书写自己的网络。
书写代码
在该步骤中,我们需要创建网络名class,继承自nn.Module,在该类中需要重写__init__(self)方法和forward(self)方法。__init__()方法用以搭建网络模型,forward()方法用以接收batch个input,正向传播后输出batch个output。
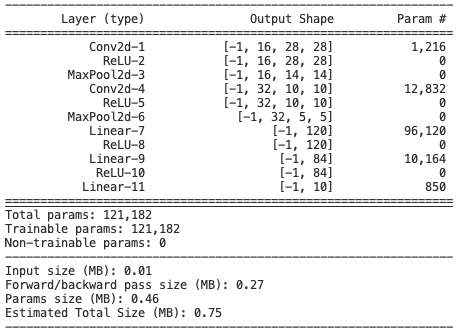
我们使用torchsummary.summary包对模型进行可视化,对输出结果进行输出。
'''
输入[batch, 3, 28, 28]
输出[batch. 10]
'''
# --- add path
import sys, os
from turtle import forward
project_dir = os.path.dirname(__file__)
sys.path.append(project_dir)
# ---
# --- import package
import torch
import torch.nn as nn
# ---


class LeNet(nn.Module):
    """model

    Args:
        torch (_type_): _description_
    """

    def __init__(self):
        """build model"""
        super(LeNet, self).__init__()
        self.conv1 = nn.Conv2d(in_channels=3, out_channels=16, kernel_size=(5, 5))  # (in_channels, out_channels, kernel_size)
        self.pool1 = nn.MaxPool2d(kernel_size=(2, 2), stride=2)     # (kernel_size, stride)
        self.conv2 = nn.Conv2d(16, 32, 5)
        self.pool2 = nn.MaxPool2d(2, 2)
        self.fc1 = nn.Linear(32*5*5, 120)       # full connect to 1 dimension
        self.fc2 = nn.Linear(120, 84)
        self.fc3 = nn.Linear(84, 10)
        self.relu = nn.ReLU(inplace=True)

    def forward(self, x):                       # x is [batch, channel, height, width]
        """forward propagation

        Args:
            x (Tensor): [batches, channels, height, width]
        """
        x = self.relu((self.conv1(x)))          # input[batch, 3, 32, 32]   output[batch, 16, 28, 28]   tensor in pytorch is [batch, channel, height, width]
        x = self.pool1(x)                       # height and width become 1/2   output(16, 14, 14)
        x = self.relu((self.conv2(x)))          # output[batch, 32, 10, 10]
        x = self.pool2(x)                       # output[batch, 32, 5, 5]
        x = x.view(-1, 32*5*5)                  # output(32*5*5)    # -1 means Automated reasoning
        x = self.relu(self.fc1(x))              # output(120)
        x = self.relu(self.fc2(x))              # output(84)
        x = self.fc3(x)                         # output(10)
        return x


if __name__ == "__main__":
    """Visual model"""
    from torchsummary import summary
    model = LeNet()
    summary(model, input_size=(3, 32, 32))
测试结果
我们使用torchsummary.summary包对模型进行可视化,对输出结果进行输出。
函数解释
在数学网络结构时,遇到不熟悉的函数就去pytorch官网手册查找是一个不错的学习方法。下列几个常见函数。可以参考大纲当做词典进行查找。
def init(self):
一定要重写父类的__init__方法:
super(LeNet, self).__init__()
torch.nn.Conv2d()
该函数即创建卷积层,他的函数声明如下:
torch.nn.Conv2d(in_channels, out_channels, kernel_size,
				stride=1, padding=0, dilation=1, groups=1, bias=True,
				padding_mode='zeros', device=None, dtype=None)
- in_channels即输入特征矩阵维度,由上一层输出矩阵决定,等于该层卷积核的channels(维数)
- out_channels即输出特征矩阵维度,由该层卷积核的numbers(个数)决定。
- kernel_size(卷积核大小),stride(步长),padding(填补)三因素再加in_size(输入特征矩阵大小)共同决定out_size(输出特征矩阵大小),公式为
out_size = ( in_size - kernel_size + 2 * padding ) / stride +1
torch.nn.MaxPool2d()
该函数即创建最大池化层,下采样层的一种,它的函数声明如下:
torch.nn.MaxPool2d(kernel_size,
					stride=None, padding=0, dilation=1,
					return_indices=False, ceil_mode=False)
- 该层不改变channels,只影响输出矩阵的大小out_size(stride一般默认等于kernel_size),计算公式为
out_size = ( in_size - kernel_size + 2 * padding ) / stride + 1
torch.nn.Linear()
该函数即创建全连接层,全连接层是一维的。在书写该函数时我们先要通过公式计算最终离全连接层最近的那一层的输出矩阵的out_size为多少,即输入全连接层的自变量个数为多少。Linear()函数的声明如下:
torch.nn.Linear(in_features, out_features,
				bias=True, device=None, dtype=None)
- in_features 表示输入全连接层的参数个数
- out_features 表示输出全连接层的参数个数
def forward(self, x):
重写forward方法,即正向传播过程,其中x即输入,x的通道排列顺序为PyTorch接受的Tensor的通道排列顺序:[batch, channel, height, width]。
self.conv1(x)
self.conv1是前面在__init__()函数中定义的对象,为何对象名后能直接加小括号添加变量呢?这里其实调用了__call__函数。
call():Python中,只要在创建类型的时候定义了__call__()方法,这个类型就是可调用的。Python中的所有东西都是对象,其中包括int/str/func/class这四类,它们都是对象,都是从一个类创建而来的。元类就是创建这些对象的东西,type就是Python的内建元类。其中,self.conv1是可调用的对象,说明在创建它的类型(父类或它本身)的时候,定义了__call__()方法。
# 下面两种调用方法是等价的
x = torch.nn.functional.relu(self.conv1.__call__(x))
x = torch.nn.functional.relu(self.conv1(x))
self.pool1(x)同理也调用了__call__()
torch.nn.functional.relu()
函数定义如下,传入tensor进行relu处理后,传出tensor。需要注意的是relu()是不需要训练参数的。
torch.nn.functional.relu(input, inplace=False) → Tensor
torch.Tensor.view()
view函数即展平操作,在进入全连接层前需要进行展平处理view(x, y),其中y为你要接受的input参数,如3255,根据Tensor通道排序,x为batch值,我们往往将x=-1进行自动推理。
torch.nn.Sequential()
该函数的主要作用就是在搭建网络过程中,继承nn.Module的网络模型类,不用在其__init__()函数中为每一个卷积层添加变量名,可以将这些层封装进一个对象中,体现面向对象封装的思想。
函数原型如下:
torch.nn.Sequential(*args)
example如下:
# Using Sequential to create a small model. When `model` is run,
# input will first be passed to `Conv2d(1,20,5)`. The output of
# `Conv2d(1,20,5)` will be used as the input to the first
# `ReLU`; the output of the first `ReLU` will become the input
# for `Conv2d(20,64,5)`. Finally, the output of
# `Conv2d(20,64,5)` will be used as input to the second `ReLU`
model = nn.Sequential(
          nn.Conv2d(1,20,5),
          nn.ReLU(),
          nn.Conv2d(20,64,5),
          nn.ReLU()
        )

# Using Sequential with OrderedDict. This is functionally the
# same as the above code
model = nn.Sequential(OrderedDict([
          ('conv1', nn.Conv2d(1,20,5)),
          ('relu1', nn.ReLU()),
          ('conv2', nn.Conv2d(20,64,5)),
          ('relu2', nn.ReLU())
        ]))
torch.nn.ReLU()
ReLU和relu的区别要弄清楚,在使用sequential的时候更推荐使用ReLU()函数,该函数不需要传入tensor参数,直接对上文的tensor进行ReLU。
函数声明如下:
# ReLU
torch.nn.ReLU(inplace=False)
# relu
torch.nn.functional.relu(input, inplace=False) → Tensor
判断torch.Tensor中的每个元素是否相等
使用torch.Tensor.sum()用来计量一维Tensor中每个元素是否相等。使用torch.Tensor.item()将Tensor中的单个元素转成数值。要将他全部转成一维的才可用sum()。
# 判断是否相等
sum = 0
for i in range(2):
    sum += (c[i,] == b[i,]).sum().item()
print(sum)
torch.flatten()
flatten()函数的使用同torch.Tensor.view()函数使用,flatter指定将特征矩阵从第几个维度开始压缩,view指定矩阵任意维度,推荐使用view。如下:
# test flattern
import torch
a = torch.randn(2, 3, 4, 5)
b = a.view(2, 60)
c = torch.flatten(a, start_dim=1)
print(c.size())	# b, c的shape相等
print(b.size())
python 寻找上一级目录
寻找上一级目录使用os.path.dirname(),如下:
# 找上一级目录文件 -- 使用dirname
import os
my_path = __file__
find_path = os.path.dirname()
torch.nn.kaiming_normal_()
一种数学方法,用于初始化权重值。