深度学习YOLOv4模型简单部署,flask框架搭建以及web开发
一.深度学习模型的部署
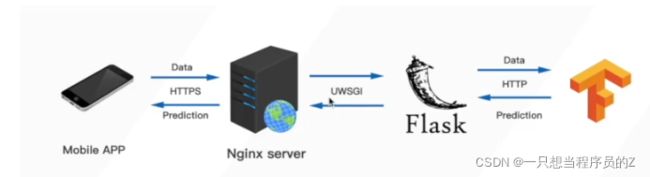
相信很多人在训练深度学习模型之后不知道如何将训练好的模型部署到服务端,这里我们提出一个想法,用Flask来搭建一个框架,Flask就不在这里进行详细讲解了,本文的模型皆以Tensorflow2.X为基础。我们这里就着重于Flask的搭建。服务器和域名我们就不多讲解。
二.本地预测代码部分
首先我们需要有一个训练好的模型的权重.h5文件,首先我们需要实现的就是在本地能够检测图片的功能。
class YOLO(object):
    _defaults = {
        "model_path"        : '.h5',
        "classes_path"      : 'model_data/tomato.txt',
        "anchors_path"      : 'model_data/yolo_anchors.txt',
        "anchors_mask"      : [[6, 7, 8], [3, 4, 5], [0, 1, 2]],
        "input_shape"       : [416, 416],
        "confidence"        : 0.2,
        "nms_iou"           : 0.3,
        "max_boxes"         : 100,
        "letterbox_image"   : True,
    }

    @classmethod
    def get_defaults(cls, n):
        if n in cls._defaults:
            return cls._defaults[n]
        else:
            return "Unrecognized attribute name '" + n + "'"

    def __init__(self, **kwargs):
        self.__dict__.update(self._defaults)
        for name, value in kwargs.items():
            setattr(self, name, value)

        self.class_names, self.num_classes = get_classes(self.classes_path)
        self.anchors, self.num_anchors     = get_anchors(self.anchors_path)
        hsv_tuples  = [(x / self.num_classes, 1., 1.) for x in range(self.num_classes)]
        self.colors = list(map(lambda x: colorsys.hsv_to_rgb(*x), hsv_tuples))
        self.colors = list(map(lambda x: (int(x[0] * 255), int(x[1] * 255), int(x[2] * 255)), self.colors))

        self.generate()

    def generate(self):
        model_path = os.path.expanduser(self.model_path)
        assert model_path.endswith('.h5'), 'Keras model or weights must be a .h5 file.'

        self.yolo_model = yolo_body([None, None, 3], self.anchors_mask, self.num_classes)
        self.yolo_model.load_weights(self.model_path)

        print('{} model, anchors, and classes loaded.'.format(model_path))
        self.input_image_shape = Input([2,],batch_size=1)
        inputs  = [*self.yolo_model.output, self.input_image_shape]
        outputs = Lambda(
            DecodeBox,
            output_shape = (1,),
            name = 'yolo_eval',
            arguments = {
                'anchors'           : self.anchors,
                'num_classes'       : self.num_classes,
                'input_shape'       : self.input_shape,
                'anchor_mask'       : self.anchors_mask,
                'confidence'        : self.confidence,
                'nms_iou'           : self.nms_iou,
                'max_boxes'         : self.max_boxes,
                'letterbox_image'   : self.letterbox_image
             }
        )(inputs)
        self.yolo_model = Model([self.yolo_model.input, self.input_image_shape], outputs)

    @tf.function
    def get_pred(self, image_data, input_image_shape):
        out_boxes, out_scores, out_classes = self.yolo_model([image_data, input_image_shape], training=False)
        return out_boxes, out_scores, out_classes


    def detect_image(self, image):
        image       = cvtColor(image)
        image_data  = resize_image(image, (self.input_shape[1], self.input_shape[0]), self.letterbox_image)
        image_data  = np.expand_dims(preprocess_input(np.array(image_data, dtype='float32')), 0)
        input_image_shape = np.expand_dims(np.array([image.size[1], image.size[0]], dtype='float32'), 0)
        out_boxes, out_scores, out_classes = self.get_pred(image_data, input_image_shape)

        print('Found {} boxes for {}'.format(len(out_boxes), 'img'))
        font        = ImageFont.truetype(font='model_data/simhei.ttf', size=np.floor(3e-2 * image.size[1] + 0.5).astype('int32'))
        thickness   = int(max((image.size[0] + image.size[1]) // np.mean(self.input_shape), 1))
        for i, c in list(enumerate(out_classes)):
            predicted_class = self.class_names[int(c)]
            box             = out_boxes[i]
            score           = out_scores[i]

            top, left, bottom, right = box

            top     = max(0, np.floor(top).astype('int32'))
            left    = max(0, np.floor(left).astype('int32'))
            bottom  = min(image.size[1], np.floor(bottom).astype('int32'))
            right   = min(image.size[0], np.floor(right).astype('int32'))

            label = '{} {:.2f}'.format(predicted_class, score)
            draw = ImageDraw.Draw(image)
            label_size = draw.textsize(label, font)
            label = label.encode('utf-8')
            print(label, top, left, bottom, right)

            if top - label_size[1] >= 0:
                text_origin = np.array([left, top - label_size[1]])
            else:
                text_origin = np.array([left, top + 1])

            for i in range(thickness):
                draw.rectangle([left + i, top + i, right - i, bottom - i], outline=self.colors[c])
            draw.rectangle([tuple(text_origin), tuple(text_origin + label_size)], fill=self.colors[c])
            draw.text(text_origin, str(label,'UTF-8'), fill=(0, 0, 0), font=font)
            del draw

        return image
def detect_image(self, image):
就是我们检测图片的一个函数,传入需要检测的image,return的便是已经框选好的图片了。
那么在本地想要进行预测,只需要以下代码
if __name__ == "__main__":
    yolo = YOLO()
    image = yolo.detect_image(image)
    image.show()
三.搭建Flask框架代码部分
实例化Flask服务对象,赋值给变量server,设置开启web服务后,如果更新html文件,可以使得更新立即生效。
server = Flask(
    __name__,
    static_folder='../resources/received_images',
)
server.jinja_env.auto_reload = True
server.config['TEMPLATES_AUTO_RELOAD'] = True
然后我们需要写一个html后缀文件,使得我们的有一个前端页面进行交互
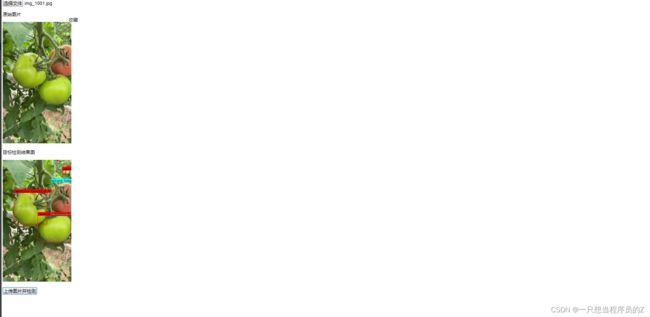
前端页面
原始图片
![]()
目标检测结果图
![]()
随后在部署代码里写入调用html的回调函数
@server.route('/')
def index():
    htmlFileName = '_10_yolov3_2.html'
    return render_template(htmlFileName)
部署代码中的检测图像的回调函数
@server.route('/get_drawedImage', methods=['POST'])
def anyname_you_like():
    startTime = time.time()
    received_file = request.files['input_image']
    imageFileName = received_file.filename
    if received_file:
        # 保存接收的图片到指定文件夹
        received_dirPath = '../resources/received_images'
        if not os.path.isdir(received_dirPath):
            os.makedirs(received_dirPath)
        imageFilePath = os.path.join(received_dirPath, imageFileName)
        received_file.save(imageFilePath)
        print('接收图片文件保存到此路径:%s' % imageFilePath)
        usedTime = time.time() - startTime
        print('接收图片并保存,总共耗时%.2f秒' % usedTime)
        # 对指定图片路径的图片做目标检测,并打印耗时
        image = Image.open(imageFilePath)
        yolo = YOLO()
        drawed_image = yolo.detect_image(image)
        # 把目标检测结果图保存在服务端指定路径,返回指定路径对应的图片经过base64编码后的字符串
        drawed_imageFileName = 'drawed_' + os.path.splitext(imageFileName)[0] + '.jpg'
        drawed_imageFilePath = os.path.join(received_dirPath, drawed_imageFileName)
        drawed_image.save(drawed_imageFilePath)
        image_source_url = url_for('static', filename=drawed_imageFileName)
        return jsonify(src=image_source_url)
部署代码的主函数
if __name__ == '__main__':
    server.run('127.0.0.1', port=5000)
运行之后,打开网站,我们可以得到以下结果。