Pytorch总结
Pytorch总结
文章目录
- Pytorch总结
- Pytorch的安装
-
- 目标
- 1. Pytorch的介绍
- 2. Pytorch的版本
- 3. Pytorch的安装
- Pytorch的入门使用
-
- 目标
- 1. 张量Tensor
- 2. Pytorch中创建张量
- 3. Pytorch中tensor的常用方法
- 4. tensor的数据类型
- 5. tensor的其他操作
- 梯度下降和反向传播
-
- 目标
- 1. 梯度是什么?
- 2. 偏导的计算
-
- 2.1 常见的导数计算
- 2.2 多元函数求偏导
- 3. 反向传播算法
-
- 3.1 计算图和反向传播
- 3.2 神经网络中的反向传播
-
- 3.2.1 神经网络的示意图
- 3.2.2 神经网络的计算图
- Pytorch完成线性回归
-
- 目标
- 1. 向前计算
-
- 1.1 计算过程
- 1.2 requires_grad和grad_fn
- 2. 梯度计算
- 3. 线性回归实现
- Pytorch完成基础的模型
-
- 目标
- 1. Pytorch完成模型常用API
-
- 1.1 `nn.Module`
- 1.2 优化器类
- 1.3 损失函数
- 1.4 线性回归完整代码
- 2. 在GPU上运行代码
- 3. 常见的优化算法介绍
-
- 3.1 梯度下降算法(batch gradient descent BGD)
- 3.2 随机梯度下降法 (Stochastic gradient descent SGD)
- 3.3 小批量梯度下降 (Mini-batch gradient descent MBGD)
- 3.4 动量法
- 3.5 AdaGrad
- 3.6 RMSProp
- 3.7 Adam
- 3.8 效果演示:
- Pytorch中的数据加载
-
- 目标
- 1. 模型中使用数据加载器的目的
- 2. 数据集类
-
- 2.1 Dataset基类介绍
- 2.2 数据加载案例
- 3. 迭代数据集
- 4 pytorch自带的数据集
-
- 4.1 torchversion.datasets
- 4.2 MNIST数据集的介绍
- 使用Pytorch实现手写数字识别
-
- 目标
- 1. 思路和流程分析
- 2. 准备训练集和测试集
-
- 2.1 `torchvision.transforms`的图形数据处理方法
-
- 2.1.1 `torchvision.transforms.ToTensor`
- 2.1.2 `torchvision.transforms.Normalize(mean, std)`
- 2.1.3 `torchvision.transforms.Compose(transforms)`
- 2.2 准备MNIST数据集的Dataset和DataLoader
- 3. 构建模型
-
- 3.1 激活函数的使用
- 3.2 模型中数据的形状(【添加形状变化图形】)
- 3.3 模型的损失函数
- 4. 模型的训练
- 5. 模型的保存和加载
-
- 5.1 模型的保存
- 5.2 模型的加载
- 6. 模型的评估
- 7. 完整的代码如下:
Pytorch的安装
目标
- 知道如何安装pytorch
1. Pytorch的介绍
Pytorch是一款facebook发布的深度学习框架,由其易用性,友好性,深受广大用户青睐。
2. Pytorch的版本
3. Pytorch的安装
安装地址介绍:https://pytorch.org/get-started/locally/
带GPU安装步骤:
conda install pytorch torchvision cudatoolkit=9.0 -c pytorch
不带GPU安装步骤
conda install pytorch-cpu torchvision-cpu -c pytorch
pip install torch1.7.1+cpu torchvision0.8.2+cpu torchaudio==0.7.2 -f https://download.pytorch.org/whl/torch_stable.html
安装之后打开ipython
输入:
In [1]: import torch
In [2]: torch.__version__
Out[2]: '1.7.1+cpu'
注意:安装模块的时候安装的是pytorch ,但是在代码中都是使用torch
Pytorch的入门使用
目标
- 知道张量和Pytorch中的张量
- 知道pytorch中如何创建张量
- 知道pytorch中tensor的常见方法
- 知道pytorch中tensor的数据类型
- 知道pytorch中如何实现tensor在cpu和cuda中转化
1. 张量Tensor
张量是一个统称,其中包含很多类型:
- 0阶张量:标量、常数,0-D Tensor
- 1阶张量:向量,1-D Tensor
- 2阶张量:矩阵,2-D Tensor
- 3阶张量
- …
- N阶张量
2. Pytorch中创建张量
-
使用python中的列表或者序列创建tensor
torch.tensor([[1., -1.], [1., -1.]]) tensor([[ 1.0000, -1.0000], [ 1.0000, -1.0000]]) -
使用numpy中的数组创建tensor
torch.tensor(np.array([[1, 2, 3], [4, 5, 6]])) tensor([[ 1, 2, 3], [ 4, 5, 6]]) -
使用torch的api创建tensor
-
torch.empty(3,4)创建3行4列的空的tensor,会用无用数据进行填充 -
torch.ones([3,4])创建3行4列的全为1的tensor -
torch.zeros([3,4])创建3行4列的全为0的tensor -
torch.rand([3,4])创建3行4列的随机值的tensor,随机值的区间是[0, 1)>>> torch.rand(2, 3) tensor([[ 0.8237, 0.5781, 0.6879], [ 0.3816, 0.7249, 0.0998]]) -
torch.randint(low=0,high=10,size=[3,4])创建3行4列的随机整数的tensor,随机值的区间是[low, high)>>> torch.randint(3, 10, (2, 2)) tensor([[4, 5], [6, 7]]) -
torch.randn([3,4])创建3行4列的随机数的tensor,随机值的分布式均值为0,方差为1
-
3. Pytorch中tensor的常用方法
-
获取tensor中的数据(当tensor中只有一个元素可用):
tensor.item()In [10]: a = torch.tensor(np.arange(1)) In [11]: a Out[11]: tensor([0]) In [12]: a.item() Out[12]: 0 -
转化为numpy数组
In [55]: z.numpy() Out[55]: array([[-2.5871205], [ 7.3690367], [-2.4918075]], dtype=float32) -
获取形状:
tensor.size()In [72]: x Out[72]: tensor([[ 1, 2], [ 3, 4], [ 5, 10]], dtype=torch.int32) In [73]: x.size() Out[73]: torch.Size([3, 2]) -
形状改变:
tensor.view((3,4))。类似numpy中的reshape,是一种浅拷贝,仅仅是形状发生改变In [76]: x.view(2,3) Out[76]: tensor([[ 1, 2, 3], [ 4, 5, 10]], dtype=torch.int32) -
获取阶数:
tensor.dim()In [77]: x.dim() Out[77]: 2 -
获取最大值:
tensor.max()In [78]: x.max() Out[78]: tensor(10, dtype=torch.int32) -
转置、轴交换:
tensor.t()tensor.transpose()tensor.permute()In [79]: x.t() Out[79]: tensor([[ 1, 3, 5], [ 2, 4, 10]], dtype=torch.int32) t3 = torch.Tensor(np.arange(24).reshape(2, 3, 4)) t3 # tensor([[[ 0., 1., 2., 3.], # [ 4., 5., 6., 7.], # [ 8., 9., 10., 11.]], # # [[12., 13., 14., 15.], # [16., 17., 18., 19.], # [20., 21., 22., 23.]]]) t3.size() # torch.Size([2, 3, 4]) t3.transpose(0, 1) # tensor([[[ 0., 1., 2., 3.], # [12., 13., 14., 15.]], # # [[ 4., 5., 6., 7.], # [16., 17., 18., 19.]], # # [[ 8., 9., 10., 11.], # [20., 21., 22., 23.]]]) t3.permute(0, 1, 2) # tensor([[[ 0., 1., 2., 3.], # [ 4., 5., 6., 7.], # [ 8., 9., 10., 11.]], # # [[12., 13., 14., 15.], # [16., 17., 18., 19.], # [20., 21., 22., 23.]]]) t3.permute(1, 0, 2) # tensor([[[ 0., 1., 2., 3.], # [12., 13., 14., 15.]], # # [[ 4., 5., 6., 7.], # [16., 17., 18., 19.]], # # [[ 8., 9., 10., 11.], # [20., 21., 22., 23.]]]) t3.permute(1, 2, 0) # tensor([[[ 0., 12.], # [ 1., 13.], # [ 2., 14.], # [ 3., 15.]], # # [[ 4., 16.], # [ 5., 17.], # [ 6., 18.], # [ 7., 19.]], # # [[ 8., 20.], # [ 9., 21.], # [10., 22.], # [11., 23.]]]) -
tensor[1,3]获取tensor中第一行第三列的值 -
tensor[1,3]=100对tensor中第一行第三列的位置进行赋值100 -
tensor的切片
In [101]: x
Out[101]:
tensor([[1.6437, 1.9439, 1.5393],
        [1.3491, 1.9575, 1.0552],
        [1.5106, 1.0123, 1.0961],
        [1.4382, 1.5939, 1.5012],
        [1.5267, 1.4858, 1.4007]])

In [102]: x[:,1]
Out[102]: tensor([1.9439, 1.9575, 1.0123, 1.5939, 1.4858])
4. tensor的数据类型
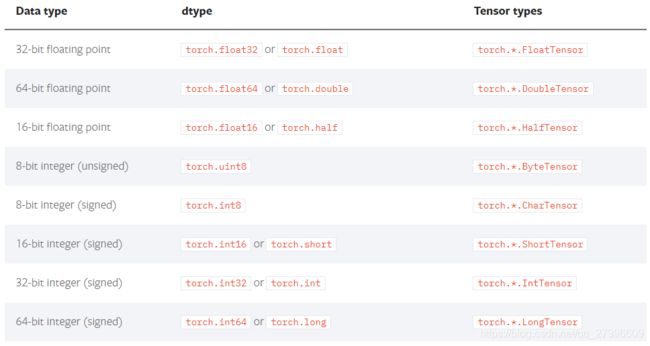
tensor中的数据类型非常多,常见类型如下:
上图中的Tensor types表示这种type的tensor是其实例
-
获取tensor的数据类型:
tensor.dtypeIn [80]: x.dtype Out[80]: torch.int32 -
创建数据的时候指定类型
In [88]: torch.ones([2,3],dtype=torch.float32) Out[88]: tensor([[9.1167e+18, 0.0000e+00, 7.8796e+15], [8.3097e-43, 0.0000e+00, -0.0000e+00]]) -
类型的修改
In [17]: a
Out[17]: tensor([1, 2], dtype=torch.int32)

In [18]: a.type(torch.float)
Out[18]: tensor([1., 2.])

In [19]: a.double()
Out[19]: tensor([1., 2.], dtype=torch.float64)
5. tensor的其他操作
-
tensor和tensor相加
In [94]: x = x.new_ones(5, 3, dtype=torch.float)

In [95]: y = torch.rand(5, 3)

In [96]: x+y
Out[96]:
tensor([[1.6437, 1.9439, 1.5393],
        [1.3491, 1.9575, 1.0552],
        [1.5106, 1.0123, 1.0961],
        [1.4382, 1.5939, 1.5012],
        [1.5267, 1.4858, 1.4007]])
In [98]: torch.add(x,y)
Out[98]:
tensor([[1.6437, 1.9439, 1.5393],
        [1.3491, 1.9575, 1.0552],
        [1.5106, 1.0123, 1.0961],
        [1.4382, 1.5939, 1.5012],
        [1.5267, 1.4858, 1.4007]])
In [99]: x.add(y)
Out[99]:
tensor([[1.6437, 1.9439, 1.5393],
        [1.3491, 1.9575, 1.0552],
        [1.5106, 1.0123, 1.0961],
        [1.4382, 1.5939, 1.5012],
        [1.5267, 1.4858, 1.4007]])
In [100]: x.add_(y)  #带下划线的方法会对x进行就地修改
Out[100]:
tensor([[1.6437, 1.9439, 1.5393],
        [1.3491, 1.9575, 1.0552],
        [1.5106, 1.0123, 1.0961],
        [1.4382, 1.5939, 1.5012],
        [1.5267, 1.4858, 1.4007]])

In [101]: x #x发生改变
Out[101]:
tensor([[1.6437, 1.9439, 1.5393],
        [1.3491, 1.9575, 1.0552],
        [1.5106, 1.0123, 1.0961],
        [1.4382, 1.5939, 1.5012],
        [1.5267, 1.4858, 1.4007]])
注意:带下划线的方法(比如:
add_)会对tensor进行就地修改 -
tensor和数字操作
In [97]: x +10 Out[97]: tensor([[11., 11., 11.], [11., 11., 11.], [11., 11., 11.], [11., 11., 11.], [11., 11., 11.]]) -
CUDA中的tensor
CUDA(Compute Unified Device Architecture),是NVIDIA推出的运算平台。 CUDA™是一种由NVIDIA推出的通用并行计算架构,该架构使GPU能够解决复杂的计算问题。
torch.cuda这个模块增加了对CUDA tensor的支持,能够在cpu和gpu上使用相同的方法操作tensor通过
.to方法能够把一个tensor转移到另外一个设备(比如从CPU转到GPU)#device = torch.device("cuda:0" if torch.cuda.is_available() else "cpu") if torch.cuda.is_available(): device = torch.device("cuda") # cuda device对象 y = torch.ones_like(x, device=device) # 创建一个在cuda上的tensor x = x.to(device) # 使用方法把x转为cuda 的tensor z = x + y print(z) print(z.to("cpu", torch.double)) # .to方法也能够同时设置类型 >>tensor([1.9806], device='cuda:0') >>tensor([1.9806], dtype=torch.float64)
通过前面的学习,可以发现torch的各种操作几乎和numpy一样
梯度下降和反向传播
目标
- 知道什么是梯度下降
- 知道什么是反向传播
1. 梯度是什么?
梯度:是一个向量,导数+变化最快的方向(学习的前进方向)
回顾机器学习
收集数据 x x x ,构建机器学习模型 f f f,得到 f ( x , w ) = Y p r e d i c t f(x,w) = Y_{predict} f(x,w)=Ypredict
判断模型好坏的方法:
l o s s = ( Y p r e d i c t − Y t r u e ) 2 ( 回 归 损 失 ) l o s s = Y t r u e ⋅ l o g ( Y p r e d i c t ) ( 分 类 损 失 ) \begin{aligned} loss & = (Y_{predict}-Y_{true})^2 &(回归损失) \\ loss & = Y_{true} \cdot log(Y_{predict}) &(分类损失) \end{aligned} lossloss=(Ypredict−Ytrue)2=Ytrue⋅log(Ypredict)(回归损失)(分类损失)
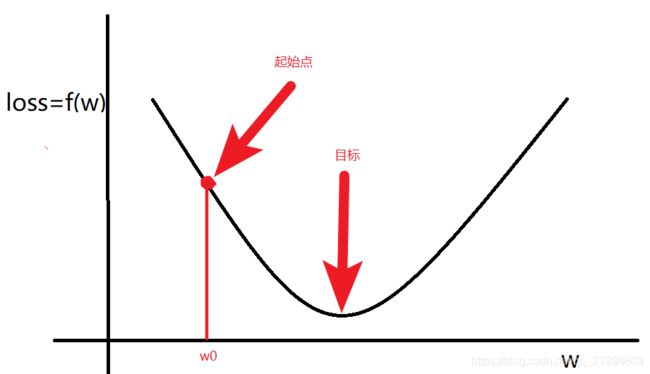
目标:通过调整(学习)参数 w w w,尽可能的降低 l o s s loss loss,那么我们该如何调整 w w w呢?
随机选择一个起始点 w 0 w_0 w0,通过调整 w 0 w_0 w0,让loss函数取到最小值
w w w的更新方法:
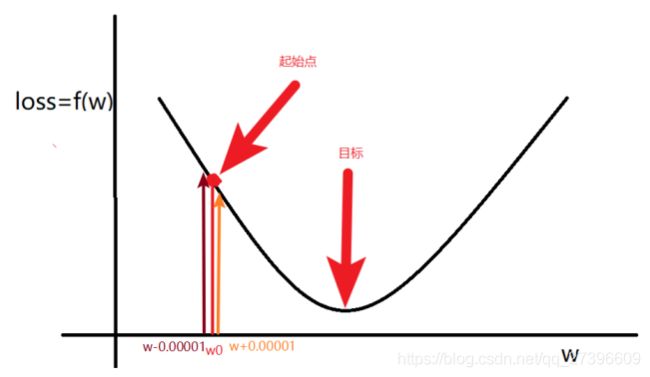
- 计算 w w w的梯度(导数)
∇ w = f ( w + 0.000001 ) − f ( w − 0.000001 ) 2 ∗ 0.000001 \begin{aligned} \nabla w = \frac{f(w+0.000001)-f(w-0.000001)}{2*0.000001} \end{aligned} ∇w=2∗0.000001f(w+0.000001)−f(w−0.000001)
- 更新 w w w
w = w − α ∇ w w = w - \alpha \nabla w w=w−α∇w
其中:
- ∇ w < 0 \nabla w < 0 ∇w<0 ,意味着w将增大
- ∇ w > 0 \nabla w > 0 ∇w>0 ,意味着w将减小
总结:梯度就是多元函数参数的变化趋势(参数学习的方向),只有一个自变量时称为导数
2. 偏导的计算
2.1 常见的导数计算
-
多项式求导数: f ( x ) = x 5 f(x) = x^5 f(x)=x5 , f ′ ( x ) = 5 x ( 5 − 1 ) f^{'}(x) = 5x^{(5-1)} f′(x)=5x(5−1)
-
基本运算求导: f ( x ) = x y f(x) = xy f(x)=xy , f ′ ( x ) = y f^{'}(x) = y f′(x)=y
-
指数求导: f ( x ) = 5 e x f(x) = 5e^x f(x)=5ex , f ′ ( x ) = 5 e x f^{'}(x) = 5e^x f′(x)=5ex
-
对数求导: f ( x ) = 5 l n x f(x) = 5lnx f(x)=5lnx , f ′ ( x ) = 5 x f^{'}(x) = \frac{5}{x} f′(x)=x5,ln 表示log以e为底的对数
-
导数的微分形式:
f ′ ( x ) = d f ( x ) d x 牛 顿 莱 布 尼 兹 \begin{aligned} & f^{'}(x) = & \frac{d f(x)}{dx} \\ & 牛顿 &莱布尼兹 \end{aligned} f′(x)=牛顿dxdf(x)莱布尼兹
那么:如何求 f ( x ) = ( 1 + e − x ) − 1 f(x) = (1+e^{-x})^{-1} f(x)=(1+e−x)−1 的导数呢?那就可以使用
f ( x ) = ( 1 + e − x ) − 1 f(x) = (1+e^{-x})^{-1} f(x)=(1+e−x)−1 ==> f ( a ) = a − 1 , a ( b ) = ( 1 + b ) , b ( c ) = e c , c ( x ) = − x f(a) = a^{-1},a(b) = (1+b),b(c) = e^c,c(x) = -x f(a)=a−1,a(b)=(1+b),b(c)=ec,c(x)=−x
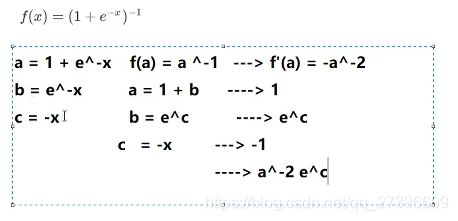
则有:
d f ( x ) d x = d f d a × d a d b × d b d c × d c d x = − a − 2 × 1 × e c × ( − 1 ) = − ( 1 + e − x ) − 2 × e − x × ( − 1 ) = e − x ( 1 + e − x ) − 2 \begin{aligned} \frac{d f(x)}{dx} & = \frac{df}{da} \times \frac{da}{db} \times \frac{db}{dc}\times \frac{dc}{dx} \\ &=-a^{-2} \times 1\times e^c \times (-1) \\ &= -(1+e^{-x})^{-2} \times e^{-x} \times (-1) \\ &= e^{-x}(1+e^{-x})^{-2} \end{aligned} dxdf(x)=dadf×dbda×dcdb×dxdc=−a−2×1×ec×(−1)=−(1+e−x)−2×e−x×(−1)=e−x(1+e−x)−2
2.2 多元函数求偏导
一元函数,即有一个自变量。类似 f ( x ) f(x) f(x)
多元函数,即有多个自变量。类似 f ( x , y , z ) , 三 个 自 变 量 x , y , z f(x,y,z),三个自变量x,y,z f(x,y,z),三个自变量x,y,z
多元函数求偏导过程中:对某一个自变量求导,其他自变量当做常量即可
例1:
f ( x , y , z ) = a x + b y + c z d f ( x , y , z ) d x = a d f ( x , y , z ) d y = b d f ( x , y , z ) d z = c \begin{aligned} &f(x,y,z) &= &ax+by+cz \\ &\frac{df(x,y,z)}{dx} &= &a \\ &\frac{df(x,y,z)}{dy} &= &b \\ &\frac{df(x,y,z)}{dz} &= &c \end{aligned} f(x,y,z)dxdf(x,y,z)dydf(x,y,z)dzdf(x,y,z)====ax+by+czabc
例2:
f ( x , y ) = x y d f ( x , y ) d x = y d f ( x , y ) d y = x \begin{aligned} &f(x,y) &= &xy \\ &\frac{df(x,y)}{dx} &= & y\\ &\frac{df(x,y)}{dy} &= &x \end{aligned} f(x,y)dxdf(x,y)dydf(x,y)===xyyx
例3:
f ( x , w ) = ( y − x w ) 2 d f ( x , w ) d x = − 2 w ( y − x w ) d f ( x , w ) d w = − 2 x ( y − x w ) \begin{aligned} &f(x,w) &= &(y-xw)^2 \\ &\frac{df(x,w)}{dx} &= & -2w(y-xw)\\ &\frac{df(x,w)}{dw} &= & -2x(y-xw) \end{aligned} f(x,w)dxdf(x,w)dwdf(x,w)===(y−xw)2−2w(y−xw)−2x(y−xw)
练习:
已知 J ( a , b , c ) = 3 ( a + b c ) , 令 u = a + v , v = b c J(a,b,c) = 3(a+bc),令u=a+v,v = bc J(a,b,c)=3(a+bc),令u=a+v,v=bc,求a,b,c各自的偏导数。
令 : J ( a , b , c ) = 3 u d J d a = d J d u × d u d a = 3 × 1 d J d b = d J d u × d u d v × d v d b = 3 × 1 × c d J d c = d J d u × d u d v × d v d c = 3 × 1 × b \begin{aligned} 令:& J(a,b,c) = 3u\\ \frac{dJ}{da} &=\frac{dJ}{du} \times \frac{du}{da} = 3\times1 \\ \frac{dJ}{db} &=\frac{dJ}{du} \times \frac{du}{dv} \times \frac{dv}{db} = 3\times1\times c \\ \frac{dJ}{dc} &=\frac{dJ}{du} \times \frac{du}{dv} \times \frac{dv}{dc} = 3\times1\times b \\ \end{aligned} 令:dadJdbdJdcdJJ(a,b,c)=3u=dudJ×dadu=3×1=dudJ×dvdu×dbdv=3×1×c=dudJ×dvdu×dcdv=3×1×b
3. 反向传播算法
3.1 计算图和反向传播
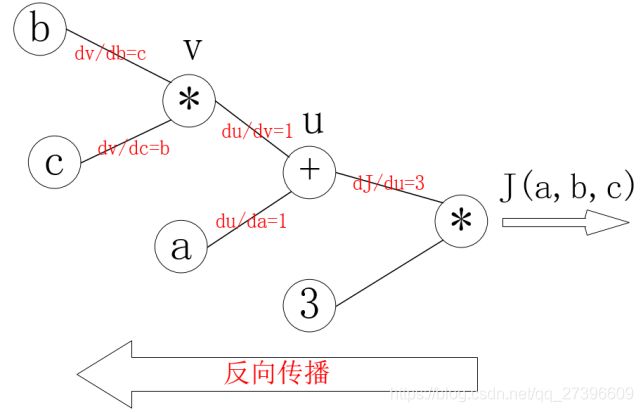
计算图:通过图的方式来描述函数的图形
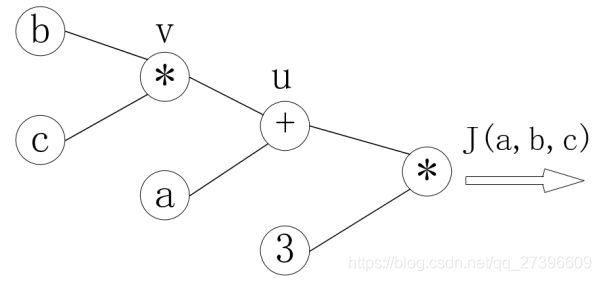
在上面的练习中, J ( a , b , c ) = 3 ( a + b c ) , 令 u = a + v , v = b c J(a,b,c) = 3(a+bc),令u=a+v,v = bc J(a,b,c)=3(a+bc),令u=a+v,v=bc,把它绘制成计算图可以表示为:
绘制成为计算图之后,可以清楚的看到向前计算的过程
之后,对每个节点求偏导可有:
那么反向传播的过程就是一个上图的从右往左的过程,自变量 a , b , c a,b,c a,b,c各自的偏导就是连线上的梯度的乘积:
d J d a = 3 × 1 d J d b = 3 × 1 × c d J d c = 3 × 1 × b \begin{aligned} \frac{dJ}{da} &= 3 \times 1 \\ \frac{dJ}{db} &= 3 \times 1 \times c \\ \frac{dJ}{dc} &= 3 \times 1 \times b \end{aligned} dadJdbdJdcdJ=3×1=3×1×c=3×1×b
3.2 神经网络中的反向传播
3.2.1 神经网络的示意图
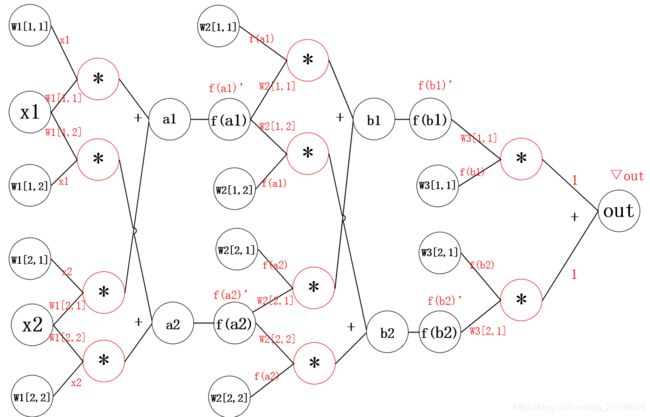
w 1 , w 2 , . . . . w n w1,w2,....wn w1,w2,....wn表示网络第n层权重
w n [ i , j ] w_n[i,j] wn[i,j]表示第n层第i个神经元,连接到第n+1层第j个神经元的权重。
3.2.2 神经网络的计算图
其中:
- ∇ o u t \nabla out ∇out是根据损失函数对预测值进行求导得到的结果
- f函数可以理解为激活函数
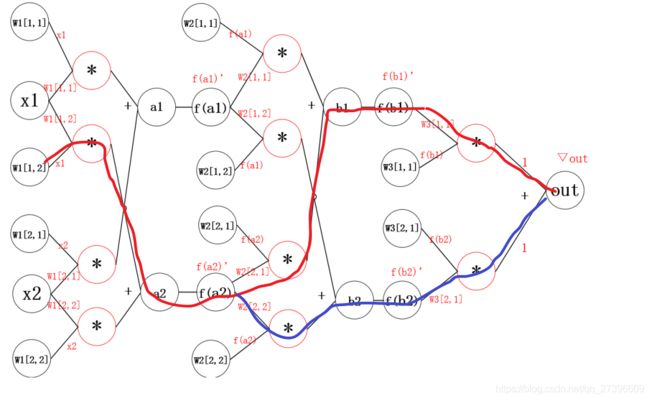
**问题:**那么此时 w 1 [ 1 , 2 ] w_1[1,2] w1[1,2]的偏导该如何求解呢?
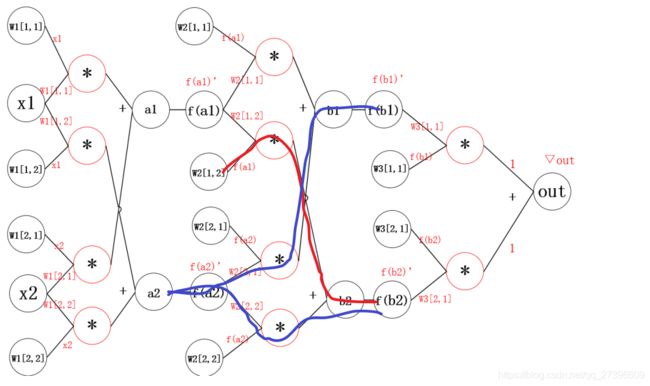
通过观察,发现从 o u t out out 到 w 1 [ 1 , 2 ] w_1[1,2] w1[1,2]的来连接线有两条
结果如下:
d o u t d W 1 [ 1 , 2 ] = x 1 ∗ f ′ ( a 2 ) ∗ ( W 2 [ 2 , 1 ] ∗ f ′ ( b 1 ) ∗ W 3 [ 1 , 1 ] ∗ ∇ o u t + W 2 [ 2 , 2 ] ∗ f ′ ( b 2 ) ∗ W 3 [ 2 , 1 ] ∗ ∇ o u t ) \frac{dout}{dW_1[1,2]} = x1*f^{'}(a2)*(W_2[2,1]*f^{'}(b1)*W_3[1,1]*\nabla out +W_2[2,2]*f^{'}(b2)*W_3[2,1]*\nabla out) dW1[1,2]dout=x1∗f′(a2)∗(W2[2,1]∗f′(b1)∗W3[1,1]∗∇out+W2[2,2]∗f′(b2)∗W3[2,1]∗∇out)
公式分为两部分:
- 括号外:左边红线部分
- 括号内
- 加号左边:右边红线部分
- 加号右边:蓝线部分
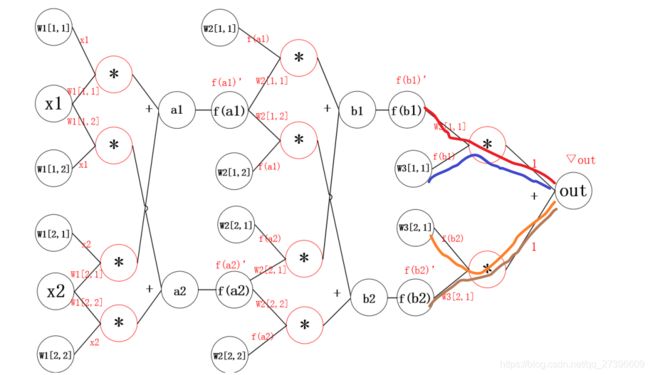
但是这样做,当模型很大的时候,计算量非常大
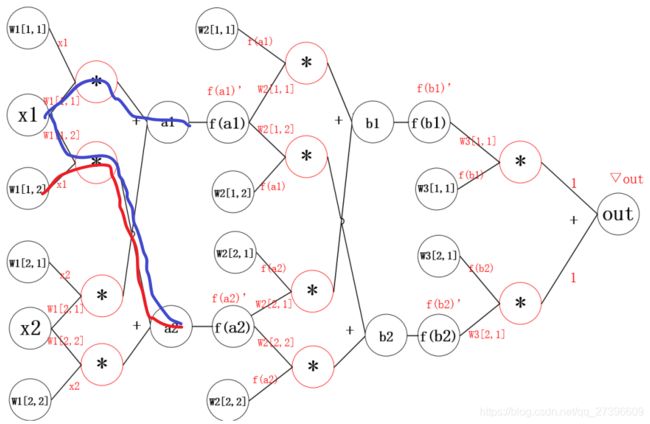
所以反向传播的思想就是对其中的某一个参数单独求梯度,之后更新,如下图所示:
计算过程如下
∇ W 3 [ 1 , 1 ] = f ( b 1 ) ∗ ∇ o u t ( 计 算 W 3 [ 1 , 1 ] 梯 度 ) ∇ W 3 [ 2 , 1 ] = f ( b 2 ) ∗ ∇ o u t ( 计 算 W 3 [ 2 , 1 ] 梯 度 ) ∇ b 1 = f ′ ( b 1 ) ∗ W 3 [ 1 , 1 ] ∗ ∇ o u t ( 计 算 W 3 [ 2 , 1 ] 梯 度 ) ∇ b 2 = f ′ ( b 2 ) ∗ W 3 [ 2 , 1 ] ∗ ∇ o u t ( 计 算 W 3 [ 2 , 1 ] 梯 度 ) \begin{aligned} &\nabla W_3[1,1] = f(b_1)*\nabla out & (计算W_3[1,1]梯度)\\ &\nabla W_3[2,1] = f(b_2)*\nabla out & (计算W_3[2,1]梯度)\\ \\ &\nabla b_1= f^{'}(b_1)*W_3[1,1]*\nabla out & (计算W_3[2,1]梯度)\\ &\nabla b_2= f^{'}(b_2)*W_3[2,1]*\nabla out & (计算W_3[2,1]梯度)\\ \end{aligned} ∇W3[1,1]=f(b1)∗∇out∇W3[2,1]=f(b2)∗∇out∇b1=f′(b1)∗W3[1,1]∗∇out∇b2=f′(b2)∗W3[2,1]∗∇out(计算W3[1,1]梯度)(计算W3[2,1]梯度)(计算W3[2,1]梯度)(计算W3[2,1]梯度)
更新参数之后,继续反向传播
计算过程如下:
∇ W 2 [ 1 , 2 ] = f ( a 1 ) ∗ ∇ b 2 ∇ a 2 = f ′ ( a 2 ) ∗ ( w 2 [ 2 , 1 ] ∇ b 1 + W 2 [ 2 , 2 ] ∇ b 2 ) \begin{aligned} &\nabla W_2[1,2] = f(a_1)* \nabla b_2 \\ &\nabla a_2 = f^{'}(a_2)*(w_2[2,1]\nabla b_1 +W_2[2,2] \nabla b_2) \end{aligned} ∇W2[1,2]=f(a1)∗∇b2∇a2=f′(a2)∗(w2[2,1]∇b1+W2[2,2]∇b2)
继续反向传播
计算过程如下:
▽ W 1 [ 1 , 2 ] = x 1 ∗ ▽ a 2 ▽ x 1 = ( W 1 [ 1 , 1 ] ∗ ▽ a 1 + w 1 [ 1 , 2 ] ∗ ▽ a 2 ) ∗ x 1 ’ \begin{aligned} &▽W_1[1,2]= x_1*▽a_2\\ &▽x_1= (W_1[1,1]*▽a_1+w_1[1,2]*▽a_2)*x_1’ \end{aligned} ▽W1[1,2]=x1∗▽a2▽x1=(W1[1,1]∗▽a1+w1[1,2]∗▽a2)∗x1’
通用的描述如下
∇ w i , j l = f ( a i l ) ∗ ∇ a j i + 1 ∇ a i l = f ′ ( a i l ) ∗ ( ∑ j = 1 m w i , j ∗ ∇ a j l + 1 ) \nabla w^{l}_{i,j} = f(a^l_i)* \nabla a^{i+1}_{j}\\ \nabla a^{l}_i = f'(a^l_i)*(\sum_{j=1}^{m}w_{i,j}*\nabla a_j^{l+1}) ∇wi,jl=f(ail)∗∇aji+1∇ail=f′(ail)∗(j=1∑mwi,j∗∇ajl+1)
Pytorch完成线性回归
目标
- 知道
requires_grad的作用 - 知道如何使用
backward - 知道如何手动完成线性回归
1. 向前计算
对于pytorch中的一个tensor,如果设置它的属性 .requires_grad为True,那么它将会追踪对于该张量的所有操作。或者可以理解为,这个tensor是一个参数,后续会被计算梯度,更新该参数。
1.1 计算过程
假设有以下条件(1/4表示求均值,xi中有4个数),使用torch完成其向前计算的过程
o = 1 4 ∑ i z i z i = 3 ( x i + 2 ) 2 其 中 : z i ∣ x i = 1 = 27 \begin{aligned} &o = \frac{1}{4}\sum_iz_i \\ &z_i = 3(x_i+2)^2\\ 其中:&\\ &z_i|_{x_i=1}=27\\ \end{aligned} 其中:o=41i∑zizi=3(xi+2)2zi∣xi=1=27
如果x为参数,需要对其进行梯度的计算和更新
那么,在最开始随机设置x的值的过程中,需要设置他的requires_grad属性为True,其默认值为False
import torch
x = torch.ones(2, 2, requires_grad=True)  #初始化参数x并设置requires_grad=True用来追踪其计算历史
print(x)
#tensor([[1., 1.],
#        [1., 1.]], requires_grad=True)

y = x+2
print(y)
#tensor([[3., 3.],
#        [3., 3.]], grad_fn=)

z = y*y*3  #平方x3
print(x)
#tensor([[27., 27.],
#        [27., 27.]], grad_fn=)

out = z.mean() #求均值
print(out)
#tensor(27., grad_fn=)
从上述代码可以看出:
- x的requires_grad属性为True
- 之后的每次计算都会修改其
grad_fn属性,用来记录做过的操作- 通过这个函数和grad_fn能够组成一个和前一小节类似的计算图
1.2 requires_grad和grad_fn
a = torch.randn(2, 2)
a = ((a * 3) / (a - 1))
print(a.requires_grad) #False
a.requires_grad_(True) #就地修改
print(a.requires_grad) #True
b = (a * a).sum()
print(b.grad_fn) # 注意:
为了防止跟踪历史记录(和使用内存),可以将代码块包装在with torch.no_grad():中。在评估模型时特别有用,因为模型可能具有requires_grad = True的可训练的参数,但是我们不需要在此过程中对他们进行梯度计算。
2. 梯度计算
对于1.1 中的out而言,我们可以使用backward方法来进行反向传播,计算梯度
out.backward(),此时便能够求出导数 d o u t d x \frac{d out}{dx} dxdout,调用x.gard能够获取导数值
得到
tensor([[4.5000, 4.5000],
        [4.5000, 4.5000]])
因为:
d ( O ) d ( x i ) = 3 2 ( x i + 2 ) \frac{d(O)}{d(x_i)} = \frac{3}{2}(x_i+2) d(xi)d(O)=23(xi+2)
在 x i x_i xi等于1时其值为4.5
注意:在输出为一个标量的情况下,我们可以调用输出tensor的backword() 方法,但是在数据是一个向量的时候,调用backward()的时候还需要传入其他参数。
很多时候我们的损失函数都是一个标量,所以这里就不再介绍损失为向量的情况。
loss.backward()就是根据损失函数,对参数(requires_grad=True)的去计算他的梯度,并且把它累加保存到x.gard,此时还并未更新其梯度
注意点:
-
tensor.data:-
在tensor的require_grad=False,tensor.data和tensor等价
-
require_grad=True时,tensor.data仅仅是获取tensor中的数据
-
-
tensor.numpy():require_grad=True不能够直接转换,需要使用tensor.detach().numpy()
3. 线性回归实现
下面,我们使用一个自定义的数据,来使用torch实现一个简单的线性回归
假设我们的基础模型就是y = wx+b,其中w和b均为参数,我们使用y = 3x+0.8来构造数据x、y,所以最后通过模型应该能够得出w和b应该分别接近3和0.8
- 准备数据
- 计算预测值
- 计算损失,把参数的梯度置为0,进行反向传播
- 更新参数
import torch
import numpy as np
from matplotlib import pyplot as plt


#1. 准备数据 y = 3x+0.8,准备参数
x = torch.rand([50])
y = 3*x + 0.8

w = torch.rand(1,requires_grad=True)
b = torch.rand(1,requires_grad=True)

def loss_fn(y,y_predict):
    loss = (y_predict-y).pow(2).mean()
    for i in [w,b]:
		#每次反向传播前把梯度置为0
        if i.grad is not None:
            i.grad.data.zero_()
    # [i.grad.data.zero_() for i in [w,b] if i.grad is not None]
    loss.backward()
    return loss.data

def optimize(learning_rate):
    # print(w.grad.data,w.data,b.data)
    w.data -= learning_rate* w.grad.data
    b.data -= learning_rate* b.grad.data

for i in range(3000):
    #2. 计算预测值
    y_predict = x*w + b

    #3.计算损失,把参数的梯度置为0,进行反向传播
    loss = loss_fn(y,y_predict)

    if i%500 == 0:
        print(i,loss)
    #4. 更新参数w和b
    optimize(0.01)

# 绘制图形,观察训练结束的预测值和真实值
predict =  x*w + b  #使用训练后的w和b计算预测值

plt.scatter(x.data.numpy(), y.data.numpy(),c = "r")
plt.plot(x.data.numpy(), predict.data.numpy())
plt.show()

print("w",w)
print("b",b)
图形效果如下:
打印w和b,可有
w tensor([2.9280], requires_grad=True)
b tensor([0.8372], requires_grad=True)
可知,w和b已经非常接近原来的预设的3和0.8
Pytorch完成基础的模型
目标
- 知道Pytorch中Module的使用方法
- 知道Pytorch中优化器类的使用方法
- 知道Pytorch中常见的损失函数的使用方法
- 知道如何在GPU上运行代码
- 能够说出常见的优化器及其原理
1. Pytorch完成模型常用API
在前一部分,我们自己实现了通过torch的相关方法完成反向传播和参数更新,在pytorch中预设了一些更加灵活简单的对象,让我们来构造模型、定义损失,优化损失等
那么接下来,我们一起来了解一下其中常用的API
1.1 nn.Module
nn.Modul 是torch.nn提供的一个类,是pytorch中我们自定义网络的一个基类,在这个类中定义了很多有用的方法,让我们在继承这个类定义网络的时候非常简单
当我们自定义网络的时候,有两个方法需要特别注意:
__init__需要调用super方法,继承父类的属性和方法farward方法必须实现,用来定义我们的网络的向前计算的过程
用前面的y = wx+b的模型举例如下:
from torch import nn
class Lr(nn.Module):
    def __init__(self):
        super(Lr, self).__init__()  #继承父类init的参数
        self.linear = nn.Linear(1, 1)

    def forward(self, x):
        out = self.linear(x)
        return out
注意:
nn.Linear为torch预定义好的线性模型,也被称为全链接层,传入的参数为输入的数量,输出的数量(in_features, out_features),是不算(batch_size的列数)nn.Module定义了__call__方法,实现的就是调用forward方法,即Lr的实例,能够直接被传入参数调用,实际上调用的是forward方法并传入参数
# 实例化模型
model = Lr()
# 传入数据,计算结果
predict = model(x)
1.2 优化器类
优化器(optimizer),可以理解为torch为我们封装的用来进行更新参数的方法,比如常见的随机梯度下降(stochastic gradient descent,SGD)
优化器类都是由torch.optim提供的,例如
torch.optim.SGD(参数,学习率)torch.optim.Adam(参数,学习率)
注意:
- 参数可以使用
model.parameters()来获取,获取模型中所有requires_grad=True的参数 - 优化类的使用方法
- 实例化
- 所有参数的梯度,将其值置为0
- 反向传播计算梯度
- 更新参数值
示例如下:
optimizer = optim.SGD(model.parameters(), lr=1e-3) #1. 实例化
optimizer.zero_grad() #2. 梯度置为0
loss.backward() #3. 计算梯度
optimizer.step()  #4. 更新参数的值
1.3 损失函数
前面的例子是一个回归问题,torch中也预测了很多损失函数
- 均方误差:
nn.MSELoss(),常用于回归问题 - 交叉熵损失:
nn.CrossEntropyLoss(),常用于分类问题
使用方法:
model = Lr() #1. 实例化模型
criterion = nn.MSELoss() #2. 实例化损失函数
optimizer = optim.SGD(model.parameters(), lr=1e-3) #3. 实例化优化器类
for i in range(100):
    y_predict = model(x_true) #4. 向前计算预测值
    loss = criterion(y_true,y_predict) #5. 调用损失函数传入真实值和预测值,得到损失结果
    optimizer.zero_grad() #5. 当前循环参数梯度置为0
    loss.backward() #6. 计算梯度
    optimizer.step()  #7. 更新参数的值
1.4 线性回归完整代码
import torch
from torch import nn
from torch import optim
import numpy as np
from matplotlib import pyplot as plt

# 1. 定义数据
x = torch.rand([50,1])
y = x*3 + 0.8

#2 .定义模型
class Lr(nn.Module):
    def __init__(self):
        super(Lr,self).__init__()
        self.linear = nn.Linear(1,1)

    def forward(self, x):
        out = self.linear(x)
        return out

# 2. 实例化模型,loss,和优化器
model = Lr()
criterion = nn.MSELoss()
optimizer = optim.SGD(model.parameters(), lr=1e-3)
#3. 训练模型
for i in range(30000):
    out = model(x) #3.1 获取预测值
    loss = criterion(y,out) #3.2 计算损失
    optimizer.zero_grad()  #3.3 梯度归零
    loss.backward() #3.4 计算梯度
    optimizer.step()  # 3.5 更新梯度
    if (i+1) % 20 == 0:
        print('Epoch[{}/{}], loss: {:.6f}'.format(i,30000,loss.data))

#4. 模型评估
model.eval() #设置模型为评估模式,即预测模式
predict = model(x)
predict = predict.data.numpy()
plt.scatter(x.data.numpy(),y.data.numpy(),c="r")
plt.plot(x.data.numpy(),predict)
plt.show()
输出如下:
注意:
model.eval()表示设置模型为评估模式,即预测模式
model.train(mode=True) 表示设置模型为训练模式
在当前的线性回归中,上述并无区别
但是在其他的一些模型中,训练的参数和预测的参数会不相同,到时候就需要具体告诉程序我们是在进行训练还是预测,比如模型中存在Dropout,BatchNorm的时候
2. 在GPU上运行代码
当模型太大,或者参数太多的情况下,为了加快训练速度,经常会使用GPU来进行训练
此时我们的代码需要稍作调整:
-
判断GPU是否可用
torch.cuda.is_available()torch.device("cuda:0" if torch.cuda.is_available() else "cpu") >>device(type='cuda', index=0) #使用gpu >>device(type='cpu') #使用cpu -
把模型参数和input数据转化为cuda的支持类型
model.to(device) x_true.to(device) -
在GPU上计算结果也为cuda的数据类型,需要转化为numpy或者torch的cpu的tensor类型
predict = predict.cpu().detach().numpy()detach()的效果和data的相似,但是detach()是深拷贝,data是取值,是浅拷贝
修改之后的代码如下:
import torch
from torch import nn
from torch import optim
import numpy as np
from matplotlib import pyplot as plt
import time

# 1. 定义数据
x = torch.rand([50,1])
y = x*3 + 0.8

#2 .定义模型
class Lr(nn.Module):
    def __init__(self):
        super(Lr,self).__init__()
        self.linear = nn.Linear(1,1)

    def forward(self, x):
        out = self.linear(x)
        return out

# 2. 实例化模型,loss,和优化器

device = torch.device("cuda:0" if torch.cuda.is_available() else "cpu")
x,y = x.to(device),y.to(device)

model = Lr().to(device)
criterion = nn.MSELoss()
optimizer = optim.SGD(model.parameters(), lr=1e-3)

#3. 训练模型
for i in range(300):
    out = model(x)
    loss = criterion(y,out)

    optimizer.zero_grad()
    loss.backward()
    optimizer.step()
    if (i+1) % 20 == 0:
        print('Epoch[{}/{}], loss: {:.6f}'.format(i,30000,loss.data))

#4. 模型评估
model.eval() #
predict = model(x)
predict = predict.cpu().detach().numpy() #转化为numpy数组
plt.scatter(x.cpu().data.numpy(),y.cpu().data.numpy(),c="r")
plt.plot(x.cpu().data.numpy(),predict,)
plt.show()
3. 常见的优化算法介绍
3.1 梯度下降算法(batch gradient descent BGD)
每次迭代都需要把所有样本都送入,这样的好处是每次迭代都顾及了全部的样本,做的是全局最优化,但是有可能达到局部最优。
3.2 随机梯度下降法 (Stochastic gradient descent SGD)
针对梯度下降算法训练速度过慢的缺点,提出了随机梯度下降算法,随机梯度下降算法算法是从样本中随机抽出一组,训练后按梯度更新一次,然后再抽取一组,再更新一次,在样本量及其大的情况下,可能不用训练完所有的样本就可以获得一个损失值在可接受范围之内的模型了。
torch中的api为:torch.optim.SGD()
3.3 小批量梯度下降 (Mini-batch gradient descent MBGD)
SGD相对来说要快很多,但是也有存在问题,由于单个样本的训练可能会带来很多噪声,使得SGD并不是每次迭代都向着整体最优化方向,因此在刚开始训练时可能收敛得很快,但是训练一段时间后就会变得很慢。在此基础上又提出了小批量梯度下降法,它是每次从样本中随机抽取一小批进行训练,而不是一组,这样即保证了效果又保证的速度。
3.4 动量法
mini-batch SGD算法虽然这种算法能够带来很好的训练速度,但是在到达最优点的时候并不能够总是真正到达最优点,而是在最优点附近徘徊。
另一个缺点就是mini-batch SGD需要我们挑选一个合适的学习率,当我们采用小的学习率的时候,会导致网络在训练的时候收敛太慢;当我们采用大的学习率的时候,会导致在训练过程中优化的幅度跳过函数的范围,也就是可能跳过最优点。我们所希望的仅仅是网络在优化的时候网络的损失函数有一个很好的收敛速度同时又不至于摆动幅度太大。
所以Momentum优化器刚好可以解决我们所面临的问题,它主要是基于梯度的移动指数加权平均,对网络的梯度进行平滑处理的,让梯度的摆动幅度变得更小。
g r a d e n t = 0.8 ∇ w + 0.2 h i s t o r y _ g r a d e n t , ∇ w 表 示 当 前 一 次 的 梯 度 w = w − α ∗ g r a d e n t , α 表 示 学 习 率 \begin{aligned} &gradent = 0.8\nabla w + 0.2 history\_gradent &,\nabla w 表示当前一次的梯度\\ &w = w - \alpha* gradent &,\alpha表示学习率 \end{aligned} gradent=0.8∇w+0.2history_gradentw=w−α∗gradent,∇w表示当前一次的梯度,α表示学习率
(注:t+1的的histroy_gradent 为第t次的gradent)
3.5 AdaGrad
AdaGrad算法就是将每一个参数的每一次迭代的梯度取平方累加后在开方,用全局学习率除以这个数,作为学习率的动态更新,从而达到自适应学习率的效果
g r a d e n t = h i s t o r y _ g r a d e n t + ( ∇ w ) 2 w = w − α g r a d e n t + δ ∇ w , δ 为 小 常 数 , 为 了 数 值 稳 定 大 约 设 置 为 1 0 − 7 \begin{aligned} &gradent = history\_gradent + (\nabla w)^2 \\ &w = w - \frac{\alpha}{\sqrt{gradent}+\delta} \nabla w ,&\delta为小常数,为了数值稳定大约设置为10^{-7} \end{aligned} gradent=history_gradent+(∇w)2w=w−gradent+δα∇w,δ为小常数,为了数值稳定大约设置为10−7
3.6 RMSProp
Momentum优化算法中,虽然初步解决了优化中摆动幅度大的问题,为了进一步优化损失函数在更新中存在摆动幅度过大的问题,并且进一步加快函数的收敛速度,RMSProp算法对参数的梯度使用了平方加权平均数。
g r a d e n t = 0.8 ∗ h i s t o r y _ g r a d e n t + 0.2 ∗ ( ∇ w ) 2 w = w − α g r a d e n t + δ ∇ w \begin{aligned} & gradent = 0.8*history\_gradent + 0.2*(\nabla w)^2 \\ & w = w - \frac{\alpha}{\sqrt{gradent}+\delta} \nabla w \end{aligned} gradent=0.8∗history_gradent+0.2∗(∇w)2w=w−gradent+δα∇w
3.7 Adam
Adam(Adaptive Moment Estimation)算法是将Momentum算法和RMSProp算法结合起来使用的一种算法,能够达到防止梯度的摆幅多大,同时还能够加开收敛速度
1. 需 要 初 始 化 梯 度 的 累 积 量 和 平 方 累 积 量 v w = 0 , s w = 0 2. 第 t 轮 训 练 中 , 我 们 首 先 可 以 计 算 得 到 M o m e n t u m 和 R M S P r o p 的 参 数 更 新 : v w = 0.8 v + 0.2 ∇ w , M o m e n t u m 计 算 的 梯 度 s w = 0.8 ∗ s + 0.2 ∗ ( ∇ w ) 2 , R M S P r o p 计 算 的 梯 度 3. 对 其 中 的 值 进 行 处 理 后 , 得 到 : w = w − α s w + δ v w \begin{aligned} & 1. 需要初始化梯度的累积量和平方累积量 \\ & v_w = 0,s_w = 0 \\ & 2. 第 t 轮训练中,我们首先可以计算得到Momentum和RMSProp的参数更新:\\ & v_w = 0.8v + 0.2 \nabla w \qquad,Momentum计算的梯度\\ & s_w = 0.8*s + 0.2*(\nabla w)^2 \qquad,RMSProp计算的梯度\\ & 3. 对其中的值进行处理后,得到:\\ & w = w - \frac{\alpha}{\sqrt{s_w}+\delta} v_w \end{aligned} 1.需要初始化梯度的累积量和平方累积量vw=0,sw=02.第t轮训练中,我们首先可以计算得到Momentum和RMSProp的参数更新:vw=0.8v+0.2∇w,Momentum计算的梯度sw=0.8∗s+0.2∗(∇w)2,RMSProp计算的梯度3.对其中的值进行处理后,得到:w=w−sw+δαvw
torch中的api为:torch.optim.Adam()
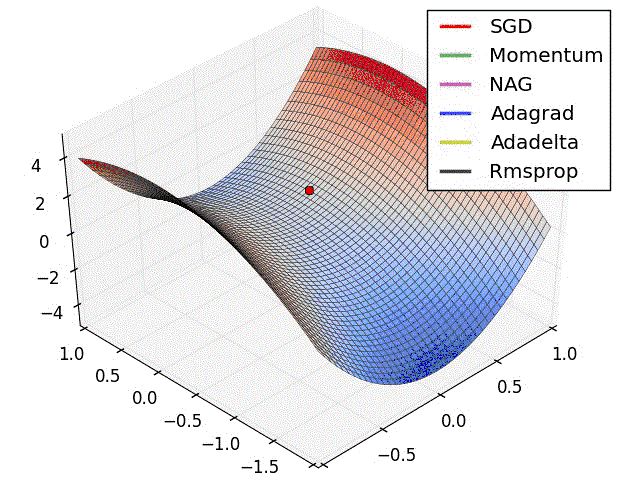
3.8 效果演示:
Pytorch中的数据加载
目标
- 知道数据加载的目的
- 知道pytorch中Dataset的使用方法
- 知道pytorch中DataLoader的使用方法
- 知道pytorch中的自带数据集如何获取
1. 模型中使用数据加载器的目的
在前面的线性回归模型中,我们使用的数据很少,所以直接把全部数据放到模型中去使用。
但是在深度学习中,数据量通常是都非常多,非常大的,如此大量的数据,不可能一次性的在模型中进行向前的计算和反向传播,经常我们会对整个数据进行随机的打乱顺序,把数据处理成一个个的batch,同时还会对数据进行预处理。
所以,接下来我们来学习pytorch中的数据加载的方法
2. 数据集类
2.1 Dataset基类介绍
在torch中提供了数据集的基类torch.utils.data.Dataset,继承这个基类,我们能够非常快速的实现对数据的加载。
torch.utils.data.Dataset的源码如下:
class Dataset(object):
    """An abstract class representing a Dataset.

    All other datasets should subclass it. All subclasses should override
    ``__len__``, that provides the size of the dataset, and ``__getitem__``,
    supporting integer indexing in range from 0 to len(self) exclusive.
    """

    def __getitem__(self, index):
        raise NotImplementedError

    def __len__(self):
        raise NotImplementedError

    def __add__(self, other):
        return ConcatDataset([self, other])
可知:我们需要在自定义的数据集类中继承Dataset类,同时还需要实现两个方法:
__len__方法,能够实现通过全局的len()方法获取其中的元素个数__getitem__方法,能够通过传入索引的方式获取数据,例如通过dataset[i]获取其中的第i条数据
2.2 数据加载案例
下面通过一个例子来看看如何使用Dataset来加载数据
数据来源:http://archive.ics.uci.edu/ml/datasets/SMS+Spam+Collection
数据介绍:SMS Spam Collection是用于骚扰短信识别的经典数据集,完全来自真实短信内容,包括4831条正常短信和747条骚扰短信。正常短信和骚扰短信保存在一个文本文件中。 每行完整记录一条短信内容,每行开头通过ham和spam标识正常短信和骚扰短信
数据实例:
实现如下:
from torch.utils.data import Dataset,DataLoader
import pandas as pd

data_path = r"data\SMSSpamCollection"

class CifarDataset(Dataset):
    def __init__(self):
        lines = open(data_path,"r")
        #对数据进行处理,前4个为label,后面的为短信内容
        lines = [[i[:4].strip(),i[4:].strip()] for i in lines]
        #转化为dataFrame
        self.df = pd.DataFrame(lines,columns=["label","sms"])

    def __getitem__(self, index):
        single_item = self.df.iloc[index,:]
        return single_item.values[0],single_item.values[1]

    def __len__(self):
        return self.df.shape[0]
之后对Dataset进行实例化,可以跌倒获取其中的数据
d = CifarDataset()
for i in range(len(d)):
    print(i,d[i])
输出如下:
....
5571 ('ham', 'Pity, * was in mood for that. So...any other suggestions?')
5572 ('ham', "The guy did some bitching but I acted like i'd be interested in buying something else next week and he gave it to us for free")
5573 ('ham', 'Rofl. Its true to its name')
3. 迭代数据集
使用上述的方法能够进行数据的读取,但是其中还有很多内容没有实现:
- 批处理数据(Batching the data)
- 打乱数据(Shuffling the data)
- 使用多线程
multiprocessing并行加载数据。
在pytorch中torch.utils.data.DataLoader提供了上述的所用方法
DataLoader的使用方法示例:
from torch.utils.data import DataLoader

dataset = CifarDataset()
data_loader = DataLoader(dataset=dataset,batch_size=10,shuffle=True,num_workers=2)

#遍历,获取其中的每个batch的结果
for index, (label, context) in enumerate(data_loader):
    print(index,label,context)
    print("*"*100)
其中参数含义:
- dataset:提前定义的dataset的实例
- batch_size:传入数据的batch的大小,常用128,256等等
- shuffle:bool类型,表示是否在每次获取数据的时候提前打乱数据
num_workers:加载数据的线程数
数据迭代器的返回结果如下:
555 ('spam', 'ham', 'spam', 'ham', 'ham', 'ham', 'ham', 'spam', 'ham', 'ham') ('URGENT! We are trying to contact U. Todays draw shows that you have won a £800 prize GUARANTEED. Call 09050003091 from....", 'swhrt how u dey,hope ur ok, tot about u 2day.love n miss.take care.')
***********************************************************************************
556 ('ham', 'ham', 'ham', 'ham', 'ham', 'ham', 'ham', 'ham', 'ham', 'spam') ('He telling not to tell any one. If so treat for me hi hi hi', 'Did u got that persons story', "Don kn....1000 cash prize or a prize worth £5000')
注意:
len(dataset) = 数据集的样本数len(dataloader) = math.ceil(样本数/batch_size) 即向上取整
4 pytorch自带的数据集
pytorch中自带的数据集由两个上层api提供,分别是torchvision和torchtext
其中:
torchvision提供了对图片数据处理相关的api和数据- 数据位置:
torchvision.datasets,例如:torchvision.datasets.MNIST(手写数字图片数据)
- 数据位置:
torchtext提供了对文本数据处理相关的API和数据- 数据位置:
torchtext.datasets,例如:torchtext.datasets.IMDB(电影评论文本数据)
- 数据位置:
下面我们以Mnist手写数字为例,来看看pytorch如何加载其中自带的数据集
使用方法和之前一样:
- 准备好Dataset实例
- 把dataset交给dataloder 打乱顺序,组成batch
4.1 torchversion.datasets
torchversoin.datasets中的数据集类(比如torchvision.datasets.MNIST),都是继承自Dataset
意味着:直接对torchvision.datasets.MNIST进行实例化就可以得到Dataset的实例
但是MNIST API中的参数需要注意一下:
torchvision.datasets.MNIST(root='/files/', train=True, download=True, transform=)
root参数表示数据存放的位置train:bool类型,表示是使用训练集的数据还是测试集的数据download:bool类型,表示是否需要下载数据到root目录transform:实现的对图片的处理函数
4.2 MNIST数据集的介绍
数据集的原始地址:http://yann.lecun.com/exdb/mnist/
MNIST是由Yann LeCun等人提供的免费的图像识别的数据集,其中包括60000个训练样本和10000个测试样本,其中图拍了的尺寸已经进行的标准化的处理,都是黑白的图像,大小为28X28
执行代码,下载数据,观察数据类型:
import torchvision

dataset = torchvision.datasets.MNIST(root="./data",train=True,download=True,transform=None)

print(dataset[0])
下载的数据如下:
代码输出结果如下:
Downloading http://yann.lecun.com/exdb/mnist/train-images-idx3-ubyte.gz
Downloading http://yann.lecun.com/exdb/mnist/train-labels-idx1-ubyte.gz
Downloading http://yann.lecun.com/exdb/mnist/t10k-images-idx3-ubyte.gz
Downloading http://yann.lecun.com/exdb/mnist/t10k-labels-idx1-ubyte.gz
Processing...
Done!
(<PIL.Image.Image image mode=L size=28x28 at 0x18D303B9C18>, tensor(5))
可以其中数据集返回了两条数据,可以猜测为图片的数据和目标值
返回值的第0个为Image类型,可以调用show() 方法打开,发现为手写数字5
import torchvision

dataset = torchvision.datasets.MNIST(root="./data",train=True,download=True,transform=None)

print(dataset[0])

img = dataset[0][0]
img.show() #打开图片
图片如下:
由上可知:返回值为(图片,目标值),这个结果也可以通过观察源码得到
使用Pytorch实现手写数字识别
目标
- 知道如何使用Pytorch完成神经网络的构建
- 知道Pytorch中激活函数的使用方法
- 知道Pytorch中
torchvision.transforms中常见图形处理函数的使用 - 知道如何训练模型和如何评估模型
1. 思路和流程分析
流程:
- 准备数据,这些需要准备DataLoader
- 构建模型,这里可以使用torch构造一个深层的神经网络
- 模型的训练
- 模型的保存,保存模型,后续持续使用
- 模型的评估,使用测试集,观察模型的好坏
2. 准备训练集和测试集
准备数据集的方法前面已经讲过,但是通过前面的内容可知,调用MNIST返回的结果中图形数据是一个Image对象,需要对其进行处理
为了进行数据的处理,接下来学习torchvision.transfroms的方法
2.1 torchvision.transforms的图形数据处理方法
2.1.1 torchvision.transforms.ToTensor
把一个取值范围是[0,255]的PIL.Image或者shape为(H,W,C)的numpy.ndarray,转换成形状为[C,H,W]
其中(H,W,C)意思为(高,宽,通道数),黑白图片的通道数只有1,其中每个像素点的取值为[0,255],彩色图片的通道数为(R,G,B),每个通道的每个像素点的取值为[0,255],三个通道的颜色相互叠加,形成了各种颜色
示例如下:
from torchvision import transforms
import numpy as np

data = np.random.randint(0, 255, size=12)
img = data.reshape(2,2,3)
print(img.shape)
img_tensor = transforms.ToTensor()(img) # 转换成tensor
print(img_tensor)
print(img_tensor.shape)
输出如下:
shape:(2, 2, 3)
img_tensor:tensor([[[215, 171],
                 [ 34,  12]],

                [[229,  87],
                 [ 15, 237]],

                [[ 10,  55],
                 [ 72, 204]]], dtype=torch.int32)
new shape:torch.Size([3, 2, 2])
注意:
transforms.ToTensor对象中有__call__方法,所以可以对其示例能够传入数据获取结果
2.1.2 torchvision.transforms.Normalize(mean, std)
给定均值:mean,shape和图片的通道数相同(指的是每个通道的均值),方差:std,和图片的通道数相同(指的是每个通道的方差),将会把Tensor规范化处理。
即:Normalized_image=(image-mean)/std。
例如:
from torchvision import transforms
import numpy as np
import torchvision

data = np.random.randint(0, 255, size=12)
img = data.reshape(2,2,3)
img = transforms.ToTensor()(img) # 转换成tensor
print(img)
print("*"*100)

norm_img = transforms.Normalize((10,10,10), (1,1,1))(img) #进行规范化处理

print(norm_img)
输出如下:
tensor([[[177, 223],
         [ 71, 182]],

        [[153, 120],
         [173,  33]],

        [[162, 233],
         [194,  73]]], dtype=torch.int32)
***************************************************************************************
tensor([[[167, 213],
         [ 61, 172]],

        [[143, 110],
         [163,  23]],

        [[152, 223],
         [184,  63]]], dtype=torch.int32)
注意:在sklearn中,默认上式中的std和mean为数据每列的std和mean,sklearn会在标准化之前算出每一列的std和mean。
但是在api:Normalize中并没有帮我们计算,所以我们需要手动计算
-
当mean为全部数据的均值,std为全部数据的std的时候,才是进行了标准化。
-
如果mean(x)不是全部数据的mean的时候,std(y)也不是的时候,Normalize后的数据分布满足下面的关系
n e w _ m e a n = m e a n − x y , m e a n 为 原 数 据 的 均 值 , x 为 传 入 的 均 值 x n e w _ s t d = s t d y , y 为 传 入 的 标 准 差 y \begin{aligned} &new\_mean = \frac{mean-x}{y}&, mean为原数据的均值,x为传入的均值x \\ &new\_std = \frac{std}{y} &,y为传入的标准差y\\ \end{aligned} new_mean=ymean−xnew_std=ystd,mean为原数据的均值,x为传入的均值x,y为传入的标准差y
2.1.3 torchvision.transforms.Compose(transforms)
将多个transform组合起来使用。
例如
transforms.Compose([
     torchvision.transforms.ToTensor(), #先转化为Tensor
     torchvision.transforms.Normalize(mean,std) #在进行正则化
 ])
2.2 准备MNIST数据集的Dataset和DataLoader
准备训练集
import torchvision

#准备数据集,其中0.1307,0.3081为MNIST数据的均值和标准差,这样操作能够对其进行标准化
#因为MNIST只有一个通道(黑白图片),所以元组中只有一个值
dataset = torchvision.datasets.MNIST('/data', train=True, download=True,
                             transform=torchvision.transforms.Compose([
                               torchvision.transforms.ToTensor(),
                               torchvision.transforms.Normalize(
                                 (0.1307,), (0.3081,))
                             ]))
#准备数据迭代器
train_dataloader = torch.utils.data.DataLoader(dataset,batch_size=64,shuffle=True)
准备测试集
import torchvision

#准备数据集,其中0.1307,0.3081为MNIST数据的均值和标准差,这样操作能够对其进行标准化
#因为MNIST只有一个通道(黑白图片),所以元组中只有一个值
dataset = torchvision.datasets.MNIST('/data', train=False, download=True,
                             transform=torchvision.transforms.Compose([
                               torchvision.transforms.ToTensor(),
                               torchvision.transforms.Normalize(
                                 (0.1307,), (0.3081,))
                             ]))
#准备数据迭代器
train_dataloader = torch.utils.data.DataLoader(dataset,batch_size=64,shuffle=True)
3. 构建模型
补充:全连接层:当前一层的神经元和前一层的神经元相互链接,其核心操作就是 y = w x y = wx y=wx,即矩阵的乘法,实现对前一层的数据的变换
模型的构建使用了一个三层的神经网络,其中包括两个全连接层和一个输出层,第一个全连接层会经过激活函数的处理,将处理后的结果交给下一个全连接层,进行变换后输出结果
那么在这个模型中有两个地方需要注意:
- 激活函数如何使用
- 每一层数据的形状
- 模型的损失函数
3.1 激活函数的使用
前面介绍了激活函数的作用,常用的激活函数为Relu激活函数,他的使用非常简单
Relu激活函数由import torch.nn.functional as F提供,F.relu(x)即可对x进行处理
例如:
In [30]: b
Out[30]: tensor([-2, -1,  0,  1,  2])

In [31]: import torch.nn.functional as F

In [32]: F.relu(b)
Out[32]: tensor([0, 0, 0, 1, 2])
3.2 模型中数据的形状(【添加形状变化图形】)
- 原始输入数据为的形状:
[batch_size,1,28,28] - 进行形状的修改:
[batch_size,28*28],(全连接层是在进行矩阵的乘法操作) - 第一个全连接层的输出形状:
[batch_size,28],这里的28是个人设定的,你也可以设置为别的 - 激活函数不会修改数据的形状
- 第二个全连接层的输出形状:
[batch_size,10],因为手写数字有10个类别
构建模型的代码如下:
import torch
from torch import nn
import torch.nn.functional as F

class MnistNet(nn.Module):
    def __init__(self):
        super(MnistNet,self).__init__()
        self.fc1 = nn.Linear(28*28*1,28)  #定义Linear的输入和输出的形状
        self.fc2 = nn.Linear(28,10)  #定义Linear的输入和输出的形状

    def forward(self,x):
        x = x.view(-1,28*28*1)  #对数据形状变形,-1表示该位置根据后面的形状自动调整
        x = self.fc1(x) #[batch_size,28]
        x = F.relu(x)  #[batch_size,28]
        x = self.fc2(x) #[batch_size,10]
可以发现:pytorch在构建模型的时候形状上并不会考虑batch_size
3.3 模型的损失函数
首先,我们需要明确,当前我们手写字体识别的问题是一个多分类的问题,所谓多分类对比的是之前学习的2分类
回顾之前的课程,我们在逻辑回归中,我们使用sigmoid进行计算对数似然损失,来定义我们的2分类的损失。
-
在2分类中我们有正类和负类,正类的概率为 P ( x ) = 1 1 + e − x = e x 1 + e x P(x) = \frac{1}{1+e^{-x}} = \frac{e^x}{1+e^x} P(x)=1+e−x1=1+exex,那么负类的概率为 1 − P ( x ) 1-P(x) 1−P(x)
-
将这个结果进行计算对数似然损失 − ∑ y l o g ( P ( x ) ) -\sum y log(P(x)) −∑ylog(P(x))就可以得到最终的损失
那么在多分类的过程中我们应该怎么做呢?
-
多分类和2分类中唯一的区别是我们不能够再使用sigmoid函数来计算当前样本属于某个类别的概率,而应该使用softmax函数。
-
softmax和sigmoid的区别在于我们需要去计算样本属于每个类别的概率,需要计算多次,而sigmoid只需要计算一次
softmax的公式如下:
σ ( z ) j = e z j ∑ k = 1 K e z K , j = 1 ⋯ k \sigma(z)_j = \frac{e^{z_j}}{\sum^K_{k=1}e^{z_K}} ,j=1 \cdots k σ(z)j=∑k=1KezKezj,j=1⋯k
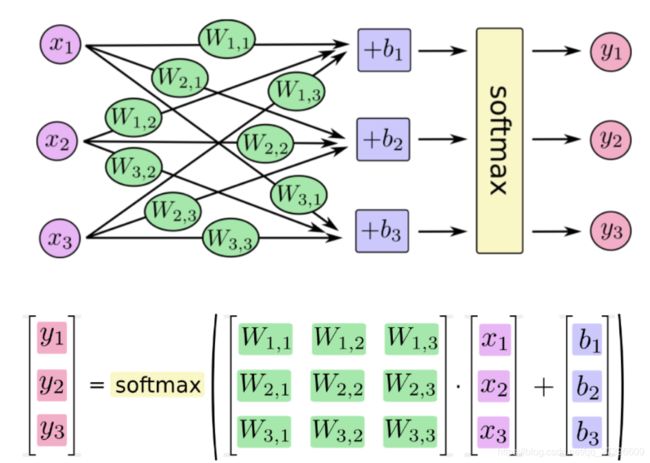
例如下图:
假如softmax之前的输出结果是2.3, 4.1, 5.6,那么经过softmax之后的结果是多少呢?
Y 1 = e 2.3 e 2.3 + e 4.1 + e 5.6 Y 2 = e 4.1 e 2.3 + e 4.1 + e 5.6 Y 3 = e 5.6 e 2.3 + e 4.1 + e 5.6 Y1 = \frac{e^{2.3}}{e^{2.3}+e^{4.1}+e^{5.6}} \\ Y2 = \frac{e^{4.1}}{e^{2.3}+e^{4.1}+e^{5.6}} \\ Y3 = \frac{e^{5.6}}{e^{2.3}+e^{4.1}+e^{5.6}} \\ Y1=e2.3+e4.1+e5.6e2.3Y2=e2.3+e4.1+e5.6e4.1Y3=e2.3+e4.1+e5.6e5.6
对于这个softmax输出的结果,是在[0,1]区间,我们可以把它当做概率
和前面2分类的损失一样,多分类的损失只需要再把这个结果进行对数似然损失的计算即可
即:
J = − ∑ Y l o g ( P ) , 其 中 P = e z j ∑ k = 1 K e z K , Y 表 示 真 实 值 \begin{aligned} & J = -\sum Y log(P) &, 其中 P = \frac{e^{z_j}}{\sum^K_{k=1}e^{z_K}} ,Y表示真实值 \end{aligned} J=−∑Ylog(P),其中P=∑k=1KezKezj,Y表示真实值
最后,会计算每个样本的损失,即上式的平均值
我们把softmax概率传入对数似然损失得到的损失函数称为交叉熵损失
在pytorch中有两种方法实现交叉熵损失
-
criterion = nn.CrossEntropyLoss() loss = criterion(input,target) -
#1. 对输出值计算softmax和取对数
output = F.log_softmax(x,dim=-1)
#2. 使用torch中带权损失
loss = F.nll_loss(output,target)
带权损失定义为: l n = − ∑ w i x i l_n = -\sum w_{i} x_{i} ln=−∑wixi,其实就是把 l o g ( P ) log(P) log(P)作为 x i x_i xi,把真实值Y作为权重
4. 模型的训练
训练的流程:
- 实例化模型,设置模型为训练模式
- 实例化优化器类,实例化损失函数
- 获取,遍历dataloader
- 梯度置为0
- 进行向前计算
- 计算损失
- 反向传播
- 更新参数
mnist_net = MnistNet()
optimizer = optim.Adam(mnist_net.parameters(),lr= 0.001)
def train(epoch):
    mode = True
    mnist_net.train(mode=mode) #模型设置为训练模型

    train_dataloader = get_dataloader(train=mode) #获取训练数据集
    for idx,(data,target) in enumerate(train_dataloader):
        optimizer.zero_grad() #梯度置为0
        output = mnist_net(data) #进行向前计算
        loss = F.nll_loss(output,target) #带权损失
        loss.backward()  #进行反向传播,计算梯度
        optimizer.step() #参数更新
        if idx % 10 == 0:
            print('Train Epoch: {} [{}/{} ({:.0f}%)]\tLoss: {:.6f}'.format(
                epoch, idx * len(data), len(train_dataloader.dataset),
                       100. * idx / len(train_dataloader), loss.item()))
5. 模型的保存和加载
5.1 模型的保存
torch.save(mnist_net.state_dict(),"model/mnist_net.pt") #保存模型参数
torch.save(optimizer.state_dict(), 'results/mnist_optimizer.pt') #保存优化器参数
5.2 模型的加载
mnist_net.load_state_dict(torch.load("model/mnist_net.pt"))
optimizer.load_state_dict(torch.load("results/mnist_optimizer.pt"))
6. 模型的评估
评估的过程和训练的过程相似,但是:
- 不需要计算梯度
- 需要收集损失和准确率,用来计算平均损失和平均准确率
- 损失的计算和训练时候损失的计算方法相同
- 准确率的计算:
- 模型的输出为[batch_size,10]的形状
- 其中最大值的位置就是其预测的目标值(预测值进行过sotfmax后为概率,sotfmax中分母都是相同的,分子越大,概率越大)
- 最大值的位置获取的方法可以使用
torch.max,返回最大值和最大值的位置 - 返回最大值的位置后,和真实值(
[batch_size])进行对比,相同表示预测成功
def test():
    test_loss = 0
    correct = 0
    mnist_net.eval()  #设置模型为评估模式
    test_dataloader = get_dataloader(train=False) #获取评估数据集
    with torch.no_grad(): #不计算其梯度
        for data, target in test_dataloader:
            output = mnist_net(data)
            test_loss += F.nll_loss(output, target, reduction='sum').item()
            pred = output.data.max(1, keepdim=True)[1] #获取最大值的位置,[batch_size,1]
            correct += pred.eq(target.data.view_as(pred)).sum()  #预测准备样本数累加
    test_loss /= len(test_dataloader.dataset) #计算平均损失
    print('\nTest set: Avg. loss: {:.4f}, Accuracy: {}/{} ({:.2f}%)\n'.format(
        test_loss, correct, len(test_dataloader.dataset),
        100. * correct / len(test_dataloader.dataset)))
7. 完整的代码如下:
import torch
from torch import nn
from torch import optim
import torch.nn.functional as F
import torchvision

train_batch_size = 64
test_batch_size = 1000
img_size = 28

def get_dataloader(train=True):
    assert isinstance(train,bool),"train 必须是bool类型"

    #准备数据集,其中0.1307,0.3081为MNIST数据的均值和标准差,这样操作能够对其进行标准化
    #因为MNIST只有一个通道(黑白图片),所以元组中只有一个值
    dataset = torchvision.datasets.MNIST('/data', train=train, download=True,
                                         transform=torchvision.transforms.Compose([
                                         torchvision.transforms.ToTensor(),
                                         torchvision.transforms.Normalize((0.1307,), (0.3081,)),]))
    #准备数据迭代器
    batch_size = train_batch_size if train else test_batch_size
    dataloader = torch.utils.data.DataLoader(dataset,batch_size=batch_size,shuffle=True)
    return dataloader

class MnistNet(nn.Module):
    def __init__(self):
        super(MnistNet,self).__init__()
        self.fc1 = nn.Linear(28*28*1,28)
        self.fc2 = nn.Linear(28,10)

    def forward(self,x):
        x = x.view(-1,28*28*1)
        x = self.fc1(x) #[batch_size,28]
        x = F.relu(x)  #[batch_size,28]
        x = self.fc2(x) #[batch_size,10]
        # return x
        return F.log_softmax(x,dim=-1)

mnist_net = MnistNet()
optimizer = optim.Adam(mnist_net.parameters(),lr= 0.001)
# criterion = nn.NLLLoss()
# criterion = nn.CrossEntropyLoss()
train_loss_list = []
train_count_list = []

def train(epoch):
    mode = True
    mnist_net.train(mode=mode)
    train_dataloader = get_dataloader(train=mode)
    print(len(train_dataloader.dataset))
    print(len(train_dataloader))
    for idx,(data,target) in enumerate(train_dataloader):
        optimizer.zero_grad()
        output = mnist_net(data)
        loss = F.nll_loss(output,target) #对数似然损失
        loss.backward()
        optimizer.step()
        if idx % 10 == 0:
            print('Train Epoch: {} [{}/{} ({:.0f}%)]\tLoss: {:.6f}'.format(
                epoch, idx * len(data), len(train_dataloader.dataset),
                       100. * idx / len(train_dataloader), loss.item()))

            train_loss_list.append(loss.item())
            train_count_list.append(idx*train_batch_size+(epoch-1)*len(train_dataloader))
            torch.save(mnist_net.state_dict(),"model/mnist_net.pkl")
            torch.save(optimizer.state_dict(), 'results/mnist_optimizer.pkl')


def test():
    test_loss = 0
    correct = 0
    mnist_net.eval()
    test_dataloader = get_dataloader(train=False)
    with torch.no_grad():
        for data, target in test_dataloader:
            output = mnist_net(data)
            test_loss += F.nll_loss(output, target, reduction='sum').item()
            pred = output.data.max(1, keepdim=True)[1] #获取最大值的位置,[batch_size,1]
            correct += pred.eq(target.data.view_as(pred)).sum()
    test_loss /= len(test_dataloader.dataset)
    print('\nTest set: Avg. loss: {:.4f}, Accuracy: {}/{} ({:.2f}%)\n'.format(
        test_loss, correct, len(test_dataloader.dataset),
        100. * correct / len(test_dataloader.dataset)))


if __name__ == '__main__':

    test()
    for i in range(5): #模型训练5轮
        train(i)
        test()

