化学实验室自动化 - 1. 深度学习视觉检测(实例分割) - Mask-RCNN模型训练和预测
在上一篇文章中,我们完成了化学实验室常见物体的COCO格式的实例分割数据集制作。上一篇文章的数据集中总共只有65张图像,而且被分成了训练集、验证集和测试集,经Mask-RCNN模型训练测试,发现模型的预测精度较差,因此我后续又在数据集中添加了大量的96孔板(我们实验室前期主要检测对象)图像数据,顺利地提高了模型对96孔板的检测性能。
本文将介绍Mask-RCNN模型的训练和预测过程,主要使用了mmdetection来构建Mask-RCNN。
CUDA和cuDNN安装教程,参考:
https://blog.csdn.net/u010618587/article/details/82940528
Pytorch安装教程,参考:
https://blog.csdn.net/love_respect/article/details/124681233
mmdetection安装教程,参考:
https://github.com/open-mmlab/mmdetection/blob/master/docs/en/get_started.md/#Installation
其它参考资料:
用mmdetection跑通Mask-RCNN - 知乎
MMdetection运行自己的coco数据集时报错does not matches the length of \`CLASSES\` 80) in CocoDataset_gy-77的博客-CSDN博客
1. 开发环境配置
Win10,64位+RTX3090
Visual Studio 2017
Python 3.6.13
CUDA 11.3.0+cuDNN 8.2.1
pytorch 1.10.0, torchvision 0.11.1
labelme 5.0.1, fiftyone 0.15.1
mmdetection 2.25.0
2.1 数据准备
新建mmdetection项目,将上一步骤生成的train2019, val2019, test2019文件夹内的3个annotations,json文件分别改名为instances_train2019.json, instances_val2019.json, instances_test2019.json,然后放入mmdetection/data/coco/annotations文件目录内。
将原先train2019/JPEGImages, val2019/JPEGImages, test2019/JPEGImages文件夹内的图像文件复制到mmdetection/data/coco/train2019, mmdetection/data/coco/val2019, mmdetection/data/coco/test2019文件夹内。
上图内的configs, demo, mmdet, tests, tools文件夹来自于mmdetection安装包。此外,新建checkpoints和work_dirs文件夹。
2.2 修改源代码
修改数据集的对象标签和种类数量时,要去mmdet源代码的路径(下图是我的mmdet源代码路径),修改掉以下两个文件内容:
C:\Users\Administrator\mmdetection\mmdet\datasets\coco.py
C:\Users\Administrator\mmdetection\mmdet\core\evaluation\class_names.py
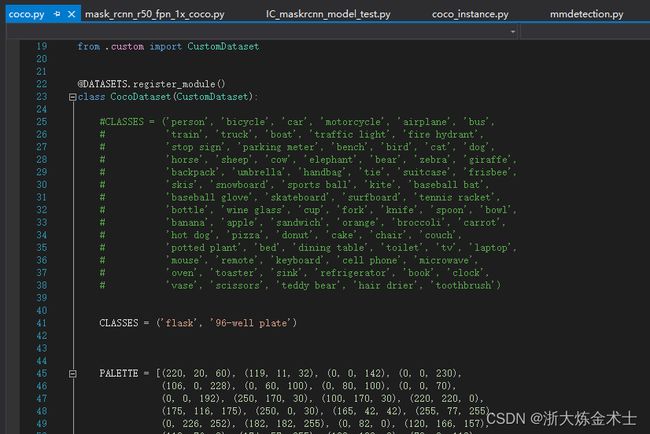
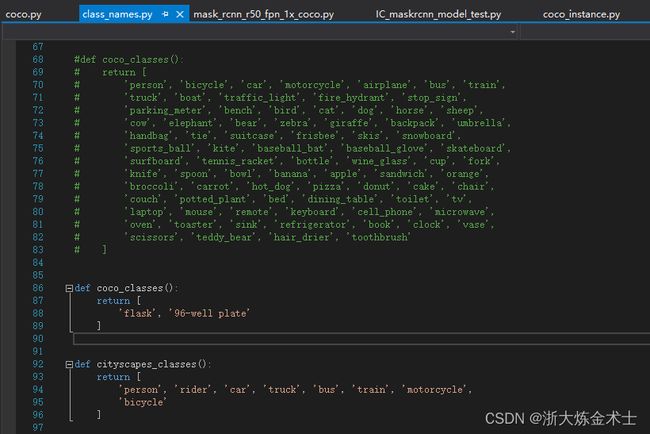
若不修改mmdet源代码里的文件,后续运行训练程序时会报错(# AssertionError: The `num_classes` (2) in Shared2FCBBoxHead of MMDataParallel does not matches the length of `CLASSES` 80) in CocoDataset)。
目前我的数据集内只有flask和96-well plate两类样本,要将mmdet/datasets/coco.py修改成自己的分类,如下图所示:
将mmdet/core/evaluation/class_names.py修改成自己的分类,如下图所示:
2.3 修改配置文件
首先查看自己模型的配置文件,对我而言路径为:
E:\Code\Python\mmdetection\mmdetection\configs\mask_rcnn\mask_rcnn_r50_fpn_1x_coco.py
打开后,可以看到以下内容:
我们需要对这4个文件进行修改。
(1)将configs/_base_/models/mask_rcnn_r50_fpn.py文件内的num_classes的值修改为分类的数量,对我而言,修改值为2。文件内共有2处地方要修改,不要漏掉,如下图所示:
(2)将configs/_base_/datasets/coco_instance.py文件内的data_root修改为'data/coco/',另外将data字典内的训练集、验证集、测试集的标注文件和图像路径修改为自己数据集相应的路径,如下图所示:
另外,在train_pipeline和test_pipeline中间添加val_pipeline(据说是添加验证步骤,具体有没有用我还不清楚,但是不会报错)
val_pipeline =[
    dict(type='LoadImageFromFile'),
    dict(type='LoadAnnotations', with_bbox=True),
    dict(type='Resize', img_scale=(1333, 800), keep_ratio=True),
    dict(type='RandomFlip', flip_ratio=0.5),
    dict(type='Normalize', **img_norm_cfg),
    dict(type='Pad',size_divisor=32),
    dict(type='DefaultFormatBundle'),
    dict(type='Collect',keys=['img', 'gt_bboxes', 'gt_labels']),
]
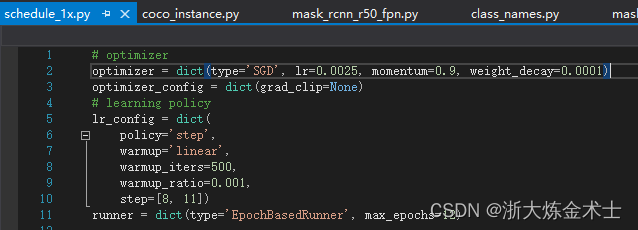
(3)在configs/_base_/schedules/schedule_1x.py中修改epoch和学习率(原文件是8个GPU学习率是0.02,我这只有1个GPU所以是0.02/8=0.0025)
(4)修改configs/_base_/default_runtime.py
首先将第一行修改成:
checkpoint_config = dict(create_symlink=False)
避免FileNotFoundError: [Errno 2] No such file or directory: 'epoch_1.pth' 这个错误。
然后取消第八行的注释(dict(type='TensorboardLoggerHook')),这是为了可以在训练以后通过tensorboard查看训练结果。
最后修改workflow = [('train', 1), ('val', 1)],据说也是为了验证。
2.4 模型训练和预测
配置文件(configs\mask_rcnn\mask_rcnn_r50_fpn_1x_coco.py)中设置加载预训练模型,以提高训练后模型的性能。
打开Anaconda Prompt,cd进入本项目所在的文件夹,通过以下指令完成模型训练和模型测试。
模型训练:
(pytorch) E:\Code\Python\mmdetection\mmdetection>python tools/train.py configs/mask_rcnn/mask_rcnn_r50_fpn_1x_coco.py模型测试:
(pytorch) E:\Code\Python\mmdetection\mmdetection>python tools/test.py configs/mask_rcnn/mask_rcnn_r50_fpn_1x_coco.py work_dirs/mask_rcnn_r50_fpn_1x_coco/epoch_12.pth --show --eval bbox segm完成模型训练后,模型存放在work_dirs/mask_rcnn_r50_fpn_1x_coco文件夹内(epoch_12.pth)。
如果要用自己训练的模型预测单张图像,可使用以下脚本:
#coding=utf-8

from mmdet.apis import init_detector
from mmdet.apis import inference_detector
from mmdet.apis import show_result_pyplot
from PIL import Image

# 模型配置文件
config_file = 'configs/mask_rcnn/mask_rcnn_r50_fpn_1x_coco.py'

# 预训练模型文件
checkpoint_file = 'work_dirs/mask_rcnn_r50_fpn_1x_coco/epoch_12.pth'

# 通过模型配置文件与预训练文件构建模型
model = init_detector(config_file, checkpoint_file, device='cuda:0')

# 测试单张图片并进行展示
img = 'data/coco/test2019/000000000084.jpg'
result = inference_detector(model, img)

show_result_pyplot(model, img, result, out_file='result.jpg')
show_img = Image.open('result.jpg')
show_img.show()
在我的电脑上,show_result_pyplot在结果显示上有问题,并不能正常显示预测后的图像。因此我直接是调用这个函数保存结果为result.jpg,然后再用PIL.Image来加载和显示预测后的图像。
后面我自己也对模型预测结果result进行了解析,根据我自己的需求(我暂时只需要检测96孔板),编写了一些可视化的函数(如检测方框绘制、mask绘制、96孔板中心点绘制等)。如下所示:
mmdet_result_analisys.py
import numpy as np
import cv2

# 计算检测到的96孔板(置信度阈值默认0.8),返回96孔板数量,bbox,mask
def cal_96_well_plate(result, threshold = 0.8):
    if(len(result[0][1]) == 0):
        return 0, [], []
    else:
        count = 0  # 用于记录符合条件的孔板数量
        bbox = []  # 用于储存符合条件孔板的位置信息
        mask = []  # 用于储存符合条件孔板的mask信息
        center = []  # 用于储存符合条件孔板的中心点坐标
        for i in range(len(result[0][1])):
            if (result[0][1][i][4] > threshold):
                count += 1
                bbox.append(result[0][1][i])
                mask.append(result[1][1][i])
                center.append([int((result[0][1][i][0]+result[0][1][i][2])/2),int((result[0][1][i][1]+result[0][1][i][3])/2)])

    return count, bbox, mask, center


# 在图像上绘制中心点,返回处理后的图像
# cv2.circle(img, center, radius, color, thickness, lineType, shift)
# img:输入的图片data; center:圆心位置; radius:圆的半径; color:圆的颜色; thickness:圆形轮廓的粗细(如果为正),负厚度表示要绘制实心圆; lineType: 圆边界的类型。
def plot_center(img, center, resize = 3, rotate_90 = False):
    for i in range(len(center)):
        cv2.circle(img,(center[i][0], center[i][1]), 30, (255,0,0), -1)

    # 缩放图片,并显示
    height,width = img.shape[:2]  #获取原图像的水平方向尺寸和垂直方向尺寸
    # 缩小图像时,使用cv2.INTER_AREA插值函数效果好;放大图像时,使用cv2.INTER_CUBIC和cv2.INTER_LINEAR都行,但后者速度更快
    img = cv2.resize(img, (width//resize,height//resize), interpolation = cv2.INTER_AREA)
    # 旋转图像
    if rotate_90:
        img = cv2.rotate(img, cv2.ROTATE_90_CLOCKWISE)
    cv2.imshow('img',img)
    cv2.waitKey(0)
    cv2.destroyAllWindows()

    #return img


# 在图像上绘制mask
def plot_mask(img, mask, resize = 3, rotate_90 = False):
    # 绘制mask
    for i in range(len(mask)):
        color_masks = np.random.randint(0, 256, (1, 3), dtype=np.uint8)  # mask颜色,随机
        img = np.array(img)
        img[mask[i]] = img[mask[i]]*0.6 + color_masks*0.4

    # 缩放图片,并显示
    height,width = img.shape[:2]  #获取原图像的水平方向尺寸和垂直方向尺寸
    # 缩小图像时,使用cv2.INTER_AREA插值函数效果好;放大图像时,使用cv2.INTER_CUBIC和cv2.INTER_LINEAR都行,但后者速度更快
    img = cv2.resize(img, (width//resize,height//resize), interpolation = cv2.INTER_AREA)
    # 旋转图像
    if rotate_90:
        img = cv2.rotate(img, cv2.ROTATE_90_CLOCKWISE)
    cv2.imshow('img',img)
    cv2.waitKey(0)
    cv2.destroyAllWindows()

    #return img


# 在图像上绘制检测框
def plot_bbox(img, bbox, resize = 3, rotate_90 = False):
    # 绘制bbox
    for i in range(len(bbox)):
        line_color = np.random.randint(0, 256, (1, 3), dtype=np.uint8)  # 边框颜色,随机
        color = (int(line_color[0][0]), int(line_color[0][1]), int(line_color[0][2]))

        cv2.rectangle(img, (int(bbox[i][0]),int(bbox[i][1])), (int(bbox[i][2]),int(bbox[i][3])), color, 8)  # 线宽8

        font = cv2.FONT_HERSHEY_SIMPLEX
        # 各参数依次是:图片,添加的文字,左上角坐标,字体,字体大小,颜色,字体粗细
        cv2.putText(img, '96-well plate', (int(bbox[i][0]), int(bbox[i][1])-50), font, 2, color, 3)

    # 缩放图片,并显示
    height,width = img.shape[:2]  #获取原图像的水平方向尺寸和垂直方向尺寸
    # 缩小图像时,使用cv2.INTER_AREA插值函数效果好;放大图像时,使用cv2.INTER_CUBIC和cv2.INTER_LINEAR都行,但后者速度更快
    img = cv2.resize(img, (width//resize,height//resize), interpolation = cv2.INTER_AREA)
    # 旋转图像
    if rotate_90:
        img = cv2.rotate(img, cv2.ROTATE_90_CLOCKWISE)
    cv2.imshow('img',img)
    cv2.waitKey(0)
    cv2.destroyAllWindows()

    #return img


# 在图像上绘制所有信息
def plot_all_result(img, bbox, mask, center, resize = 3, rotate_90 = False, saveimg = False):

    for i in range(len(bbox)):
        line_color = np.random.randint(0, 256, (1, 3), dtype=np.uint8)  # 边框颜色,随机
        color = (int(line_color[0][0]), int(line_color[0][1]), int(line_color[0][2]))

        # 绘制检测框
        cv2.rectangle(img, (int(bbox[i][0]),int(bbox[i][1])), (int(bbox[i][2]),int(bbox[i][3])), color, 7)  # 线宽8

        # 绘制文本
        font = cv2.FONT_HERSHEY_SIMPLEX
        # 各参数依次是:图片,添加的文字,左上角坐标,字体,字体大小,颜色,字体粗细
        cv2.putText(img, '96-well plate | ' + str(bbox[i][4])[:4] + ' | ' + str((center[i][0], center[i][1])),
                   (int(bbox[i][0]), int(bbox[i][1])-50), font, 1.5, color, 3)

        # 绘制mask
        img = np.array(img)
        img[mask[i]] = img[mask[i]]*0.6 + line_color*0.4

        # 绘制中心点
        cv2.circle(img,(center[i][0], center[i][1]), 30, color, -1)


    # 缩放图片,并显示
    height,width = img.shape[:2]  #获取原图像的水平方向尺寸和垂直方向尺寸
    # 缩小图像时,使用cv2.INTER_AREA插值函数效果好;放大图像时,使用cv2.INTER_CUBIC和cv2.INTER_LINEAR都行,但后者速度更快
    img = cv2.resize(img, (width//resize,height//resize), interpolation = cv2.INTER_AREA)
    # 旋转图像
    if rotate_90:
        img = cv2.rotate(img, cv2.ROTATE_90_CLOCKWISE)
    if saveimg:
        cv2.imwrite('result_analysis.jpg',img)
    cv2.imshow('img',img)
    cv2.waitKey(2000)
    cv2.destroyAllWindows()
利用上面编写的脚本,再用下述脚本,即可实现用mask-rcnn模型对图像中96孔板的预测:
#coding=utf-8

from mmdet.apis import init_detector
from mmdet.apis import inference_detector
from mmdet.apis import show_result_pyplot
from PIL import Image
import time
import cv2
from IC_TCP_Server.mmdet_result_analisys import cal_96_well_plate, plot_center, plot_mask, plot_bbox, plot_all_result

# 使用cv2.imshow()出问题,pip install opencv-contrib-python

# 模型配置文件
config_file = 'configs/mask_rcnn/mask_rcnn_r50_fpn_1x_coco.py'

# 预训练模型文件
checkpoint_file = 'work_dirs/mask_rcnn_r50_fpn_1x_coco/epoch_12.pth'

# 通过模型配置文件与预训练文件构建模型
model = init_detector(config_file, checkpoint_file, device='cuda:0')


# 预测单张图片
img = cv2.imread('data/coco/test2019/000000000084.jpg')
result = inference_detector(model, img)


# 分析结果中关于96孔板的信息
count, bbox, mask, center = cal_96_well_plate(result)
#plot_center(img, center, resize = 4, rotate_90 = True)
#plot_mask(img, mask, resize = 4, rotate_90 = True)
#plot_bbox(img, bbox, resize = 4, rotate_90 = True)
plot_all_result(img, bbox, mask, center, resize = 3, rotate_90 = False, saveimg = True)
模型预测结果如下图所示,可以看到模型对96孔板的检测精度很高:
至此,完成mask-rcnn模型训练和预测。
后续我将实现将模型部署在服务器端,然后机器人工控机的客户端软件将摄像头采集到的图像发送给服务端软件,服务端收到数据后解析,然后将结果传回给客户端。


