games101——作业7
文章目录
- 总览
- 调通框架
-
- 修改的内容
- 你需要迁移的内容
- 编译运行
- 开始实现
-
- 代码框架
- Path Tracing 的实现说明
- 结果与分析
-
- 注意事项
- 参考结果
- 材质的扩展
- 作业代码
- 进阶代码
-
- 多线程
- Microfacet
总览
在之前的练习中,我们实现了 Whitted-Style Ray Tracing 算法,并且用 BVH
等加速结构对于求交过程进行了加速。在本次实验中,我们将在上一次实验的基
础上实现完整的 Path Tracing 算法。至此,我们已经来到了光线追踪版块的最后
一节内容。
请认真阅读本文档,按照本文档指示的流程完成本次实验。
调通框架
修改的内容
相比上一次实验,本次实验对框架的修改较大,主要在以下几方面:
- 修改了 main.cpp,以适应本次实验的测试模型 CornellBox
- 修改了 Render,以适应 CornellBox 并且支持 Path Tracing 需要的同一 Pixel 多次 Sample
- 修改了 Object,Sphere,Triangle,TriangleMesh,BVH,添加了 area 属性与Sample 方法,以实现对光源按面积采样,并在 Scene 中添加了采样光源的接口 sampleLight
- 修改了 Material 并在其中实现了 sample, eval, pdf 三个方法用于 Path Tracing 变量的辅助计算
你需要迁移的内容
你需要从上一次编程练习中直接拷贝以下函数到对应位置:
- Triangle::getIntersection in Triangle.hpp: 将你的光线-三角形相交函数
粘贴到此处,请直接将上次实验中实现的内容粘贴在此。
inline Intersection Triangle::getIntersection(Ray ray)
{
    Intersection inter;

    if (dotProduct(ray.direction, normal) > 0)
        return inter;
    double u, v, t_tmp = 0;
    Vector3f pvec = crossProduct(ray.direction, e2);
    double det = dotProduct(e1, pvec);
    if (fabs(det) < EPSILON)
        return inter;

    double det_inv = 1. / det;
    Vector3f tvec = ray.origin - v0;
    u = dotProduct(tvec, pvec) * det_inv;
    if (u < 0 || u > 1)
        return inter;
    Vector3f qvec = crossProduct(tvec, e1);
    v = dotProduct(ray.direction, qvec) * det_inv;
    if (v < 0 || u + v > 1)
        return inter;
    t_tmp = dotProduct(e2, qvec) * det_inv;

    // TODO find ray triangle intersection
    inter.happened = true;
    inter.coords = ray.origin + t_tmp * ray.direction;
    inter.normal = this->normal;
    inter.distance = dotProduct(t_tmp * ray.direction, t_tmp * ray.direction);
    inter.obj = this;
    inter.m = this->m;

    return inter;
}
- IntersectP(const Ray& ray, const Vector3f& invDir,const std::array
的内容粘贴在此处,并且注意检查 t_enter = t_exit 的时候的判断是否正确。
inline bool Bounds3::IntersectP(const Ray& ray, const Vector3f& invDir,
                                const std::array<int, 3>& dirIsNeg) const
{
    // invDir: ray direction(x,y,z), invDir=(1.0/x,1.0/y,1.0/z), use this because Multiply is faster that Division
    // dirIsNeg: ray direction(x,y,z), dirIsNeg=[int(x>0),int(y>0),int(z>0)], use this to simplify your logic
    // TODO test if ray bound intersects
    float t_enter;
    float t_exit;
    Vector3f t_enter_v3f = (pMin - ray.origin) * invDir;
    Vector3f t_exit_v3f = (pMax - ray.origin) * invDir;

    // for(int i=0; i<3; ++i) {
    //     if(!dirIsNeg[i])
    //         std::swap(t_enter_v3f[i], t_exit_v3f[i]);
    // }
    if(!dirIsNeg[0])
        std::swap(t_enter_v3f.x, t_exit_v3f.x);
    if(!dirIsNeg[1])
        std::swap(t_enter_v3f.y, t_exit_v3f.y);
    if(!dirIsNeg[2])
        std::swap(t_enter_v3f.z, t_exit_v3f.z);

    t_enter = std::max(t_enter_v3f.x, std::max(t_enter_v3f.y, t_enter_v3f.z));
    t_exit = std::min(t_exit_v3f.x, std::min(t_exit_v3f.y, t_exit_v3f.z));

    if (t_enter <= t_exit && t_exit >= 0)
        return true;
    else
        return false;
}
这里需要注意的是, t e n t e r = = t e x i t t_{enter} == t_{exit} tenter==texit 也满足条件,主要是因为场景中(与水平面或垂直面平行)存在高为 0 包围框(比如墙壁),如果不加上相等,可能会出现渲染之后全黑的情况
- getIntersection(BVHBuildNode* node, const Ray ray) in BVH.cpp: BVH查找过程,请直接将上次实验中实现的内容粘贴在此处.
Intersection BVHAccel::getIntersection(BVHBuildNode* node, const Ray& ray) const
{
    Intersection isect;
    // TODO Traverse the BVH to find intersection
    if(!node->bounds.IntersectP(ray, ray.direction_inv, std::array<int, 3> {ray.direction.x>0, ray.direction.y>0, ray.direction.z>0}))
        return isect;
    if(node->object != nullptr)
        return node->object->getIntersection(ray);

    Intersection isect_left, isect_right;
    isect_left = getIntersection(node->left, ray);
    isect_right = getIntersection(node->right, ray);

    return isect_left.distance <= isect_right.distance ? isect_left : isect_right;
}
编译运行
基础代码只依赖于 CMake,下载基础代码后,执行下列命令,就可以编译这
个项目:
mkdir build
cd ./build
cmake ..
make
在此之后,你就可以通过 ./Raytracing 来执行程序。请务必确保程序可以正常编译之后,再进入下一节的内容。
开始实现
代码框架
在本次实验中,你只需要修改这一个函数:
- castRay(const Ray ray, int depth) in Scene.cpp: 在其中实现 Path Tracing 算法
可能用到的函数有:
- intersect(const Ray ray) in Scene.cpp: 求一条光线与场景的交点
- sampleLight(Intersection pos, float pdf) in Scene.cpp: 在场景的所有光源上按面积 uniform 地 sample 一个点,并计算该sample 的概率密度
- sample(const Vector3f wi, const Vector3f N) in Material.cpp: 按照该
材质的性质,给定入射方向与法向量,用某种分布采样一个出射方向 - pdf(const Vector3f wi, const Vector3f wo, const Vector3f N) in Material.cpp: 给定一对入射、出射方向与法向量,计算 sample 方法得到该出射方向的概率密度
- eval(const Vector3f wi, const Vector3f wo, const Vector3f N) in Material.cpp: 给定一对入射、出射方向与法向量,计算这种情况下的 f_r 值
可能用到的变量有:
- RussianRoulette in Scene.cpp: P_RR, Russian Roulette 的概率
Path Tracing 的实现说明
课程中介绍的 Path Tracing 伪代码如下 (为了与之前框架保持一致,wo 定义与课程介绍相反,因为代码里的光线是从相机射出的

按照本次实验给出的框架,我们进一步可以将伪代码改写为:
请确保你已经清晰地理解 Path Tracing 的实现方式,再进入下一个环节的讨论。
结果与分析
本章节讨论得到结果与调试过程中需要特别注意的一些问题。
注意事项
- 本次实验代码的运行非常慢,建议调试时调整 main.cpp 中的场景大小或 Render.cpp 中的 SPP 数以加快运行速度;此外,还可以实现多线程来进一步加快运算。
- 注意数值精度问题,尤其注意 pdf 接近零的情况,以及 sampleLight 时判断光线是否被挡的边界情况。这些情况往往会造成渲染结果噪点过多,或出现黑色横向条纹。
参考结果
如果严格按照上述算法实现,你会发现渲染结果中光源区域为纯黑。请分析这一现象的原因,并且修改 Path Tracing 算法使光源可见。最终结果如下:

材质的扩展
目前的框架中拆分 sample, eval, pdf,实现了最基础的 Diffuse 材质。请在不破
坏这三个函数定义方式的情况下修改这三个函数,实现 Microfacet 模型。本任务
不要求你实现复杂的采样手段,因此你依然可以沿用 Diffuse 材质采用的 sample
与 pdf 计算。
Microfacet 相关知识见第十七讲 Slides https://sites.cs.ucsb.edu/~lingqi/teaching/resources/GAMES101_Lecture_17.pdf.
作业代码
首先向场景中射出一条光线,看其与场景中最近的交点在哪,如果存在交点,获得相关属性(交点坐标,法向量,材质)
Intersection intersection = Scene::intersect(ray);
if(intersection.happened) {
        // std::cout<<1<
        Vector3f hitPoint = intersection.coords;
        Vector3f N = intersection.normal; // normal
        Material *m = intersection.m;
这里光照由直接光照与间接光照组成,我们先将其初始化
 // init L_dir and L_indir
Vector3f L_dir(0.0), L_indir(0.0);
计算直接光照对光源进行采样(课上提到过,如果只是对物体的光线进行采样,如果上方有光源,会有许多射线没打到光源而被浪费掉)
 // Uniformly sample the light at x (pdf_light = 1 / A)
Intersection intersection_light;
float pdf_light;
sampleLight(intersection_light, pdf_light);
然后从点 p p p 向采样光线处点 x x x 射出一条光线,这里需要确定其起点,方向,然后在场景中射出这条射线。
// Shoot a ray from p to x
Vector3f dir_p_x = (intersection_light.coords - hitPoint).normalized();
Ray ray_p_x(hitPoint + EPSILON * N, dir_p_x);
// std::cout<
// std::cout<
Intersection intersection_p_x = Scene::intersect(ray_p_x);
这里需要注意的是,我们要在 hitPoint 上加上 EPSLON * N,如果不这样,那么之后判断光线是否被遮挡会有问题(会认为被自己遮挡),然后出现下图的问题
如果光线没有被遮挡住这里我们寻找 d ω d\omega dω 与 d A dA dA 的关系,将原来的积分转换为对 d A dA dA 的积分,这样就可以使用蒙特卡洛积分求解对光源进行采样

在伪代码中对于这个式子
![]()
这里注意光线的方向在光源上是如下图所示的
那我们使用向量点积计算 c o s θ ′ cos\theta' cosθ′,要给 向量 ws 加上负号
		// If the ray is not blocked in the middle
        if(intersection_p_x.happened && intersection_p_x.m->hasEmission()) {
            // std::cout<<1<
            Vector3f NN = intersection_p_x.normal;
            L_dir = intersection_p_x.m->m_emission * m->eval(ray.direction, dir_p_x, N) * dotProduct(dir_p_x, N) * dotProduct(-dir_p_x, NN) / intersection_p_x.distance / pdf_light;
        }
下面计算间接光照,首先使用俄罗斯轮盘赌判断此时是否结束,如果还未结束,我们采样入射方向(这里指的是光线的入射方向,在之前的代码框架里对应 w o w_o wo),这里在 f r f_r fr 的计算中是与光线的入射方向有关的,而与出射方向无关(对于漫反射材质),然后使用蒙特卡洛采样即可,间接光照要不停弹射(在这里就是递归调用castRay),直到俄罗斯轮盘赌停止。
 if(get_random_float() <= RussianRoulette) {
            // Trace a ray r(p, wi)
            // std::cout<<1<
            Vector3f dir_i = m->sample(ray.direction, N).normalized();
            Ray ray_p_diri(hitPoint, dir_i);
            Intersection intersection_p_diri = Scene::intersect(ray_p_diri);

            // If ray r hit a non-emitting object at q
            if(intersection_p_diri.happened && !intersection_p_diri.m->hasEmission()) {
                L_indir = castRay(ray_p_diri, depth+1) * m->eval(ray.direction, dir_i, N) * dotProduct(dir_i, N) / m->pdf(ray.direction, dir_i, N) / RussianRoulette;
            }
        }
然后返回直接光照+间接光照的结果
return L_dir + L_indir;
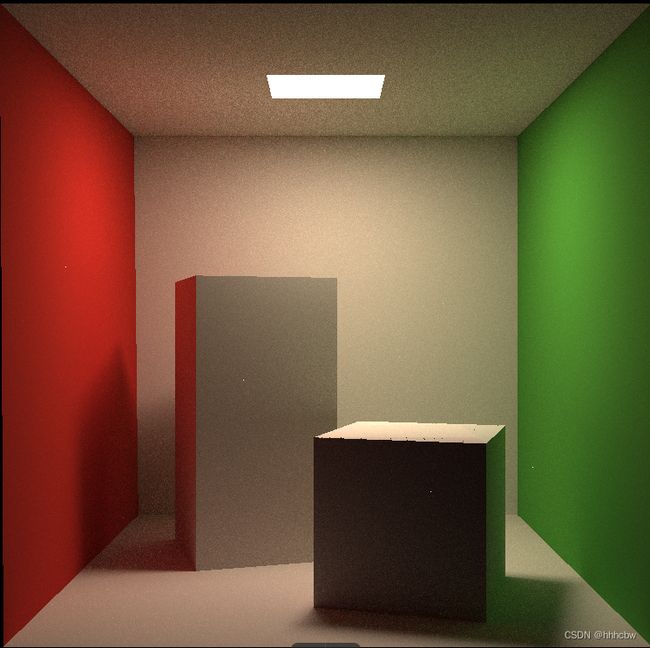
其结果如下
我们会发现光源很暗,这是因为我们在计算渲染方程时是要加上自身释放的光

我们把自身释放的光加上
return m->getEmission() + L_dir + L_indir;
castRay完整代码如下
// Implementation of Path Tracing
Vector3f Scene::castRay(const Ray &ray, int depth) const
{
    // TO DO Implement Path Tracing Algorithm here
    Intersection intersection = Scene::intersect(ray);
    if(intersection.happened) {
        // std::cout<<1<
        Vector3f hitPoint = intersection.coords;
        Vector3f N = intersection.normal; // normal
        Material *m = intersection.m;
        // if(m->hasEmission())
        //     std::cout<<1<

        // init L_dir and L_indir
        Vector3f L_dir(0.0), L_indir(0.0);

        // Uniformly sample the light at x (pdf_light = 1 / A)
        Intersection intersection_light;
        float pdf_light;
        sampleLight(intersection_light, pdf_light);
        // std::cout<

        // Shoot a ray from p to x
        Vector3f dir_p_x = (intersection_light.coords - hitPoint).normalized();
        Ray ray_p_x(hitPoint + EPSILON * N, dir_p_x);
        // std::cout<
        // std::cout<
        Intersection intersection_p_x = Scene::intersect(ray_p_x);
        // if(intersection_p_x.happened)
            // std::cout<

        // If the ray is not blocked in the middle
        if(intersection_p_x.happened && intersection_p_x.m->hasEmission()) {
            // std::cout<<1<
            Vector3f NN = intersection_p_x.normal;
            L_dir = intersection_p_x.m->m_emission * m->eval(ray.direction, dir_p_x, N) * dotProduct(dir_p_x, N) * dotProduct(-dir_p_x, NN) / intersection_p_x.distance / pdf_light;
        }

        // Test Russian Roulette with probability RussianRoulette
        if(get_random_float() <= RussianRoulette) {
            // Trace a ray r(p, wi)
            // std::cout<<1<
            Vector3f dir_i = m->sample(ray.direction, N).normalized();
            Ray ray_p_diri(hitPoint, dir_i);
            Intersection intersection_p_diri = Scene::intersect(ray_p_diri);

            // If ray r hit a non-emitting object at q
            if(intersection_p_diri.happened && !intersection_p_diri.m->hasEmission()) {
                L_indir = castRay(ray_p_diri, depth+1) * m->eval(ray.direction, dir_i, N) * dotProduct(dir_i, N) / m->pdf(ray.direction, dir_i, N) / RussianRoulette;
            }
        }

        return m->getEmission() + L_dir + L_indir;
    } else {
        return Vector3f(0,0,0);
    }
}
改进结果如下(SPP=16)
SPP=256 结果如下
进阶代码
多线程
如果不使用多线程,那么渲染会特别慢,这里 SPP=4,就使用了 24 分钟
其实我们对于每一个像素射出一条光线,其本身就特别适合多线程处理,因为并不会相互影响(除了 m,这里使用 i 与 j 表示,以及进度的更新如果是在外层循环加多线程会受到影响)
这里参考 games101 论坛大佬的评论,直接使用 #pragma omp parallel for 实现多线程


这里对比了在外层循环 j j j和内层循环 i i i以及内存循环 k k k分别使用多线程的时间对比(SPP=16),可以发现在外层循环加多线程会更快(因为内层循环在所有线程完成之后,再进行外层循环的下一次遍历,这时就会产生线程空闲)
内层循环 k k k使用多线程

内层循环 i i i使用多线程

外层循环 j j j使用多线程

Microfacet
这里微表面模型建议可以先观看 Games202的第十节,有一个更深入的了解。这里主要参考这位大佬的代码,并对一些地方做了调整。
首先在场景中添加一个 Microfacet 材质的球
	Material* red = new Material(DIFFUSE, Vector3f(0.0f));
    red->Kd = Vector3f(0.63f, 0.065f, 0.05f);
    Material* green = new Material(DIFFUSE, Vector3f(0.0f));
    green->Kd = Vector3f(0.14f, 0.45f, 0.091f);
    Material* white = new Material(DIFFUSE, Vector3f(0.0f));
    white->Kd = Vector3f(0.725f, 0.71f, 0.68f);
    Material* light = new Material(DIFFUSE, (8.0f * Vector3f(0.747f+0.058f, 0.747f+0.258f, 0.747f) + 15.6f * Vector3f(0.740f+0.287f,0.740f+0.160f,0.740f) + 18.4f *Vector3f(0.737f+0.642f,0.737f+0.159f,0.737f)));
    light->Kd = Vector3f(0.65f);
    Material* m = new Material(Microfacet, Vector3f(0.0f));
    // m->Ks = Vector3f(0.45, 0.45, 0.45);
    m->Kd = Vector3f(0.3, 0.3, 0.25);
    Sphere sphere1(Vector3f(150, 100, 300), 100, m);

    MeshTriangle floor("../models/cornellbox/floor.obj", white);
    // MeshTriangle shortbox("../models/cornellbox/shortbox.obj", white);
    // MeshTriangle tallbox("../models/cornellbox/tallbox.obj", white);
    MeshTriangle left("../models/cornellbox/left.obj", red);
    MeshTriangle right("../models/cornellbox/right.obj", green);
    MeshTriangle light_("../models/cornellbox/light.obj", light);

    scene.Add(&floor);
    scene.Add(&sphere1);
    // scene.Add(&shortbox);
    // scene.Add(&tallbox);
    scene.Add(&left);
    scene.Add(&right);
    scene.Add(&light_);
下面是CookTorrance模型的公式,主要用于计算镜面反射

那么根据能量守恒,最后反射的光由漫反射与镜面反射组成,即 ( 1 − F ) ∗ r d + r s (1-F)*r_d + r_s (1−F)∗rd+rs,这里的 F F F在这里为菲涅尔项,我觉得这里可能考虑折射的光线有的部分成为了漫反射。漫反射还是按照之前的做法(之前的做法,就是部分变成了漫反射),镜面反射就按照 CookTorrance 模型计算
漫反射计算公式如下,可以看到漫反射就是一个常数, ρ \rho ρ 就代表了颜色,如果为1,就是没有吸收,全均匀地反射出去

Vector3f diffuse = Kd / M_PI;
这里 F 为菲涅尔项,因为反射率依赖入射角度,具体公式如下,代码框架中也也已经给出具体代码

 void fresnel(const Vector3f &I, const Vector3f &N, const float &ior, float &kr) const
    {
        float cosi = clamp(-1, 1, dotProduct(I, N));
        float etai = 1, etat = ior;
        if (cosi > 0) {  std::swap(etai, etat); }
        // Compute sini using Snell's law
        float sint = etai / etat * sqrtf(std::max(0.f, 1 - cosi * cosi));
        // Total internal reflection
        if (sint >= 1) {
            kr = 1;
        }
        else {
            float cost = sqrtf(std::max(0.f, 1 - sint * sint));
            cosi = fabsf(cosi);
            float Rs = ((etat * cosi) - (etai * cost)) / ((etat * cosi) + (etai * cost));
            float Rp = ((etai * cosi) - (etat * cost)) / ((etai * cosi) + (etat * cost));
            kr = (Rs * Rs + Rp * Rp) / 2;
        }
        // As a consequence of the conservation of energy, transmittance is given by:
        // kt = 1 - kr;
    }
D 和 G 的实现方式有很多在,这里主要参考下面的公式
其中 α \alpha α 表示粗糙度的平方, n n n 表示法线, h h h 表示半程向量, k k k 是基于粗糙度的项 k = ( r ∗ r ) / 8 k=(r*r)/8 k=(r∗r)/8。
D 表示微表面的法线分布,因为考虑微表面都是镜面反射,所以考虑其法线分布,决定了有多少光能反射到出射方向(宏观)
float Material::DistributionGGX(const Vector3f &N, const Vector3f &H, const float &roughness)
{
    float a = roughness * roughness;
    float a2 = a * a;
    float cosnh = std::max(0.0f, dotProduct(N, H));
    float cosnh2 = cosnh * cosnh;
    float x2 = (cosnh2 * (a2 - 1) + 1) * (cosnh2 * (a2 - 1) + 1);

    return a2 / (M_PI * x2);
}
G 表示阴影遮挡项,因为可能存在反射的光被其他表面给遮挡住,所以要加上这项
float Material::GeometrySub(const float &NdotV, const float &roughness)
{
    float r = (roughness + 1.0);
    float k = (r*r) / 8.0;

    float nom = NdotV;
    float denom = NdotV * (1.0 - k) + k;
    return nom / denom;
}

float Material::GeometrySmith(const Vector3f &N, const Vector3f &V, const Vector3f &L, const float &roughness)
{
    float NdotV = std::max(dotProduct(N, V), 0.0f);
    float NdotL = std::max(dotProduct(N, L), 0.0f);
    return GeometrySub(NdotV, roughness) * GeometrySub(NdotL, roughness);
}
实现该材质,主要是通过修改 Material::eval 函数来实现的:
Vector3f Material::eval(const Vector3f &wi, const Vector3f &wo, const Vector3f &N){
    switch(m_type){
        case DIFFUSE:
        {
            // calculate the contribution of diffuse   model
            float cosalpha = dotProduct(N, wo);
            if (cosalpha > 0.0f) {
                Vector3f diffuse = Kd / M_PI;
                return diffuse;
            }
            else
                return Vector3f(0.0f);
            break;
        }
        case Microfacet:
        {
            // calculate the contribution of Microfacet model
            float cosalpha = dotProduct(N, wo);
            if (cosalpha > 0.0f) {
                float roughness = 0.35;

                Vector3f V = -wi;
                Vector3f L = wo;
                Vector3f H = normalize(V + L);

                // calculate distribution of normals: D
                float D = DistributionGGX(N, H, roughness);

                // calculate shadowing masking term: G
                float G = GeometrySmith(N, V, L, roughness);

                // calculate fresnel coefficient: F
                float F;
                float etat = 1.85;
                fresnel(wo, N, etat, F);

                Vector3f nominator = D * G * F;
                float denominator = 4 * std::max(dotProduct(N, V), 0.0f) * std::max(dotProduct(N, L), 0.0f);
                Vector3f specular = nominator / std::max(denominator, 0.001f);

                // energy balance
                Vector3f diffuse = Kd / M_PI;
                return (Vector3f(1.0f) - F) * diffuse + specular;
            }
            else
                return Vector3f(0.0f);
            break;
        }
    }
}
结果如下(SPP=16,可见球上噪点还是很明显的)
看别人博客说要修改球与光线相交的判断,更改完代码如下
Intersection getIntersection(Ray ray){
        Intersection result;
        result.happened = false;
        Vector3f L = ray.origin - center;
        float a = dotProduct(ray.direction, ray.direction);
        float b = 2 * dotProduct(ray.direction, L);
        float c = dotProduct(L, L) - radius2;
        float t0, t1;
        if (!solveQuadratic(a, b, c, t0, t1)) return result;
        if (t0 < 0) t0 = t1;
        if (t0 < 0) return result;

		// 相交判定修改
		if (t0 > 0.5) {
			result.happened = true;

			result.coords = Vector3f(ray.origin + ray.direction * t0);
			result.normal = normalize(Vector3f(result.coords - center));
			result.m = this->m;
			result.obj = this;
			result.distance = t0;
		}
        return result;

    }

Vector3f evalDiffuseColor(const Vector2f &st)const {
        //return m->getColor();
        return {};
    }
结果如下