PyTorch学习笔记之模型构建和模型初始化
PyTorch学习笔记之模型构建和模型初始化
文章目录
- PyTorch学习笔记之模型构建和模型初始化
-
- 2.3 模型构建
-
- 2.3.1 构造神经网络
- 2.3.2 层结构基本介绍
-
- 1)不含模型参数的层
- 2)含模型参数的层
- 3)卷积层
-
- a. 原理
- b. 代码
- c. 如何计算输出特征图的大小
- 4)反卷积
-
- a. 双线性插值上采样
- b. 转置卷积
- 5)池化层
-
- a. 原理
- b. 代码
- 6) 正则化层
-
- a. 原理
- b. 代码
- 7) 激活函数
-
- a. 原理
- b. 代码
- 8) 全连接层
- 2.3.3 模型举例
-
- 1)LeNet
- 2)AlexNet
- 2.4 模型初始化
-
- 2.4.1 `torch.nn.init`内容
- 2.4.2 `torch.nn.init`使用
- 2.4.3 初始化函数的封装
2.3 模型构建
2.3.1 构造神经网络
- Module类是nn模块里提供的一个模型构造类,是所有神经网络模块的基类,可以继承它来定义模型
- 举例继承Module类构造多层感知机
- 这里定义的MLP类重载了Module类的
init函数(用于创建模型参数)和forward函数(用于定义前向计算,即正向传播)
import torch
from torch import nn

class MLP(nn.Module):
    #声明带有模型参数的层,这里声明了两个全连接层
    def __init__(self, **kwargs):
        #调用MLP父类Block的构造函数来进行必要的初始化,这样在构造实例时还可以指定其他函数
        super(MLP, self).__init__(**kwargs)
        self.hidden = nn.Linear(784, 256)
        self.act = nn.ReLU()
        self.output = nn.Linear(256,10)

	#定义模型的前向计算,即如何根据输入x计算返回所需要的模型输出
    def forward(self, x):
        o = self.act(self.hidden(x))
        return self.output(o)
- 以上的MLP类无需定义反向传播函数,系统将通过自动求梯度而自动生成反向传播所需的backward函数
- 实例化MLP类得到模型变量net
- 代码初始化net并传入输入数据 X 做一次前向运算
- 其中
net(X)会调用MLP集成自Module类的call函数,这个函数将调用MLP类定义的forward函数来完成前向计算
X = torch.rand(2, 784)
net = MLP()
print(net)
net(X)
MLP(
	(hidden): Linear(in_features=784, out_features=256, bias=True)
    (act): ReLU()
    (output): Linear(in_features=256, out_features=10, bias=True)
)
tensor([[ 0.0149, -0.2641, -0.0040,  0.0945, -0.1277, -0.0092,  0.0343,  0.0627,
         -0.1742,  0.1866],
        [ 0.0738, -0.1409,  0.0790,  0.0597, -0.1572,  0.0479, -0.0519,  0.0211,
         -0.1435,  0.1958]], grad_fn=<AddmmBackward>)
- 注意:这里并未将Module类命名为层或者模型之类的名字,因为该类是一个可自由组建的部件,子类既可以是一个层(如PyTorch提供的Linear类),又可以是一个模型(如这里定义的 MLP 类),或者是模型的⼀个部分
2.3.2 层结构基本介绍
- 可以使用
torch.nn包来构建神经网络。nn包依赖autograd包来定义模型并对它们求导。一个nn.Module包含各个层和一个forward(input)方法,该方法返回output
1)不含模型参数的层
- 下面构造的MyLayer类通过继承Module类自定义一个将输入减掉均值后输出的层,并将层的计算定义在forward函数里,这个层不含模型参数
import torch
from torch import nn

class MyLayer(nn.Module):
    def __init__(self, **kwargs):
        super(MyLayer, self).__init__(**kwargs)
    def forward(self, x):
        return x - x.mean()
- 测试,实例化该层,然后做前向计算
layer = MyLayer()
layer(torch.tensor([1, 2, 3, 4, 5]))
- 输出
tensor([-2., -1., 0., 1., 2.])
2)含模型参数的层
- 如果一个 Tensor 是 Parameter ,会自动被添加到模型的参数列表里。所以在自定义含模型参数的层时,我们应该将参数定义成 Parameter ,除了直接定义成 Parameter 类外,还可以使用 ParameterList 和 ParameterDict 分别定义参数的列表和字典
class MyListDense(nn.Module):
    def __init__(self):
        super(MyListDense, self).__init__()
        self.params = nn.ParameterList([nn.Parameter(torch.randn(4, 4)) for i in range(3)])
        self.params.append(nn.Parameter(torch.randn(4, 1)))

    def forward(self, x):
        for i in range(len(self.params)):
            x = torch.mm(x, self.params[i])
        return x
net = MyListDense()
print(net)
class MyDictDense(nn.Module):
    def __init__(self):
        super(MyDictDense, self).__init__()
        self.params = nn.ParameterDict({
                'linear1': nn.Parameter(torch.randn(4, 4)),
                'linear2': nn.Parameter(torch.randn(4, 1))
        })
        self.params.update({'linear3': nn.Parameter(torch.randn(4, 2))}) #新增

    def forward(self, x, choice='linear1'):
        return torch.mm(x, self.params[choice])

net = MyDictDense()
print(net)
3)卷积层
- 二维卷积层将输入和卷积核做互相关运算,并加上一个标量偏差来得到输出。模型参数包括卷积核和标量偏差。在训练模型时,通常先对卷积核随机初始化,然后不断迭代卷积核和偏差。
(1)注意卷积的计算方式方法,如何设置相应的参数
(2)步长和填充会影响最终输出特征图的尺寸
(3)特征图的计算公式:包含/不包含膨胀率
a. 原理
- 分类
- 离散
- 连续
- 卷积核在数字图像上依次由左至右、由上至下滑动,将每次滑动的行数和列数称为步幅
- 取与卷积核大小相等的区域
- 逐像素相乘后再做加法运算
b. 代码
- 示例
#—————— 创建一个高和宽为3的二维卷积层,然后设输⼊高和宽两侧的填充数分别为1。给定一个高和宽为8的输入,我们发现输出的高和宽也是8 ——————#
import torch
from torch import nn

#定义一个函数来计算卷积层。它对输入和输出做相应的升维和降维
def comp_conv2d(conv2d, X):
    # (1, 1)代表批量大小和通道数
    X = X.view((1, 1) + X.shape)
    Y = conv2d(X)
    return Y.view(Y.shape[2:])  #排除不关心的前两维:批量和通道

# 注意这里是两侧分别填充1行或列,所以在两侧一共填充2行或列
conv2d = nn.Conv2d(in_channels=1, out_channels=1, kernel_size=3,padding=1)

X = torch.rand(8, 8)
comp_conv2d(conv2d, X).shape


#—————— 更常见的卷积层写法 ——————#
import torch.nn as nn
conv_layer = nn.Conv2d(in_channels, out_channels,
                       kernel_size, stride=1,
                       padding=0, dilation=1,
                       groups=1, bias=True)
- 最基本的层结构指令:
nn.Conv2d - 具体参数包括输入通道、输出通道、卷积核、步长、膨胀率、组卷积、偏置
- 当卷积核的高和宽不同时,可以通过设置高和宽上不同的填充数使输出和输入具有相同的高和宽
# 使用高为5、宽为3的卷积核。在高和宽两侧的填充数分别为2和1
conv2d = nn.Conv2d(in_channels=1, out_channels=1, kernel_size=(5, 3), padding=(2, 1))
comp_conv2d(conv2d, X).shape
c. 如何计算输出特征图的大小
- 假设当前图像的大小为:Hin,Win
- 假设卷积核大小为FH、FW、个数为FN
- 填充数(padding)为P,可以增加输出的高和宽,常用来使输出与输入具有相同的高和宽
- 步距(stride)为S,可以减小输出的高和宽
- 输出图像的大小为:Hout,Wout
- 输出图像的维度为:(FN,Hout,Wout)
- 其中Paddding如果取VALID模式,则p=0;如果取SAME,则p>0
- 不带有扩充卷积的公式1: H o u t = H i n + 2 P − F h S + 1 H_{out}=\frac{H_{in}+2P-Fh}{S}+1 Hout=SHin+2P−Fh+1
- 带有扩充卷积D(膨胀率≠0): H o = H i + 2 P − D ( F h − 1 ) − 1 S + 1 Ho=\frac{Hi+2P-D(Fh-1)-1}{S}+1 Ho=SHi+2P−D(Fh−1)−1+1
4)反卷积
反卷积是卷积的反向操作,pytorch中有两种反卷积方法

a. 双线性插值上采样
先获知四个顶点,再根据计算公式进行插值处理
- 公式
Q 11 = ( x 1 , y 1 ) , Q 12 = ( x 1 , y 2 ) Q_{11}=\left(x_{1}, y_{1}\right), \quad Q_{12}=\left(x_{1}, y_{2}\right) Q11=(x1,y1),Q12=(x1,y2)
Q 21 = ( x 2 , y 1 ) , Q 22 = ( x 2 , y 2 ) Q_{21}=\left(x_{2}, y_{1}\right), \quad Q_{22}=\left(x_{2}, y_{2}\right) Q21=(x2,y1),Q22=(x2,y2)
→
f ( x , y 1 ) ≈ x 2 − x x 2 − x 1 f ( Q 11 ) + x − x 1 x 2 − x 1 f ( Q 21 ) f ( x , y 2 ) ≈ x 2 − x x 2 − x 1 f ( Q 12 ) + x − x 1 x 2 − x 1 f ( Q 22 ) f ( x 1 , y ) ≈ y 2 − y y 2 − y 1 f ( Q 11 ) + y − y 1 y 2 − y 1 f ( Q 21 ) f ( x 2 , y ) ≈ y 2 − y y 2 − y 1 f ( Q 12 ) + y − y 1 y 2 − y 1 f ( Q 22 ) \begin{array}{ll}f\left(x, y_{1}\right) \approx \frac{x_{2}-x}{x_{2}-x_{1}} f\left(Q_{11}\right)+\frac{x-x_{1}}{x_{2}-x_{1}} f\left(Q_{21}\right) & f\left(x, y_{2}\right) \approx \frac{x_{2}-x}{x_{2}-x_{1}} f\left(Q_{12}\right)+\frac{x-x_{1}}{x_{2}-x_{1}} f\left(Q_{22}\right) \\ f\left(x_{1}, y\right) \approx \frac{y_{2}-y}{y_{2}-y_{1}} f\left(Q_{11}\right)+\frac{y-y_{1}}{y_{2}-y_{1}} f\left(Q_{21}\right) & f\left(x_{2}, y\right) \approx \frac{y_{2}-y}{y_{2}-y_{1}} f\left(Q_{12}\right)+\frac{y-y_{1}}{y_{2}-y_{1}} f\left(Q_{22}\right)\end{array} f(x,y1)≈x2−x1x2−xf(Q11)+x2−x1x−x1f(Q21)f(x1,y)≈y2−y1y2−yf(Q11)+y2−y1y−y1f(Q21)f(x,y2)≈x2−x1x2−xf(Q12)+x2−x1x−x1f(Q22)f(x2,y)≈y2−y1y2−yf(Q12)+y2−y1y−y1f(Q22)
- 代码
import torch.nn as nn
bilinear_layer = nn.UpsamplingBilinear2d(size=None, scale_factor=None)
- size表示期望的输出尺寸,scale_factor表示缩放因子,用来决定缩放的大小
b. 转置卷积
(1)转置卷积则通过学习的方式,即通过在训练中更新卷积核的参数,以完成上采样过程
(2)其计算结果往往更具鲁棒性
(3)缺点是会增加模型的训练时间和训练参数
import torch.nn as nn
transpose_conv = nn.ConvTranspose2d(in_channels, out_channels, kernel_size, stride=1, padding=0, out_padding=0, groups=1, bias=True)
(4)其具体代码与卷积代码类似:
与卷积层仅多了一个输出填充参数,其他参数均不变
5)池化层
a. 原理
- 池化层每次对输入数据的一个固定形状窗口(又称池化窗口)中的元素计算输出。不同于卷积层里计算输⼊和核的互相关性,池化层直接计算池化窗口内元素的最大值或者平均值
- 池化层即对输入的特征图进行压缩。可以使特征图变小、简化计算,还可以进一步提取主要特征
- 在二维最大池化中,池化窗口从输入数组的最左上方开始,按从左往右、从上往下的顺序,依次在输⼊数组上滑动。当池化窗口滑动到某一位置时,窗口中的输入子数组的最大值即输出数组中相应位置的元素
- 类型
- 最大池化(右图,找最大的元素)
- 平均池化(左图,对其中元素取均值)
- Mixed Pooling
- Stochastic Pooling
b. 代码
- 常见池化层实现
import torch.nn as nn
maxpool_layer = nn.MaxPool2d(kernel_size, stride=None, padding=0, dilation=1,                             return_indices=False, ceil_mode=False)
average_layer = nn.AveragePool2d(kernel_size, stride=None, padding=0
                                ceil_mode=False, count_include_pad=True)
- dilation(
intortuple,optional):一个控制窗口中元素步幅的参数 - cell_mode:如果等于
True,计算输出信号大小的时候,会使用向上取整,代替默认的向下取整的操作 - count_include_pad:如果等于
True,计算平均池化时,将包括padding填充的0
- 将池化层的前向计算实现在pool2d函数
import torch
from torch import nn

def pool2d(X, pool_size, mode='max'):
    p_h, p_w = pool_size
    Y = torch.zeros((X.shape[0] - p_h + 1, X.shape[1] - p_w + 1))
    for i in range(Y.shape[0]):
        for j in range(Y.shape[1]):
            if mode == 'max':
                Y[i, j] = X[i: i + p_h, j: j + p_w].max()
            elif mode == 'avg':
                Y[i, j] = X[i: i + p_h, j: j + p_w].mean()
    return Y

X = torch.tensor([[0, 1, 2], [3, 4, 5], [6, 7, 8]], dtype=torch.float)
pool2d(X, (2, 2))
- 输出
tensor([[4., 5.],
	[7., 8.]])
pool2d(X, (2, 2), 'avg')
tensor([[2., 3.],
	[5., 6.]])
6) 正则化层
a. 原理
- 正则化层全称Batch Normalization(BN),即标准化处理。通过将数据进行偏移和尺度缩放调整,在数据预处理时是非常常见的操作,在网络的中间层也频繁被使用
- 公式:
y = x − mean [ x ] Var [ x ] + ε ∗ y=\frac{x-\operatorname{mean}[x]}{\sqrt{\operatorname{Var}[x]}+\varepsilon} * y=Var[x]+εx−mean[x]∗ $gamma + + + beta$
- 完成对数据的偏移和缩放,使其保持原有的分布特征,从而补偿网络的非线性表达能力损失
- 优势/好处
- 减轻对初始数据的依赖
- 加速训练,学习率可以设置的更高
- 劣势
- 依赖batch的大小,batch不同,方差和均值的计算不稳定——>BN不适合batch较小的场景,不适合RNN
b. 代码
BN = nn.BatchNorm2d(out_channel)
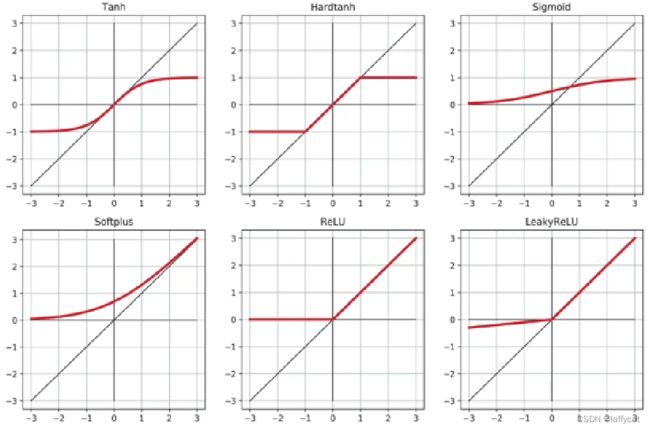
7) 激活函数
- Sigmoid
- ReLU
a. 原理
- sigmod函数之后求导趋近于0,故引入ReLU
b. 代码
掌握常见的几种激活函数,根据实际的训练任务进行选择
import torch.nn as nn
ReLU = nn.ReLU(inplace=True)
Leaky ReLU = nn.LeakyReLU(negative_slope=0.01, inplace=False)
Sigmoid = nn.Sigmoid()
Tanh = nn.Tanh()
Hardtanh = nn.Hardtanh(min_value=-1, max_value=1, inplace=False)
Softplus = nn.Softplus(beta=1, threshold=20)
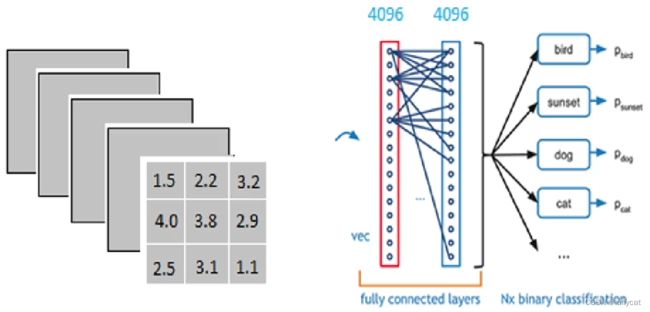
8) 全连接层
- 图像分类任务中常用
- 当特征图维度过大时,可以通过两个全连接层完成降维
- 最后一个全连接层的输出通道为最终的分类类别
Linear = nn.Linear(out_channel, obj)
2.3.3 模型举例
- 一个神经网络的典型训练过程如下
- 定义包含一些可学习参数(或者叫权重)的神经网络
- 在输入数据集上迭代
- 通过网络处理输入
- 计算 loss (输出和正确答案的距离)
- 将梯度反向传播给网络的参数
- 更新网络的权重,一般使用一个简单的规则:
weight = weight - learning_rate * gradient
1)LeNet
- 代码实现
import torch
import torch.nn as nn
import torch.nn.functional as F

class Net(nn.Module):
    def __init__(self):
        super(Net, self).__init__()
        # 输入图像channel:1;输出channel:6;5×5卷积核
        self.conv1 = nn.Conv2d(1, 6, 5)
        self.conv2 = nn.Conv2d(6, 16, 5)
        # 一个映射操作:y= Wx+b
        self.fc1 = nn.Linear(16 * 5 * 5, 120)
        self.fc2 = nn.Linear(120, 84)
        self.fc3 = nn.Linear(84, 10)

	def forward(self, x):
        # 2×2 最大池化层
        x = F.max_pool2d(F.relu(self.conv1(x)), (2, 2))
        # 如果是方阵,则可以只使用一个数字进行定义
        x = F.max_pool2d(F.relu(self.conv2(x)), 2)
        x = x.view(-1, self.num_flat_features(x))
        x = F.relu(self.fc1(x))
        x = F.relu(self.fc2(x))
        x = self.fc3(x)
        return x

    def num_flat_features(self, x):
        size = x.size()[1:]  # 除去批处理维度的其他所有维度
        num_features = 1
        for s in size:
            num_features *= s
        return num_features

net = Net()
print(net)
- 输出
Net(
  (conv1): Conv2d(1, 6, kernel_size=(5, 5), stride=(1, 1))
  (conv2): Conv2d(6, 16, kernel_size=(5, 5), stride=(1, 1))
  (fc1): Linear(in_features=400, out_features=120, bias=True)
  (fc2): Linear(in_features=120, out_features=84, bias=True)
  (fc3): Linear(in_features=84, out_features=10, bias=True)
)
-
我们只需定义
forward函数,backward函数会在使用autograd时自动定义,backward函数用来计算导数。可以在forward函数中使用任何针对张量的操作和计算 -
一个模型的可学习参数可以通过
net.parameters()返回
params = list(net.parameters())
print(len(params))
print(params[0].size())  # conv1的权重
- 输出
10
torch.Size([6, 1, 5, 5])
- 尝试一个随机的 32x32 的输入
input = torch.randn(1, 1, 32, 32)
out = net(input)
print(out)
- 清零所有参数的梯度缓存,然后进行随机梯度的反向传播:
net.zero_grad()
out.backward(torch.randn(1, 10))
- 注意:
torch.nn只支持小批量处理 (mini-batches)。整个torch.nn包只支持小批量样本的输入,不支持单个样本的输入。比如,nn.Conv2d接受一个4维的张量,即nSamples x nChannels x Height x Width如果是一个单独的样本,只需要使用input.unsqueeze(0)来添加一个“假的”批大小维度
torch.Tensor- 一个多维数组,支持诸如backward()等的自动求导操作,同时也保存了张量的梯度nn.Module- 神经网络模块。是一种方便封装参数的方式,具有将参数移动到GPU、导出、加载等功能nn.Parameter- 张量的一种,当它作为一个属性分配给一个Module时,它会被自动注册为一个参数autograd.Function- 实现了自动求导前向和反向传播的定义,每个Tensor至少创建一个Function节点,该节点连接到创建Tensor的函数并对其历史进行编码
2)AlexNet
class AlexNet(nn.Module):
    def __init__(self):
        super(AlexNet, self).__init__()
        self.conv = nn.Sequential(
            nn.Conv2d(1, 96, 11, 4), # in_channels, out_channels, kernel_size, stride, padding
            nn.ReLU(),
            nn.MaxPool2d(3, 2), # kernel_size, stride
            # 减小卷积窗口,使用填充为2来使得输入与输出的高和宽一致,且增大输出通道数
            nn.Conv2d(96, 256, 5, 1, 2),
            nn.ReLU(),
            nn.MaxPool2d(3, 2),
            # 连续3个卷积层,且使用更小的卷积窗口。除了最后的卷积层外,进一步增大了输出通道数。
            # 前两个卷积层后不使用池化层来减小输入的高和宽
            nn.Conv2d(256, 384, 3, 1, 1),
            nn.ReLU(),
            nn.Conv2d(384, 384, 3, 1, 1),
            nn.ReLU(),
            nn.Conv2d(384, 256, 3, 1, 1),
            nn.ReLU(),
            nn.MaxPool2d(3, 2)
        )
         # 这里全连接层的输出个数比LeNet中的大数倍。使用丢弃层来缓解过拟合
        self.fc = nn.Sequential(
            nn.Linear(256*5*5, 4096),
            nn.ReLU(),
            nn.Dropout(0.5),
            nn.Linear(4096, 4096),
            nn.ReLU(),
            nn.Dropout(0.5),
            # 输出层。由于这里使用Fashion-MNIST,所以用类别数为10,而非论文中的1000
            nn.Linear(4096, 10),
        )

    def forward(self, img):
        feature = self.conv(img)
        output = self.fc(feature.view(img.shape[0], -1))
        return output
net = AlexNet()
print(net)
AlexNet(
  (conv): Sequential(
    (0): Conv2d(1, 96, kernel_size=(11, 11), stride=(4, 4))
    (1): ReLU()
    (2): MaxPool2d(kernel_size=3, stride=2, padding=0, dilation=1, ceil_mode=False)
    (3): Conv2d(96, 256, kernel_size=(5, 5), stride=(1, 1), padding=(2, 2))
    (4): ReLU()
    (5): MaxPool2d(kernel_size=3, stride=2, padding=0, dilation=1, ceil_mode=False)
    (6): Conv2d(256, 384, kernel_size=(3, 3), stride=(1, 1), padding=(1, 1))
    (7): ReLU()
    (8): Conv2d(384, 384, kernel_size=(3, 3), stride=(1, 1), padding=(1, 1))
    (9): ReLU()
    (10): Conv2d(384, 256, kernel_size=(3, 3), stride=(1, 1), padding=(1, 1))
    (11): ReLU()
    (12): MaxPool2d(kernel_size=3, stride=2, padding=0, dilation=1, ceil_mode=False)
  )
  (fc): Sequential(
    (0): Linear(in_features=6400, out_features=4096, bias=True)
    (1): ReLU()
    (2): Dropout(p=0.5)
    (3): Linear(in_features=4096, out_features=4096, bias=True)
    (4): ReLU()
    (5): Dropout(p=0.5)
    (6): Linear(in_features=4096, out_features=10, bias=True)
  )
)
2.4 模型初始化
- 一个好的权重值,会使模型收敛速度提高,使模型准确率更精确
- 为了利于训练和减少收敛时间,我们需要对模型进行合理的初始化。PyTorch也在
torch.nn.init中为我们提供了常用的初始化方法
2.4.1 torch.nn.init内容
- 官方文档地址torch.nn.init — PyTorch 1.12 documentation
torch.nn.init提供以下初始化方法:
torch.nn.init.uniform_(tensor, a=0.0, b=1.0)torch.nn.init.normal_(tensor, mean=0.0, std=1.0)torch.nn.init.constant_(tensor, val)torch.nn.init.ones_(tensor)torch.nn.init.zeros_(tensor)torch.nn.init.eye_(tensor)torch.nn.init.dirac_(tensor, groups=1)torch.nn.init.xavier_uniform_(tensor, gain=1.0)torch.nn.init.xavier_normal_(tensor, gain=1.0)torch.nn.init.kaiming_uniform_(tensor, a=0, mode=‘fan__in’, nonlinearity=‘leaky_relu’)torch.nn.init.kaiming_normal_(tensor, a=0, mode=‘fan_in’, nonlinearity=‘leaky_relu’)torch.nn.init.orthogonal_(tensor, gain=1)torch.nn.init.sparse_(tensor, sparsity, std=0.01)torch.nn.init.calculate_gain(nonlinearity, param=None)
- 关于计算增益如下表
| nonlinearity | gain |
|---|---|
| Linear/Identity | 1 |
| Conv{1,2,3}D | 1 |
| Sigmod | 1 |
| Tanh | 5/3 |
| ReLU | sqrt(2) |
| Leaky Relu | sqrt(2/1+neg_slop^2) |
- 这些函数除了
calculate_gain,所有函数的后缀都带有下划线 - 这些函数将会直接原地更改输入张量的值
2.4.2 torch.nn.init使用
- 通常会根据实际模型来使用
torch.nn.init进行初始化,使用isinstance来进行判断模块属于什么类型
- 代码示例
import torch
import torch.nn as nn

conv = nn.Conv2d(1,3,3)
linear = nn.Linear(10,1)

isinstance(conv,nn.Conv2d)
isinstance(linear,nn.Conv2d)
- 输出
True
False
- 对于不同的类型层,可以设置不同的权值初始化的方法
# 查看随机初始化的conv参数
conv.weight.data
# 查看linear的参数
linear.weight.data
- 输出
tensor([[[[ 0.1174,  0.1071,  0.2977],
          [-0.2634, -0.0583, -0.2465],
          [ 0.1726, -0.0452, -0.2354]]],
        [[[ 0.1382,  0.1853, -0.1515],
          [ 0.0561,  0.2798, -0.2488],
          [-0.1288,  0.0031,  0.2826]]],
        [[[ 0.2655,  0.2566, -0.1276],
          [ 0.1905, -0.1308,  0.2933],
          [ 0.0557, -0.1880,  0.0669]]]])

tensor([[-0.0089,  0.1186,  0.1213, -0.2569,  0.1381,  0.3125,  0.1118, -0.0063, -0.2330,  0.1956]])
# 对conv进行kaiming初始化
torch.nn.init.kaiming_normal_(conv.weight.data)
conv.weight.data
# 对linear进行常数初始化
torch.nn.init.constant_(linear.weight.data,0.3)
linear.weight.data
tensor([[[[ 0.3249, -0.0500,  0.6703],
          [-0.3561,  0.0946,  0.4380],
          [-0.9426,  0.9116,  0.4374]]],
        [[[ 0.6727,  0.9885,  0.1635],
          [ 0.7218, -1.2841, -0.2970],
          [-0.9128, -0.1134, -0.3846]]],
        [[[ 0.2018,  0.4668, -0.0937],
          [-0.2701, -0.3073,  0.6686],
          [-0.3269, -0.0094,  0.3246]]]])
tensor([[0.3000, 0.3000, 0.3000, 0.3000, 0.3000, 0.3000, 0.3000, 0.3000, 0.3000,0.3000]])
2.4.3 初始化函数的封装
- 常将各种初始化方法定义为一个
initialize_weights()的函数并在模型初始后进行使用
- 代码示例1
def initialize_weights(self):
	for m in self.modules():
		# 判断是否属于Conv2d
		if isinstance(m, nn.Conv2d):
			torch.nn.init.xavier_normal_(m.weight.data)
			# 判断是否有偏置
			if m.bias is not None:
				torch.nn.init.constant_(m.bias.data,0.3)
		elif isinstance(m, nn.Linear):
			torch.nn.init.normal_(m.weight.data, 0.1)
			if m.bias is not None:
				torch.nn.init.zeros_(m.bias.data)
		elif isinstance(m, nn.BatchNorm2d):
			m.weight.data.fill_(1)
			m.bias.data.zeros_()
- 这段代码流程是遍历当前模型的每一层,然后判断各层属于什么类型,然后根据不同类型层,设定不同的权值初始化方法
- 代码示例2
# 模型的定义
class MLP(nn.Module):
  # 声明带有模型参数的层,这里声明了两个全连接层
  def __init__(self, **kwargs):
    # 调用MLP父类Block的构造函数来进行必要的初始化。这样在构造实例时还可以指定其他函数
    super(MLP, self).__init__(**kwargs)
    self.hidden = nn.Conv2d(1,1,3)
    self.act = nn.ReLU()
    self.output = nn.Linear(10,1)

   # 定义模型的前向计算,即如何根据输入x计算返回所需要的模型输出
  def forward(self, x):
    o = self.act(self.hidden(x))
    return self.output(o)

mlp = MLP()
print(list(mlp.parameters()))
print("-------初始化-------")

initialize_weights(mlp)
print(list(mlp.parameters()))
- 输出
[Parameter containing:
tensor([[[[ 0.2103, -0.1679,  0.1757],
          [-0.0647, -0.0136, -0.0410],
          [ 0.1371, -0.1738, -0.0850]]]], requires_grad=True), Parameter containing:
tensor([0.2507], requires_grad=True), Parameter containing:
tensor([[ 0.2790, -0.1247,  0.2762,  0.1149, -0.2121, -0.3022, -0.1859,  0.2983,
         -0.0757, -0.2868]], requires_grad=True), Parameter containing:
tensor([-0.0905], requires_grad=True)]
"-------初始化-------"
[Parameter containing:
 tensor([[[[-0.3196, -0.0204, -0.5784],
           [ 0.2660,  0.2242, -0.4198],
           [-0.0952,  0.6033, -0.8108]]]], requires_grad=True),
 Parameter containing:
 tensor([0.3000], requires_grad=True),
 Parameter containing:
 tensor([[ 0.7542,  0.5796,  2.2963, -0.1814, -0.9627,  1.9044,  0.4763,  1.2077,
           0.8583,  1.9494]], requires_grad=True),
 Parameter containing:
 tensor([0.], requires_grad=True)]
关于损失函数和优化器的部分放在下篇文章中讲解~
学习笔记前传:
- PyTorch学习笔记之张量
- PyTorch学习笔记之基本配置&数据处理
资料参考来源:1. Datawhale社区《深入浅出PyTorch教程》
3. 有三AI《PyTorch入门及实战》
4. 其他零散网络资源


