tensorflow1.x代码转换到tensorflow2.x
这里我考虑使用PASCAL VOC 2007和PASCAL VOC 2012数据集来示意,这两个数据集的一些介绍可以参见如下博客的介绍
计算机视觉标准数据集整理—PASCAL VOC数据集_xingwei_09的博客-CSDN博客_pascal数据集下载
这里我给出两个数据集的链接路径
VOC 2007
链接:https://pan.baidu.com/s/1xK3gmKMpK1CzgxeyEuVYiw
提取码:21ww
VOC 2012
链接:https://pan.baidu.com/s/1GK7o5Xu3X6JihJzKqA9FCw
提取码:0obj
这两个数据集在这篇博客中暂且用不到,下面要记录的是Anaconda3中tensorflow 2.3的配置过程(之前一直用的是tensorflow 1.x系列搭配keras,考虑到跟上节奏,还是配置下tensorflow 2.x的环境吧)
一. Anaconda3下配置tensorflow 2.3.1
1. 我安装的是Anaconda3-5.2.0-Windows-x86_64.exe,对应python版本是3.6.5版本
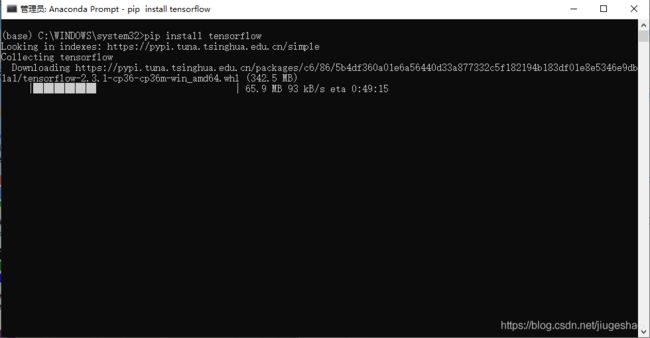
2. 在Anaconda Prompt环境里直接pip安装
pip install tensorflow如果下载速度很慢,可以更改下载源,参见我的博客
等待一段后出现报错Found existing installation: wrapt 1.10.11. ERROR: Cannot uninstall 'wrapt'. It is a distutils installed project and thus we cannot accurately determine which files belong...
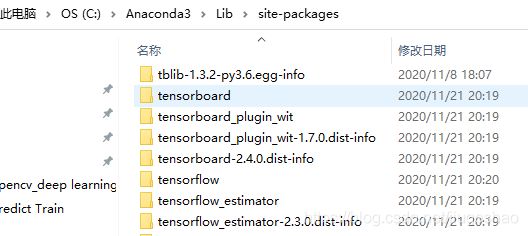
此时可以手动将Anaconda3下的site-packages中含有tensorflow或者tensorboard前缀的文件夹手动删除,我的路径如下:
删除完毕后可以执行如下命令:
pip install -U --ignore-installed wrapt enum34 simplejson netaddr完毕后再执行pip install tensorflow
3 安装成功后,可以import下tensorflow
import tensorflow as tf
tf.__version__
执行可以看到我安装的tensorflow版本
注: 在实验过程中,我有出现过could not load dynamic library 'cudart64_101.dll': dlerror: cudart64_101.dll not found报错
这里其实是cuda版本和cudnn版本和tensorflow2.3.1不搭配,当前我的cuda版本是我的博客里的配置,得更改为cuda10.1,cudnn7.6配置,这里上传下我的cuda和cudnn文件
cudnn-10.1-windows10-x64-v7.6.5.32.zip
链接:https://pan.baidu.com/s/1_VFpx8Idl0ghXdmIShg8lg
提取码:87vc
cuda_10.1.105_418.96_win10.exe
链接:https://pan.baidu.com/s/1NKwE0yMmfNIzXoaZHf6QLw
提取码:66gp
二. tensorflow 2.3.1更新tensorflow 1.10版本的代码
1. 如下是当时用tensorflow1.10创建的代码
#!/usr/bin/env python
# -*- coding: utf-8 -*-
# 在sess之前,计算图需要构建完成,才能对变量进行正确的初始化。详细的知识感觉自己也不是很懂。
# 。。。反正就记住了,在使用Sess启动计算图之前,一定要构建完整的计算图,不能在会话里面
# 再补充计算图。
import tensorflow as tf
import numpy as np
def f1(xx):
    w1=tf.Variable(tf.random_normal([2, 3], stddev=1, seed=1),name="w1")
    return tf.matmul(xx, w1)

def f2(aa):
    w2=tf.Variable(tf.random_normal([3, 1], stddev=1, seed=1),name="w2")
    return tf.matmul(aa, w2)


x=tf.placeholder(tf.float32,shape=[None,2],name="x")
#y=tf.placeholder(tf.float32,shape=[None,1],name="y")
a=f1(x)
y=f2(a)
init=tf.global_variables_initializer()
with tf.Session() as sess:
    sess.run(init)
    tmp=np.array([[0.7,0.9]])
    print(sess.run(y,feed_dict={x:tmp}))
    tf.identity(y,"y")
    writer = tf.summary.FileWriter('D://tensorflow-log//test_tensorboard3', tf.get_default_graph())
    writer.close()
出现报错AttributeError: module 'tensorflow' has no attribute 'placeholder'
可以将import tensorflow as tf更改为
import tensorflow.compat.v1 as tf
tf.disable_eager_execution()
即如下代码:
#!/usr/bin/env python
# -*- coding: utf-8 -*-
# 在sess之前,计算图需要构建完成,才能对变量进行正确的初始化。详细的知识感觉自己也不是很懂。
# 。。。反正就记住了,在使用Sess启动计算图之前,一定要构建完整的计算图,不能在会话里面
# 再补充计算图。
import tensorflow.compat.v1 as tf
tf.disable_eager_execution()
#import tensorflow as tf
import numpy as np
def f1(xx):
    w1=tf.Variable(tf.random_normal([2, 3], stddev=1, seed=1),name="w1")
    return tf.matmul(xx, w1)

def f2(aa):
    w2=tf.Variable(tf.random_normal([3, 1], stddev=1, seed=1),name="w2")
    return tf.matmul(aa, w2)


x=tf.placeholder(tf.float32,shape=[None,2],name="x")
#y=tf.placeholder(tf.float32,shape=[None,1],name="y")
a=f1(x)
y=f2(a)
init=tf.global_variables_initializer()
with tf.Session() as sess:
    sess.run(init)
    tmp=np.array([[0.7,0.9]])
    print(sess.run(y,feed_dict={x:tmp}))
    tf.identity(y,"y")
    writer = tf.summary.FileWriter('D://tensorflow-log//test_tensorboard3', tf.get_default_graph())
    writer.close()
运行成功。
2. 如下代码是当时用tensorflow1.10搭配keras2.1.2所写的代码,通过加载一个已经训练好的模型权重参数来预测mnist数据集
所用权重参数h5文件见如下链接:
链接:https://pan.baidu.com/s/1eBu5aISDnH_-BS6AOnJR_A
提取码:2mk1
所用mnist文件夹链接如下:
链接:https://pan.baidu.com/s/191IQx9OT1ddLLxMV5riVcA
提取码:cl3e
# -*- coding: UTF-8 -*-

# mnist神经网络训练,采用LeNet-5模型

import os
import cv2
import numpy as np
import pydot
import graphviz
import struct

from keras.models import Sequential
from keras.layers import Conv2D, MaxPooling2D, Flatten
from keras.layers.core import Dense, Dropout, Activation, Flatten
from keras.layers.advanced_activations import PReLU
from keras.optimizers import SGD, Adadelta, Adagrad

from keras.utils import np_utils
from keras.utils import plot_model

import h5py
from keras.models import model_from_json
from keras.models import load_model
import matplotlib.pyplot as plt
import pickle as p
import matplotlib.image as plimg
from PIL import Image
import tensorflow as tf
import keras.backend as K
def load_mnist(path, kind='train'):
    """Load MNIST data from `path`"""
    labels_path = os.path.join(path,
                               '%s-labels.idx1-ubyte'
                               % kind)
    images_path = os.path.join(path,
                               '%s-images.idx3-ubyte'
                               % kind)

    print("labels_path: ",labels_path)
    print("images_path: ", images_path)
    with open(labels_path, 'rb') as lbpath:
        magic, n = struct.unpack('>II',
                                 lbpath.read(8))
        labels = np.fromfile(lbpath,
                             dtype=np.uint8)

    with open(images_path, 'rb') as imgpath:
        magic, num, rows, cols = struct.unpack('>IIII',
                                               imgpath.read(16))
        images = np.fromfile(imgpath,
                             dtype=np.uint8).reshape(len(labels), 784)

    return images, labels

# 建立一个Sequential模型
model = Sequential()

# model.add(Conv2D(4, 5, 5, border_mode='valid',input_shape=(28,28,1)))
# 第一个卷积层,4个卷积核,每个卷积核5*5,卷积后24*24,第一个卷积核要申明input_shape(通道,大小) ,激活函数采用“tanh”
model.add(Conv2D(filters=4, kernel_size=(5, 5), padding='valid', input_shape=(28, 28, 1), activation='tanh'))

# model.add(Conv2D(8, 3, 3, subsample=(2,2), border_mode='valid'))
# 第二个卷积层,8个卷积核,不需要申明上一个卷积留下来的特征map,会自动识别,下采样层为2*2,卷完且采样后是11*11
model.add(MaxPooling2D(pool_size=(2, 2)))
model.add(Conv2D(filters=8, kernel_size=(3, 3), padding='valid', activation='tanh'))
# model.add(Activation('tanh'))

# model.add(Conv2D(16, 3, 3, subsample=(2,2), border_mode='valid'))
# 第三个卷积层,16个卷积核,下采样层为2*2,卷完采样后是4*4
model.add(Conv2D(filters=16, kernel_size=(3, 3), padding='valid', activation='tanh'))
model.add(MaxPooling2D(pool_size=(2, 2)))
# model.add(Activation('tanh'))

model.add(Flatten())
# 把多维的模型压平为一维的,用在卷积层到全连接层的过度

# model.add(Dense(128, input_dim=(16*4*4), init='normal'))
# 全连接层,首层的需要指定输入维度16*4*4,128是输出维度,默认放第一位
model.add(Dense(128, activation='tanh'))

# model.add(Activation('tanh'))

# model.add(Dense(10, input_dim= 128, init='normal'))
# 第二层全连接层,其实不需要指定输入维度,输出为10维,因为是10类
model.add(Dense(10, activation='softmax'))
# model.add(Activation('softmax'))
# 激活函数“softmax”,用于分类

# 训练CNN模型

sgd = SGD(lr=0.05, momentum=0.9, decay=1e-6, nesterov=True)
# 采用随机梯度下降法,学习率初始值0.05,动量参数为0.9,学习率衰减值为1e-6,确定使用Nesterov动量
model.compile(loss='categorical_crossentropy', optimizer=sgd, metrics=['accuracy'])
# 配置模型学习过程,目标函数为categorical_crossentropy:亦称作多类的对数损失,注意使用该目标函数时,需要将标签转化为形如(nb_samples, nb_classes)的二值序列,第18行已转化,优化器为sgd
model.load_weights("CNN.h5")

path = ".\\mnist"
X_train, y_train = load_mnist(path, kind='train')

path = ".\\mnist"
X_test, y_test = load_mnist(path, kind='t10k')

print("X_train: ",X_train.T.shape, X_train.dtype)
print('y_train: ',y_train.T.shape, y_train.dtype)
print("X_test: ",X_test.shape, X_test.dtype)
print("y_test: ",y_test.shape, y_test.dtype)

number_index = 69
x_test1 = X_test[number_index,:]
print(x_test1.shape)

x_test1 = x_test1.reshape(28,28)
print(x_test1.shape)

plt.subplot(1,1,1)
plt.imshow(x_test1, cmap='gray', interpolation='none')

x_test1 = x_test1[np.newaxis, ..., np.newaxis]
x_test1_pred = model.predict(x_test1, batch_size=1, verbose=1)
print("x_test1_pred: ",np.argmax(x_test1_pred))

x_test1_actual = y_test[number_index]
print("x_test1_actual: ", x_test1_actual)

writer = tf.summary.FileWriter('logs/', tf.get_default_graph())
writer.close()
K.clear_session()
会报ModuleNotFoundError: No module named 'keras'错误,需要将from keras.model import方式改为from tensorflow.keras.models import方式,更改之后见如下代码:
# -*- coding: UTF-8 -*-

# mnist神经网络训练,采用LeNet-5模型

import os
import cv2
import numpy as np
import pydot
import graphviz
import struct
import h5py

from tensorflow.keras.models import Sequential
from tensorflow.keras.layers import Conv2D, MaxPooling2D, Flatten, Dense, Dropout, Activation, PReLU
from tensorflow.keras.optimizers import SGD, Adadelta, Adagrad
from tensorflow.keras.utils import plot_model
from tensorflow.keras.models import model_from_json, load_model
from tensorflow.keras import backend as K

import matplotlib.pyplot as plt
import pickle as p
import matplotlib.image as plimg
from PIL import Image
import tensorflow as tf

def load_mnist(path, kind='train'):
    """Load MNIST data from `path`"""
    labels_path = os.path.join(path,
                               '%s-labels.idx1-ubyte'
                               % kind)
    images_path = os.path.join(path,
                               '%s-images.idx3-ubyte'
                               % kind)

    print("labels_path: ",labels_path)
    print("images_path: ", images_path)
    with open(labels_path, 'rb') as lbpath:
        magic, n = struct.unpack('>II',
                                 lbpath.read(8))
        labels = np.fromfile(lbpath,
                             dtype=np.uint8)

    with open(images_path, 'rb') as imgpath:
        magic, num, rows, cols = struct.unpack('>IIII',
                                               imgpath.read(16))
        images = np.fromfile(imgpath,
                             dtype=np.uint8).reshape(len(labels), 784)

    return images, labels


# 创建日志
logdir = 'D://tensorflow-v2-log//test_tensorboard'
writer = tf.summary.create_file_writer(logdir)

#开启autograph跟踪
tf.summary.trace_on(graph=True, profiler=True)

# 建立一个Sequential模型
model = Sequential()

# model.add(Conv2D(4, 5, 5, border_mode='valid',input_shape=(28,28,1)))
# 第一个卷积层,4个卷积核,每个卷积核5*5,卷积后24*24,第一个卷积核要申明input_shape(通道,大小) ,激活函数采用“tanh”
model.add(Conv2D(filters=4, kernel_size=(5, 5), padding='valid', input_shape=(28, 28, 1), activation='tanh'))

# model.add(Conv2D(8, 3, 3, subsample=(2,2), border_mode='valid'))
# 第二个卷积层,8个卷积核,不需要申明上一个卷积留下来的特征map,会自动识别,下采样层为2*2,卷完且采样后是11*11
model.add(MaxPooling2D(pool_size=(2, 2)))
model.add(Conv2D(filters=8, kernel_size=(3, 3), padding='valid', activation='tanh'))
# model.add(Activation('tanh'))

# model.add(Conv2D(16, 3, 3, subsample=(2,2), border_mode='valid'))
# 第三个卷积层,16个卷积核,下采样层为2*2,卷完采样后是4*4
model.add(Conv2D(filters=16, kernel_size=(3, 3), padding='valid', activation='tanh'))
model.add(MaxPooling2D(pool_size=(2, 2)))
# model.add(Activation('tanh'))

model.add(Flatten())
# 把多维的模型压平为一维的,用在卷积层到全连接层的过度

# model.add(Dense(128, input_dim=(16*4*4), init='normal'))
# 全连接层,首层的需要指定输入维度16*4*4,128是输出维度,默认放第一位
model.add(Dense(128, activation='tanh'))

# model.add(Activation('tanh'))

# model.add(Dense(10, input_dim= 128, init='normal'))
# 第二层全连接层,其实不需要指定输入维度,输出为10维,因为是10类
model.add(Dense(10, activation='softmax'))
# model.add(Activation('softmax'))
# 激活函数“softmax”,用于分类

# 训练CNN模型

sgd = SGD(lr=0.05, momentum=0.9, decay=1e-6, nesterov=True)
# 采用随机梯度下降法,学习率初始值0.05,动量参数为0.9,学习率衰减值为1e-6,确定使用Nesterov动量
model.compile(loss='categorical_crossentropy', optimizer=sgd, metrics=['accuracy'])
# 配置模型学习过程,目标函数为categorical_crossentropy:亦称作多类的对数损失,注意使用该目标函数时,需要将标签转化为形如(nb_samples, nb_classes)的二值序列,第18行已转化,优化器为sgd
model.load_weights("CNN.h5")

path = ".\\mnist"
X_train, y_train = load_mnist(path, kind='train')

path = ".\\mnist"
X_test, y_test = load_mnist(path, kind='t10k')

print("X_train: ",X_train.T.shape, X_train.dtype)
print('y_train: ',y_train.T.shape, y_train.dtype)
print("X_test: ",X_test.shape, X_test.dtype)
print("y_test: ",y_test.shape, y_test.dtype)

number_index = 69
x_test1 = X_test[number_index,:]
print(x_test1.shape)

x_test1 = x_test1.reshape(28,28)
print(x_test1.shape)

plt.subplot(1,1,1)
plt.imshow(x_test1, cmap='gray', interpolation='none')
plt.show()
cv2.imshow("img1",x_test1)
cv2.waitKey()

x_test1 = x_test1[np.newaxis, ..., np.newaxis]
x_test1_pred = model.predict(x_test1, batch_size=1, verbose=1)
print("x_test1_pred: ",np.argmax(x_test1_pred))

x_test1_actual = y_test[number_index]
print("x_test1_actual: ", x_test1_actual)

#将计算图信息写入日志
with writer.as_default():
    tf.summary.trace_export(
        name="autograph",
        step=0,
        profiler_outdir=logdir)
可以看到保存计算图这块语句也做了修改,如果不更改还是使用tf.summary.FileWriter()函数,则会出现如下报错
AttributeError: module 'tensorboard.summary._tf.summary' has no attribute 'FileWriter'
如上代码执行完毕后,在D:\tensorflow-v2-log\test_tensorboard路径下便可以看到tensorboard日志
在D盘下可以新建一个cmd文件,文件里内容如下:
tensorboard --logdir=D://tensorflow-v2-log --host=127.0.0.1运行该cmd文件,
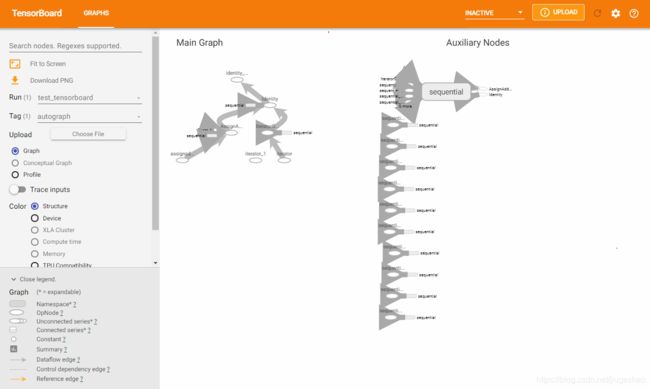
可在网页中输入如下地址:http://localhost:6006,可看到tensorboard可视化的一些内容


