虚幻引擎(UE4) Gameplay Debugger(调试器)
Gameplay Debugger(虚幻调试器)对于开发者查看运行时数据非常有用,甚至在利用网络复制的客户端上也是如此。他可以运行在编辑器,模拟器中,并且独立于游戏,所有的数据都显示在游戏窗口上,调试系统提供了一套可以扩展的调试框架。
引擎实现可以显示:
- Pawn基础信息
- AIController 基础信息
- 行为树和黑板信息
- 执行环境信息
- 触觉系统信息
- 玩家网格和选择的Pawn的所有细节
通常有很多类别信息需要输出到屏幕上,通常用5个类别来显示:
- Navmesh
- Basic
- Behavior Tree
- EQS
- Perception
也可以扩展类别来演示更多的游戏信息
下面我们用一张游戏截图来说明:
添加依赖项: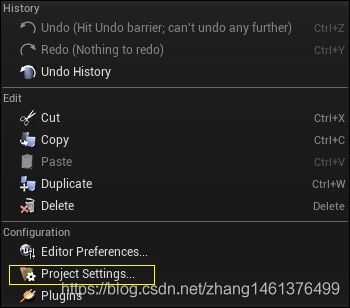
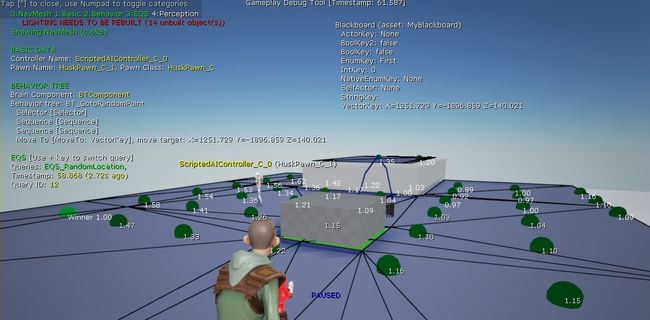
Gameplay Debugger调试器可以通过点击(~键)来激活,也可以使用EnableGDT命令行来激活,键位绑定设置在文件里,可以随时修改。选择一个敌人然后按下(~键),这时候屏幕上就显示了敌人的信息了。用数字键盘0,1,2,3,4切换不同日志类别。GameplayDebugger模块必须被添加到项目的依赖模块中才能被激活和使用。
使用Gameplay Debugger
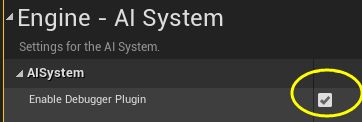
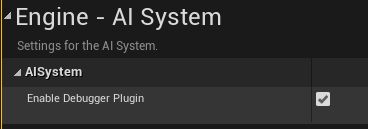
在编辑器中,GDT可以被用于PIE(Play In Editor)和Simulate(Play In Simulate)。绑定的快捷键或者使用命令行, EableGDT可以激活PIE。模拟器模式与PIE有点不同,要激活模拟器PIS,你需要启用Debug AI 标识。
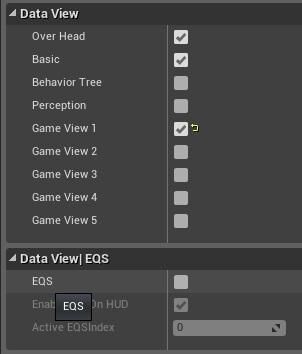
不过还有一种方案可以改变各类别调试信息在模拟器中的可见性,利用GameplayDebuggingReplicator 可以实现。这个Actor可以在World Outliner窗口中找到,它的属性面板用于控制GDT。
Debug Camera Controller(调试相机控制器)
DebugCameraController拥有以下特性:
- 动态观察功能:这允许您围绕选定位置或选定角色的中心环绕摄影机,以便可以更彻底地查看游戏对象。
- 可视化缓冲区:提供了一个选项,可以全屏显示缓冲区内容,让你可视化测试图形显卡内的帧缓冲(FBO/FAO)。
- 循环显示模式:这让你能够检查正在处理的不同类型的场景数据。
DebugCameraController PIE新特性增强了游戏调试能力。检查视图模式和图形缓冲区的功能可以帮助您在游戏中检测不可预见的问题。
激活DebugCameraController:输入命令行:ToggleDebugCamera,或者使用分号(;)快捷键。
扩展
GamePlay Debugger 可以使用C++代码来扩展,在蓝图中你只能用来显示基本调试信息。首先你需要自定义一个类并继承自UGameplayDebuggingComponent和AGameplayDebuggingHUDComponent类,第一个类用来收集数据,第二个类用来显示到屏幕上。下面给出一个简单的例子:
收集游戏数据:
GDTComponent.h

#pragma once
#include "GameplayDebuggingComponent.h"
#include "GDTComponent.generated.h"

UCLASS()
class UGDTComponent : public UGameplayDebuggingComponent
{
public:
    GENERATED_UCLASS_BODY()
    virtual void CollectBasicData() override;

    UPROPERTY(Replicated)
    float TestData; //custom data replicated to clients
};

//---------------------------------------------------------------------------------------------------

GDTComponent.cpp

#include "MyGameProject.h"
#include "GameplayDebuggingComponent.h"
#include "GDTComponent.h"

UGDTComponent::UGDTComponent(const class FPostConstructInitializeProperties& PCIP) : Super(PCIP) { }

void UGDTComponent::GetLifetimeReplicatedProps(TArray &OutLifetimeProps) const
{
    Super::GetLifetimeReplicatedProps( OutLifetimeProps );
#if !(UE_BUILD_SHIPPING || UE_BUILD_TEST)
    DOREPLIFETIME( UGDTComponent, TestData);
#endif
}

void UGDTComponent::CollectBasicData()
{
    Super::CollectBasicData();
#if !(UE_BUILD_SHIPPING || UE_BUILD_TEST)
    TestData= FMath::RandRange(2.75, 8.25); //collect data and store it
#endif
}
下面的类被用于显示数据在屏幕上:
GDTHUDComponent.h

#pragma once

#include "GameplayDebuggingHUDComponent.h"
#include "GDTHUDComponent.generated.h"

UCLASS(notplaceable)
class AGDTHUDComponent: public AGameplayDebuggingHUDComponent
{
    GENERATED_UCLASS_BODY()
protected:
    virtual void DrawBasicData(APlayerController* PC, class UGameplayDebuggingComponent *DebugComponent) override;
};

//------------------------------------------------------------------------------------------

GDTHUDComponent.cpp

#include "MyGameProject.h"
#include "GDTComponent.h"
#include "GDTHUDComponent.h"

AGDTHUDComponent::AGDTHUDComponent(const class FPostConstructInitializeProperties& PCIP)
    : Super(PCIP)
{
}
void AGDTHUDComponent::DrawBasicData(APlayerController* PC, class UGameplayDebuggingComponent *DebugComponent)
{
    Super::DrawBasicData(PC, DebugComponent);
#if !(UE_BUILD_SHIPPING || UE_BUILD_TEST)
    const UGDTComponent* MyComp = Cast(DebugComponent);
    if (MyComp)
    {
        PrintString(DefaultContext, FString::Printf(TEXT("{white}Test data: {red}%f\n"), MyComp->TestData));
    }
#endif
}
定义了新的类,那么还需要让GameplayDebugger识别他,可以在DefaultEngine.ini中配置:
DefaultEngine.ini

[/Script/GameplayDebugger.GameplayDebuggingReplicator]
DebugComponentClassName="/Script/MyGameProject.GDTComponent"
DebugComponentHUDClassName="/Script/MyGameProject.GDTHUDComponent" |
自定义调试日志类别:
添加一些自定义的类别,还需要一些步骤,下面就来扩展GDTComponent类。
#pragma once
#include "GameplayDebuggingComponent.h"
#include "GDTComponent.generated.h"

UCLASS()
class UGDTComponent : public UGameplayDebuggingComponent
{
public:
    GENERATED_UCLASS_BODY()
protected:
    virtual void CollectDataToReplicate(bool bCollectExtendedData) override;
    void CollectCustomData();
public:
    UPROPERTY(Replicated)
    float TestData; //custom data replicated to clients
};

//------------------------------------------------------------------------------------------

GDTComponent.cpp

#include "MyGameProject.h"
#include "GameplayDebuggingComponent.h"
#include "GDTComponent.h"

UGDTComponent::UGDTComponent(const class FPostConstructInitializeProperties& PCIP) : Super(PCIP) { }

void UGDTComponent::GetLifetimeReplicatedProps(TArray &OutLifetimeProps) const
{
    Super::GetLifetimeReplicatedProps( OutLifetimeProps );
#if !(UE_BUILD_SHIPPING || UE_BUILD_TEST)
    DOREPLIFETIME( UGDTComponent, TestData);
#endif
}

void UGDTComponent::CollectCustomData()
{
    Super::CollectBasicData();
#if !(UE_BUILD_SHIPPING || UE_BUILD_TEST)
    TestData= FMath::RandRange(2.75, 8.25); //collect data and store it
#endif
}

void UGDTComponent::CollectDataToReplicate(bool bCollectExtendedData)
{
    Super::CollectDataToReplicate(bCollectExtendedData);
#if !(UE_BUILD_SHIPPING || UE_BUILD_TEST)
    if (ShouldReplicateData(EAIDebugDrawDataView::GameView1))
    {
        CollectCustomData();
        if (bCollectExtendedData)
        {
            // collect additional data for selected Pawn/AIController
        }
    }
#endif
}
下面是扩展对应的HUD类:
GDTHUDComponent.h

#pragma once

#include "GameplayDebuggingHUDComponent.h"
#include "GDTHUDComponent.generated.h"

UCLASS(notplaceable)
class AGDTHUDComponent: public AGameplayDebuggingHUDComponent
{
    GENERATED_UCLASS_BODY()
protected:
    virtual void DrawGameSpecificView(APlayerController* PC, class UGameplayDebuggingComponent *DebugComponent) override;
    virtual void GetKeyboardDesc(TArray& Categories) override;
    void DrawCustomData(APlayerController* PC, class UGameplayDebuggingComponent *DebugComponent);
};

//------------------------------------------------------------------------------------------

GDTHUDComponent.cpp

#include "MyGameProject.h"
#include "GDTComponent.h"
#include "GDTHUDComponent.h"

AGDTHUDComponent::AGDTHUDComponent(const class FPostConstructInitializeProperties& PCIP)
    : Super(PCIP)
{
}
void AGDTHUDComponent::DrawCustomData(APlayerController* PC, class UGameplayDebuggingComponent *DebugComponent)
{
#if !(UE_BUILD_SHIPPING || UE_BUILD_TEST)
    const UGDTComponent* MyComp = Cast(DebugComponent);
    if (MyComp)
    {
        PrintString(DefaultContext, FString::Printf(TEXT("{white}Test data: {red}%f\n"), MyComp->TestData));
    }
#endif
}
void AGDTHUDComponent::GetKeyboardDesc(TArray& Categories)
{
    Super::GetKeyboardDesc(Categories);
#if !(UE_BUILD_SHIPPING || UE_BUILD_TEST)
    Categories.Add(FDebugCategoryView(EAIDebugDrawDataView::GameView1, TEXT("MyData")));
#endif
}
void AGDTHUDComponent::DrawGameSpecificView(APlayerController* PC, class UGameplayDebuggingComponent *InDebugComponent)
{
     Super::DrawGameSpecificView(PC, InDebugComponent);
#if !(UE_BUILD_SHIPPING || UE_BUILD_TEST)
    if (InDebugComponent && GameplayDebuggerSettings(GetDebuggingReplicator()).CheckFlag(EAIDebugDrawDataView::GameView1))
    {
        PrintString(DefaultContext, FColor::Green, TEXT("\nMY GAME DATA\n"));
         DrawCustomData(PC, InDebugComponent);
    }
#endif
}
到此为止,新的类别已经添加好了,你可以用来调试项目了,在编辑器中你将看到下面的界面:
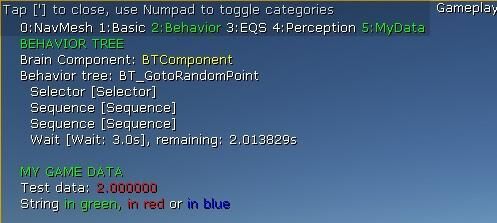
为了将调试信息显示成不同的颜色,PrintString函数可以通过参数控制文字的颜色。这是更加方便快捷显示不同颜色调试信息的方法。
void PrintString(FPrintContext& Context, const FString& InString );
void PrintString(FPrintContext& Context, const FColor& InColor, const FString& InString );
PrintString(DefaultContext, FColor::Green, TEXT("Whole text in green"));
PrintString(DefaultContext, TEXT("String {green}in green, {red}in red {white}or {R=0,G=0,B=255,A=255}in blue"));
上面最后一行,PrintString方法同时输出了不同的文字信息,类似于富文本了。格式可以理解为:{Color}后面的文字都将显示为花括号内的颜色