PyTorch笔记 - SwinTransformer的原理与实现
Swin Transformer: Hierarchical Vision Transformer using Shifted Windows
MRA:Microsoft Research Asia,微软亚洲研究院
参考:Swin Transformer 相比之前的 ViT 模型,做出了哪些改进?
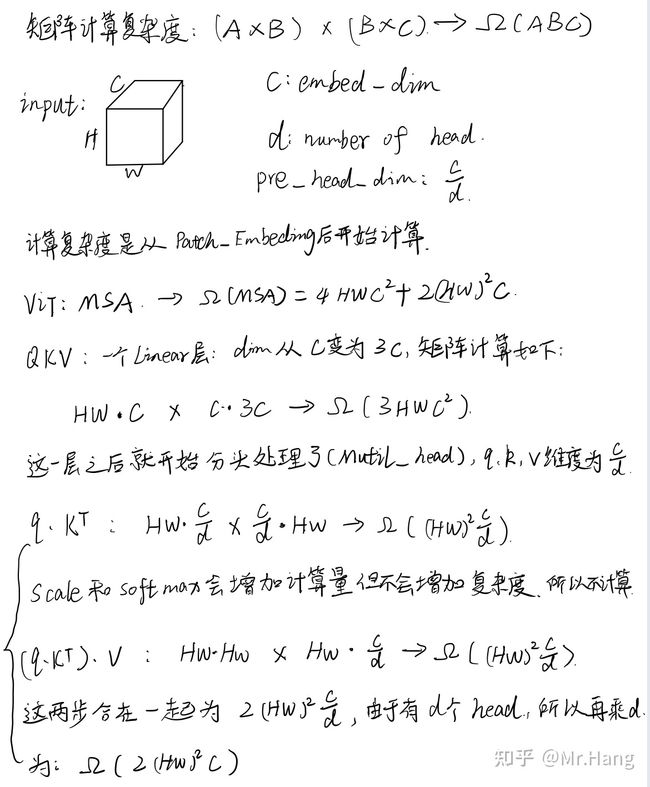
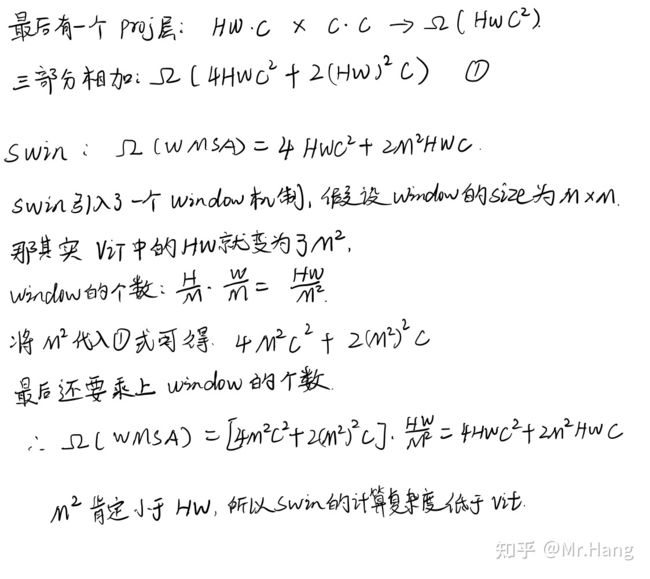
时间复杂度降低:
- MSA(Multi-head Self-Attention):
4*H*W*C^2 + 2*(H*W)^2*C - WMSA(Window Multi-head Self-Attention):
4*H*W*C^2 + 2*M^2*(H*W)*C - HW的平方复杂度,降低为线性复杂度
SwinTransformer:
- Patch Embedding
- naive method
- conv2 method
- SwinTransformer Block
- Window Multi-Head Self-Attention
- Shift Window Multi-Head Self-Attention:shift window、window mask、reverse shift window
- Patch Merging
- Patch reduction (降低)
- Depth expansion (扩展)
- Classification
2021年8月发表:
SwinTransformer:将复杂度和效果,都做了优化,Transformer在NLP中取得比较好的效果。
将图像划分为不同的window,每个window内计算self-attention,时间复杂度window与图像的hw成线性关系,通过shift-window,实现window之间的交互。
To address these differences, we propose a hierarchical Transformer whose representation is computed with Shifted windows.
- 为了解决这些差异,我们提出了一种分层 Transformer,其表示是用 Shifted windows (Swin)计算的。
This hierarchical architecture has the flexibility to model at various scales and has linear computational complexity with respect to image size.
- SwinTransformer这种分层架构,具有在各种尺度上建模的灵活性,并且,具有相对于图像尺寸的线性计算复杂度。
步骤:
- 将RGB图,切分为互相不交叠(non-overlapping)的区域(patch),类似ViT;
- 每个patch有4x4,通道是3,特征维度4x4x3=48个像素,48个像素通过MLP,映射是线性模式;
- 通过Patch Merging层,特征图减少4倍,通道数增加2倍(MLP 4->2),把2x2的patch合并成1个patch;
- 每2个Block,1个是W-MSA和SW-MSA,每个window内计算Self-Attention;
- SW-MSA是移动1/2个窗长,再做合并做Self-Attention。
每个Patch是4x4x3=48个像素大小,把像素值组成向量,经过一个线性层(MLP Multilayer Perceptron,多层感知机,Linear Embedding Layer),转换为C维的向量,作为Embedding。Swin-Transformer Block 应用于Embedding之上。
时间复杂度:
1. 如何基于图像生成Patch Embedding
方法一:
- 基于PyTorch Unfold的API来将图像进行分块,也就是模仿卷积的思路,设置
kernel_size=stride=patch_size,得到分块后的图片。 - 得到格式为
[bs, num_patch, patch_depth]的张量。 - 将张量与形状为
[patch_depth, model_dim_C]的权重矩阵进行乘法操作,即可得到形状为[bs, num_patch, model_dim_C]的patch embedding。
F.unfold:输入为(N, C, H, W),其中N为batch_size,C是channel个数,H和W分别是channel的长宽,K1xK2是kernel_size。unfold输出为(N, C×(K1xK2), L),L是根据kernel_size滑动剪裁之后得到的区块数量,参考卷积计算公式 M = (N+2P-K)/S + 1。
方法二:
patch_depth是等于input_channel * patch_size * patch_sizemodel_dim_C相当于二维卷积的输出通道数目- 将形状为
[patch_depth, model_dim_C]的权重矩阵转换为[model_dim_C, input_channel, patch_size, patch_size]的卷积核。 - 调用PyTorch的conv2d API得到卷积的输出张量,形状为
[bs, output_channel, height, width],output_channel和input_channel一致。 - 转换为
[bs, num_patch, model_dim_C]的格式,即为patch embedding
源码:
import torch
import torch.nn as nn
import torch.nn.functional as F
import math

# 难点1 patch embedding
def image2emb_naive(image, patch_size, weight):
    """
    直观方法去实现patch embedding
    """
    # patch = [bs, num_patch, patch_depth]
    patch = F.unfold(image, kernel_size=(patch_size, patch_size), stride=(patch_size, patch_size)).transpose(-1, -2)
    # weight = [patch_depth, model_dim_C]
    # patch @ weight = [bs, num_patch, model_dim_C]
    patch_embedding = patch @ weight
    return patch_embedding


def image2emb_conv(image, kernel, stride):
    """
    基于二维卷积来实现patch embedding,embedding的维度就是卷积的输出通道数
    """
    conv_output = F.conv2d(image, kernel, stride=stride)  # bs*oc*oh*ow
    bs, oc, oh, ow = conv_output.shape  # model_dim_C就是oc
    patch_embedding = conv_output.reshape((bs, oc, oh*ow)).transpose(-1, -2)
    return patch_embedding
2. 如何构建MHSA(MultiHead Self-Attention)并计算其复杂度?
矩阵计算复杂度:[AxB] x [BxC] = 复杂度ABC
- 基于输入x进行3个映射分别得到qkv
- 此步复杂度为
3 * L * C^2,其中L位序列长度,C为特征大小 - 每个特征都线性映射1次,复杂度是
[LxC] x [CxC] = L * C^2
- 此步复杂度为
- 将qkv拆分成多头的形式,注意这里的多头各自计算不影响,所以可以与bs维度进行统一看待
- 计算
q * k_t,并考虑可能的掩码,即让无效的两两位置之间的能量为负无穷,掩码是在shift window MHSA中会需要,而在window MHSA中暂不需要- 此步复杂度是
L^2 * C,复杂度是:[LxC] x [CxL] = C * L^2,
- 此步复杂度是
- 计算概率值与v的乘积
- 此步复杂度是
L^2 * C,复杂度是:[LxL] x [LxC] = C * L^2
- 此步复杂度是
- 对输出进行再次映射
- 此步复杂度是
L * C^2,复杂度是[LxC] x [CxC] = L * C^2
- 此步复杂度是
- 总体复杂度为
4*L*C^2 + 2*L^2*C
torch.chunk:切分,将tensor切分为多个块,维度保持不变。
源码如下:
# MSA or MHSA
# 复杂度:
class MultiHeadSelfAttention(nn.Module):
    def __init__(self, model_dim, num_head):
        super(MultiHeadSelfAttention, self).__init__()
        self.num_head = num_head
        self.proj_linear_layer = nn.Linear(model_dim, 3*model_dim)
        self.final_linear_layer = nn.Linear(model_dim, model_dim)

    def forward(self, input, additive_mask=None):
        bs, seqlen, model_dim = input.shape
        num_head = self.num_head
        head_dim = model_dim // num_head

        proj_output = self.proj_linear_layer(input)  # 映射为3个model_dim,[bs, seqlen, 3*model_dim]
        q, k, v = proj_output.chunk(3, dim=-1)  # 3 * [bs, seqlen, model_dim]

        # [bs, seqlen, num_head, head_dim]
        q = q.reshape(bs, seqlen, num_head, head_dim).transpose(1, 2)  # model_dim -> num_head, head_dim
        q = q.reshape(bs*num_head, seqlen, head_dim)  # 相当于bs提升, num_head不参与计算

        k = k.reshape(bs, seqlen, num_head, head_dim).transpose(1, 2)  # model_dim -> num_head, head_dim
        k = k.reshape(bs*num_head, seqlen, head_dim)  # 相当于bs提升

        v = v.reshape(bs, seqlen, num_head, head_dim).transpose(1, 2)  # model_dim -> num_head, head_dim
        v = v.reshape(bs*num_head, seqlen, head_dim)  # 相当于bs提升

        if additive_mask is None:
            # k的转置是转的最后2维
            attn_prob = F.softmax(torch.bmm(q, k.transpose(-2, -1)) / math.sqrt(head_dim), dim=-1)
        else:
            additive_mask = additive_mask.tile((num_head, 1, 1))  # 扩充至num_head倍
            attn_prob = F.softmax(torch.bmm(q, k.transpose(-2, -1)) / math.sqrt(head_dim) + additive_mask, dim=-1)

        output = torch.bmm(attn_prob, v)
        output = output.reshape(bs, num_head, seqlen, head_dim).transpose(1, 2)  # [bs, num_head, seqlen, head_dim]
        output = output.reshape(bs, seqlen, model_dim)

        output = self.final_linear_layer(output)
        return attn_prob, output
3. 如何构建Window MHSA并计算其复杂度?
- 将patch组成的图片,进一步划分成一个个更大的window
- 首先,需要将三维的patch embedding转换成图片格式
- 使用unfold来将patch划分成window
- 在每个window内部计算MHSA
- window数目其实可以跟batchsize进行统一对待,因为window与window之间没有交互计算
-
关于计算复杂度
- 假设窗的边长为W,sequence长度 L = W^2,那么计算每个窗的总体复杂度是
4*W^2*C^2 + 2W^4^C - 假设patch的总数目为L,那么窗的数目为
L/W^2 - 因此,窗的复杂度*窗的数目,W-MHSA的总体复杂度为
4*L*C^2 + 2*L*W^2*C
- 假设窗的边长为W,sequence长度 L = W^2,那么计算每个窗的总体复杂度是
- 此处不需要mask
- 将计算结果转换成带window的4维张量格式
- 复杂度对比:
- MHSA:
4*L*C^2 + 2*L^2*C,复杂度与L^2是平方关系 - W-MHSA:
4*L*C^2 + 2*L*W^2*C,复杂度与L是线性关系
- MHSA:
源码:
def window_multi_head_self_attention(patch_embedding, mhsa, window_size=4, num_head=2):
    """
    W-MHSA
    """
    num_patch_in_window = window_size * window_size  # patch数量
    bs, num_patch, patch_depth = patch_embedding.shape
    image_height = image_width = int(math.sqrt(num_patch))

    patch_embedding = patch_embedding.transpose(-1, -2)
    patch = patch_embedding.reshape(bs, patch_depth, image_height, image_width)  # 照片

    window = F.unfold(patch, kernel_size=(window_size, window_size),
                      stride=(window_size, window_size)).transpose(-1, -2)  # patch转换为window, [bs, num_window, window_depth]

    # 窗的深度,patch的深度 x 1个window内patch的数目
    bs, num_window, _ = window.shape
    # [bs*num_w, num_patch, patch_depth]
    window = window.reshape(bs*num_window, patch_depth, num_patch_in_window).transpose(-1, -2)

    # 基础的mhsa, 多头自注意机制,MultiHead Self-Attention
    attn_prob, output = mhsa(window)  # [bs*num_window, num_patch_in_window, patch_depth]

    output = output.reshape(bs, num_window, num_patch_in_window, patch_depth)
    return output
4. 如何构建Shift Window MHSA及其Mask?
window shift -> cycle shift -> reverse cycle shift
- 将上一步的W-MHSA的结果转换为图片格式
- 假设已经做了新的window划分,这一步叫做shift-window
- 为了保持window数目不变,从而有高效的计算,需要将图片的patch往左和往上各自滑动半个窗口大小的步长,保持patch所属window类型不变
- 将图片patch还原成window的数据格式
- 由于cycle shift-window后,每个window虽然形状规整,但部分window中存在原本不属于同一个窗口的patch,所以需要生成mask
- 如何生成mask?
- 首先构建一个shift-window的patch所属的window类别矩阵
- 对该矩阵进行同样的往左和往上,各自滑动半个窗口大小的步长的操作
- 通过unfold操作,得到
[bs, num_window, num_patch_in_window]形状的类别矩阵 - 对该矩阵进行扩维成
[bs, num_window, num_patch_in_window, 1] - 将该矩阵与其转置矩阵进行作差,得到同类关系矩阵,为0的位置上的patch属于同类,否则属于不同类
- 对同类关系矩阵中非0的位置,用负无穷数进行填充,对于零的位置用0去填充,这样就构建好了MHSA所需的mask
- 此mask的形状为
[bs, num_window, num_patch_in_window, num_patch_in_window],每个窗内的window不一样
- 将window转换成3维的格式,
[bs*num_window, num_patch_in_window, patch_depth] - 将3维格式的特征,连同mask一起送人MHSA中计算得到注意力输出
- 将注意力输出转换为图片patch格式,
[bs, num_window, num_patch_in_window, patch_depth] - 为了恢复位置,需要将图片的patch,往右和往下各自滑动半个窗口大小的步长,至此,SW-MHSA计算完毕。
同类关系矩阵示例:
import torch
a = torch.tensor([[1], [4], [1], [9]])  # 第1和第3属于同一个类别
print(f"a: \n{a}")
b = a - a.T
print(f"b: \n{b}")
c = b==0
print(f"c: \n{c}")  # 相同的是True和False

"""
a:
tensor([[1],
        [4],
        [1],
        [9]])
b:
tensor([[ 0, -3,  0, -8],
        [ 3,  0,  3, -5],
        [ 0, -3,  0, -8],
        [ 8,  5,  8,  0]])
c:
tensor([[ True, False,  True, False],
        [False,  True, False, False],
        [ True, False,  True, False],
        [False, False, False,  True]])
"""
源码:
# 定义一个辅助函数,window2image,也就是将transformer block的结果转化成图片格式
def window2image(msa_output):
    bs, num_window, num_patch_in_window, patch_depth = msa_output.shape
    window_size = int(math.sqrt(num_patch_in_window))
    image_height = int(math.sqrt(num_window)) * window_size
    image_width = image_height

    msa_output = msa_output.reshape(bs, int(math.sqrt(num_window)), int(math.sqrt(num_window)),
                                    window_size, window_size, patch_depth)

    msa_output = msa_output.transpose(2, 3)

    image = msa_output.reshape(bs, image_height*image_width, patch_depth)
    image = image.transpose(-1, -2)
    image = image.reshape(bs, patch_depth, image_height, image_width) # 跟卷积格式一致

#     print(f'[Info] image: {image.shape}')
    return image

# 定义辅助函数 shift_window, 即高效地计算swmsa
# generate_mask: 正向需要生成mask,反向不需要生成mask
def shift_window(w_msa_output, window_size, shift_size, generate_mask=False):

    bs, num_window, num_patch_in_window, patch_depth = w_msa_output.shape

    # 复杂的reshape操作
    w_msa_output = window2image(w_msa_output)  # [bs, n_win, n_patch, depth] -> [bs, depth, h, w]
#     print(f'[Info] w_msa_output: {w_msa_output.shape}')

    bs, patch_depth, image_height, image_width = w_msa_output.shape

    rolled_w_msa_output = torch.roll(w_msa_output, shifts=(shift_size, shift_size), dims=(2, 3))

    shifted_w_msa_input = rolled_w_msa_output.reshape(bs, patch_depth, int(math.sqrt(num_window)), window_size, int(math.sqrt(num_window)), window_size)

    shifted_w_msa_input = shifted_w_msa_input.transpose(3, 4)
    shifted_w_msa_input = shifted_w_msa_input.reshape(bs, patch_depth, num_window*num_patch_in_window)
    shifted_w_msa_input = shifted_w_msa_input.transpose(-1, -2)
    shifted_window = shifted_w_msa_input.reshape(bs, num_window, num_patch_in_window, patch_depth)

    if generate_mask:
        additive_mask = build_mask_for_shifted_wmsa(bs, image_height, image_width, window_size)
    else:
        additive_mask = None

    return shifted_window, additive_mask

# 构建shift window multi-head attention mask
def build_mask_for_shifted_wmsa(batch_size, image_height, image_width, window_size):
    index_matrix = torch.zeros(image_height, image_width)

    for i in range(image_height):
        for j in range(image_width):
            row_times = (i + window_size // 2) // window_size
            col_times = (j + window_size // 2) // window_size
            index_matrix[i, j] = row_times * (image_height // window_size) + col_times + 1

    rolled_index_matrix = torch.roll(index_matrix, shifts=(-window_size // 2, -window_size // 2), dims=(0, 1))
    rolled_index_matrix = rolled_index_matrix.unsqueeze(0).unsqueeze(0)

    c = F.unfold(rolled_index_matrix, kernel_size=(window_size, window_size),
                 stride=(window_size, window_size)).transpose(-1, -2)

    c = c.tile(batch_size, 1, 1)  # [bs, num_window, num_patch_in_window]

    bs, num_window, num_patch_in_window = c.shape

    c1 = c.unsqueeze(-1)
    c2 = (c1 - c1.transpose(-1, -2)) == 0

    valid_matrix = c2.to(torch.float32)
    additive_mask = (1 - valid_matrix) * (-1e9)

    additive_mask = additive_mask.reshape(bs*num_window, num_patch_in_window, num_patch_in_window)

    return additive_mask

def shift_window_multi_head_self_attention(w_msa_output, mhsa, window_size=4, num_head=2):
    bs, num_window, num_patch_in_window, patch_depth = w_msa_output.shape  # window msa的结果

    # shift window 按照规整的patch计算
    shifted_w_msa_input, additive_mask = shift_window(w_msa_output, window_size, shift_size=-window_size//2, generate_mask=True)

    shifted_w_msa_input = shifted_w_msa_input.reshape(bs*num_window, num_patch_in_window, patch_depth)
    attn_prob, output = mhsa(shifted_w_msa_input, additive_mask=additive_mask)

    output = output.reshape(bs, num_window, num_patch_in_window, patch_depth)

    # 反向操作,还原窗口,9窗 -> 4窗
    output, _ = shift_window(output, window_size, shift_size=window_size//2, generate_mask=False)

    return output
5. 如何构建Patch Merging?
- 将window格式的特征转换成图片的patch格式。
- 利用unfold操作,按照
merge_size * merge_size的大小得到新的patch,形状为[bs, num_patch_new, merge_size * merge_size * patch_depth_old] - 使用一个全连接层对depth进行降维成0.5倍,也就是从
merge_size * merge_size * patch_depth_old映射到0.5 * merge_size * merge_size * patch_depth_old - 输出的是patch embedding的形状格式,
[bs, num_patch, patch_depth] - 举例说明:以 merge_size = 2 为例,经过PatchMerging后,patch数目减少为之前的1/4,但是depth增大为原来的2倍,而不是4倍。
源码:
# 难点4 patch merging
class PatchMerging(nn.Module):
    def __init__(self, model_dim, merge_size, output_depth_scale = 0.5):
        super(PatchMerging, self).__init__()
        self.merge_size = merge_size
        mm_size = model_dim*merge_size*merge_size
#         print(f'[Info] mm_size: {mm_size}, mm_size_scale: {mm_size*output_depth_scale}')
        self.proj_layer = nn.Linear(
            model_dim*merge_size*merge_size,
            int(model_dim*merge_size*merge_size*output_depth_scale)
        )

    def forward(self, input):
        bs, num_window, num_patch_in_window, patch_depth = input.shape
        window_size = int(math.sqrt(num_patch_in_window))

        input = window2image(input)
        merged_window = F.unfold(
            input, kernel_size=(self.merge_size, self.merge_size),
            stride=(self.merge_size, self.merge_size)).transpose(-1, -2)
#         print(f'[Info] merged_window: {merged_window.shape}')
        merged_window = self.proj_layer(merged_window)  # [bs, num_patch, new_patch_depth]

        return merged_window
6. 如何构建SwinTransformerBlock?
- 每个block包含LayerNorm、W-MHSA、MLP、SW-MHSA、残差连接等模块
- 输入是patch embedding格式
- 每个MLP包含两层,分别是
4*model_dim和model_dim的大小 - 输出的是window的数据格式,
[bs, num_window, num_patch_in_window, patch_depth] - 需要注意残差连接对数据形状的要求
源码:
class SwinTransformerBlock(nn.Module):

    def __init__(self, model_dim, window_size, num_head):
        super(SwinTransformerBlock, self).__init__()
        self.layer_norm1 = nn.LayerNorm(model_dim)
        self.layer_norm2 = nn.LayerNorm(model_dim)
        self.layer_norm3 = nn.LayerNorm(model_dim)
        self.layer_norm4 = nn.LayerNorm(model_dim)

        self.wsma_mlp1 = nn.Linear(model_dim, 4*model_dim)
        self.wsma_mlp2 = nn.Linear(4*model_dim, model_dim)
        self.swsma_mlp1 = nn.Linear(model_dim, 4*model_dim)
        self.swsma_mlp2 = nn.Linear(4*model_dim, model_dim)

        self.mhsa1 = MultiHeadSelfAttention(model_dim, num_head)
        self.mhsa2 = MultiHeadSelfAttention(model_dim, num_head)

    def forward(self, input):
        bs, num_patch, patch_depth = input.shape

        # window w-mhsa
        input1 = self.layer_norm1(input)
        w_msa_output = window_multi_head_self_attention(input, self.mhsa1, window_size=4, num_head=2)
        bs, num_window, num_patch_in_window, patch_depth = w_msa_output.shape
        w_msa_output = input + w_msa_output.reshape(bs, num_patch, patch_depth)
        output1 = self.wsma_mlp2(self.wsma_mlp1(self.layer_norm2(w_msa_output)))
        output1 += w_msa_output

        # shift_window sw-mhsa
        input2 = self.layer_norm3(output1)
        input2 = input2.reshape(bs, num_window, num_patch_in_window, patch_depth)
        sw_msa_output = shift_window_multi_head_self_attention(input2, self.mhsa2, window_size=4, num_head=2)
        sw_msa_output = output1 + sw_msa_output.reshape(bs, num_patch, patch_depth)
        output2 = self.swsma_mlp2(self.swsma_mlp1(self.layer_norm4(sw_msa_output)))
        output2 += sw_msa_output
#         print(f'[Info] output2: {output2.shape}')

        output2 = output2.reshape(bs, num_window, num_patch_in_window, patch_depth)
        return output2
7. 如何构建SwinTransformerModel?
- 输入是图片
- 首先对图片进行分块并得到patch embedding
- 经过第一个stage
- 进行patch merging,再进行第二个stage
- 以此类推,每个model_dim是之前的2倍
- 对最后一个block的输出,转换成patch embedding的格式,
[bs, num_patch, patch_depth] - 对patch embedding在时间维度进行平均池化,并映射到分类层得到分类的logits,完毕
class SwinTransformerModel(nn.Module):

    def __init__(self, input_image_channel=3, patch_size=4, model_dim_C=8, num_classes=10, window_size=4, num_head=2, merge_size=2):
        super(SwinTransformerModel, self).__init__()
        patch_depth = patch_size * patch_size * input_image_channel
        self.patch_size = patch_size
        self.model_dim_C = model_dim_C
        self.num_classes = num_classes

        # Parameter可以进行梯度更新
        self.patch_embedding_weight = nn.Parameter(torch.randn(patch_depth, model_dim_C))
        self.block1 = SwinTransformerBlock(model_dim_C, window_size, num_head)
        self.block2 = SwinTransformerBlock(model_dim_C*2, window_size, num_head)
        self.block3 = SwinTransformerBlock(model_dim_C*4, window_size, num_head)
        self.block4 = SwinTransformerBlock(model_dim_C*8, window_size, num_head)

        self.patch_merging1 = PatchMerging(model_dim_C, merge_size)
        self.patch_merging2 = PatchMerging(model_dim_C*2, merge_size)
        self.patch_merging3 = PatchMerging(model_dim_C*4, merge_size)

        self.final_layer = nn.Linear(model_dim_C*8, num_classes)

    def forward(self, image):
        patch_embedding_naive = image2emb_naive(image, self.patch_size, self.patch_embedding_weight)

        patch_embedding = patch_embedding_naive
        print(f"[Info] patch_embedding: {patch_embedding.shape}")

        sw_msa_output = self.block1(patch_embedding)
        print(f"[Info] block1_output: {sw_msa_output.shape}")

        merged_patch1 = self.patch_merging1(sw_msa_output)
#         print(f"[Info] merged_patch1: {merged_patch1.shape}")
        sw_msa_output_1 = self.block2(merged_patch1)
        print(f"[Info] block2_output: {sw_msa_output_1.shape}")

        merged_patch2 = self.patch_merging2(sw_msa_output_1)
#         print(f"[Info] merged_patch2: {merged_patch2.shape}")
        sw_msa_output_2 = self.block3(merged_patch2)
        print(f"[Info] block3_output: {sw_msa_output_2.shape}")

        merged_patch3 = self.patch_merging3(sw_msa_output_2)
        sw_msa_output_3 = self.block4(merged_patch3)
        print(f"[Info] block4_output: {sw_msa_output_3.shape}")

        bs, num_window, num_patch_in_window, patch_depth = sw_msa_output_3.shape
        sw_msa_output_3 = sw_msa_output_3.reshape(bs, -1, patch_depth)


        pool_output = torch.mean(sw_msa_output_3, dim=1)
        logits = self.final_layer(pool_output)
        print(f"[Info] logits: {logits.shape}")

        return logits
8. 模型测试代码
# 难点5 分类模块
if __name__ == '__main__':
    bs, ic, image_h, image_w = 4, 3, 256, 256
    patch_size = 4
    model_dim_C = 8
    max_num_token = 16
    num_classes = 10
    window_size = 4
    num_head = 2
    merge_size = 2

    patch_depth = patch_size * patch_size * ic
    image = torch.randn(bs, ic, image_h, image_w)

    model = SwinTransformerModel(
        ic, patch_size, model_dim_C, num_classes, window_size, num_head, merge_size)

    logits = model(image)
    print(f"[Info] logits: \n{logits}")
输出:
[Info] patch_embedding: torch.Size([4, 4096, 8])
[Info] block1_output: torch.Size([4, 256, 16, 8])
[Info] block2_output: torch.Size([4, 64, 16, 16])
[Info] block3_output: torch.Size([4, 16, 16, 32])
[Info] block4_output: torch.Size([4, 4, 16, 64])
[Info] logits: torch.Size([4, 10])
[Info] logits:
tensor([[-0.0211, -0.0023, -0.1871,  0.1112,  0.0741, -0.2311, -0.1542,  0.0552,
         -0.2324,  0.0457],
        [-0.0740, -0.0076,  0.1234,  0.0425,  0.1981,  0.1232, -0.0400,  0.0220,
          0.1496,  0.1029],
        [-0.1136,  0.0900,  0.0369,  0.1520,  0.3972,  0.1162, -0.0293,  0.1389,
         -0.1292, -0.0914],
        [ 0.0379, -0.1493, -0.0693,  0.1378,  0.2782,  0.0828, -0.1030,  0.0752,
          0.0447,  0.0662]], grad_fn=<AddmmBackward0>)


