win10+keras+yolo4训练自己的数据集
win10+keras+yolo4训练自己的数据集
**
一、下载准备
1、(1)yolo4的github代码:https://github.com/Ma-Dan/keras-yolo4
(2)所准备数据集::Safety-Helmet-Wearing-Dataset;
github链接::https://github.com/njvisionpower/Safety-Helmet-Wearing-Dataset
(3)yolov4权重文件yolov4.weights(包含已转换完成的yolov4.h5文件,如果想偷懒可以直接将yolov4.h5文件放入keras-yolo4-master\model_data下,不需conver.py转换这一过程):
下载链接:链接:https://pan.baidu.com/s/1_HFT8f_K0LMQNiURMNA4kQ
提取码:nnz4
2、本人电脑试验环境:
python 3.7.4
tensorflow 1.14
keras 2.2.5
CUDA 10.0
cuDNN 7.5.x
二、数据集准备及处理
数据集格式为VOC2028,可参考链接文章对自己数据集进行修改,已有很多博文解析了制作VOC格式数据集的方法,参考如下:目标检测数据集制作流程
身为小白的自己,在此列出各位大哥们需要注意的地方,防止后续运行报错
1、路径问题
keras-yolo4-master文件夹内 VOCdevkit用于存放你自己记的VOC数据集
![]()
2. VOC2028中,Annotation文件夹下xml,是Labelimage运行后生成的xml文件,需要包含正确的path,filename,且不得包含非法字符(比如汉字)
!!!若path,filename有误,可以参考如下代码进行修改(注意写入自己的路径)
该代码引用自博主Jack_0601 ,在此表示感谢,原文链接如下:python批量修改xml文件path与filenames
'''
修改xml中的路径path
'''

import xml.dom.minidom
import os

path = r'E:\models\VOCdevkit\VOC2028\Annotations'  # xml文件存放路径
sv_path = r'E:\models\VOCdevkit\VOC2028\Annotations'  # 修改后的xml文件存放路径
files = os.listdir(path)
cnt = 1

for xmlFile in files:
    dom = xml.dom.minidom.parse(os.path.join(path, xmlFile))  # 打开xml文件,送到dom解析
    root = dom.documentElement    # 得到文档元素对象
    item = root.getElementsByTagName('path')  # 获取path这一node名字及相关属性值
    for i in item:
        i.firstChild.data = 'E:\\models\\keras-yolo3-helmet\\VOCdevkit\\VOC2028\\JPEGImages' + str(cnt).zfill(6) + '.jpg'  # xml文件对应的图片路径
3、(1)若Main文件夹下为空,
则在VOC2028文件夹里新建test.py,运行代码将会在Main文件夹里生成train.txt,val.txt,test.txt和trainval.txt四个文件。代码如下:
import os
import random

trainval_percent = 0.1
train_percent = 0.9
xmlfilepath = 'Annotations'
txtsavepath = 'ImageSets\Main'
total_xml = os.listdir(xmlfilepath)

num = len(total_xml)
list = range(num)
tv = int(num * trainval_percent)
tr = int(tv * train_percent)
trainval = random.sample(list, tv)
train = random.sample(trainval, tr)

ftrainval = open('ImageSets/Main/trainval.txt', 'w')
ftest = open('ImageSets/Main/test.txt', 'w')
ftrain = open('ImageSets/Main/train.txt', 'w')
fval = open('ImageSets/Main/val.txt', 'w')

for i in list:
    name = total_xml[i][:-4] + '\n'
    if i in trainval:
        ftrainval.write(name)
        if i in train:
            ftest.write(name)
        else:
            fval.write(name)
    else:
        ftrain.write(name)

ftrainval.close()
ftrain.close()
fval.close()
ftest.close()
(2)VOC2028\ImageSets\Main中包含以下4个文件,其中,test.txt不是必要,但最好要有

三、准备工作
1、权重转换convert.py
keras所用权重为.h5文件,因此需要转化yolov4.weights格式。利用convert.py代码将yolov4.weights权重转化为keras所需yolov4.h5权重文件,代码位于keras-yolo4-master/convert.py,具体流程如下
1、下载本文开头所发链接中yolov4.weights权重文件
2、yolov4.weights移动至keras-yolo4-master文件目录下
4、将keras-yolo4-master文件目录下生成的yolov4.h5移动至keras-yolo4-master\model_data
2、voc_annotation
1、(1)修改voc_annotation.py,将sets修改为自己数据集的名称,classes修改为自己的类别。
我的数据集路径为:E:\models\keras-yolo4-master\VOCdevkit\VOC2028,且voc_annotation.py文件位于E:\models\keras-yolo4-master下。
(2)可能会报错路径错误,原voc_annotation.py文件代码中路径与我的不一致,我修改了in_file=open(xxx);image_ids=open(xxx) ;list_file=open(xxx) 这几行代码,修改为自己的路径。在此贴出自己的代码,以作参考
import xml.etree.ElementTree as ET
# xml.etree.ElementTree 实现了解析和创建xml数据的简单高效API
from os import getcwd

sets=[('2028', 'train'), ('2028', 'val'), ('2028', 'test')]

classes = ["person", "hat"]


def convert_annotation(year, image_id, list_file):
    in_file = open('VOCdevkit/VOC%s/Annotations/%s.xml'%(year, image_id))

    # 从文件读取数据
    tree=ET.parse(in_file)
    root = tree.getroot()
    '''
    从字符串读取数据
    root=ET.fromstring(xml_data_as_string)
    '''

    for obj in root.iter('object'):
        difficult = obj.find('difficult').text
        cls = obj.find('name').text
        if cls not in classes or int(difficult)==1:
            continue
        cls_id = classes.index(cls)
        xmlbox = obj.find('bndbox')
        b = (int(xmlbox.find('xmin').text), int(xmlbox.find('ymin').text), int(xmlbox.find('xmax').text), int(xmlbox.find('ymax').text))
        list_file.write(" " + ",".join([str(a) for a in b]) + ',' + str(cls_id))

wd = getcwd()

for year, image_set in sets:
    image_ids = open('VOCdevkit/VOC%s/ImageSets/Main/%s.txt'%(year, image_set)).read().strip().split()
    list_file = open('%s_%s.txt'%(year, image_set), 'w')
    for image_id in image_ids:
        list_file.write('%s/VOCdevkit/VOC%s/JPEGImages/%s.jpg'%(wd, year, image_id))
        convert_annotation(year, image_id, list_file)
        list_file.write('\n')
    list_file.close()
2、运行voc_annotation.py 生成三个txt文件在keras-yolo4-master/目录下,如下图所示
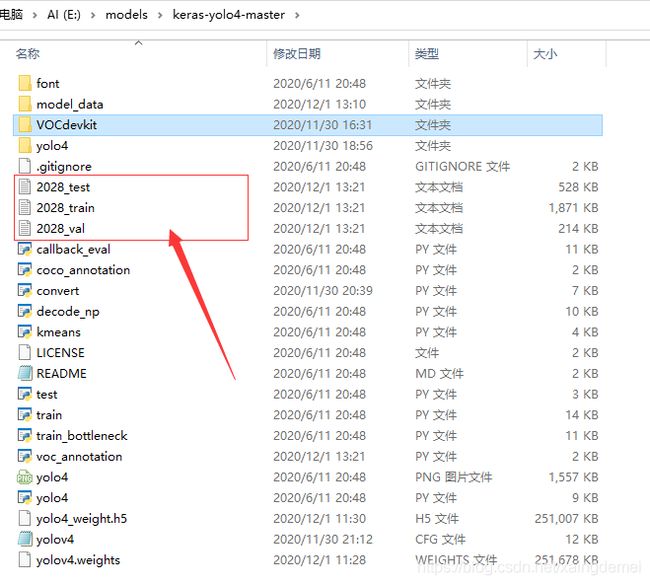 3、分别重命名 2028_test为 test。2028_train为 train。2028_val 为 val。
这一步别忘了,否则后面报错文件不存在,它其实一直都在,只不过你忘了重命名而已
3、训练的准备工作
(1)、k-means维度聚类
维度聚类的目的是 根据你自己的数据集生成合适的先验框,为了有更好的训练效果,建议大家不要忘了运行k-means.py文件,步骤如下
1、修改k-means.py文件文件内代码 “2012_train.txt” 为 “train.txt”,注意共有两处修改
2、运行k-means.py
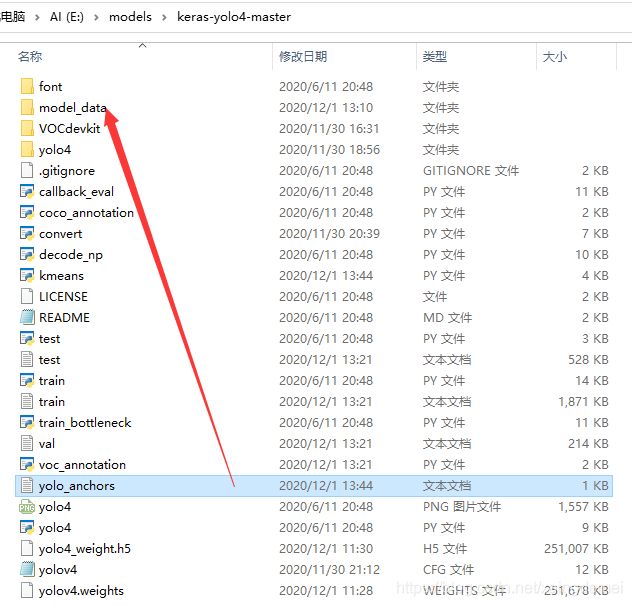
3、将主目录keras-yolo4-master下生成的yolo_anchors.txt移动至keras-yolo4-master\model_data文件夹下
(2)修改CFG文件
打开主目录keras-yolo4-master下yolov4.cfg文件,ctrl+h搜索yolo,会出现三个[yolo],(位于cfg文件后半部分)。每个[yolo]需要修改三处,共计9处要修改,修改它们!!!下图仅展示第一个[yolo]的修改
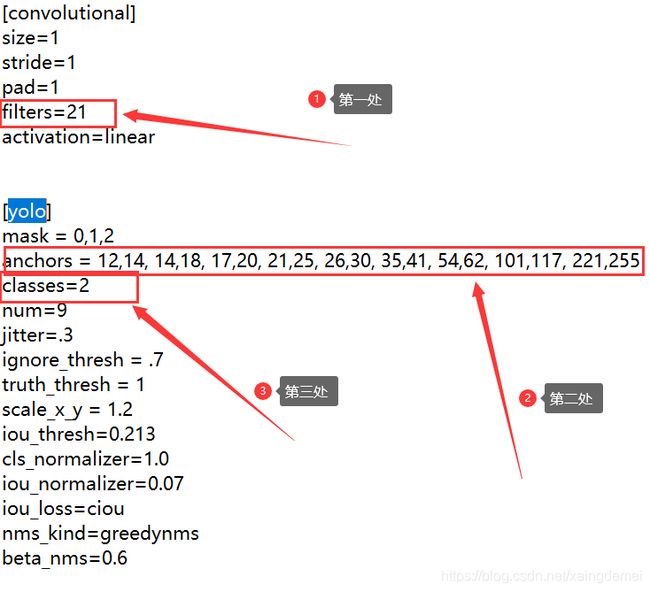 每一个[yolo]的三处修改都是一样的
第一处:filters=3*(5+类别数),比如我的是2类,filters=3*(5+2)=21
第二处:anchors为刚才生成yolo_anchors文本的内容
第三处:classes有几类就写几
切记不要擅自修改其他地方(大神请自动屏蔽这句话)
(3)新建my_classes.txt
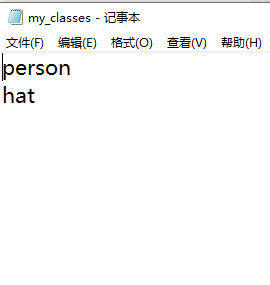
在主目录keras-yolo4-master\model_data下新建txt文件,命名为my_classes.txt,注意文件内不要有多余的空格或空行,以免训练时候读取出错
四、开始训练吧!
1、修改keras-yolo4-master/train.py
若使用GPU,我加了一行代码位于第24行,GOU编号为0
若电脑配置较低,注意修改batchsize,防止内存不足CUDA_memory_out
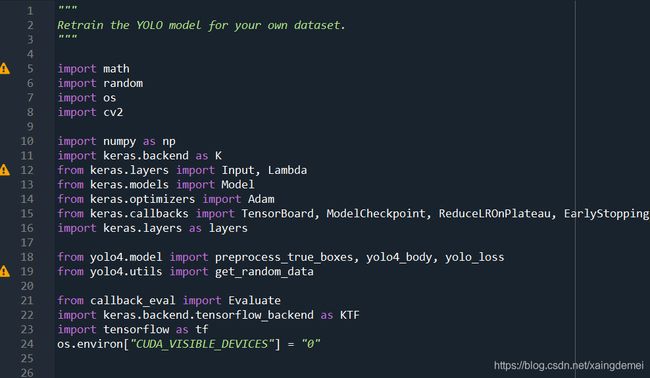
2、注意修改4处文件名称,
2012_train.txt修改为train.txt 共计修改1处
2012_val.txt修改为val.txt 共计修改2处
epoch由50000改为50轮 共计1处,(50000轮迭代太久,等换了好的GPU再试试)
此处粘贴出train.py代码,代码来源于本文开头yolov4的github文件,感谢keras-yolo4-master的创作,也希望大家能提出优化修改意见,一起学习进步
"""
Retrain the YOLO model for your own dataset.
"""

import math
import random
import os
import cv2

import numpy as np
import keras.backend as K
from keras.layers import Input, Lambda
from keras.models import Model
from keras.optimizers import Adam
from keras.callbacks import TensorBoard, ModelCheckpoint, ReduceLROnPlateau, EarlyStopping
import keras.layers as layers

from yolo4.model import preprocess_true_boxes, yolo4_body, yolo_loss
from yolo4.utils import get_random_data

from callback_eval import Evaluate
import keras.backend.tensorflow_backend as KTF
import tensorflow as tf
os.environ["CUDA_VISIBLE_DEVICES"] = "0"


def _main():

    annotation_train_path = 'train.txt'
    annotation_val_path = 'val.txt'
    log_dir = 'logs/000/'
    classes_path = 'model_data/my_classes.txt'
    anchors_path = 'model_data/yolo4_anchors.txt'
    class_names = get_classes(classes_path)
    num_classes = len(class_names)
    class_index = ['{}'.format(i) for i in range(num_classes)]
    anchors = get_anchors(anchors_path)

    max_bbox_per_scale = 150

    anchors_stride_base = np.array([
        [[12, 16], [19, 36], [40, 28]],
        [[36, 75], [76, 55], [72, 146]],
        [[142, 110], [192, 243], [459, 401]]
    ])
    # 一些预处理
    anchors_stride_base = anchors_stride_base.astype(np.float32)
    anchors_stride_base[0] /= 8
    anchors_stride_base[1] /= 16
    anchors_stride_base[2] /= 32

    input_shape = (608, 608) # multiple of 32, hw

    #不全部占满显存, 按需分配
    config = tf.ConfigProto()
    config.gpu_options.allow_growth=True   #不全部占满显存, 按需分配
    sess = tf.Session(config=config)
    KTF.set_session(sess)

    model, model_body = create_model(input_shape, anchors_stride_base, num_classes, load_pretrained=False, freeze_body=2, weights_path='yolo4_weight.h5')

    logging = TensorBoard(log_dir=log_dir)
    checkpoint = ModelCheckpoint(log_dir + 'ep{epoch:03d}-loss{loss:.3f}.h5',
        monitor='loss', save_weights_only=True, save_best_only=True, period=1)
    reduce_lr = ReduceLROnPlateau(monitor='loss', factor=0.1, patience=3, verbose=1)
    early_stopping = EarlyStopping(monitor='loss', min_delta=0, patience=10, verbose=1)
    evaluation = Evaluate(model_body=model_body, anchors=anchors, class_names=class_index, score_threshold=0.05, tensorboard=logging, weighted_average=True, eval_file='val.txt', log_dir=log_dir)

    with open(annotation_train_path) as f:
        lines_train = f.readlines()
    np.random.seed(10101)
    np.random.shuffle(lines_train)
    np.random.seed(None)
    num_train = len(lines_train)

    with open(annotation_val_path) as f:
        lines_val = f.readlines()
    np.random.seed(10101)
    np.random.shuffle(lines_val)
    np.random.seed(None)
    num_val = len(lines_val)

    # Train with frozen layers first, to get a stable loss.
    # Adjust num epochs to your dataset. This step is enough to obtain a not bad model.
    if False:
        model.compile(optimizer=Adam(lr=1e-3), loss={'yolo_loss': lambda y_true, y_pred: y_pred})

        batch_size = 1
        print('Train on {} samples, val on {} samples, with batch size {}.'.format(num_train, num_val, batch_size))
        model.fit_generator(data_generator_wrapper(lines[:num_train], batch_size, input_shape, anchors, num_classes),
                steps_per_epoch=max(1, num_train//batch_size),
                epochs=50,
                initial_epoch=0,
                callbacks=[logging, checkpoint])

    # Unfreeze and continue training, to fine-tune.
    # Train longer if the result is not good.
    if True:
        for i in range(len(model.layers)):
            model.layers[i].trainable = True
        model.compile(optimizer=Adam(lr=1e-5), loss={'yolo_loss': lambda y_true, y_pred: y_pred}) # recompile to apply the change
        print('Unfreeze all of the layers.')

        batch_size = 1 # note that more GPU memory is required after unfreezing the body
        print('Train on {} samples, val on {} samples, with batch size {}.'.format(num_train, num_val, batch_size))
        model.fit_generator(data_generator_wrapper(lines_train, batch_size, anchors_stride_base, num_classes, max_bbox_per_scale, 'train'),
            steps_per_epoch=max(1, num_train//batch_size),
            epochs=50,
            initial_epoch=0,
            callbacks=[logging, checkpoint, reduce_lr, early_stopping, evaluation])

    # Further training if needed.


def get_classes(classes_path):
    '''loads the classes'''
    with open(classes_path) as f:
        class_names = f.readlines()
    class_names = [c.strip() for c in class_names]
    return class_names

def get_anchors(anchors_path):
    '''loads the anchors from a file'''
    with open(anchors_path) as f:
        anchors = f.readline()
    anchors = [float(x) for x in anchors.split(',')]
    return np.array(anchors).reshape(-1, 2)


def create_model(input_shape, anchors_stride_base, num_classes, load_pretrained=True, freeze_body=2,
            weights_path='model_data/yolo4_weights.h5'):
    '''create the training model'''
    K.clear_session() # get a new session
    image_input = Input(shape=(None, None, 3))
    h, w = input_shape
    num_anchors = len(anchors_stride_base)

    max_bbox_per_scale = 150
    iou_loss_thresh = 0.7

    model_body = yolo4_body(image_input, num_anchors, num_classes)
    print('Create YOLOv4 model with {} anchors and {} classes.'.format(num_anchors*3, num_classes))

    if load_pretrained:
        model_body.load_weights(weights_path, by_name=True, skip_mismatch=True)
        print('Load weights {}.'.format(weights_path))
        if freeze_body in [1, 2]:
            # Freeze darknet53 body or freeze all but 3 output layers.
            num = (250, len(model_body.layers)-3)[freeze_body-1]
            for i in range(num): model_body.layers[i].trainable = False
            print('Freeze the first {} layers of total {} layers.'.format(num, len(model_body.layers)))

    y_true = [
        layers.Input(name='input_2', shape=(None, None, 3, (num_classes + 5))),  # label_sbbox
        layers.Input(name='input_3', shape=(None, None, 3, (num_classes + 5))),  # label_mbbox
        layers.Input(name='input_4', shape=(None, None, 3, (num_classes + 5))),  # label_lbbox
        layers.Input(name='input_5', shape=(max_bbox_per_scale, 4)),             # true_sbboxes
        layers.Input(name='input_6', shape=(max_bbox_per_scale, 4)),             # true_mbboxes
        layers.Input(name='input_7', shape=(max_bbox_per_scale, 4))              # true_lbboxes
    ]
    loss_list = layers.Lambda(yolo_loss, name='yolo_loss',
                           arguments={'num_classes': num_classes, 'iou_loss_thresh': iou_loss_thresh,
                                      'anchors': anchors_stride_base})([*model_body.output, *y_true])

    model = Model([model_body.input, *y_true], loss_list)
    #model.summary()

    return model, model_body

def random_fill(image, bboxes):
    if random.random() < 0.5:
        h, w, _ = image.shape
        # 水平方向填充黑边,以训练小目标检测
        if random.random() < 0.5:
            dx = random.randint(int(0.5*w), int(1.5*w))
            black_1 = np.zeros((h, dx, 3), dtype='uint8')
            black_2 = np.zeros((h, dx, 3), dtype='uint8')
            image = np.concatenate([black_1, image, black_2], axis=1)
            bboxes[:, [0, 2]] += dx
        # 垂直方向填充黑边,以训练小目标检测
        else:
            dy = random.randint(int(0.5*h), int(1.5*h))
            black_1 = np.zeros((dy, w, 3), dtype='uint8')
            black_2 = np.zeros((dy, w, 3), dtype='uint8')
            image = np.concatenate([black_1, image, black_2], axis=0)
            bboxes[:, [1, 3]] += dy
    return image, bboxes

def random_horizontal_flip(image, bboxes):
    if random.random() < 0.5:
        _, w, _ = image.shape
        image = image[:, ::-1, :]
        bboxes[:, [0,2]] = w - bboxes[:, [2,0]]
    return image, bboxes

def random_crop(image, bboxes):
    if random.random() < 0.5:
        h, w, _ = image.shape
        max_bbox = np.concatenate([np.min(bboxes[:, 0:2], axis=0), np.max(bboxes[:, 2:4], axis=0)], axis=-1)

        max_l_trans = max_bbox[0]
        max_u_trans = max_bbox[1]
        max_r_trans = w - max_bbox[2]
        max_d_trans = h - max_bbox[3]

        crop_xmin = max(0, int(max_bbox[0] - random.uniform(0, max_l_trans)))
        crop_ymin = max(0, int(max_bbox[1] - random.uniform(0, max_u_trans)))
        crop_xmax = max(w, int(max_bbox[2] + random.uniform(0, max_r_trans)))
        crop_ymax = max(h, int(max_bbox[3] + random.uniform(0, max_d_trans)))

        image = image[crop_ymin : crop_ymax, crop_xmin : crop_xmax]

        bboxes[:, [0, 2]] = bboxes[:, [0, 2]] - crop_xmin
        bboxes[:, [1, 3]] = bboxes[:, [1, 3]] - crop_ymin
    return image, bboxes

def random_translate(image, bboxes):
    if random.random() < 0.5:
        h, w, _ = image.shape
        max_bbox = np.concatenate([np.min(bboxes[:, 0:2], axis=0), np.max(bboxes[:, 2:4], axis=0)], axis=-1)

        max_l_trans = max_bbox[0]
        max_u_trans = max_bbox[1]
        max_r_trans = w - max_bbox[2]
        max_d_trans = h - max_bbox[3]

        tx = random.uniform(-(max_l_trans - 1), (max_r_trans - 1))
        ty = random.uniform(-(max_u_trans - 1), (max_d_trans - 1))

        M = np.array([[1, 0, tx], [0, 1, ty]])
        image = cv2.warpAffine(image, M, (w, h))

        bboxes[:, [0, 2]] = bboxes[:, [0, 2]] + tx
        bboxes[:, [1, 3]] = bboxes[:, [1, 3]] + ty
    return image, bboxes

def image_preprocess(image, target_size, gt_boxes):
    # 传入训练的图片是rgb格式
    ih, iw = target_size
    h, w = image.shape[:2]
    interps = [   # 随机选一种插值方式
        cv2.INTER_NEAREST,
        cv2.INTER_LINEAR,
        cv2.INTER_AREA,
        cv2.INTER_CUBIC,
        cv2.INTER_LANCZOS4,
    ]
    method = np.random.choice(interps)   # 随机选一种插值方式
    scale_x = float(iw) / w
    scale_y = float(ih) / h
    image = cv2.resize(image, None, None, fx=scale_x, fy=scale_y, interpolation=method)

    pimage = image.astype(np.float32) / 255.
    if gt_boxes is None:
        return pimage
    else:
        gt_boxes[:, [0, 2]] = gt_boxes[:, [0, 2]] * scale_x
        gt_boxes[:, [1, 3]] = gt_boxes[:, [1, 3]] * scale_y
        return pimage, gt_boxes

def parse_annotation(annotation, train_input_size, annotation_type):
    line = annotation.split()
    image_path = line[0]
    if not os.path.exists(image_path):
        raise KeyError("%s does not exist ... " %image_path)
    image = np.array(cv2.imread(image_path))
    image = cv2.cvtColor(image, cv2.COLOR_BGR2RGB)

    # 没有标注物品,即每个格子都当作背景处理
    exist_boxes = True
    if len(line) == 1:
        bboxes = np.array([[10, 10, 101, 103, 0]])
        exist_boxes = False
    else:
        bboxes = np.array([list(map(lambda x: int(float(x)), box.split(','))) for box in line[1:]])
    if annotation_type == 'train':
        # image, bboxes = random_fill(np.copy(image), np.copy(bboxes))    # 数据集缺乏小物体时打开
        image, bboxes = random_horizontal_flip(np.copy(image), np.copy(bboxes))
        image, bboxes = random_crop(np.copy(image), np.copy(bboxes))
        image, bboxes = random_translate(np.copy(image), np.copy(bboxes))
    image, bboxes = image_preprocess(np.copy(image), [train_input_size, train_input_size], np.copy(bboxes))
    return image, bboxes, exist_boxes

def data_generator(annotation_lines, batch_size, anchors, num_classes, max_bbox_per_scale, annotation_type):
    '''data generator for fit_generator'''
    n = len(annotation_lines)
    i = 0
    #多尺度训练
    train_input_sizes = [320, 352, 384, 416, 448, 480, 512, 544, 576, 608]
    strides = np.array([8, 16, 32])

    while True:
        train_input_size = random.choice(train_input_sizes)

        # 输出的网格数
        train_output_sizes = train_input_size // strides

        batch_image = np.zeros((batch_size, train_input_size, train_input_size, 3))

        batch_label_sbbox = np.zeros((batch_size, train_output_sizes[0], train_output_sizes[0],
                                      3, 5 + num_classes))
        batch_label_mbbox = np.zeros((batch_size, train_output_sizes[1], train_output_sizes[1],
                                      3, 5 + num_classes))
        batch_label_lbbox = np.zeros((batch_size, train_output_sizes[2], train_output_sizes[2],
                                      3, 5 + num_classes))

        batch_sbboxes = np.zeros((batch_size, max_bbox_per_scale, 4))
        batch_mbboxes = np.zeros((batch_size, max_bbox_per_scale, 4))
        batch_lbboxes = np.zeros((batch_size, max_bbox_per_scale, 4))

        for num in range(batch_size):
            if i == 0:
                np.random.shuffle(annotation_lines)

            image, bboxes, exist_boxes = parse_annotation(annotation_lines[i], train_input_size, annotation_type)
            label_sbbox, label_mbbox, label_lbbox, sbboxes, mbboxes, lbboxes = preprocess_true_boxes(bboxes, train_output_sizes, strides, num_classes, max_bbox_per_scale, anchors)

            batch_image[num, :, :, :] = image
            if exist_boxes:
                batch_label_sbbox[num, :, :, :, :] = label_sbbox
                batch_label_mbbox[num, :, :, :, :] = label_mbbox
                batch_label_lbbox[num, :, :, :, :] = label_lbbox
                batch_sbboxes[num, :, :] = sbboxes
                batch_mbboxes[num, :, :] = mbboxes
                batch_lbboxes[num, :, :] = lbboxes
            i = (i + 1) % n
        yield [batch_image, batch_label_sbbox, batch_label_mbbox, batch_label_lbbox, batch_sbboxes, batch_mbboxes, batch_lbboxes], np.zeros(batch_size)

def data_generator_wrapper(annotation_lines, batch_size, anchors, num_classes, max_bbox_per_scale, annotation_type):
    n = len(annotation_lines)
    if n==0 or batch_size<=0: return None
    return data_generator(annotation_lines, batch_size, anchors, num_classes, max_bbox_per_scale, annotation_type)

if __name__ == '__main__':
    _main()
**3、**运行train.py即可
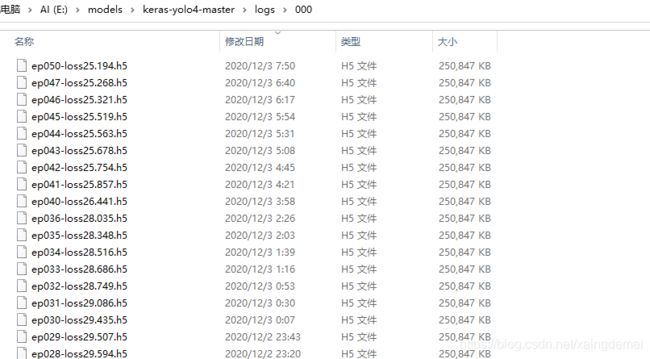
以下是我的训练展示,训练到了50轮,loss在25.194。
注意要在keras-yolo4-master下新建logs/000文件,用于储存checkpoint
**4、**附加问题 希望有缘大神帮忙解答
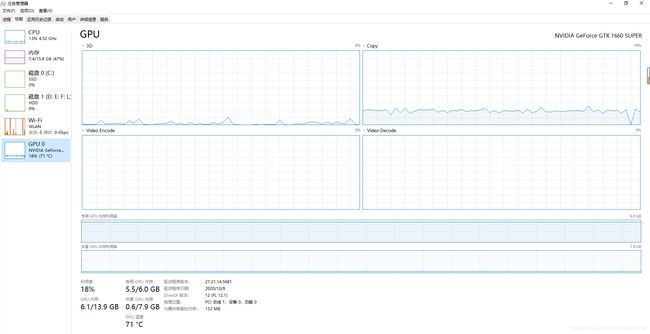
训练时我batchsize改到了2才不会报错CUDA_memory_out,可是当batchsize=2时,我的GPU使用并没有占用多少,共享内存也不清楚是什么反正几乎没使用,不知道怎么才能提高GPU的利用率,希望得到指导,感恩
五、测试部分
单张图片测试运行keras-yolo4-master/test.py即可,注意修改测试的权重文件,在此不赘述。
本文讲一下mAP的测试,具体流程如下,参考文章【YOLOV3-keras-MAP】YOLOV3-keras版本的mAP计算
(1)下载mAP文件:https://github.com/Cartucho/mAP
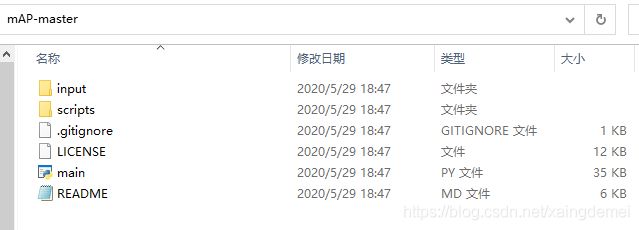
(2)下载后解压,将mAP-master解压后的文件夹内input、scripts、main.py文件放入keras-yolo4-master目录下,
(3)mAP/input文件夹下有三个文件内,分别是detection-results(即测试图片的预测结果,为.txt文件);ground-truth(即测试图片的真实标记,为.txt文件);images-optional(为测试图片)。
mAP测试的核心准备工作
这一部分实在是内容巨多,且复杂,但是很简单,照着一步步来即可
1、mAP测试需要准备三个部分,即input下三个文件这也是mAP测试的核心准备工作,一个一个详细展开来说
文件1:detection-results:
(1)在keras-yolo4-master目录下新建test文件夹,将待测试的图片放入此文件夹下,如果你的测试集图片较少,可以直接将测试图片复制粘贴移动到此文件夹
(2)如果你的待测试图片,也就是测试集时以.txt文本的形式记录的(我的就是如此),需要从数据集中找出对应的测试图片,那么请运行如下代码,将测试图片从数据集中找出来,并放入test文件夹下。
注意此代码我写的是绝对路径 注意自行修改路径
"""
Created on Sun Nov 29 20:19:43 2020
@author: you only look once
"""
# txt文本中的数字存的是图片的名字,将图片保存到另一个文件夹中
from PIL import Image
f3 = open("E:/models/keras-yolo4-master/VOCdevkit/VOC2028/ImageSets/Main/test.txt",'r') #test文件所在路径
for line2 in f3.readlines():
    line3=line2[:-1]   # 读取每行去掉后几位不相干的数
    # 打开改路径下的line3记录的的文件名
    im = Image.open('E:/models/keras-yolo4-master/VOCdevkit/VOC2028/JPEGImages/{}.jpg'.format(line3))
    # 把文件夹中指定的文件名称的图片另存到该路径下
    im.save('E:/models/keras-yolo4-master/test/{}.jpg'.format(line3))
f3.close()
运行结束后,发现E:\models\keras-yolo4-master\VOCdevkit\VOC2028\ImageSets\Main\test.txt
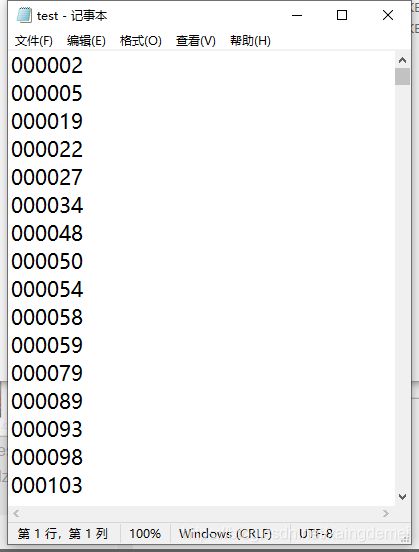
1517个图片名称对应的图片已经被完整地复制到E:\models\keras-yolo4-master\test文件夹下,完美!
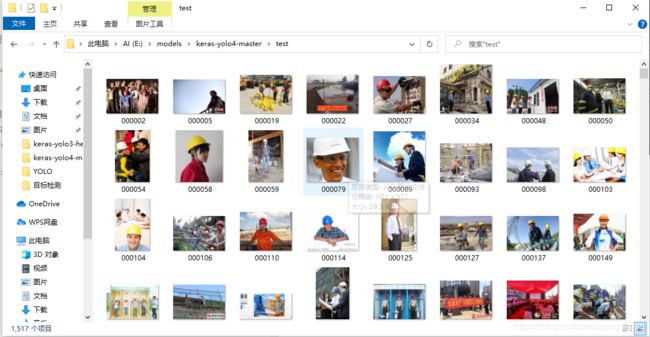 (3)运行E:\models\keras-yolo4-master\yolo_many.py 代码如下所示,即可批量运行得出每张测试图片的结果,注意根据自己的情况修改以下几部分
权重路径 “model_path”: ‘logs/000/ep050-loss25.194.h5’,
先验框路径 “anchors_path”: ‘model_data/yolo_anchors.txt’,
类别路径 “classes_path”: ‘model_data/my_classes.txt’,
"""
Created on Mon Nov 23 21:12:11 2020
@author: you only look once
"""
import colorsys
import os
from timeit import default_timer as timer
import time

import numpy as np
from keras import backend as K
from keras.models import load_model
from keras.layers import Input
from PIL import Image, ImageFont, ImageDraw

from yolo4.model import yolo_eval, yolo4_body
from yolo4.utils import letterbox_image
from keras.utils import multi_gpu_model

'''
图像统一为608*608  因此可能会出现内存不足情况
若内存较小,或报错Failed to get convolution algorithm. This is probably because cuDNN failed to initialize
请运行这段注释下面5行代码
'''
# 对GPU进行按需分配
from tensorflow.compat.v1 import ConfigProto
from tensorflow.compat.v1 import InteractiveSession
config = ConfigProto()
config.gpu_options.allow_growth = True
session = InteractiveSession(config=config)


path = './test/'  #待检测图片的位置

# 创建创建一个存储检测结果的dir
result_path = './result'
if not os.path.exists(result_path):
    os.makedirs(result_path)

# result如果之前存放的有文件,全部清除
for i in os.listdir(result_path):
    path_file = os.path.join(result_path,i)
    if os.path.isfile(path_file):
        os.remove(path_file)

#创建一个记录检测结果的文件
txt_path =result_path + '/result.txt'
file = open(txt_path,'w')

class YOLO(object):
    _defaults = {
        "model_path": 'logs/000/ep050-loss25.194.h5',
        "anchors_path": 'model_data/yolo_anchors.txt',
        "classes_path": 'model_data/my_classes.txt',
        "score" : 0.3,
        "iou" : 0.45,
        "model_image_size" : (608, 608),
        "gpu_num" : 1,
    }

    @classmethod
    def get_defaults(cls, n):
        if n in cls._defaults:
            return cls._defaults[n]
        else:
            return "Unrecognized attribute name '" + n + "'"

    def __init__(self, **kwargs):
        self.__dict__.update(self._defaults) # set up default values
        self.__dict__.update(kwargs) # and update with user overrides
        self.class_names = self._get_class()
        self.anchors = self._get_anchors()
        self.sess = K.get_session()
        self.boxes, self.scores, self.classes = self.generate()

    def _get_class(self):
        classes_path = os.path.expanduser(self.classes_path)
        with open(classes_path) as f:
            class_names = f.readlines()
        class_names = [c.strip() for c in class_names]
        return class_names

    def _get_anchors(self):
        anchors_path = os.path.expanduser(self.anchors_path)
        with open(anchors_path) as f:
            anchors = f.readline()
        anchors = [float(x) for x in anchors.split(',')]
        return np.array(anchors).reshape(-1, 2)

    def generate(self):
        model_path = os.path.expanduser(self.model_path)
        assert model_path.endswith('.h5'), 'Keras model or weights must be a .h5 file.'

        # Load model, or construct model and load weights.
        num_anchors = len(self.anchors)
        num_classes = len(self.class_names)
        is_tiny_version = num_anchors==6 # default setting
        try:
            self.yolo_model = load_model(model_path, compile=False)
        except:
            self.yolo_model = tiny_yolo_body(Input(shape=(None,None,3)), num_anchors//2, num_classes) \
                if is_tiny_version else yolo4_body(Input(shape=(None,None,3)), num_anchors//3, num_classes)
            self.yolo_model.load_weights(self.model_path) # make sure model, anchors and classes match
        else:
            assert self.yolo_model.layers[-1].output_shape[-1] == \
                num_anchors/len(self.yolo_model.output) * (num_classes + 5), \
                'Mismatch between model and given anchor and class sizes'

        print('{} model, anchors, and classes loaded.'.format(model_path))

        # Generate colors for drawing bounding boxes.
        hsv_tuples = [(x / len(self.class_names), 1., 1.)
                      for x in range(len(self.class_names))]
        self.colors = list(map(lambda x: colorsys.hsv_to_rgb(*x), hsv_tuples))
        self.colors = list(
            map(lambda x: (int(x[0] * 255), int(x[1] * 255), int(x[2] * 255)),
                self.colors))
        np.random.seed(10101)  # Fixed seed for consistent colors across runs.
        np.random.shuffle(self.colors)  # Shuffle colors to decorrelate adjacent classes.
        np.random.seed(None)  # Reset seed to default.

        # Generate output tensor targets for filtered bounding boxes.
        self.input_image_shape = K.placeholder(shape=(2, ))
        if self.gpu_num>=2:
            self.yolo_model = multi_gpu_model(self.yolo4_model, gpus=self.gpu_num)
        boxes, scores, classes = yolo_eval(self.yolo_model.output, self.anchors,
                len(self.class_names), self.input_image_shape,
                score_threshold=self.score, iou_threshold=self.iou)
        return boxes, scores, classes

    def detect_image(self, image):
        start = timer() # 开始计时

        if self.model_image_size != (None, None):
            assert self.model_image_size[0]%32 == 0, 'Multiples of 32 required'
            assert self.model_image_size[1]%32 == 0, 'Multiples of 32 required'
            boxed_image = letterbox_image(image, tuple(reversed(self.model_image_size)))
        else:
            new_image_size = (image.width - (image.width % 32),
                              image.height - (image.height % 32))
            boxed_image = letterbox_image(image, new_image_size)
        image_data = np.array(boxed_image, dtype='float32')

        print(image_data.shape) #打印图片的尺寸
        image_data /= 255.
        image_data = np.expand_dims(image_data, 0)  # Add batch dimension.

        out_boxes, out_scores, out_classes = self.sess.run(
            [self.boxes, self.scores, self.classes],
            feed_dict={
                self.yolo_model.input: image_data,
                self.input_image_shape: [image.size[1], image.size[0]],
                K.learning_phase(): 0
            })

        print('Found {} boxes for {}'.format(len(out_boxes), 'img')) # 提示用于找到几个bbox

        font = ImageFont.truetype(font='font/FiraMono-Medium.otf',
                    size=np.floor(2e-2 * image.size[1] + 0.2).astype('int32'))
        thickness = (image.size[0] + image.size[1]) // 500

        # 保存框检测出的框的个数
        # file.write('find  '+str(len(out_boxes))+' target(s) \n')

        for i, c in reversed(list(enumerate(out_classes))):
            predicted_class = self.class_names[c]
            box = out_boxes[i]
            score = out_scores[i]

            label = '{} {:.2f}'.format(predicted_class, score)
            draw = ImageDraw.Draw(image)
            label_size = draw.textsize(label, font)

            top, left, bottom, right = box
            top = max(0, np.floor(top + 0.5).astype('int32'))
            left = max(0, np.floor(left + 0.5).astype('int32'))
            bottom = min(image.size[1], np.floor(bottom + 0.5).astype('int32'))
            right = min(image.size[0], np.floor(right + 0.5).astype('int32'))

            # 写入检测位置
            # file.write(predicted_class+'  score: '+str(score)+' \nlocation: top: '+str(top)+'、 bottom: '+str(bottom)+'、 left: '+str(left)+'、 right: '+str(right)+'\n')
            file.write(
                predicted_class + ' ' + str(score) + ' ' + str(left) + ' ' + str(
                    top) + ' ' + str(right) + ' ' + str(bottom) + ';')

            print(label, (left, top), (right, bottom))

            if top - label_size[1] >= 0:
                text_origin = np.array([left, top - label_size[1]])
            else:
                text_origin = np.array([left, top + 1])

            # My kingdom for a good redistributable image drawing library.
            for i in range(thickness):
                draw.rectangle(
                    [left + i, top + i, right - i, bottom - i],
                    outline=self.colors[c])
            draw.rectangle(
                [tuple(text_origin), tuple(text_origin + label_size)],
                fill=self.colors[c])
            draw.text(text_origin, label, fill=(0, 0, 0), font=font)
            del draw

        end = timer()
        print('time consume:%.3f s '%(end - start))
        return image

    def close_session(self):
        self.sess.close()
# 图片检测
if __name__ == '__main__':

    t1 = time.time()
    yolo = YOLO()

    for filename in os.listdir(path):
        image_path = path+'/'+filename
        portion = os.path.split(image_path)
        # file.write(portion[1]+' detect_result:\n')
        file.write(portion[1]+' ')
        image = Image.open(image_path)
        r_image = yolo.detect_image(image)
        file.write('\n')
        #r_image.show() 显示检测结果
        image_save_path = './result/result_'+portion[1]
        print('detect result save to....:'+image_save_path)
        r_image.save(image_save_path)

    time_sum = time.time() - t1
    # file.write('time sum: '+str(time_sum)+'s')
    print('time sum:',time_sum)
    file.close()
    yolo.close_session()
运行结束后,在keras-yolo4-master目录下自动生成result文件夹,文件夹内包含两部分,一是每个图片的预测结果,二是文字版的预测结果result.txt
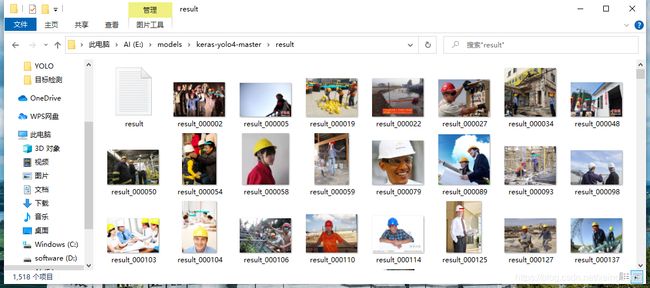 但是,诶?怎么还没写入keras-yolo4-master\input\detection-results文件夹??
接下来进入最后一个环节
(4)运行keras-yolo4-master\scripts\extra\make_dr.py 具体代码如下所示
"""
@author: you only look once
"""
f=open('E:/models/keras-yolo4-master/result/result.txt',encoding='utf8')
s=f.readlines()
result_path='E:/models/keras-yolo4-master/input/detection-results/'

for i in range(len(s)):  # 中按行存放的检测内容,为列表的形式
    r = s[i].split('.jpg ')
    file = open(result_path + r[0] + '.txt', 'w')
    if len(r[1]) > 5:
        t = r[1].split(';')
        # print('len(t):',len(t))
        if len(t) == 3:
            file.write(t[0] + '\n' + t[1] + '\n')  # 有两个对象被检测出
        elif len(t) == 4:
            file.write(t[0] + '\n' + t[1] + '\n' + t[2] + '\n')  # 有三个对象被检测出
        elif len(t) == 5:
            file.write(t[0] + '\n' + t[1] + '\n' + t[2] + '\n' + t[3] + '\n')  # 有四个对象被检测出
        elif len(t) == 6:
            file.write(t[0] + '\n' + t[1] + '\n' + t[2] + '\n' + t[3] + '\n' + t[4] + '\n')  # 有五个对象被检测出
        elif len(t) == 7:
            file.write(t[0] + '\n' + t[1] + '\n' + t[2] + '\n' + t[3] + '\n' + t[4] + '\n' + t[5] + '\n')  # 有六个对象被检测出

        else:
            file.write(t[0] + '\n')  # 有一个对象
    else:
        file.write('')  # 没有检测出来对象,创建一个空白的对象
运行后,在keras-yolo4-master\input\detection-results下生成文本
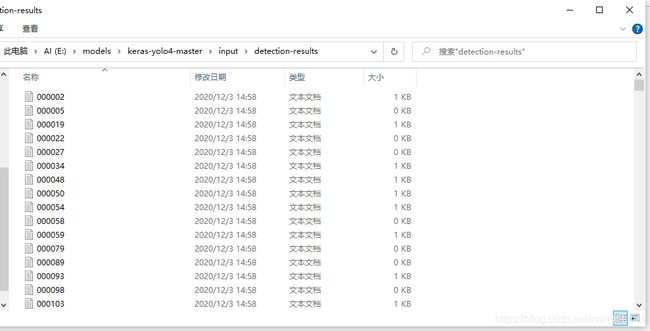
至此,detection-results文件夹制作完成!
文件2:ground truth:
此文件夹制作也是令人头疼,大致有两步,第一步:找出测试集内图片对应的xml文件;第二步:将xml文件转换为txt文本。我参考了其他文章,再次表示感谢,YOLOV3计算map(keras)
1、运行keras-yolo4-master\scripts\extra下find_xml文件
"""
Created on Mon Nov 30 10:28:46 2020
@author: you only look once
"""
# 从Annotations文件夹中找到相应的xml文件,然后粘到ground_truth文件夹
import os
import shutil

testfilepath='E:/models/keras-yolo4-master/test'
xmlfilepath = 'E:/models/keras-yolo4-master/VOCdevkit/VOC2028/Annotations/'
xmlsavepath = 'E:/models/keras-yolo4-master/input/ground-truth/'
test_jpg = os.listdir(testfilepath)

num = len(test_jpg)
list = range(num)
L=[]

for i in list:
    name = test_jpg[i][:-4] +'.xml'
    L.append(name)
for filename in L:
    shutil.copy(os.path.join(xmlfilepath,filename),xmlsavepath)
2、运行keras-yolo4-master\scripts\extra下convert_gt_xml。执行后,xml文件自动放进了ground_truth/backup中,然后在ground_truth下生成了txt文件。
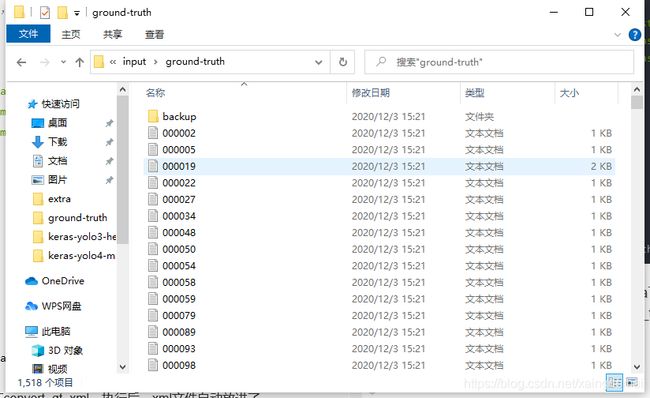 到此,完成ground truth的制作
文件3:images-optional:
将测试图片放入此文件夹即可
